If you’re considering spending any amount of money on ads to reach your target audience, you’d better spend it in the right place.
That is, somewhere with over 2.9 billion unique monthly visitors and 5 billion daily interactions.
Somewhere like Google.
Google Ads was launched just two years after what has become the most popular website in the world: Google.com. The advertising platform came on the scene in October 2000 as Google Adwords, but after some rebranding in 2018, it was renamed Google Ads.

Given Google’s expansive reach, chances are you’ve seen (and probably clicked on) a Google ad, and so have your potential customers.
It’s no secret that these days, the stronger and more focused your paid campaigns are, the more clicks you generate — leading to a greater probability of obtaining new customers.
Little wonder then that Google Ads has become increasingly popular among businesses across all industries.
In this guide, you’ll discover how to begin advertising on Google. We’ll cover features specific to the platform and teach you how to optimize your campaigns to achieve the best results with your ads.
What is Google Ads?
Google Ads is a paid advertising platform that falls under a marketing channel known as pay-per-click (PPC), where you (the advertiser) pay per click or impression (CPM) on an ad.
Google Ads is an effective way to drive qualified traffic, or good-fit customers, to your business who’re searching for products and services like the ones you offer. With Google Ads, you can boost your website traffic, receive more phone calls, and increase in-store visits.
Google Ads allows you to create and share well-timed ads (via both mobile and desktop) among your target audience. As a result, your business will show up on the search engine results page (SERP) at the moment your ideal customers are looking for products and services like yours via Google Search or Google Maps.
This way, you reach your target audience when it makes sense for them to come across your ad.
Note: Ads from the platform can span across other channels, too, including YouTube, Blogger, and Google Display Network.
Over time, Google Ads will also help you analyze and improve those ads to reach more people so your business can hit all of your paid campaign goals.
Discover how HubSpot can help you better manage your Google Ads.
Additionally, no matter the size of your business or your available resources, you can tailor your ads to suit your budget. The Google Ads tool allows you to stay within your monthly cap and even pause or stop your ad spending at any point in time.
Now, onto another critical question: Is Google Ads really effective? To answer this, let’s consider a few statistics:
- Google Ads has a click-through rate of nearly 2%.
- Display ads yield 180 million impressions each month.
- For users ready to buy, paid ads on Google get 65% of the clicks.
- 43% of customers buy something they’ve seen on a YouTube ad.
Why advertise on Google?
Google is the most used search engine, receiving over 5 billion search queries daily. Not to mention, the Google Ads platform has been around for nearly two decades, giving it some seniority and authority in paid advertising.
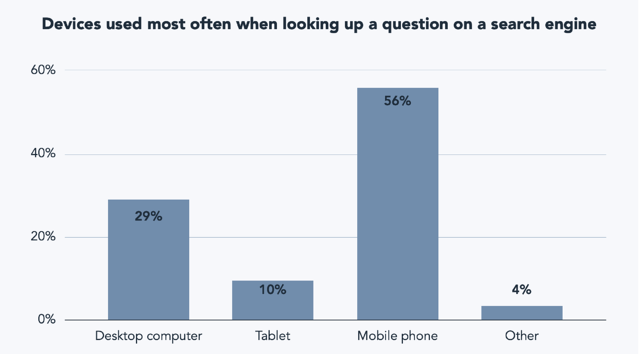
Google is a resource used by people worldwide to ask questions answered with a combination of paid advertisements and organic results.
Need another reason? Your competitors are using Google Ads (and they might even be bidding on your branded terms).
Hundreds of thousands of companies use Google Ads to promote their businesses, which means that even if you’re ranking organically for a search term, your results are being pushed down the page beneath your competitors.
If you’re using PPC to advertise your product or services, Google Ads should be a part of your paid strategy — there’s no way around it (except maybe Facebook Ads, but that’s another article).
Google Ads Best Practices
If you’ve tried unsuccessfully to advertise on Google, don’t give up. There are many reasons why your Google Ads could be underperforming. But, first, let’s cover some standard Google Ads best practices.
Download this Template for Free
Using a planner keeps your PPC projects organized. With Google and HubSpot’s PPC Planning Template, you can view how your ads will appear online, see your character counts, and manage your campaigns all in one place.
2. Avoid broad keyword terms.
You really need to nail it for your keywords, which is why testing and tweaking should be a part of your strategy. If your keywords are too broad, Google will be placing your ad in front of the wrong audience, which means fewer clicks and a higher ad spend.
Review what’s working (i.e., which keywords generate clicks) and adjust them to best match your ads with your target audience. You likely won’t get the mix right the first time, but you should keep adding, removing, and tweaking keywords until you do.
Tip: Review the keyword strategies that we cover below.
3. Don’t run irrelevant ads.
If your ad doesn’t match the searcher’s intent, you won’t get enough clicks to justify your ad spend. Your headline and ad copy need to match the keywords you’re bidding on, and the solution your ad is marketing needs to solve whatever pain point that searcher is experiencing.
It’s a combination that will yield the results you’re looking for, and it may just be a few tweaks away. You have the option to create multiple ads per campaign — use this feature to split test which ads work best. Or, better yet, use Google’s Responsive Search Ads feature.
Tip: Read our best practices for ad copy.
4. Improve your Quality Score (QS).
Your Quality Score (QS) is how Google determines how your ad should rank.
The higher your QS, the better your rank and placements on the Search Engine Results Page (SERP). If your quality score is low, you’ll have fewer eyeballs on your ad and fewer chances to convert.
Although Google lets you know your Quality Score, it’s your responsibility to improve it.
Tip: Keep reading to learn how to improve your QS.
5. Optimize your ad landing page.
Your efforts shouldn’t stop with your ad — the user experience after a click is equally essential.
What does your user see once they click your ad? Is your landing page optimized for conversions? Does the page solve your user’s pain point or answer their question? Your user should experience a seamless transition through the conversion process.
Tip: Review landing page best practices and implement them to increase your conversion rate.
These common terms will help you set up, manage, and optimize your Google Ads. Some of these are specific to Google Ads, while others are generally related to PPC. Either way, you’ll need to know these to run an effective ad campaign.
1. AdRank
Your AdRank determines your ad placement. The higher the value, the better you’ll rank, the more eyes will fall on your ad, and the higher the probability of users clicking your ad. Your AdRank is determined by your maximum bid multiplied by your Quality Score.
2. Bidding
Google Ads is based on a bidding system, where you, as the advertiser, select a maximum bid amount you’re willing to pay for a click on your ad. The higher your bid, the better your placement. You have three options for bidding: CPC, CPM, or CPE.
- CPC, or cost-per-click, is the amount you pay for each click on your ad.
- CPM, or cost per mille, is the amount you pay for one thousand ad impressions; that is when your ad is shown to a thousand people.
- CPE, or cost per engagement, is the amount you pay when someone takes a predetermined action with your ad.
And, yes, we’ll review bidding strategies below.
3. Campaign Type
Before you begin a paid campaign on Google Ads, you’ll select between seven campaign types: search, display, video, shopping, app, smart, or performance max.
- Search ads are text ads that are displayed among search results on a Google results page.
- Display ads are typically image-based and are shown on web pages within the Google Display Network.
- Video ads are between six and 15 seconds and appear on YouTube.
- Shopping campaigns appear on search results and the Google shopping tab.
- App campaigns use information from your app to optimize ads across websites.
- Smart campaigns have Google finding the best targeting to get you the most bang for your buck.
- Performance Max is a new campaign type that lets advertisers access all Google Ads inventory from a single campaign.
4. Click-Through Rate (CTR)
Your CTR is the number of clicks you get on your ad as a proportion of the number of views your ad gets. A higher CTR indicates a quality ad matching search intent and targeting relevant keywords.
5. Conversion Rate (CVR)
CVR is a measure of form submissions as a proportion of total visits to your landing page. Simplistically speaking, a high CVR means that your landing page presents a seamless user experience that matches the ad’s promise.
6. Display Network
Google ads can be displayed on either search results pages or a web page within Google’s Display Network (GDN). GDN is a network of websites that allow space on their web pages for Google Ads — these ads can be text- or image-based and are displayed alongside content relevant to your target keywords. The most popular Display Ad options are Google Shopping and app campaigns.
7. Extensions
Ad Extensions allow you to supplement your ad with additional information at no extra cost. These extensions fall under one of five categories: Sitelink, Call, Location, Offer, or App; we’ll cover each of these ad extensions below.
8. Keywords
When a Google user types a query into the search field, Google returns a range of results that match the searcher’s intent. Keywords are words or phrases that align with what a searcher wants and will satisfy their query. You select keywords based on which queries you want to display your ad alongside. For example, a searcher that types “how to clean gum off shoes” will see results for advertisers that targeted keywords like “gum on shoes” and “clean shoes.”
Negative keywords are a list of keyword terms that you do not want to rank for. Google will pull you from the bid on these keywords. Typically, these are semi-related to your intended search terms but fall outside of the realm of what you offer or want to rank for.
9. PPC
Pay-per-click, or PPC, is a type of advertising where the advertiser pays per click on an ad. PPC is not specific to Google Ads, but it is the most common type of paid campaign. It’s important to understand the ins and outs of PPC before launching your first Google Ads campaign.
10. Quality Score (QS)
Your Quality Score measures the quality of your ad by your click-through rate (CTR), the relevance of your keywords, the quality of your landing page, and your past performance on the SERPs. QS is a determining factor in your AdRank.
Click to get our free guide on how to use Google Ads.
How does Google Ads work?
Google Ads displays your ad to potential leads or customers who are interested in your product or service. Advertisers bid on search terms, or keywords, and the winners of that bid are placed at the top of search results pages, on YouTube videos, or on relevant websites, depending on the type of ad campaign selected.
Many factors impact your ability to create effective and high-performing Google Ads. Let’s cover them below, plus some Google Ads examples.
AdRank and Quality Score
AdRank determines the placement of your ads, and Quality Score is one of the two factors (the other being bid amount) that determines your AdRank. Remember, your Quality Score is based on the quality and relevance of your ad, and Google measures that by how many people click on your ad when it’s displayed — i.e., your CTR. Your CTR depends on how well your ad matches searcher intent, which you can deduce from three areas:
- The relevance of your keywords
- If your ad copy and CTA deliver what the searcher expects based on their search
- The user experience of your landing page
Your QS is where you should focus most of your attention when you first set up your Google Ad campaign — even before you increase your bid amount. The higher your QS, the lower your acquisition costs will be and the better placement you’ll get.
Location
When you first set up your Google Ad, you’ll select a geographical area where your ad will be shown. If you have a storefront, this should be within a reasonable radius around your physical location. If you have an ecommerce store and a physical product, your location should be set in the places where you ship. If you provide a service or product that is accessible worldwide, then the sky’s the limit.
Your location settings will play a role in placement. For instance, if you own a yoga studio in San Francisco, someone in New York that enters “yoga studio” will not see your result, no matter your AdRank. That’s because Google’s main objective is to display the most relevant results to searchers, even when you’re paying.
Keywords
Keyword research is just as important for paid ads as it is for organic search. Your keywords need to match searcher intent as much as possible. That’s because Google matches your ad with search queries based on the keywords you selected.
Each ad group that you create within your campaign will target a small set of keywords (one to five keywords is optimal), and Google will display your ad based on those selections.
Match Types
Match Types give you a little wiggle room when it comes to your keyword selections — they tell Google whether you want to match a search query exactly or if your ad should be shown to anyone with a search query that’s semi-related. There are four match types to choose from:
- Broad Match is the default setting that uses any word within your keyword phrase in any order. For example, “goat yoga in Oakland” will match “goat yoga” or “yoga Oakland.”
- Modified Broad Match allows you to lock in certain words within a keyword phrase by denoting them with a “+” sign. Your matches will include that locked-in word at the very least. For example, “+goats yoga in Oakland” could yield “goats,” “goats like food,” or “goats and yoga.”
- Phrase Match will match with queries that include your keyword phrase in the exact order but may include additional words before or after it. For example, “goat yoga” can yield “spotted goat yoga” or “goat yoga with puppies.”
- Exact Match maintains your keyword phrase as it is written in the exact order. For example, “goat yoga” will not show up if someone types “goats yoga” or “goat yoga class.”
If you’re just starting out and don’t know precisely how your persona will be searching, move from a broad match to a more narrow approach so you can test which queries yield the best results. However, since your ad will be ranking for many queries (some unrelated), you should keep a close eye on your ads and modify them as you can gain new information.
Headline and Description
Your ad copy can be the difference between a click on your ad and a click on your competitor’s ad. Therefore, it’s important that your ad copy matches the searcher’s intent, is aligned with your target keywords, and addresses the persona’s pain point with a clear solution.
To illustrate what we mean, let’s review an example.

A search for “baby swim lessons” yielded this result. The copy is concise and uses limited space wisely to convey its message and connect with its target audience.
The Swim Revolution knew to put the keyword in their headline, so we instantly know that this ad matches what we’re looking for. Furthermore, the description tells us why this is the best option for swim lessons because it addresses the concerns of their persona — a parent looking to enroll their baby in a swim class.
They use words like “skills,” “fun,” “confidence,” and “comfort in the water” to ease our nerves about putting a baby in a pool and to prove to us that we will get what we want out of this class — an infant that can swim.
This kind of ad copy will get you clicks, but conversions will result from carrying this level of intention into your landing page copy.
Ad Extensions
If you’re running Google Ads, you should be using Ad Extensions for two reasons: they’re free, and they give users additional information and another reason to interact with your ad. These extensions fall within one of these five categories:
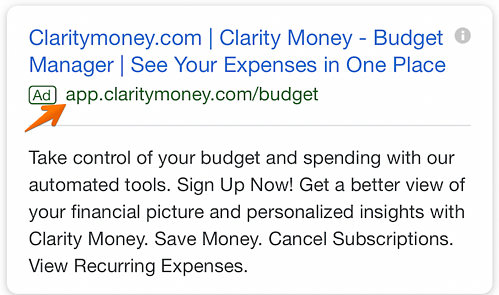
- Sitelink Extensions extend your ad — helping you stand out — and provide additional links to your site that offer users more enticing reasons to click.
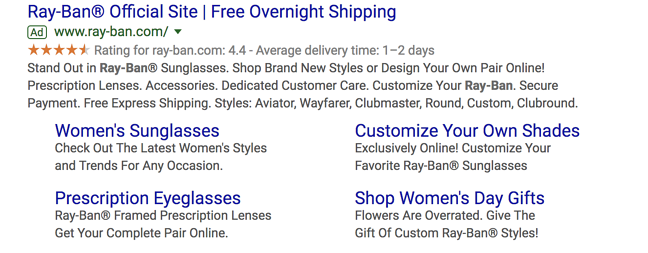
- Call Extensions allow you to incorporate your phone number in your ad, so users have an additional (and instant) way to reach out to you. If you have a customer service team that is ready to engage and convert your audience, then include your phone number.

- Location Extensions include your location and phone number within your ad so Google can offer searchers a map to find you easily. This option is great for businesses with a storefront, and it works well for the search query “…near me.”

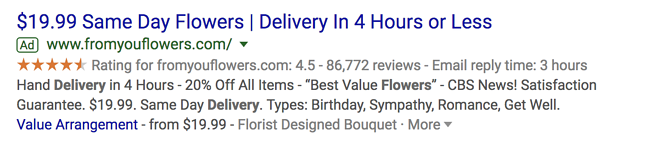
- Offer Extensions work if you’re running a current promotion. It can entice users to click your ad over others if they see that your options are discounted compared to your competitors.
- App Extensions provide a link to an app download for mobile users. This reduces the friction of performing a new search to find and download the app in an AppStore.
Google Ads Retargeting
Retargeting (or remarketing) in Google Ads is a way to advertise to users who have previously interacted with you online but have not yet converted. Tracking cookies will follow users around the web and target these users with your ads. Remarketing is effective since most prospects need to see your marketing multiple times before becoming a customer.
You can select from one of five campaign types on Google Ads. Let’s cover the optimal uses for each and why you might choose one over the other.
1. Search Ad Campaigns
Search ads are text ads that are displayed on Google results pages. As an example, a search for “pocket squares” returns sponsored results:
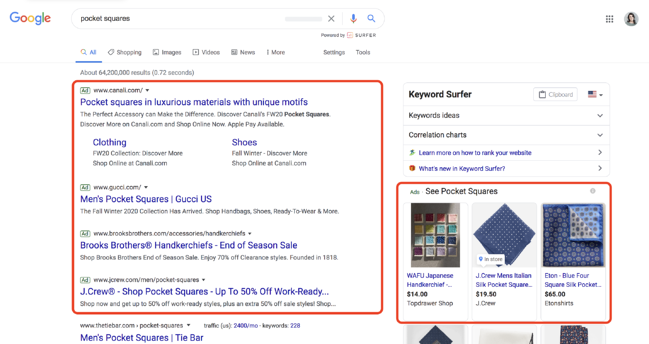
The benefit of search ads is that you’re displaying your ad in the place where most searchers look for information first — on Google. And Google shows your ad in the same format as other results (except for denoting it as an “Ad”), so users are accustomed to seeing and clicking on results.
Responsive Search Ads
Responsive search ads allow you to enter multiple versions of headlines and ad copy (15 and four variations, respectively) for Google to select the best performers to display to users. With traditional ads, you create one static version of your ad, using the same headline and description each time.
Responsive ads allow for a dynamic ad that is auto-tested until you arrive at the version that is best suited for your target audience — for Google, that means until you get the most clicks.
2. Display Ad Campaigns
Google has a network of websites in various industries and with an array of audiences that opt in to display Google Ads, known as the Google Display Network. The benefit to the website owner is that they’re paid per click or impression on the ads. The benefit to advertisers is that they can get their content in front of audiences that are aligned with their personas.
These are typically image ads that draw users’ attention away from the content on the webpage:

Image Source
3. Video Ad Campaigns
videos. Remember, YouTube is a search engine, too. So the right keywords will place you in front of a video, disrupting the user’s behavior just enough to grab their attention.
Here’s a video advertisement that pops up in the middle of another video on how to tie a tie:
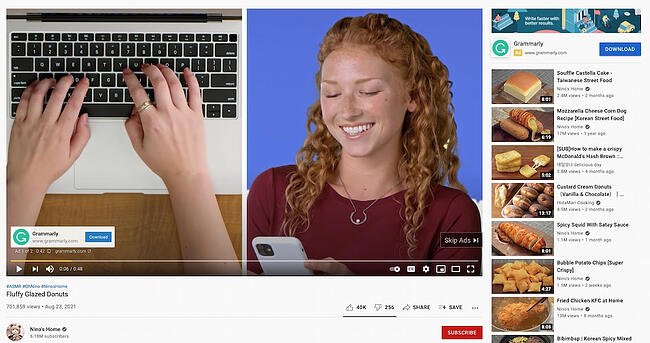
Image Source
4. App Ad Campaigns
Google App Campaigns promote your mobile application through an ad displayed on Google Search Network, YouTube, Google Play, Google Display Network, and more.
You can run ads that encourage your audience to install your app or, if they already use it, to take a certain action within your app.
Unlike other ad types, you don’t design an App ad campaign. Instead, provide Google with your app’s information and audience, and place a bid. Google does the rest to get your app in front of the right eyes:
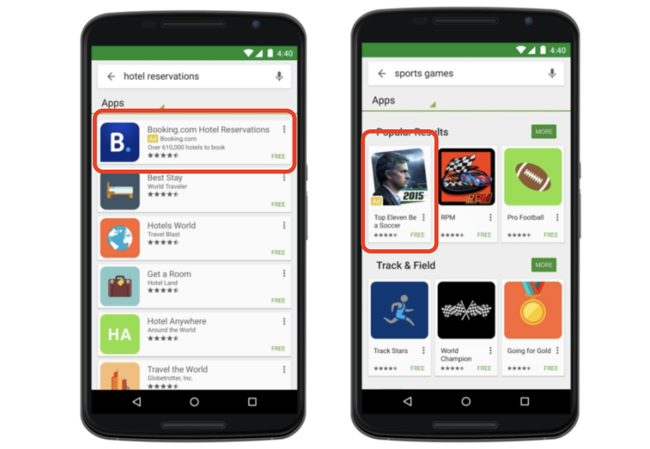
Image Source
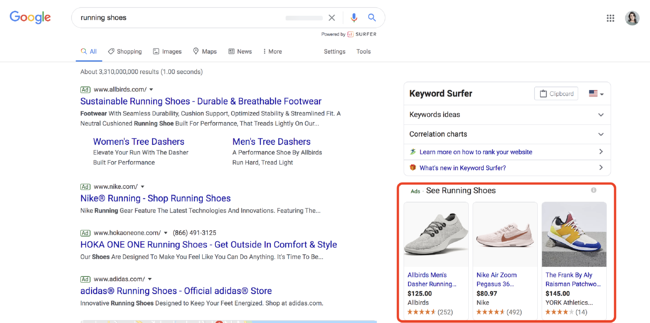
5. Shopping Ad Campaigns
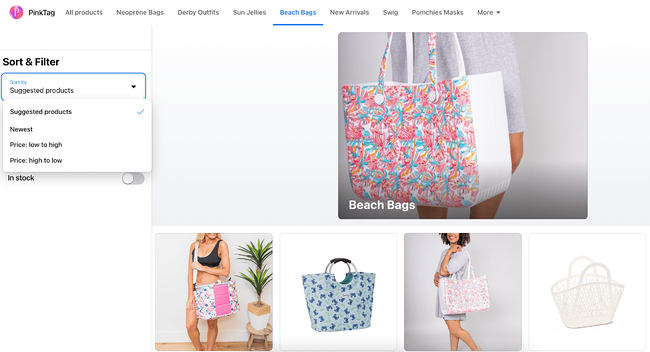
Another type of Google Ad is Google Shopping Ad Campaigns. Shopping campaigns, like these other types of ads, are displayed on SERPs and include detailed product information such as price and product imagery. You can run a Shopping campaign through Google Merchant Center, where you input specific product information that Google pulls from to create your shopping ads.
Instead of marketing your brand as a whole, Shopping Ads allow you to promote specific products and product lines. That’s why, when you search for a particular product on Google, you’ll see ads for different brands pop up along the top and/or side. This is what I see when I search “running shoes.” The ads at the top are Google Search ads, but the specific products advertised on the side are Shopping ads optimized for the keyword “running shoes”:
How to Use Google Ads
Convinced that you should start using Google Ads? Good. Getting started is simple, but requires a few steps. Here’s a step-by-step guide for setting up your first campaign on Google Ads.
1. Set up your Google Ads account.
First, go to the Google Ads homepage. On the top right-hand corner, click on ‘Start Now.’

You’ll be directed to sign in with a Google account or set up a new one.
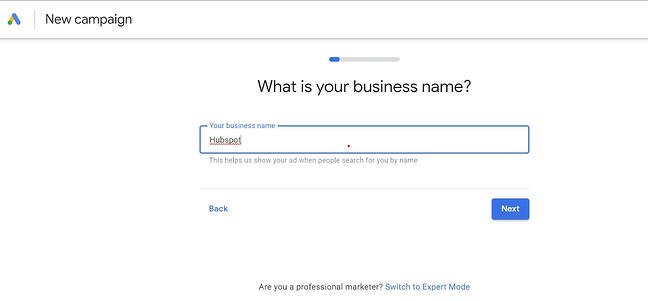
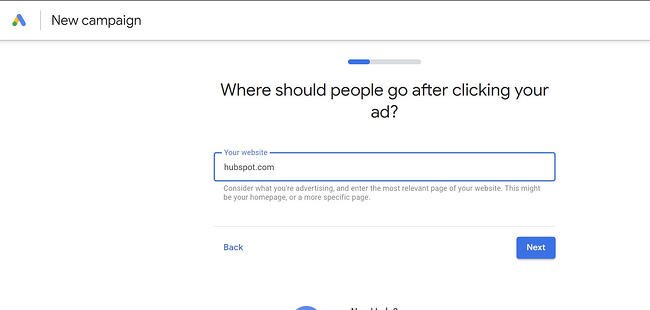
2. Choose your business name and website.
After signing in, you’ll be taken to a page where you’ll provide your business name and website. The URL you provide is where anyone who clicks on your ad will be taken.
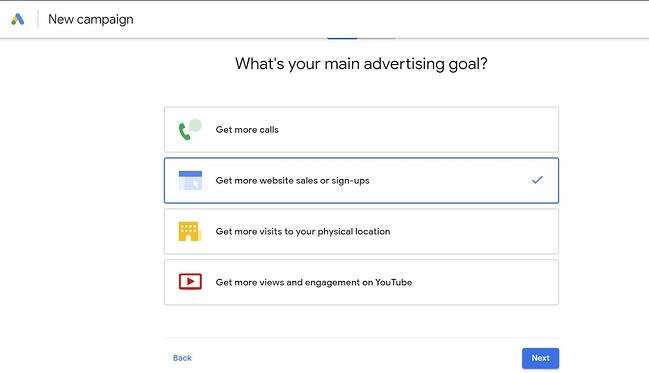
3. Select your advertising goal.
Next, select your main advertising goal. You have four options: Get more calls, get more website sales or sign-ups, get more visits to your physical location, and get more views and engagement on YouTube.
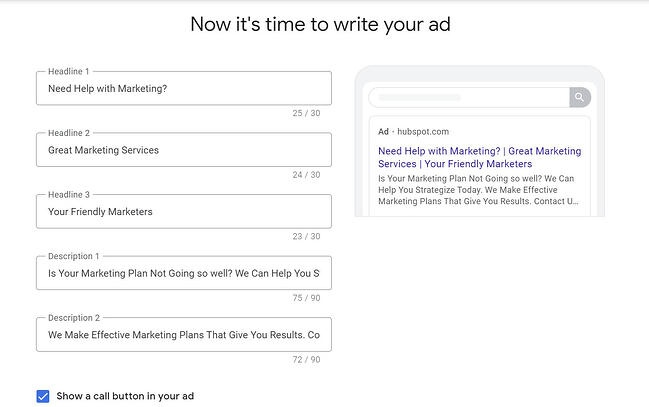
4. Craft your ad.
The next step is to create your ad. This requires creativity and can be a bit challenging.
Thankfully, Google gives you tips on what to write. But, of course, the most important thing is to write an ad that’ll attract and convert your audience.
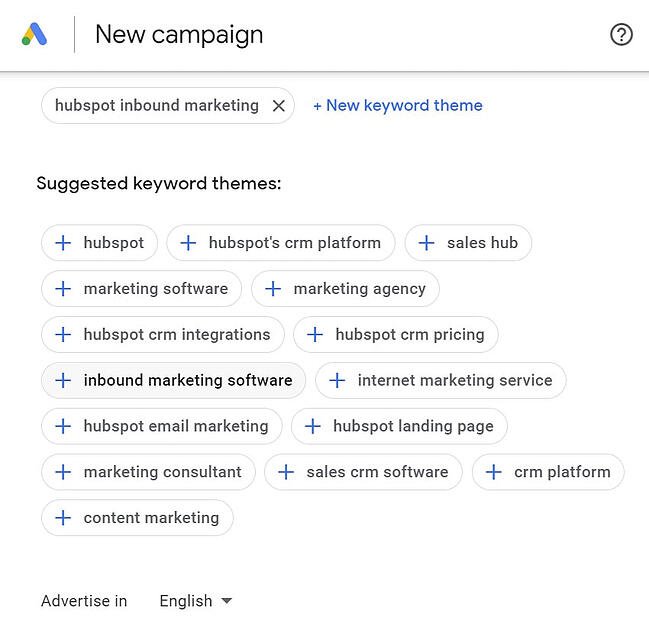
5. Add keyword themes.
On the next page, you can choose keywords that match your brand. Google will suggest a few for you; if you’re not familiar with keyword research, we suggest selecting the ones Google has suggested to start. After selecting the right keywords, click ‘Next.’
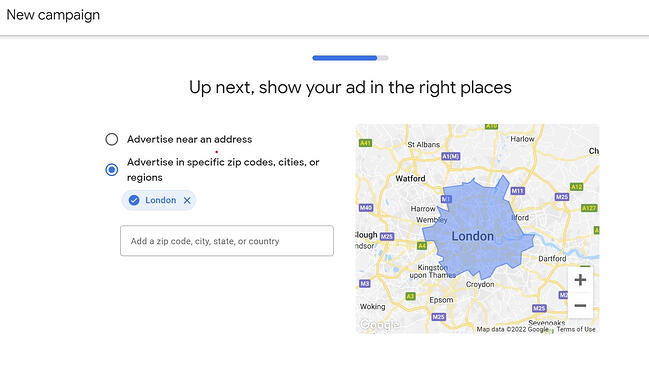
6. Set your ad location.
The next page lets you choose the location or locations where you want your ad to appear. It can be near your physical address or anywhere else.
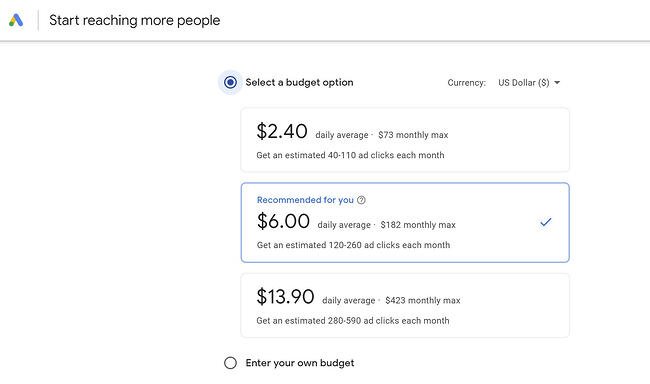
7. Set your budget.
Here, you’ll either use the budget options offered by Google or enter a specific budget.
8. Confirm payment.
Lastly, provide your billing information.
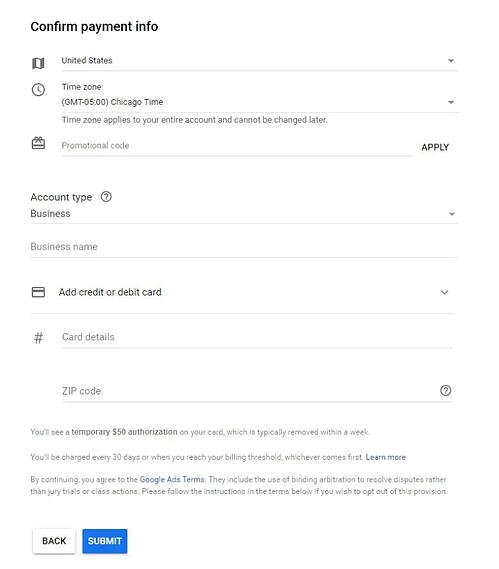
And that’s how easy it is to create your first Google ad!
As you can see, setting up your paid campaigns on Google is relatively easy (and quick), mostly because the platform takes you through the setup and provides helpful hints along the way. If you have your ad copy and/or images created, the setup should take you no more than 10 minutes.
What may be less obvious are all the additional things you need to do to make sure your ads are optimally set up and easily trackable. Let’s cover these together. These are the steps you’ll take once your ads are submitted for review.
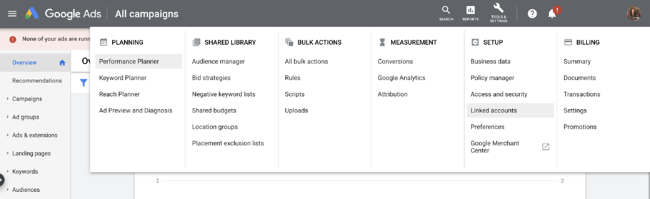
9. Link your Google Analytics account.
You likely have Google Analytics set up on your website (if not, here’s how to do it on WordPress) so you can track traffic, conversions, goals, and any unique metrics. You also need to link your Analytics account to Google Ads. Linking these accounts will make tracking, analyzing, and reporting between channels and campaigns much easier because you can view these events in one place.
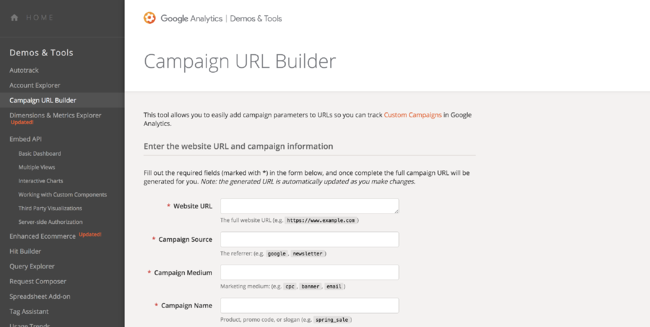
10. Add UTM codes.
Urchin Tracking Module (UTM) codes are used by Google to track any activity associated with a specific link. You’ve probably seen them before — it’s the part of a URL that follows a question mark (“?”). UTM codes will tell you which offer or ad led to a conversion so you can track the most effective parts of your campaign. UTM codes make it easier to optimize your Google Ads since you know exactly what’s working.
The trick, though, is to add your UTM codes at the campaign level when you set up your Google Ads, so you don’t have to do so manually for each ad URL. Otherwise, you can add them manually with Google’s UTM builder.
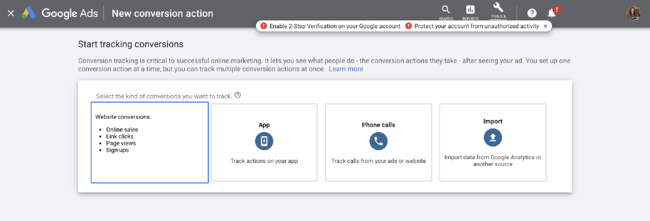
11. Set up conversion tracking.
Conversion tracking tells you exactly how many customers or leads you’ve acquired from your ad campaigns. It’s not mandatory to set up, but, without it, you’ll be guessing the ROI of your ads. Conversion tracking allows you to track sales (or other activities) on your website, app installs, or calls from your ads.
Manage and organize your ads with our free Google Ads Kit and Templates.
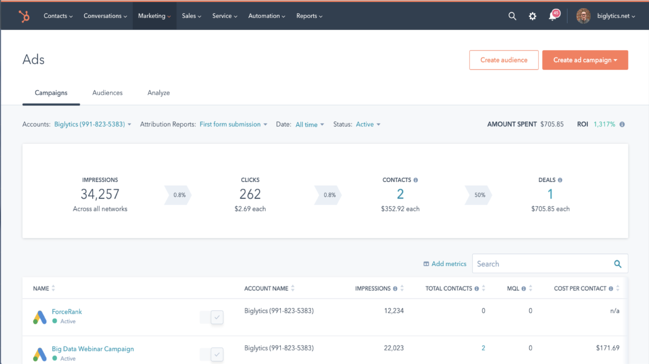
12. Integrate your Google Ads with your CRM.
There is something to be said about keeping all of your data in one place where you can track, analyze, and report on it. You already use your CRM to track contact data and lead flows. Integrating Google Ads with your CRM gives you the ability to track which ad campaigns are working for your audience so you can continue marketing to them with offers that are relevant.
Source
Google Ads Bidding Strategies
Once you’ve set up your ad campaigns and have tracking in place, it’s time to start bidding. Remember, your ability to rank in Google Ads depends on how you bid. While your bid amount will depend on your budget and goals, there are a few strategies and bid settings you should be aware of when launching your paid campaign.
Automated vs. Manual Bidding
You have two options when it comes to bidding on your keywords — automated and manual. Here’s how they work:
- Automated Bidding puts Google in the driver’s seat and allows the platform to adjust your bid based on your competitors. You can still set a maximum budget, and Google will work within a range to give you the best chance at winning the bid within those constraints.
- Manual Bidding lets you set the bid amounts for your ad groups and keywords, giving you the chance to reduce spending on low-performing ads.
Bidding on Branded Search Terms
Branded terms are those with your company or unique product name in them, like “HubSpot CRM.” There is much debate on whether to bid on your branded terms or not. On one side of the debate, bidding on terms that will likely yield organic results could be seen as a waste of money.
On the other side, bidding on these terms gives you domain over these search results pages and helps you convert prospects that are further along the flywheel. For instance, if I’ve been researching live chat tools and am heavily considering HubSpot’s Live Chat, then a simple search for “HubSpot live chat software” will yield precisely the result I’m looking for without the effort of scrolling.
The other argument in favor of bidding on your branded terms is that competitors may bid on them if you don’t, thereby taking up valuable real estate that should belong to you.
Cost Per Acquisition (CPA)
If the idea of spending money to convert prospects into leads makes you uneasy, then you can set a CPA instead and only pay when a user converts into a customer. While this bidding strategy could cost more, you can take comfort in knowing that you only pay when you acquire a paying customer. This strategy makes it easy to track and justify your ad spend.
Additional Resources to Optimize Your Google Ads
Your ad copy and headline is not the only component that will make your paid campaign successful. Getting a user to click is only the beginning … they should arrive on a landing page that’s optimized for conversion and then be taken to a Thank You page that tells them what to do next.
If you want your Google Ads to produce qualified leads and customers, then check out these additional resources and use them as guidelines as you set up your Google Ads campaign.
Google Ads Tips
Now that you know how to use and set up a Google Ad campaign, here are a few short tips or best practices to follow to help you create successful campaigns.
We’ve covered these at length throughout this post, but their importance can’t be overstated. Use this as a checklist you can refer to again and again.
1. Have a clear goal.
It’s vital to define your objectives before you create your ad, instead of creating an ad first and then tweaking it to fit your objectives. Sit down with your marketing team to prepare an advertising plan and create SMART goals for your Google Ads campaigns.
2. Create a relevant landing page.
When prompted to add your URL when creating your ad, ensure that the URL you provide leads to a relevant landing page. If your ad is interesting enough to get clicked, you could undo all that great work if it directs them to a poor landing page.
Therefore, optimize your landing pages so that your ad will help convert a curious visitor into a paying customer. Check out our landing page guide so you know exactly how to create great landing pages.
3. Use the right keywords.
Keywords are super important, so it’s only right that you choose the best ones for your ad.
Long-tail keywords are some of the best types of keywords because they are very specific and can target one business.
For example, say you run a cat clinic. A generic keyword like ‘cat clinic’ won’t target people in your area, but something like ‘cat clinic in belvedere’ is more likely to attract the right audience.
4. Automate the process.
You can maximize conversions by optimizing the bidding process. Tools like Smart Bidding can increase or reduce bids for you, depending on the chance of success.
Therefore, you’ll spend money only when there’s a higher chance of success.
5. Use Ad Extensions.
Extensions can take your ad performance up a notch. These extensions allow you to specify your locations, services, goods, or sales promotions.
For example, you could include a telephone number in your ad so people can call you to inquire about your services right away.
6. Use negative keywords.
Google Ads allows you to include negative keywords. Using these keywords indicates what your product or service is not, thus preventing you from showing up in irrelevant SERPs.
Using the cat clinic example, you might only cater to cats and not dogs or other pets. In this case, you can exclude terms like ‘dogs’ and other qualifiers.
7. Measure and improve upon your strategy.
When you integrate your ads with Google Analytics, you can track important metrics like page popularity, the keywords that drive the most traffic, and more.
Collecting and analyzing these and other metrics will help you improve the quality of your ads, boost your conversions, and increase revenue over time.
Start Your Google Ads Campaign
Given its reach and authority, Google Ads should be a part of your paid strategy. Use the tips we covered to get started, and remember to refine and iterate as you go.
There’s no such thing as a Google Ads campaign that doesn’t work — there are only ones that need a bit more work. Using the strategy and information provided above, you have what you need to create a successful Google Ad campaign that drives clicks and converts leads.
Editor’s note: This post was originally published in November 2015 and has been updated for comprehensiveness.


 For more on this, stay tuned for our upcoming coverage on workforce trends.


![→ Download Now: 8 Free Customer Onboarding Templates [Free Kit]](https://i4lead.com/wp-content/uploads/2022/07/b6abbd56-b7d5-42bf-8a85-b7ae63ca70d2.png)


![Download Now: How to Use Twitter for Business [Free Kit]](https://i4lead.com/wp-content/uploads/2022/07/190da11f-58c6-41d5-a397-843618741e09-1.png)


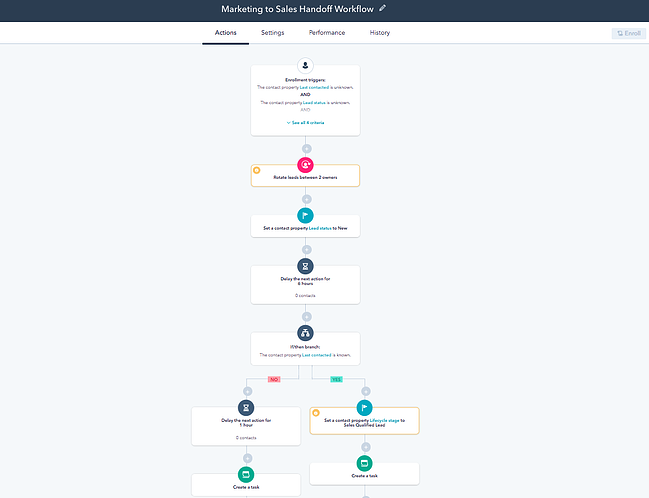 Image Source

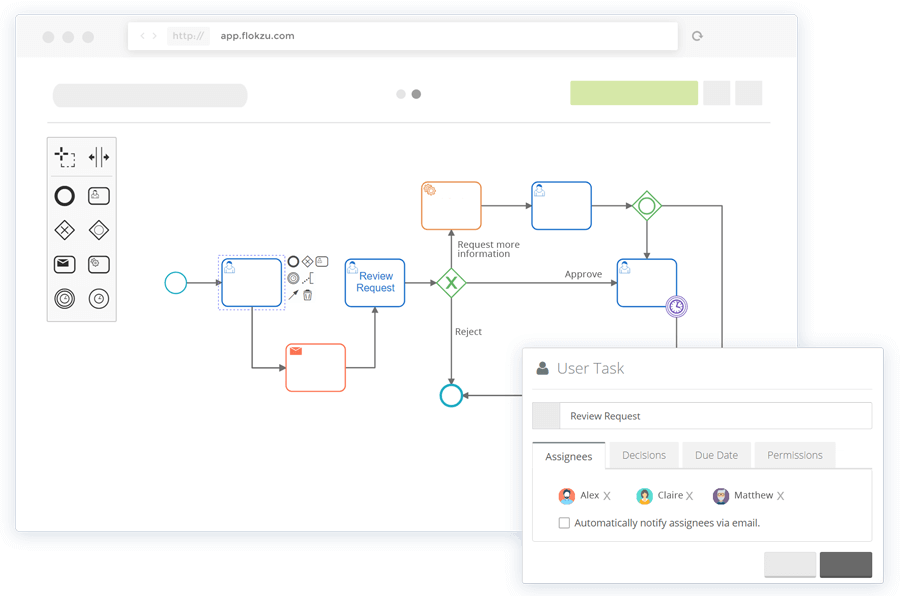
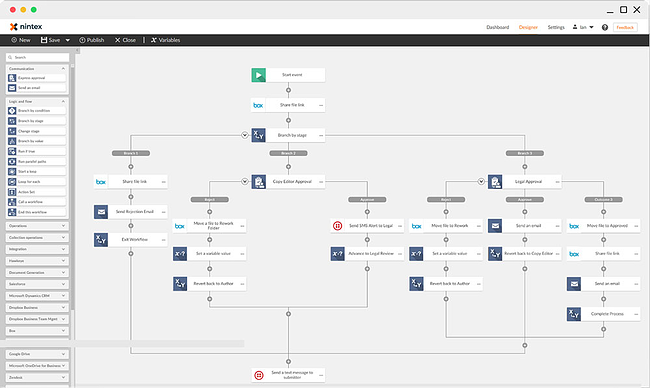 With over 3 million workflow applications operating on their platform right now, Nintex helps more than 8,000 enterprise customers manage, automate, and optimize their business processes, with no coding experience required.

![Download 10 Excel Templates for Marketers [Free Kit]](https://i4lead.com/wp-content/uploads/2022/07/9ff7a4fe-5293-496c-acca-566bc6e73f42-1.png)
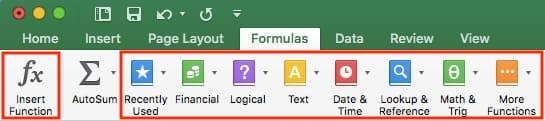
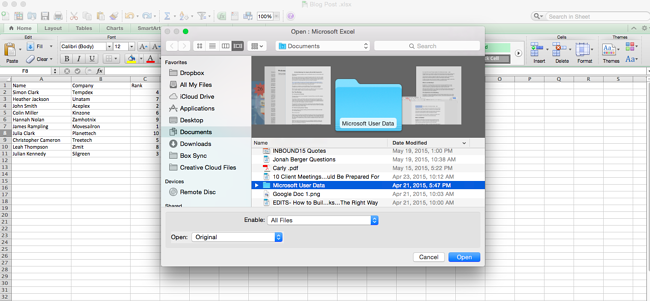
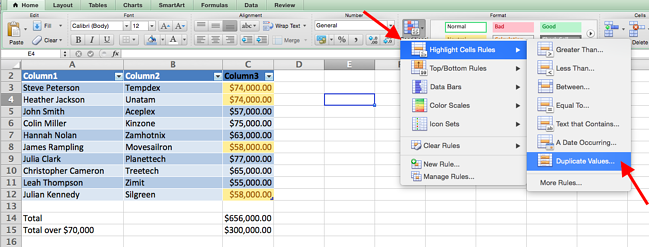
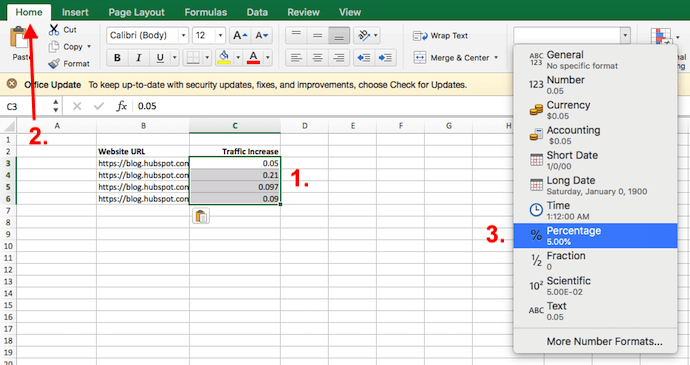
 Want a more sorted browsing experience? Use any of the icons we’ve highlighted (inside the long red rectangle in the first screenshot above) to find formulas related to a variety of common subjects — such as finance, logic, and more. Once you’ve found the formula that suits your needs, click “Insert Function,” as shown in the window above.
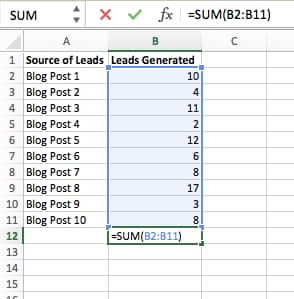
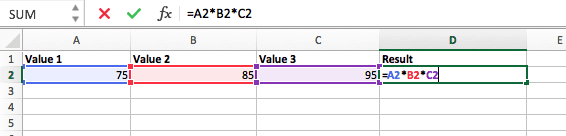


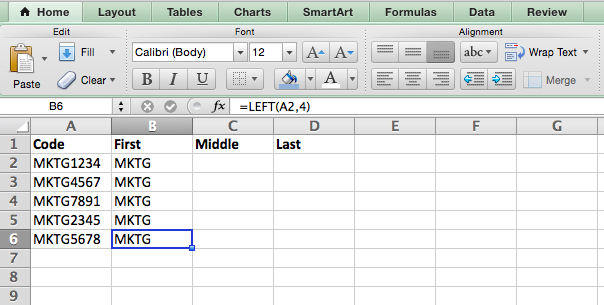
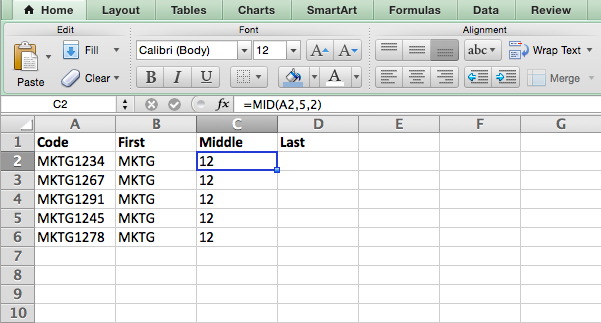
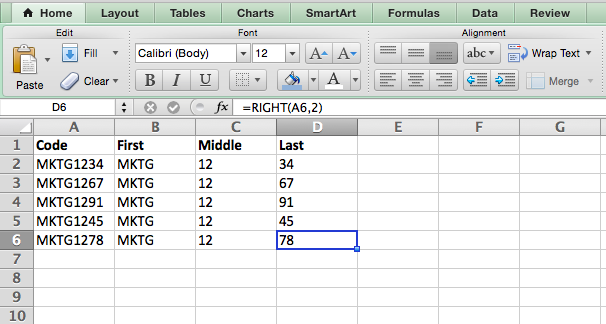
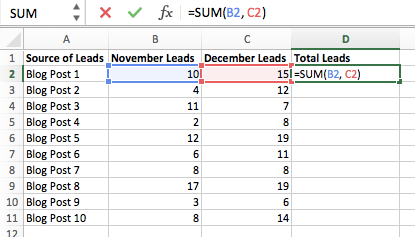
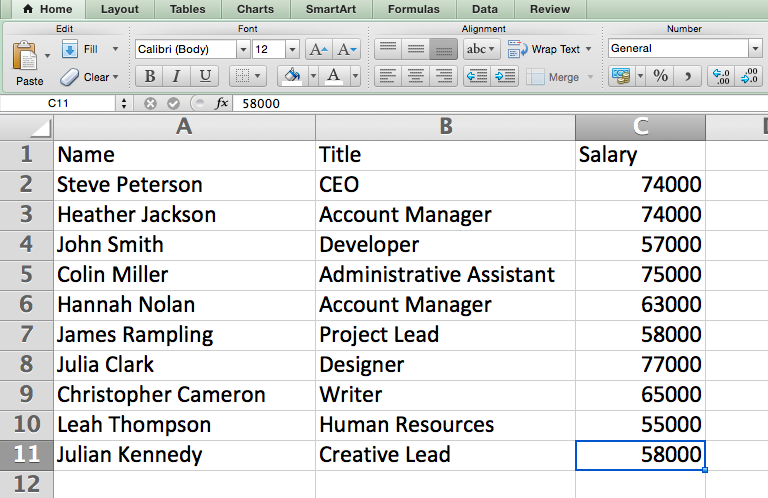
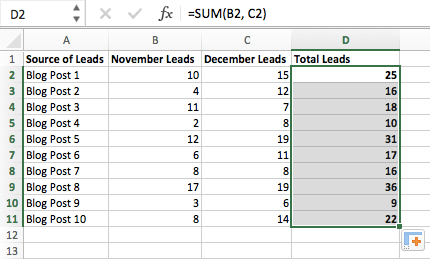 Once you’ve reached the last cell in the column you’d like to enter your formula, release your mouse to copy the formula. Then, simply check each new value to ensure it corresponds to the correct cells.