Categories B2B

How I (Easily) Make Perfect Content Calendars in Google Sheets

I‘m far from the most organized marketer you’ll ever meet — but I‘m working on it! In my quest to become a more organized person, I’ve discovered something super helpful — I can make content calendar templates in Google Sheets.

Free Download: Marketing Editorial Calendar Template

You read that right — Google Sheets. Perhaps you use spreadsheets to collect data, track campaigns, or organize weekly assignments. But have you ever thought about using a calendar template in Google Sheets to manage and track your work?

Below, we’ll review how to make a calendar in Google Sheets and include tips to help you elevate the design. So, open up Google Sheets and prepare to create your calendar.

Table of Contents

Why Create a Calendar in Google Sheets?

I know Google Sheets may not be the first tool that comes to mind when creating a calendar.

But, the truth is that there are many compelling reasons to use Google Sheets as a calendar.

Here are my favorites:

1. Easy Collaboration: Google Sheets makes it exceedingly easy to collaborate with team members. By creating a calendar in Google Sheets, I can share it with my team, allowing everyone to contribute and make updates in real-time.

This ensures everyone is on the same page and can stay organized and informed.

2. Accessibility: With Google Sheets, my calendar is accessible from anywhere with an internet connection (and even offline! Here’s how to turn offline access for your documents). I can easily access and update my calendar on any device, whether at the office, working remotely, or on the go.

This flexibility ensures that I’m always up-to-date and can make necessary changes.

3. Customizability: Google Sheets offers a range of formatting and design options to make my calendar entirely my own (in comparison with a premade calendar tool, for instance).

I love that I can choose different colors, fonts, and styles to make my calendar visually appealing and easy to navigate. This level of customization ensures that my calendar aligns with my team’s branding or reflects my unique style.

4. Integration with Other Tools: Google Sheets seamlessly integrates with other Google tools, such as Google Calendar and Google Drive.

This means I can easily sync my Google Sheets calendar with my Google Calendar and link to and organize relevant files and documents within the spreadsheet, keeping everything in one centralized location.

5. Cost-Effective: My favorite reason to use Google Sheets as a calendar? It’s free. This is particularly important for small businesses or individuals who may not have the budget for a dedicated calendar tool.

If you’re looking for a simple yet powerful way to stay organized and manage your schedule, try Google Sheets. Next, we will cover how to create one in your Google account.

Making a calendar in a tool commonly used for spreadsheets sounds intimidating, but don’t worry; the process is pretty intuitive. And with the help of some tips, you can easily make a functional calendar that you can sync your schedule with.

At the end, your calendar will look something like this:
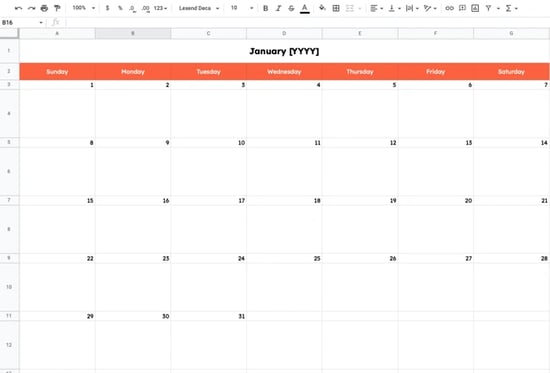
1. Open a new spreadsheet and choose your month.

First, open a new spreadsheet.

Then, choose your month.

I did January [YYYY] for this example and filled that into the first cell. What’s great about Google Sheets is that it automatically recognizes dates, so typing in a month, followed by the year in YYYY format, will tell Google that you will be working with dates.

2. Begin to format your calendar.

Next, format your calendar. I selected the January [YYYY] text in Column A, Row 1. I highlighted seven columns (A) and clicked Merge to span that cell across the entire column. You can find this button to the right of the Fill tool.

Here, I also center-aligned my text using the tool next to Merge. Later on, I’ll increase the font size and bold the month.

3. Use a formula to fill in the days of the week.

Next, fill in the days of the week in each column (A-G). You can do this manually, but I decided to use a formula. Sheets has a function that lets you type in recipes to complete specific actions at once.

To fill in the days of the week, in the cell where you want your first weekday to be, type: =TEXT(1, “D”). This tells Google that your number will be replaced by a date or time, and the format you’re using is weekdays.

Highlight the number 1 in the formula and replace it with COLUMN(). Then, press enter and select your first day. You will copy the formula in Sunday’s cell by dragging the selector to the end of your row (A-G) and pressing enter again.
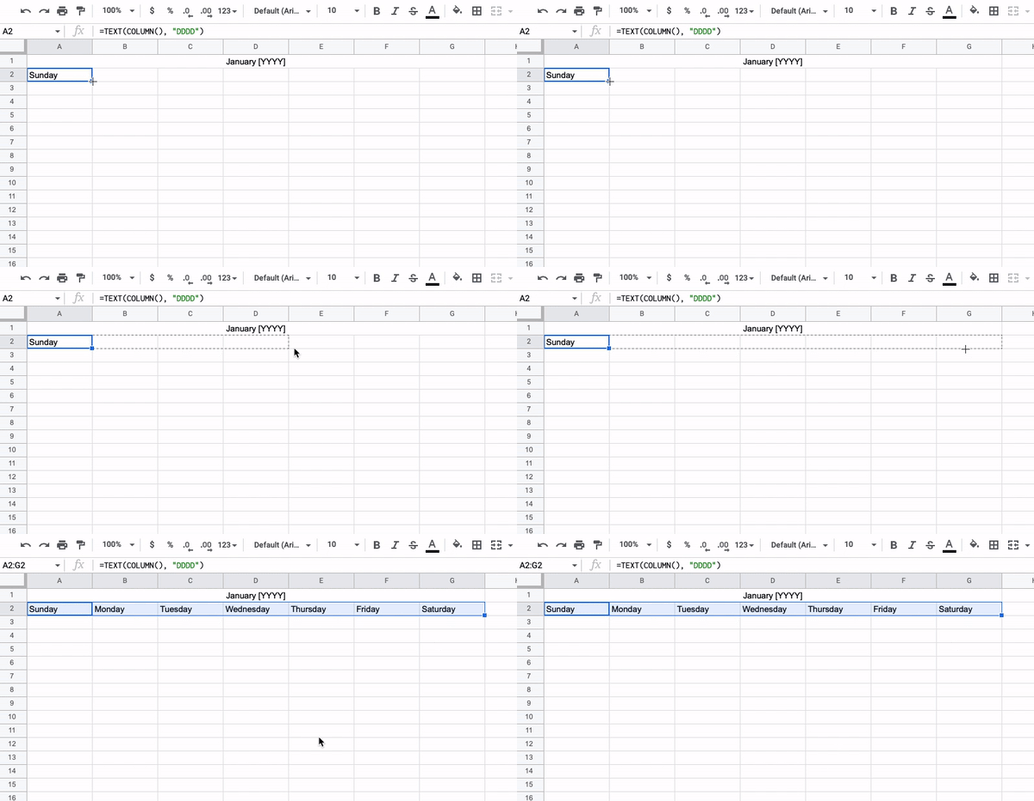
Pressing enter should automatically fill in the rest of the week. Remember, if this doesn’t work for you, you can always fill in the days manually.

4. Fill in the numbers.

Excellent! You have your days of the week. Now, we‘re going to fill in the numerical values. Before this step, I added color to the days’ row and changed the font to one I liked a little more.

For the numerical values, we’ll simply identify the first day of the month and click and drag to fill in the rest.

How?

Place the number 1 on the box right underneath the first day of the month, then click and drag horizontally. Depending on the day of the week, you may need to follow this process using the second day of the month so you can click and drag horizontally.

For this example, we’ll use Sunday as the first day of the month, but remember that the first day will vary yearly.

5. Fill in the rest of the numbers.

Note: In this step, I filled in the calendar numbers in every other row to help with my formatting later.

Now that you’ve filled out your first row, it’s time to complete the rest. Manually insert the following number, then click and drag horizontally to fill in the rest.

Repeat the process for the following rows. You’ll insert the first number manually, then click and drag down the row. Here’s what that looks like for the next row in January.
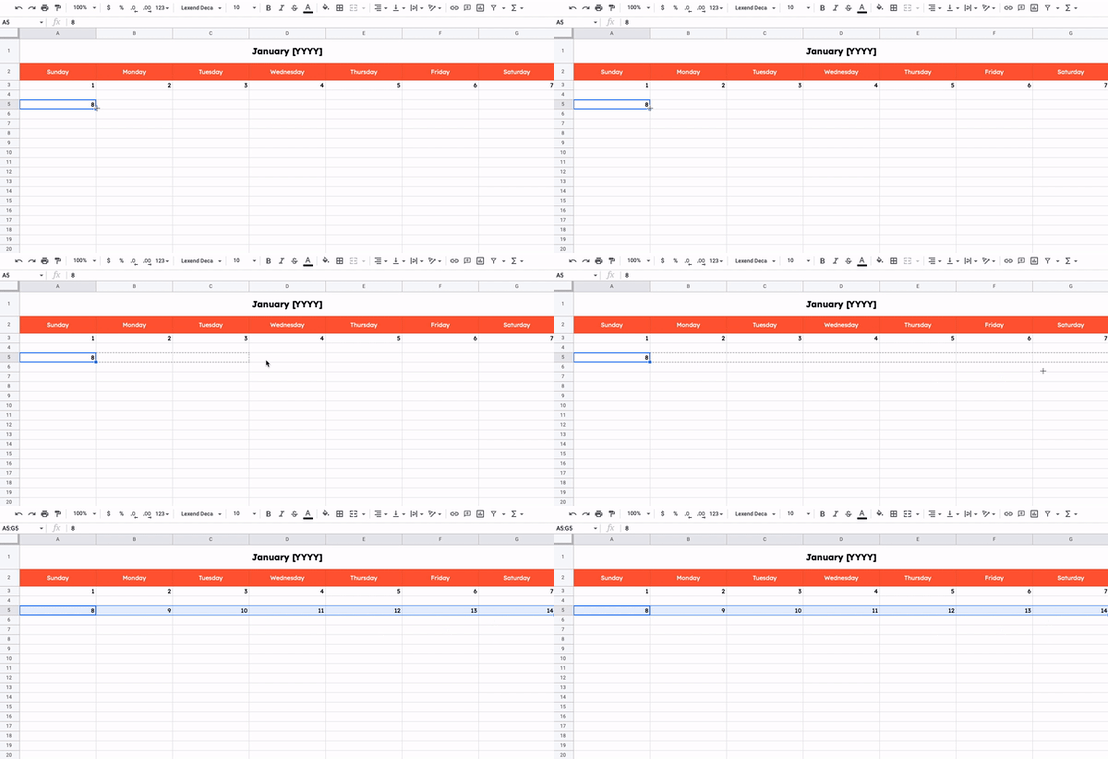
Note: Make sure to end the month on the correct number! For January, that would be the 31st.

6. Reformat your calendar if necessary.

Everything is starting to look like a calendar, right? At this stage, I reformatted things to clean up the look of my calendar a little.

Remember those extra rows in between the numbered rows? I expanded those rows to create boxes underneath the numbers. To do this, I simply dragged the rows down to make those cells bigger.
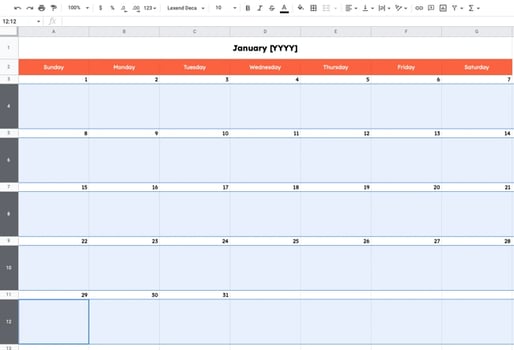
Here are some additional formatting tips:

  • Select the empty rows underneath your numbers and center them using the center text alignment tool.
  • Select your entire calendar and vertically align all elements so they’re in the center of their cells. To do this, use the vertical alignment tool.
  • Bold your day numbers.
  • If desired, lightly shade your numbered rows.
  • If desired, gray out the Saturday and Sunday columns so that your workdays stand out.

7. Add design elements to professionalize the look.

Finally, you can add some fun design elements to personalize the look and feel of your calendar. You‘ll want to incorporate the necessary launch days here if it’s for a client or an upcoming project.

For this step, I added a few fun images, included a few hypothetical calendar events, and played with font sizes.

8. Repeat the process from February to December.

It’s time to repeat for February to December. Simply duplicate your January calendar once you’ve designed it how you want it to look. To do this, right-click the sheet’s tab and select Duplicate from the menu.

To fill in the numbers, you’ll only need to know the beginning day, then click and drag to fill in the rest of the rows. Here are the first days for every month for the year 2024:

  • January: Monday
  • February: Thursday
  • March: Friday
  • April: Monday
  • May: Wednesday
  • June: Saturday
  • July: Monday
  • August: Thursday
  • September: Sunday
  • October: Tuesday
  • November: Friday
  • December: Sunday

Next, you’ll want to know how many days you must fill in. Here are the number of days you’ll need for each month:

  • January: 31
  • February: 28 or 29
  • March: 31
  • April: 30
  • May: 31
  • June: 30
  • July: 31
  • August: 31
  • September: 30
  • October: 31
  • November: 30
  • December: 31

And then, you’re done!

It’s handy to use Sheets because you can open your calendar on your browser. You can also keep track of your schedule separately from your phone.

You can either make a calendar manually, as we covered above or use a template, as we cover below. You can also insert a calendar into Google Sheets using an add-on.

Google Sheets has a built-in timeline view that could be useful for calendar-making. By itself, though, it’s not as helpful. You can insert a timeline-view calendar containing all your events with the right add-on.

We’ll use the add-on Calendar Timeline View for this simple tutorial.

1. Install Calendar Timeline View into Google Sheets.

Make sure you’re logged into your Google account. Then, install Calendar Timeline View into your Google Workspace. Simply click Install in the upper right-hand corner.

You can also go to Extensions > Add-ons > Get add-ons on a Google Sheets spreadsheet. Search for Calendar Timeline View and install it from there.

2. Open the Calendar Timeline View sidebar.

An icon will appear on the Google Sheets sidebar for the add-on we just installed. Click it to open up the sidebar.

3. Pull your Google Calendar events into Sheets.

This add-on will pull your Google Calendar events into a Google Sheets timeline view.

The best part? You can create a Google Sheets timeline for any date range, including the next month, quarter, or year. I recommend creating a different timeline for different quarters or half-years.

In the sidebar, select a specific calendar (like your calendar, the US holiday calendar, or another calendar).

Then, at the bottom, click Pull Events.

4. Clean up your calendar data.

At first, the result might look funky. The tool pulls in everything from your Google Calendar, including Zoom descriptions, which can make your timeline look cluttered.

You can clean up the data the tool pulled directly on the spreadsheet. For example, I deleted the event descriptions so that the descriptions didn’t show up on my timeline.

I also deleted the guests because I didn’t need them.

5. Enjoy your timeline Google Sheets calendar.

The add-on automatically creates a timeline after you pull your Google Calendar events. I then changed the settings in the Timeline tab to the correct start dates, end dates, and card titles.

We’re all done! Here’s the final result.

If you don’t have the time or the patience to create a calendar from scratch or install an add-on, below are Google Sheets calendar templates to download for free.

Google Sheets Calendar Templates

Good news: You’re not limited to Google Sheets’ built-in templates, which we share below. If you need a more functional annual calendar, I’ve got you covered with these marketer-friendly options.

1. Free Editorial Calendar Template for Google Sheets

Download the Free Template

This editorial calendar template is designed for Google Sheets and covers all of your editorial planning needs. This template lets you strategically lay out daily and monthly editorials in one accessible, scannable sheet.

Designed for utmost usability and readability, it includes a vertical layout for the dates, and coluto can add details such as the Author, Topic, Content Details, and Keywords.

Best For: A vertical, year-long design like this one can also be used for other efforts, such as professional and personal goals. You can change the columns to fit your and your team’s objectives for the upcoming year.

2. Free Spreadsheet Social Media Content Calendar Template

Download the Free Template

This Excel-based social media calendar template is ideal for marketers who want to build a strong social strategy for the upcoming year. The best part? It comes bundled with a user guide for those new to social media strategy planning.

If you already have a social plan, you can use this calendar for any multi-channel effort, such as content marketing across multiple platforms and guest blogging on different publishers’ websites.

Simply change the titles on the tabs to fit your goals.

Pro Tip: This template can easily be converted into a Google Sheets document. To upload it into Google Drive, simply head to drive.google.com and drag the file from your file explorer into your list of Google Drive documents.

Alternatively, head to sheets.new to create a new Google Sheets spreadsheet. Then, click File > Import > Upload. You’ll be able to import the Excel file without losing quality.

3. Monthly Calendar for Google Sheets

Need a simple monthly calendar? No worries, this monthly calendar template from smartsheet is easy to use and allows you to keep track of deadlines, appointments, and important milestones.

Best For: Tracking simple deadlines associated with campaigns. However, you may want a more robust calendar to meet your needs.

4. Yellow Project Calendar

This Yellow Project Calendar template gives a vibrant approach to the project plan while promoting organization and efficiency.

What I Like: The calendar’s layout makes project coordination, productive resource management, and timely delivery possible.

5. Light Daily Calendar

I love this template because it‘s a simple way to track daily tasks. Plus, the cool colors create a calming vibe, making the day’s to-do list seem less daunting.

Pro-Tip: Adjust the color palette to shades that you find calming.

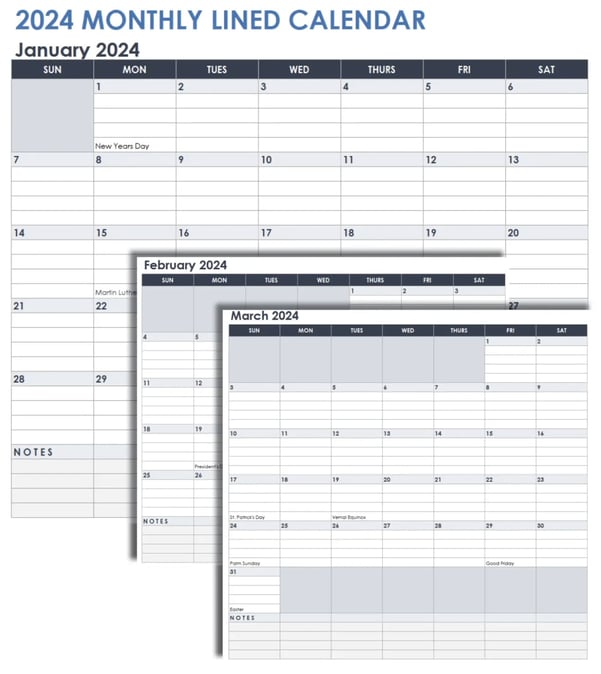
6. 2024 Monthly Lined Calendar Template for Google Sheets

2024 Monthly Lined Calendar Image source

A lined Google Sheet calendar template like this one from smartsheet makes it easy to track daily, monthly, and weekly tasks.

What I Like: I really love this lined template because it’s perfect if you need to make notes digitally or if you want to print them to handwrite your notes. 

7. 2024 Monthly Planner Template for Google Sheets
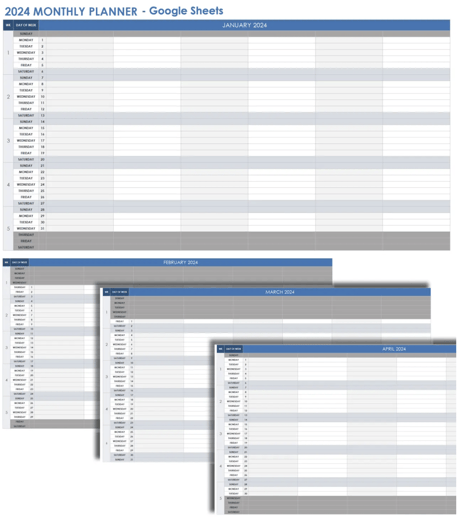
2024 Monthly Planner SheetsI know the print is super tiny, and you may struggle to read it, but this a planner-style Google Sheets calendar template with the days of the week types in a column on the left-hand side. 

Best for: If you need a day-by-day breakdown of your monthly tasks, this template will prove useful. 

8. 2024 Quarterly Calendar 
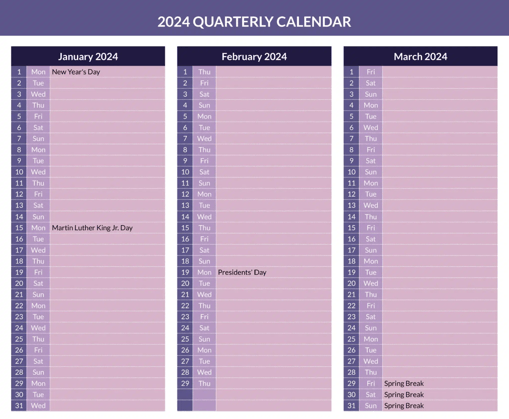
2024 Quarterly Calendar

Image source

What I Like: This purple, aesthetically pleasing calendar is perfect for tracking quarterly business goals. It also includes holidays to help you avoid accidentally booking a day when everyone is out of the office.

9. Yearly Calendar Template

Yearly Calendar

Image source

What I Like: This calendar gives a straightforward view of the year ahead and it includes a sidebar for additional notes.

How to Make a Calendar Using a Google Sheets Template

Google Sheets provides a built-in template for calendar-making. The only downside is that customization options are limited — you can only use Google Sheets’ themes. This is an excellent option if you’re in a hurry.

1. Go to sheets.google.com.

Ensure you’re logged into your Google account or log in when prompted. This will take you directly to the Sheets home page, where you can access the templates.

Alternatively, go to drive.google.com, tap New, click the right-hand arrow next to Google Sheets, and tap From a template.

2. Access the template gallery.

You won’t need to take this step if you access the Google Sheets templates via Google Drive.

Otherwise, tap the Template gallery in the top banner titled Start a new spreadsheet.

3. Find the annual calendar template.

Templates are divided into “Work” and “Project management.” Scroll down until you reach the Personal section, then tap Annual Calendar.

4. Change the formatting as needed.

All done! Your calendar has been created. Next, it’s time to change the formatting using Google Sheets’ available themes. You can also change the fonts as you’d prefer.

An alternative option to using Google Sheets’ built-in template is third-party templates such as HubSpot’s below, allowing you to create essential business documents such as social and editorial calendars.

Our editorial calendar helps you lay out a strong strategy daily. With a bit of customization, your editorial calendar will run smoothly, leaving you more time to focus on the quality of your content.

Pro-Tip: You can also connect your calendar to HubSpot to sync meetings, notes, and more. Just thought you should know.

Featured Resource: Free Editorial Calendar Templates

Download the Free Templates

Use a Google Sheets Calendar to Organize Your Tasks

If you’re handy with Sheets and want to give it a shot, create a Google Sheets calendar. And if you’re not so handy, I’m confident this step-by-step guide will help you out.

Google Sheets calendars are a great option if you need to create a clean calendar to track an internal marketing campaign, organize a client’s upcoming projects, or share an event calendar with critical stakeholders.

But if you don’t want to create one from scratch, I suggest checking out our editorial calendar template to jumpstart your planning and organization efforts immediately.

Editor’s note: This post was originally published in May 2020 and has been updated for comprehensiveness.

marketing editorial calendar templates

Categories B2B

The Best AI Search Engines to Try in 2024

Like most of you, I have fallen down countless rabbit holes in Google searches. “How to make a latte?” turns into “Latte vs. americano?” which turns into “How bad is caffeine for you?” and ends with “Coffee alternatives.”

Download Now: 5 Essential Resources for Using ChatGPT at Work [Free Kit]

Often, though, I’ve found myself frustrated by how many times I have to reword the same query in traditional search engines to nudge the browser to comprehend what I’m asking.

Not to mention how exasperating it is to scroll through unrelated sponsored ads before getting to the meat of my search.

Enter AI-generated search engines.

Table of Contents

What are AI search engines?

AI search engines are search engines that use some combination of web crawlers, innate artificial intelligence, and user data to improve users’ search experiences and provide more pertinent responses. They have become some of the top search engines today due to their intuitiveness.

You’ll find less of a need to clarify your query with AI search engines because they are built to better understand human intent. And, your responses will often be summed up in AI-generated copy with cited sources, rather than forcing you to click through several URLs to check their relevance.

Want to improve your company’s performance in today’s search landscape? Our new AI Search Grader takes your site and summarizes how your company will perform in AI search. The tool then recommends how you can perform your performance.

How I Test AI Search Engines

Since all these tools have the same purpose — answering your question by scouring the web for suitable sources and links that can be combined with innate AI knowledge or chat capabilities to provide the most accurate answer — it was easy for me to test them all in the same way.

I simply used the same two questions across every AI search engine and measured the success of the search engine by how it answered the questions. One being more of a straightforward, factual question and the other a broader question. Below are the seven best options from my research.

7 Best AI Search Engines

1. Perplexity

I kicked off with Perplexity, which has been all the rage lately. There’s a lot to know about this search engine, but most importantly, many are admitting Perplexity has replaced Google in their lives.

It’s like a mix of ChatGPT and Google. Meaning that it can answer your questions in a human-like manner, but it pulls its facts from a quick search of all the articles available, rather than having an innate knowledge base.

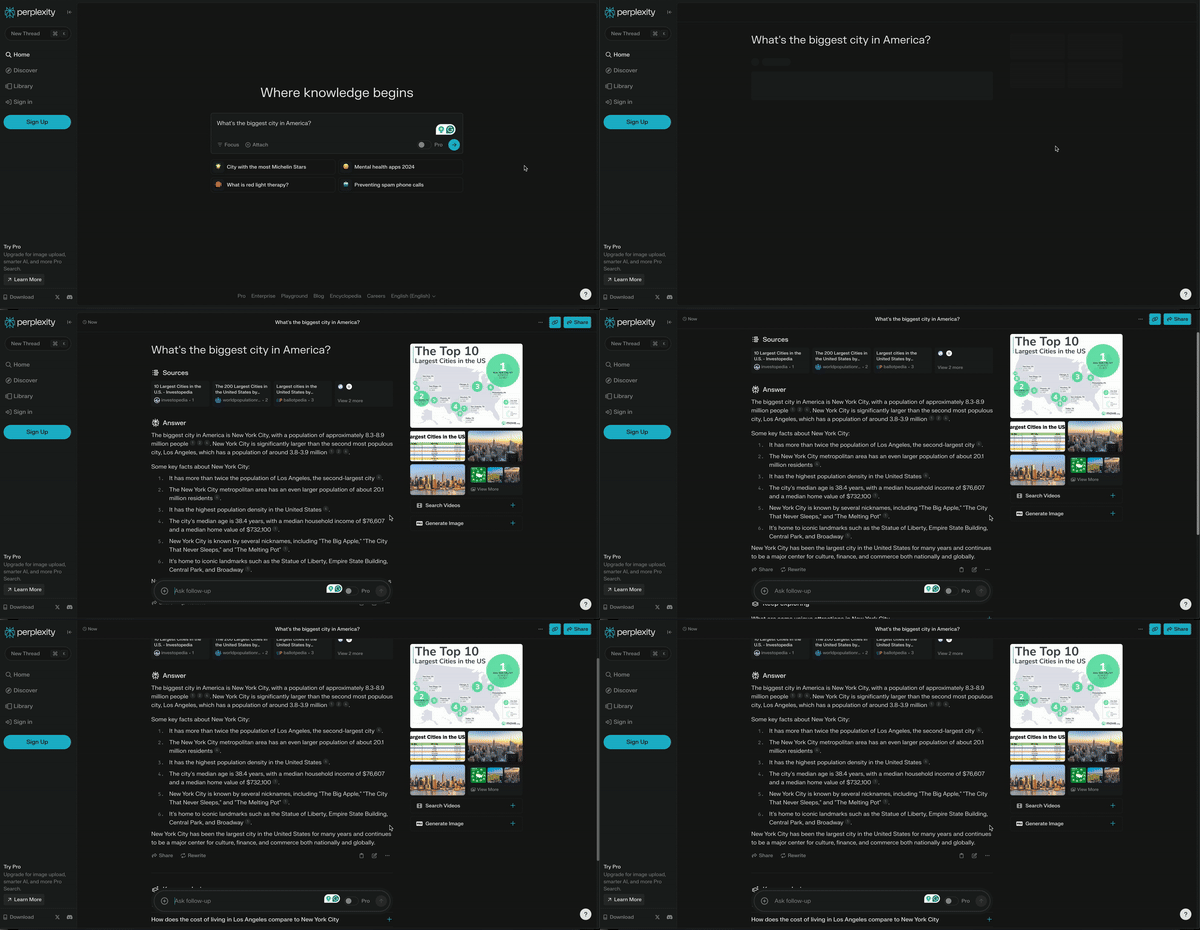
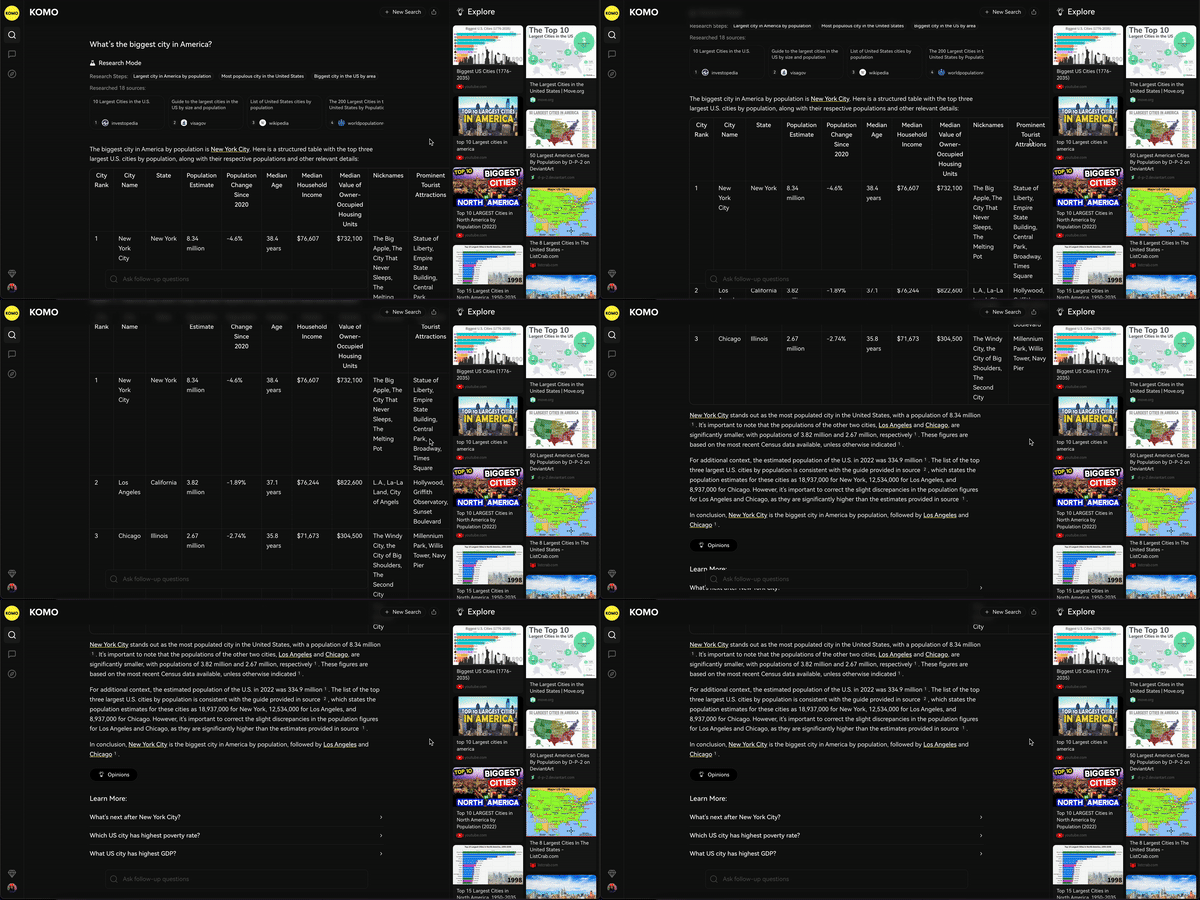
I started with my straightforward question: What’s the biggest city in America? The first thing I noted was that Perplexity has a very similar interface to ChatGPT since it uses OpenAI’s language models.

Search results from searching “What’s the biggest city in America?”

Outside of the sources linked at the top and referred to throughout the answer, Perplexity also shares relevant images on the right-hand side, with an option to search videos or generate images.

Image results from Perplexity, including a map of the top 10 largest cities in the US, and images of the Manhattan skyline.

After this search result, I tested out a more thought-provoking question. I wanted to gauge how AI search engines perform when asked a question that doesn’t have a specific, singular answer. I asked, “How do I become a better blog writer?”

A list of 13 tips to become a better blog writer, including writing consistently, reading extensively, and doing thorough research.

What I Like

  • ChatGPT users like myself will appreciate that Perplexity’s interface is familiar, as it eases the transition period.
  • Unlike ChatGPT, though, Perplexity promises answers that are always correct and cited from many sources, including academic research and Reddit threads.
  • Perplexity links to several references at the top and cites sources throughout its response. Decades of English and History teachers drilling into me to cite my sources in papers have helped me develop an appreciation for this kind of verification.
  • The visual sources are helpful for those who prefer Google Image and Video results over Web results.
  • At the bottom of your response, you will find a section called “Keep exploring,” where Perplexity suggests similar questions that you can automatically search and get an AI-generated response. For someone like me, who typically has dozens of tabs open when researching a single topic, this feature would keep all my research in one place.

What Needs Improvement

  • Honestly, nothing. I have already started using this in place of my usual relentless Google searching.

Pricing

  • Standard plan: Free
  • Professional plan: $20/month

2. Google Gemini

Gemini, formerly known as Bard, is Google’s AI chatbot, and it may be attractive to those who have grown accustomed to Google’s many revolutionary products.

Some may have noticed that Google has incorporated an “AI Overview” into some of its search results. Still, Gemini is a separate tool that can be used for specifically AI-generated responses.

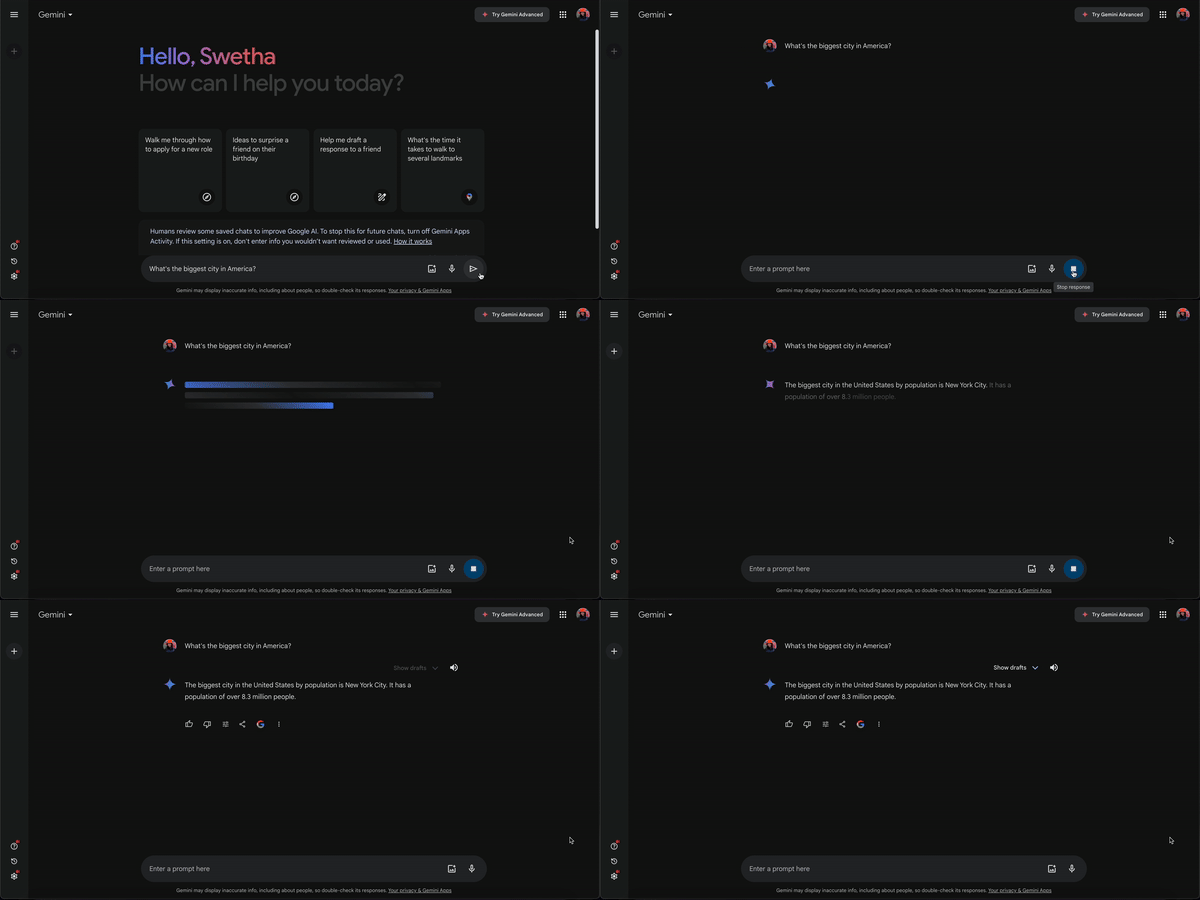
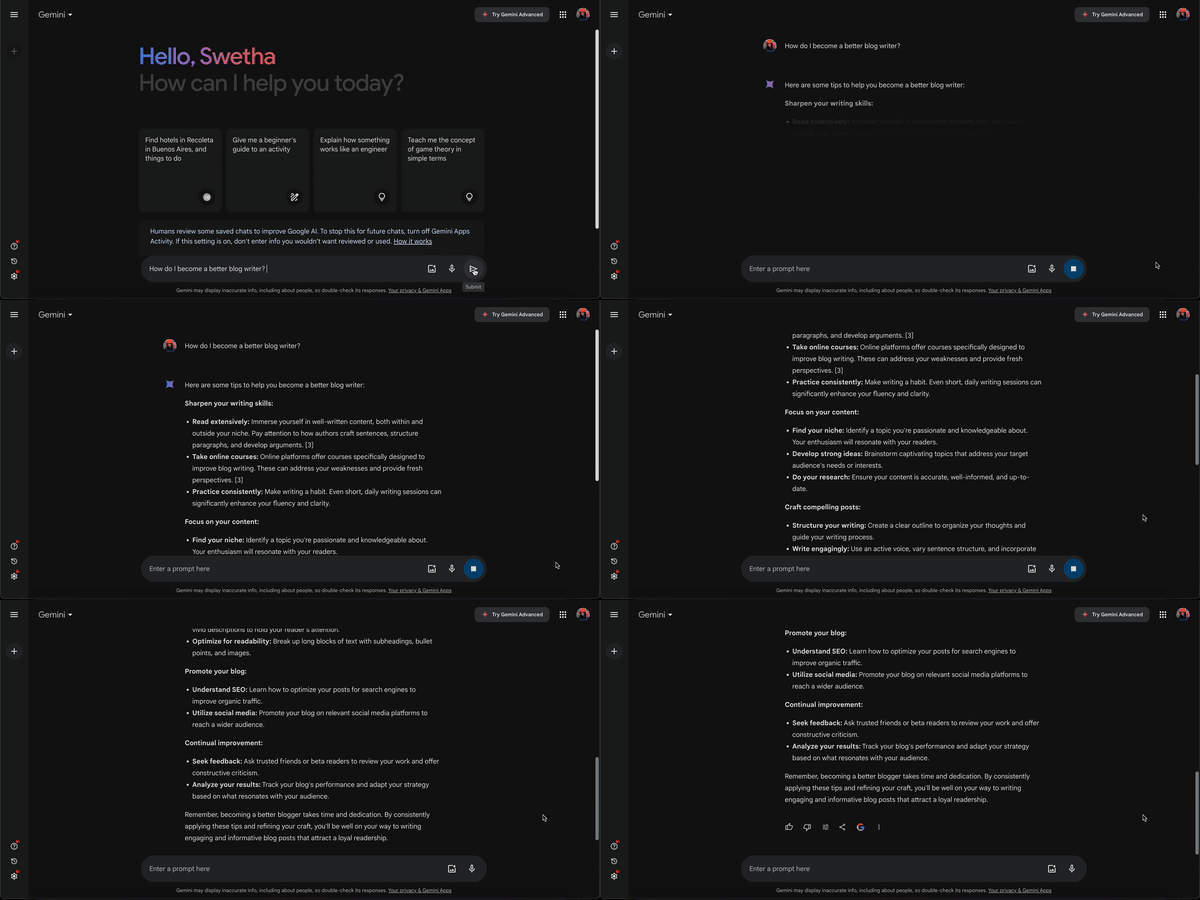
best AI search engine, Gemini homepage, stating “Hello, Swetha. How can I help you today?” with suggested prompts.

In my first question test, I noted how quickly Gemini pulled up an answer, and how short it was.

Search results from searching “What’s the biggest city in America?”

In comparison, I noticed a huge difference in the results for my second question. It’s clear Gemini answers questions very differently based on how direct or abstract they are.

 Search results from searching “How do I become a better blog writer?”

What I Like

  • Gemini’s design is aesthetically pleasing, and I like that the homepage opened up with a message stating, “Hello, Swetha” which showcases its humanity and personalization.
  • Gemini answered my first question, “What’s the biggest city in America?” as short and sweet as I had hoped for. I appreciate that it didn’t try to give me any unnecessary information.
  • It has a “Double-check response” feature, in which you can have Google perform a secondary search of your question to ensure its accuracy.

What Needs Improvement

  • Gemini provides text-only responses, which is very dissimilar from Google’s image, video, and news results, so it surprised me.
  • The search engine has a disclaimer at the bottom, stating, “Gemini may display inaccurate info, including about people, so double-check its responses.” While I appreciate the honesty, it doesn’t hold up against Perplexity, which promises complete accuracy.
  • At the bottom of your search results is a “Search related topics” feature, which is helpful if you want to keep your research going. However, these take you out of Gemini and back into Google, which I saw as a sign that Gemini hasn’t been fully flushed out yet and still relies on Google.

Pricing

  • Free of charge plan: $0
  • Pay-as-you-go plan: Price varies based on a cost-per-token model.

3. Brave Search

Brave Search is a search engine that boasts security and privacy while browsing the internet. It does this by not tracking users or their queries. Brave Search can’t share or sell personal data because it never gets collected.

Thus, it already proves beneficial to those who may work on public computers or networks. But, recently, Brave Search introduced a privacy-focused AI answer engine to put it in the running against other AI search engines on this list.

Brave Search engine homepage features a search bar with text “Search the web privately....”

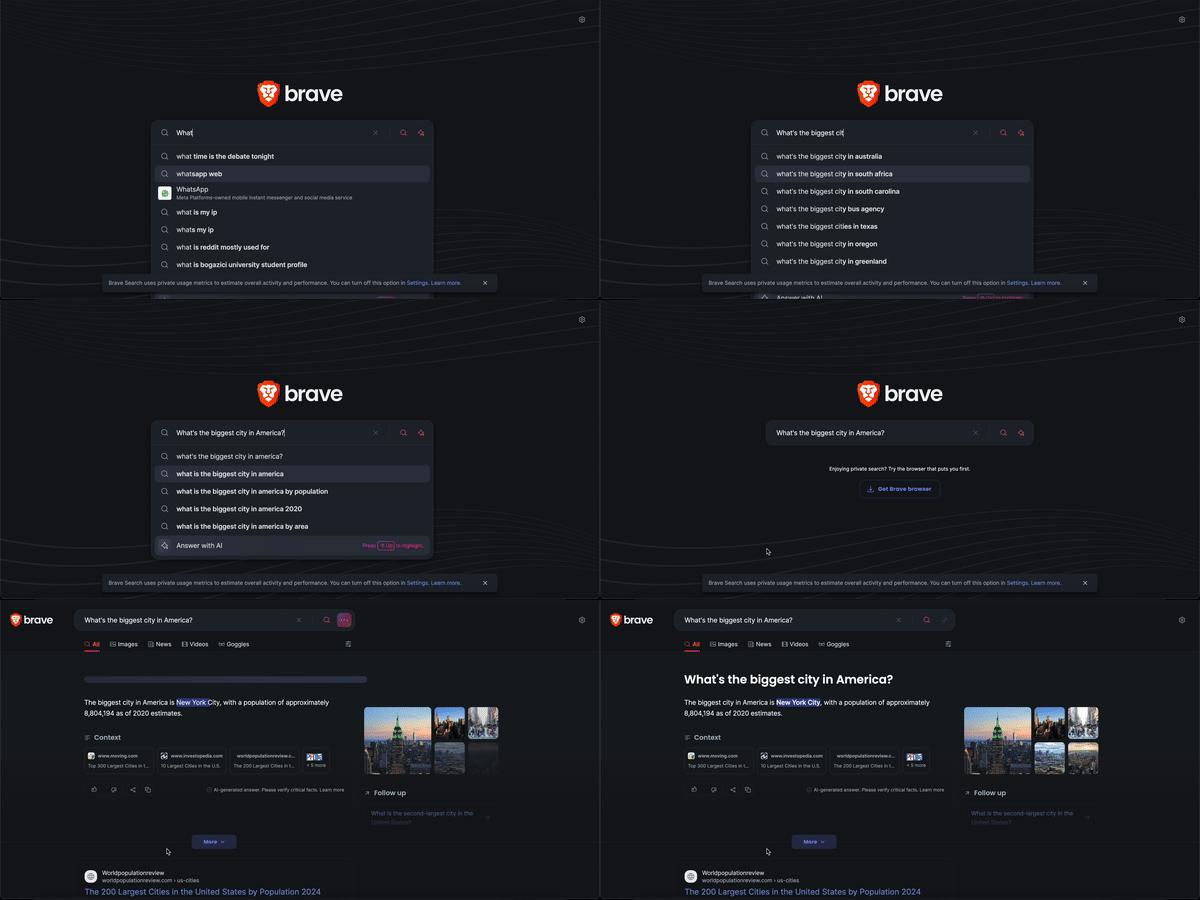
I dove into my first test question to see how Brave held up against Perplexity and Gemini.

 Search results from searching “What’s the biggest city in America?”

Brave Search resembles Google and other classic search engines since that’s what it inherently is. In this way, it may be more attractive for search engine traditionalists wary about trying out a brand-spanking new AI tool.

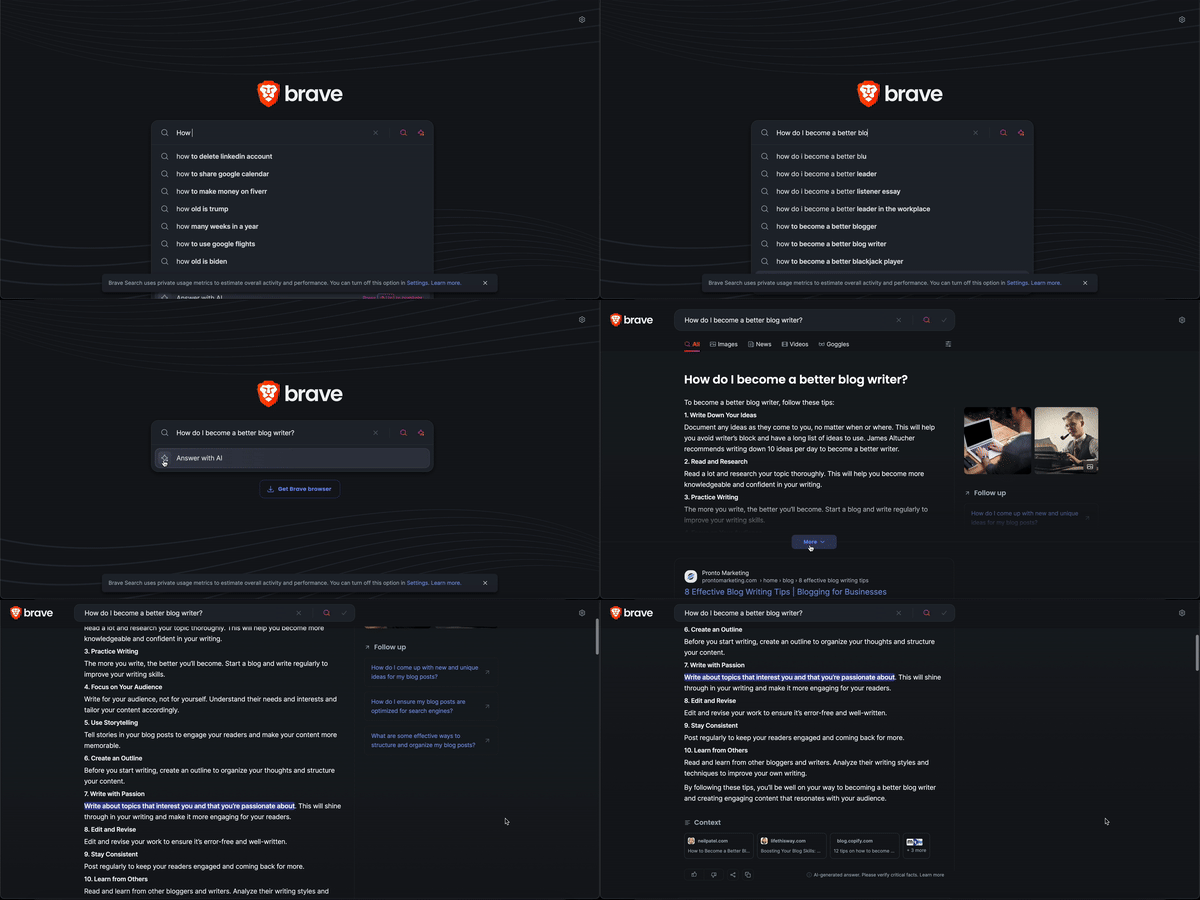
After this, I tested out my second question on the search engine and was met with a similar look and style of response.

Search results from searching “How do I become a better blog writer?”

What I Like

  • Brave Search is incredibly conventional in appearance, which I actually appreciated. I’m so used to Google’s interface when searching random queries, and it’s helpful that Brave Search is modeled similarly.
  • The emphasis on privacy and security is essential. There’s nothing more frustrating than when you mean to search something on Incognito mode and forget, or when you desperately want to avoid being served dozens of ads about Bali just because, one time, you searched “flights to Bali.”
  • Brave Search shows you “Context,” in which it links to all its references. I like that these are all at the bottom of your search result, so they don’t distract from your reading experience.
  • If you like Brave Search, you can make Brave your default browser.

What Needs Improvement

I searched normally and with the “Answer with AI” feature for both questions and received identical search results in both modes. This doesn’t exactly encourage people to use the AI feature if they feel their results will be the same.

Pricing

  • Data for AI plans:
  • Free plan: $0
  • Base plan: $5 CPM
  • Pro plan: $9 CPM
  • Data for Search plans:
  • Free plan: $0
  • Base plan: $3 CPM
  • Pro plan: $5 CPM
  • Data w/storage rights plans:
  • Base plan: $26 CPM
  • Pro plan: $45 CPM
  • Autosuggest and Spellcheck plans:
  • Free plan: $0
  • Pro plan: $0.50 CPM

4. Microsoft Copilot

Microsoft Copilot is an AI companion tool specifically meant to be paired with Microsoft 365 apps, such as Word, PowerPoint, and Excel.

It reminds me a lot of ChatSpot, HubSpot’s chatbot and AI Assistant, in that it is best used when paired with our own products.

Copilot seamlessly integrates into Microsoft 365 apps to help with the most appropriate tasks, from writing thought-starters in Word to design help in PowerPoint to email inbox efficiency in Outlook.

Microsoft Copilot web homepage.

Copilot also has a web version that functions similarly to Perplexity. You enter a question, and it curates a response by scouring the web for references.

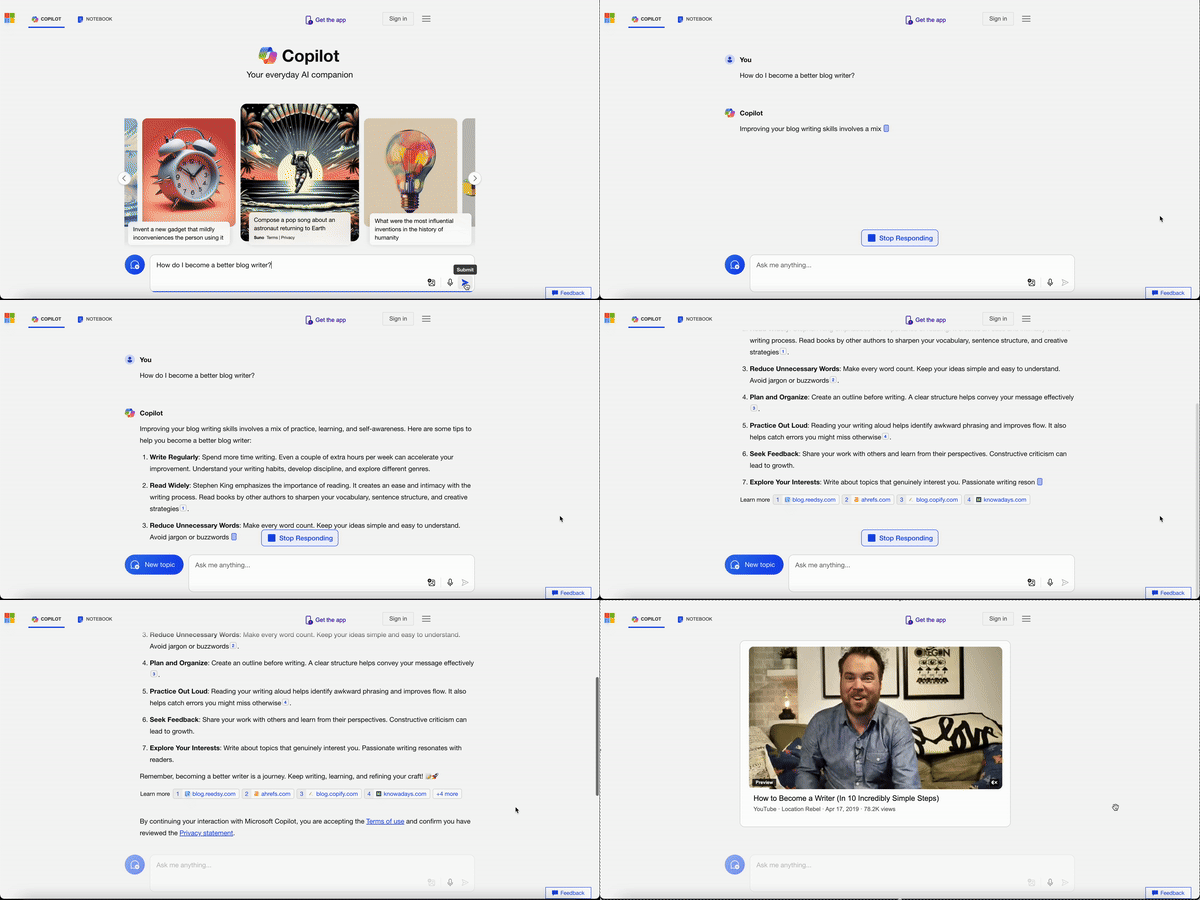
Copilot search results for “What’s the biggest city in America?”

In my second search, Copilot included a lengthier response with a relevant video that auto-played at the bottom of the page.

Search results from searching “How do I become a better blog writer?”

What I Like

  • Copilot is, first and foremost, a companion for Microsoft 365. I use Outlook every day, so the idea of an AI tool that is both a search engine and a match to my existing apps is exciting.
  • The Copilot web interface is beautiful and inviting, with its sleek white background, colorful logo, and generated artwork.
  • The sources are linked but don’t pull away my attention. I like that they appear as short URLs, and I can hover over the URLs to see the full article name.
  • It didn’t overwhelm me with tons of images and videos but instead shared one relevant video to coincide with its text-based search results.

What Needs Improvement

  • Compared to other search engines I tested, I didn’t think the search results for my second question were as thorough or informative.
  • Being a search engine is not Copilot’s primary or best feature, so it can’t necessarily be as trusted as other tools on this list.

Pricing

  • Web-only plan: Free
  • Copilot for Microsoft 365 plan: $30/user/month

5. Komo

Komo is another AI search engine with a clean UI that pumps out detailed search results. It resembles Perplexity in its ease of use and reference to factual source information.

Komo homepage featuring a search bar and example prompts.

Komo has options to Ask, Search, Research, or Explore anything. Toggling to each of these four modes changes the format of your responses. I tested this out with my first question, searching it in all four modes.

“What’s the biggest city in America?” searched in “Ask” mode.

“What’s the biggest city in America?” searched in “Search” mode.

“What’s the biggest city in America?” searched in “Explore” mode.

“What’s the biggest city in America?” searched in “Research” mode.

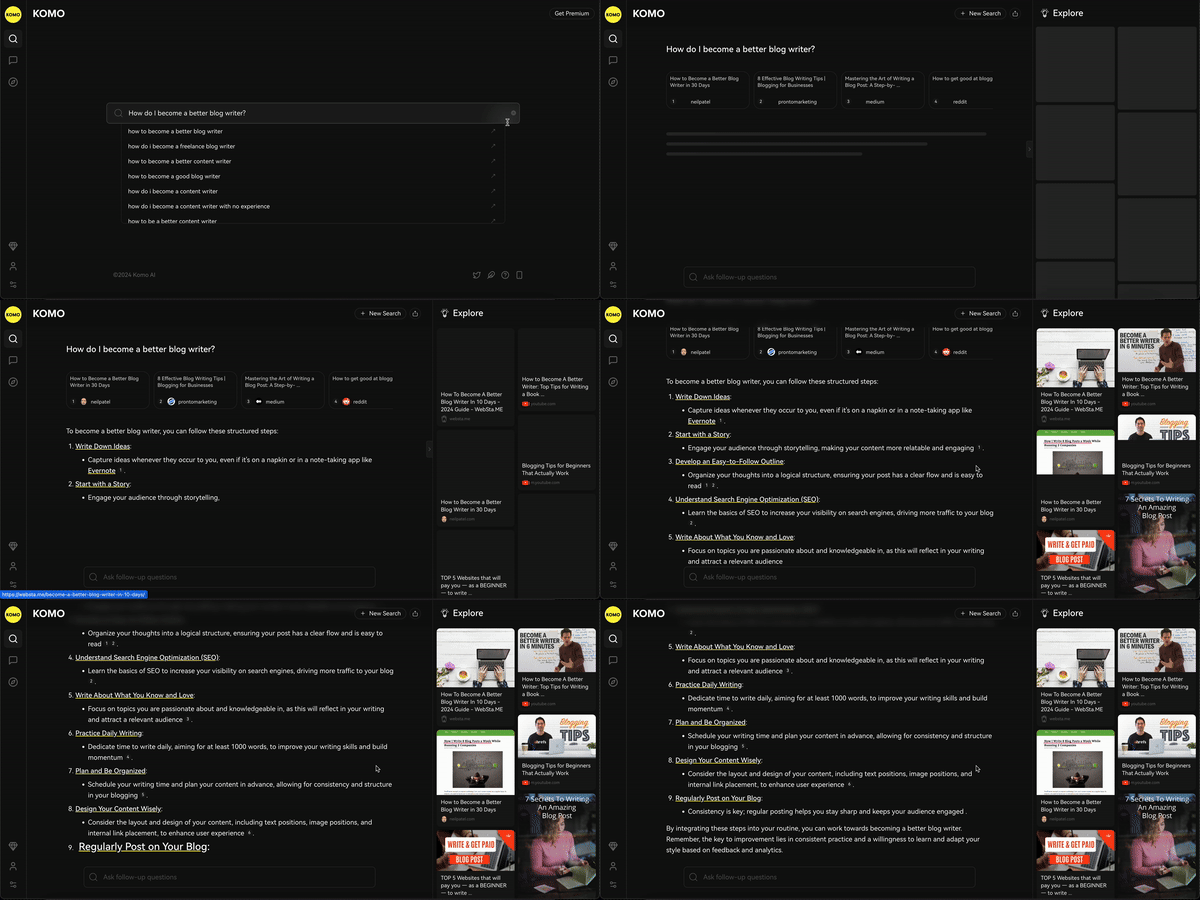
For my second question, I tested it in “Ask” mode only.

Search results from searching “How do I become a better blog writer?” in “Ask” mode.

What I Like

  • Komo’s four search modes allow you to easily search any type of query. I like that the language in each version also differs. I preferred the concise language in “Ask” mode, but academics might prefer “Research” mode, for instance.
  • Search results reference several sources, which shows the importance of fact-checking and knowledge to the search engine.
  • The “Opinions” feature links to an endless stream of useful links, no matter how simple or complex the prompt may be.
  • The “Learn More” feature lists follow-up questions to continue your search.

What Needs Improvement

  • Searching in “Research” mode is very limited in the free version, with a strict once-daily limit. This mode is very unique to Komo and would be ideal if made more available to free users.

Pricing

  • Free plan: $0
  • Basic plan: $8/month
  • Premium plan: $15/month
  • Business plan: Contact the Komo team for pricing.

6. You.com

You.com, aptly named for how it can be personalized for how you best want to use it, is an AI search engine with four AI assistants and the ability to explore 16 AI models.

You.com homepage, showing options for Smart Assistant, Research Assistant, and more.

Clicking “More” above opens you up to the sheer number of assistants and models you can try out with You.com. You can see a snapshot of some of the AI models below.

List of AI models that can be explored in You.com, including GPT-4o and Claude 3.5 Sonnet.

Like Komo, you can search various queries in each AI assistant based on the prompt type. For instance, Smart Assistant is for any questions, Research Assistant is for topics requiring deep analyses and explorations, and Genius Assistant is for multi-step problems.

I used Smart Assistant to ask my first question since it’s simpler and more direct.

Search results for “What’s the biggest city in America” in Smart Assistant.

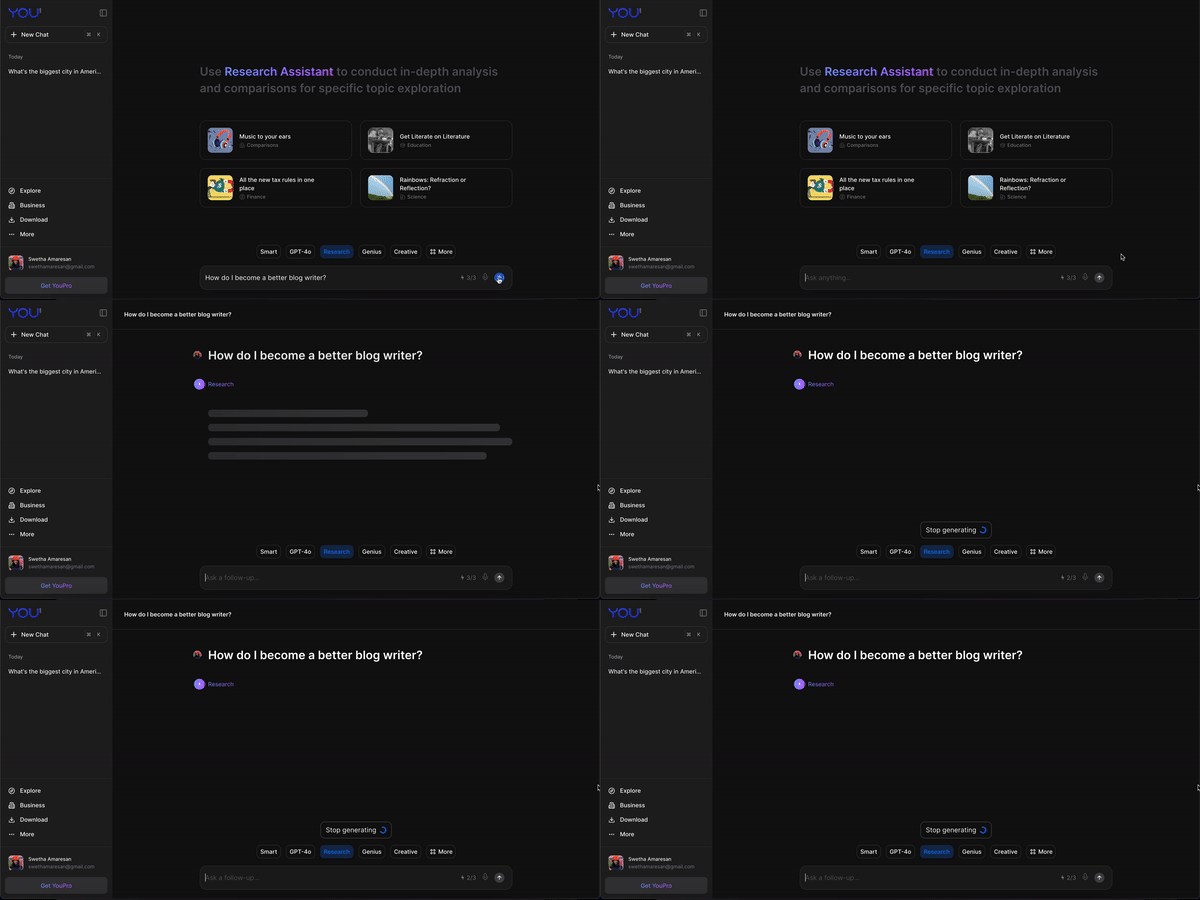
I used Research Assistant for my second question since it’s a bit more complex and can be explored more deeply.

Search results from searching “How do I become a better blog writer?” in Research Assistant.

What I Like

  • You.com’s four AI Assistants are extremely intuitive and understand their specific search mode well. It makes perfect sense what kinds of questions, topics, and prompts to search in each of the four Assistants.
  • This is the right option for any dedicated AI fanatics, as you can explore most industry-leading AI models in one place.
  • The Research Assistant is my favorite feature. I love that You.com shows exactly where it’s searching for the information, which offers me more understanding and patience while waiting for my search results to load.
  • I found my search results for “How do I become a better blog writer?” to be the most detailed and informative on this search engine.

What Needs Improvement

  • It’s not as intuitive for new users. With so many modes, Assistants, and models, it may take some time to figure out your groove and your preferred searching methods.
  • You only get three free premium queries per day, which includes any searches outside of Smart Assistant.

Pricing

  • Free plan: $0
  • YouPro plan: $20/month (or $15/month when billed annually)
  • Organizations plan: Contact the You.com team for pricing.

7. Yep

SEO Tool Ahrefs launched Yep, an AI search engine that mimics the format of a standard search engine with a unique, funky look and coloring.

Yep homepage with a search bar and note that using Yep helps pay your favorite content creators.

What sets Yep apart is that it shares 90% of its ad revenue with content creators in an effort to support high-quality content. Yep offers an unbiased, private search experience that encourages and financially supports the minds behind the content.

Outside of its positive mission, Yep looks and feels similar to Google when conducting searches. You can search any query and filter by All results, Images, or News.

Search results for “What’s the biggest city in America?”, filtering for “All” results.

You can also use the “Chat” feature on the top right-hand side if you’d prefer an AI-generated response.

Chat response to “What’s the biggest city in America?”

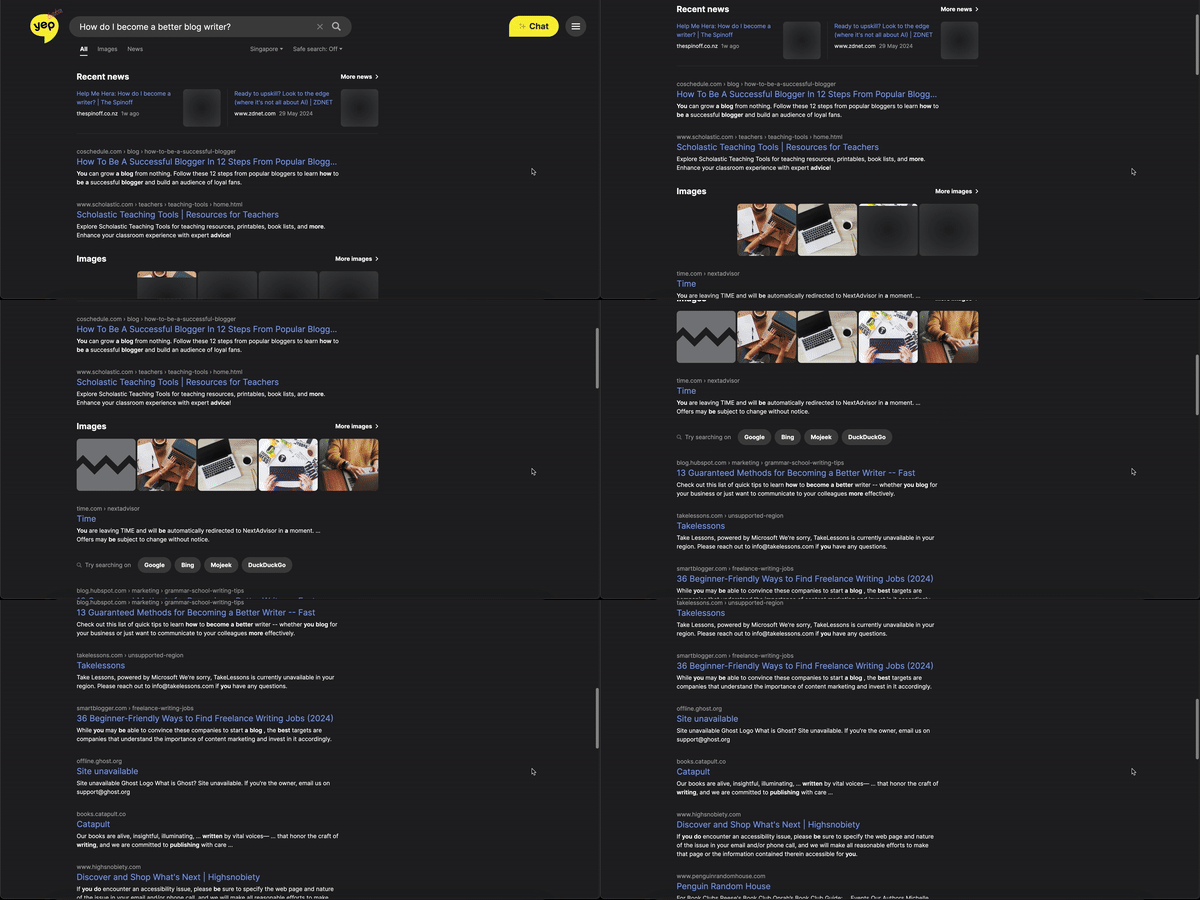
I searched my second question to see how it fared on Yep.

Search results from searching “How do I become a better blog writer?”

What I Like

  • Yep is the most like a traditional browser, but without any ads. I’m so used to scrolling through sponsored URLs on Google, that it’s refreshing to only receive links in order of how applicable they are to my question.
  • You can toggle between search browser and chat to maximize the best of an AI search engine and chatbot in one tool.
  • The UI is super easy to follow and learn, which is helpful for someone like me who isn’t always the most patient at learning a completely new version of a tool I already use daily.
  • The bonus of Yep’s mission to support high-quality, authentic content makes you feel good about using it as your main AI search engine.
  • If you like Yep, you can make it your default browser.

What Needs Improvement

  • While I appreciate its simplicity, it could do with a few additional features to create a more well-rounded experience. It’s still in beta mode, so I expect more updates to come, but it’s not yet on par with other options on this list.
  • It doesn’t have access to the breadth of information that Google or Bing (or even other search engines on this list) do, since I only received a handful of relevant URLs to both my questions. However, Yep is powered by two web crawlers (YepBot and AhrefsBot), so it has the potential to improve its knowledge base with time.
  • The AI chat feature doesn’t cite its sources, which has been something I’ve come to expect based on other search engines on this list.

Pricing

  • I couldn’t find information about pricing, which may indicate it only has a free plan (for now).

Where There’s A Will, There’s A(I) Way

As a marketer, I’ve realized the importance of practicing what I preach. I can’t promote a product if I don’t believe in its mission and use it — if applicable. After all, I do work for Nickelodeon and can’t say I consume kids’ television daily.

That’s why it’s important to believe in the efficiency and efficacy of the search engine you’re using, so you can best integrate it into your search engine marketing strategy.

I now see the value of AI search engines, especially Perplexity and You.com, and will absolutely incorporate these into my day-to-day as a user and marketer.

There’s no need to waste precious time explaining your queries and coaxing appropriate responses out of your browser. I was amazed by how easily I received answers to my two test questions on each of the above seven search engines when I usually would have needed to read a few articles to ensure correctness.

For those wary about AI’s impact on society, you can see how beneficial it can be for marketers and users in streamlining our work, weeding out the noise, and creating more meaningful, relevant experiences.

New call-to-action

Categories B2B

I Tried 5 AI Logo Generators. Here’s My Favorite

Welcome to “I Tried…,” the series where I try different marketing tools and strategies so you don’t have to. In this series, I document my experience and let you know if a tool or strategy is worth your time.

Get Started with HubSpot's AI Campaign Assistant

AI and marketing are becoming like peanut butter and jelly—inseparable.

According to our complete guide to AI in digital marketing, 64% of marketing professionals say they use AI in some form in their jobs. Specifically, 38% say they use it in content creation.

With AI becoming so entrenched in marketing, I became curious about its use in one of the most defining aspects of marketing—brand logos!

After a quick Google search, I found 5 AI logo generators, and I tried them all to see which one is the best and whether I would recommend using AI logo generators at all.

Keep reading to learn what I found:

How I Tested AI Logo Generators

Testing these generators was pretty simple. I thought up a business called Eri’s Cat Cafe because if you know me, then you know I love cats—and I would definitely be the owner of an adorable cat cafe in another universe.

I then entered the name of my cafe into the generators and followed each step to create my logo. I also timed how long it took to generate the logos and took into consideration aesthetics and customization options.

By the end of this blog post, you’ll know which one is my favorite and if I would recommend using an AI logo generator for your organization or business.

5 AI Logo Generators

Here are the five AI logo generators I tested and my experiences with each.

1. Adobe Express Logo Maker (BETA)

Price: Free, but you must sign up for Adobe Express to download the logo.

Using Adobe Express Logo Maker is simple and fast. After entering my business name, industry, and slogan, I simply choose the style I want for my logo. I can choose between:

  • Elegant
  • Organic
  • Bold
  • Minimal

I chose Organic for my style. From there, Adobe displays various icons I can incorporate into my logo. I could have gone with a coffee-themed icon, but it’s a cat cafe, so I chose two adorable fluffy cats.

Once I chose my icon, I scrolled through various customizable sample logos before settling on one I liked.

Now, it’s time to design. The icon of my choice is incorporated into my logo, and I can move it around the page as I see fit. I can also move the text and change its font and size. By clicking the color tab, I can cycle through different color palettes until I find one I like.

Then, bam! I have my logo. Adobe Express’ Logo Maker is free; however, you must have an account to download your creation.

Pros: Adobe Express’ Logo Maker is simple, user-friendly, and fast. I timed how long it took to design my logo, which only took 2 minutes and 10 seconds.

Cons: The AI logo generator has limited customization capabilities and icons. Therefore, it‘s difficult to really tailor your creation to make it as unique as possible for your brand.

You’re also only allowed to choose one industry for your logo, which can pose a problem if your organization fits into multiple industries.

For example, my fake cat cafe would occupy the restaurant business, as well as pet adoption or animal rental. When creating my logo, I had to choose between an image that emphasized the cat aspect of my business or the restaurant aspect.

2. Designs AI

Price: $49 to download the logo or $19 monthly for a Designs AI subscription.

I start by entering my business name and industry into the prompts. Then, I choose a logo category that suits me. Essentially, the category determines the logo‘s primary design focus, which can be an icon, initials, or the business’s name.

I love logos with unique icons, so I clicked the icon category. Then, though optional, I entered my company‘s slogan— “The purrrfect place to be.” I know, I’m so clever.

Now, it’s time to figure out my logo’s style. Designs AI presents users with various sample logo designs in different styles. Users can choose up to five to give the AI an idea of what style to incorporate into a logo.

After choosing a few, it‘s time to select a color. Purple is my favorite color, so let’s go with that.

From there, I get to my favorite part: choosing the symbols! This part ranks Designs AI a bit higher than Adobe Express, in my opinion, because I can select multiple symbols that capture different aspects of my business.

However, whichever logo I pick will only incorporate one of the five symbols. From there, I make a few more stylistic choices and in just a moment I have my logo. 

You can watch my progress by clicking through the photo gallery below.

Pros: Generating a logo with Designs AI only took exactly 3 minutes. It took a little longer than Adobe Express because it has more icons and symbols for me to choose from and slightly more thorough customization options.

I also like that it allows you to download high-quality files of your logo without subscribing, though you still have to pay a one-time fee of $49.

Cons: By now, I have a good idea of the caveat behind using AI logo generators—their customization options are limiting. Thus, it’s hard to create a logo that is truly unique to your brand. And the same goes for Designs AI.

3. Wix

Price: You must subscribe to Wix to download high-quality images of your logo, but you can download it in low resolution for free. Wix subscription plans start as low as $9.59 per month.

My favorite feature of Wix‘s logo generator is its optional chatbot.

The platform allows users to design their logos from scratch using steps similar to those of the previous two AI logo generators, or they can explain their ideas to Wix’s AI logo chatbot.

You can scroll through the images below to see how the chatbot helped design my logo. With the chatbot, it took a little less than 2 minutes to generate my logo.

The results were similar, but I enjoyed the chatbot because it suggested symbols and color schemes I hadn’t considered when I designed my logo manually.

Designing the logo on my own was a similar experience to previous generators, so it wasn’t much to write about. That said, I liked the color scheme and logo I chose a bit better than the chatbots. I even found a cat cafe-themed symbol!

You can click through the images below to see how it works. Without the chatbot, it took about 3 minutes to generate my logo. 

Pros: Both methods generated quick results, and I spent no more than a few minutes using each.

Cons: You can download your logo for free, but it is of poor quality unless you pay for a subscription.

4. Looka

Price: $20 for low-resolution files of your logo to $129 a year for a brand kit with high-quality resolutions.

At this point, I realize that most AI logo generators work the same. With Looka, and almost all other generators on this list, you do the following to generate your logo:

  • Enter your business name
  • Select a style or inspo for your logo
  • Choose your symbols and icons to incorporate
  • Add your slogan
  • Pick a generated image to tweak or customize

However, one thing I enjoyed most about Looka was that it has icons of a cat cafe! That’s right. I found icons that encompass both cats and coffee!

So that’s a win. Oh yeah, and I generated my logo in 2 minutes and 30 seconds.

Pros: It has more variety in icons and symbols, at least when it comes to my cat cafe. Looka also provides a comprehensive brand kit (more on that later).

Cons: It works about the same as other generators and has limited customization options.

5. LOGO.com

Price: Free

LOGO.com’s design process differs slightly from that of others on this list. Instead of choosing at least one symbol to include in my logo, I instead must enter keywords. Then, LOGO.com will generate logos based on those keywords.

Naturally, most of the logos generated include some type of cat or coffee symbol. After selecting the logo I want to customize, I can click the icons tab and choose other symbols by typing in keywords. The whole thing took 2 minutes flat. 

Pros: The generator is simple, intuitive, and fast. I can also download a zip file of my logo and its components for free.

Cons: Though I can enter multiple keywords, I can still only choose one type of symbol for my logo.

My Favorite AI Logo Generator

Overall, all these generators work about the same, so it‘s hard to choose my favorite. However, if I had to recommend only one of these, I’d suggest Looka mainly for its brand kit.

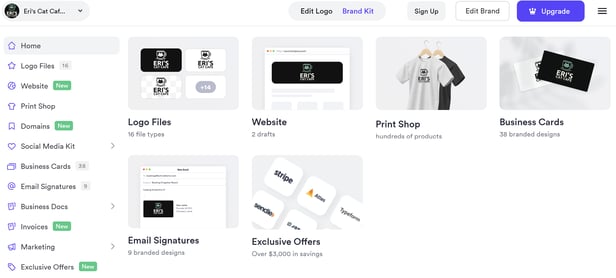
For $129, Looka creates an entire brand kit around your logo.

Its brand kit includes 16 downloaded file types for your logo, 2 website drafts, hundreds of products for your logo to be printed on (stickers, mugs, T-shirts, etc.), business cards, email signatures, and more!

Looka Brand KitImage search

Should your business use an AI logo generator?

If you‘re really committed to using an AI logo generator to save time or money, then I suggest Looka. However, I don’t recommend using an AI logo generator for your logo beyond brainstorming.

Your logo is supposed to be a unique symbol for your brand. When people see your logo, they should automatically connect it to your business because it‘s one of a kind.

For example, when you see the golden M against a red background, you automatically think, “McDonald’s.”

This experiment shows that most AI logo generators work similarly and generate similar results.

If you want a logo that is truly unique to your brand and can‘t be found anywhere else, it’s best to design one from scratch or work with a graphic designer with a keen eye for style.

That said, I can see using an AI log generator to brainstorm concept art for your logo and bringing these images to a designer who can put their own spin on the designs and create something special that makes your brand stand out.

What other marketing tools or methods would you like me to try? Feel free to contact me on X or LinkedIn to let me know what I should try next!

campaign-assistant

Categories B2B

How Video Consumption Is Changing in 2024 [New Research]

Video continuously evolves as an impactful form of marketing – and now is considered more important to consumers now than ever.

Download Now: Free Video Marketing Trends Report

If consumer connection and engagement are your goals, you must stay on top of video consumption trends.

Our annual State of Video Marketing survey with Wistia shows that video plays have increased for businesses of all sizes. Small- to medium-sized businesses increased plays by 13%, and large businesses increased plays by 5%.

Here, I’ll highlight seven research-backed ways video consumption habits are changing and how marketers can respond strategically.

In this article:

Online Video Consumption Statistics Marketers Should Know

As video continues to be integral to marketing strategies, marketers should keep the following statistics in mind:

Video Consumption Trends

From video length to what attracts viewers — here‘s what’s changing for video consumption in 2024.

1. Consumers increasingly rely on marketing videos from brands.

In the past, consumers would visit websites, look at online reviews, watch commercials, and maybe watch a few YouTube videos to learn about a product.

Now, with video accessible on every major social media network, they are learning to rely more heavily on this type of content in their research phase.

According to HubSpot research, 62% of consumers have watched video content (i.e., product demos, reviews, FAQs, unboxings, etc.) to learn about a brand or product.

In the latest Consumer Trends Report, HubSpot surveyed more than 700 consumers, and 37% prefer to discover products through short-form videos (such as TikTik’s or Instagram reels), 8% prefer long-form video, and 17% favor the video livestream.

The trend is clear: In 2024, consumers increasingly expect to see brand video content. Why?

Videos allow consumers to know how a product or service works, discover any flaws before purchasing the item and identify perks they might not have learned in the text-based description.

2. Conversions are made directly within the video.

Considering consumers are watching and relying on brand videos, failing to optimize your video for conversion is a missed opportunity. Conversions can be encouraged within videos using annotations, CTAs, or forms.

chart of top conversation opportunities and rates rom wistia and hubspot state of video survey

Image Source

A Wistia survey, which includes HubSpot insights, found that conversions are best placed at the end of videos for shorter form videos (less than one minute to five minutes long), but longer form videos, those over five minutes, benefit from a CTA placement early in the video.

Interestingly, videos at sixty minutes or more have the highest conversion rate at 24% when the CTA is placed at the end.

Video conversion is a video consumption trend to consider in 2024; the table shows where users are most likely to convert.

Image Source

Jack Brodie, managing director and video producer at Colada Creative, is finding conversion success through an innovative and interactive video format.

Brodie says, “This innovative video format is already used by brands like Nike, IKEA, Porsche, and more. We‘re using it with our clients, and we’re positive that businesses large and small shouldn’t sleep on interactive video.”

Brodie expects interactive video to have as much as five times more engagement and 30% higher conversions.

“Ecommerce brands can make their products literally purchasable within the video, and this leads to a 41% increase in products added to cart. The immersive nature of interactive video means consumers spend as much as 47% more time watching and engaging with the video,” Brodie recommends.

3. Brands must create relatable and authentic content.

Authentic and relatable content is a must. Our most recent survey found that 38% of consumers found that relatable content was more memorable.

Additionally, when it comes to social media content, consumers prefer to see relatable and authentic videos (63%) over polished and high-production-value videos (37%).

Even if you‘re creating informative marketing videos, bring in your brand’s authenticity and relate to your consumer.

Tristan Harris, demand generation senior marketing manager at Thrive Digital Marketing Agency, experimented with relatable and authentic video in social media content.

Harris notes there is a significant following for reels and live videos, with the value it puts on authenticity and even immediacy. Then, there are personalized videos, which cater to the preferences of specifically identified market segments.

“Short-form videos also have their share of popularity. We tried to integrate this format for thought leadership here. The insights and feedback indicated that this is how our audience wants to learn now,” Harris says.

Harris emphasizes that the audience will remain engaged in high-quality content that is both informative and entertaining: “The storytelling and production should be given good thought as well to ensure that this meets the expectations of your target viewers.”

screenshot from Thrive short-form video on linkedin

Image Source

4. Consumers prefer shorter videos.

Thanks to the rise of TikTok — and the wave of short-form content that followed — consumers are seeking quick, snappy videos. Specifically, videos under three minutes fall into a sweet spot.

If you’re new to video, starting with short-form videos can help you get your feet wet — and tell you what resonates with your audience.

You also need to set the right pace for your video content. Before you put a marketing video online, re-watch it from the point-of-view of a somewhat busy consumer. Then, ask yourself, “Does this video quickly pull viewers into the action and keep their attention?”

If you‘re worried that parts of your video seem dull, shorten it. But, if your team thinks it’s entertaining or informative the entire time, you can experiment with publishing your longer-form video and learning from its results.

Daniel Anderson, founder and editor at The Money Maniac, discovered that “Short-form videos can help improve your content’s accessibility and reach. Once I started publishing videos that section a blog post into engaging parts, it also improved our website traffic and monthly visits by up to 70% and has been consistent ever since.”

It’s worth noting that Anderson is repurposing content by adding engaging media to blog sections. This type of repurposing can save marketers a lot of time.

The key to repurposing is a) understanding your content architecture and b) organization.

HubSpot’s Content Hub will improve your ability to repurpose using AI to help you turn existing content into various video formats.

With Content Hub, you can record and embed video content on your website and across marketing channels such as emails. Plus, Content Hub’s AI will do some of the thinking and organizing for you.

The AI can generate titles and find repurposing opportunities.

Video Consumption Trends by Demographic

Naturally, different demographics think about and interact with video differently. This next section looks at video consumption trends by demographic.

1. Video Sharing on Social Media

Video marketing on social media is likely to increase brand visibility and encourage user engagement through sharing.

pie chart of percentages of people who use which social media platforms for sharing images and video

HubSpot surveyed over 700 consumers, and every social media platform was used to varying degrees for video sharing. Facebook came up top, with 40% of users prioritizing sharing videos and images on the platform.

Surprisingly, video-led platforms like YouTube, Twitch, and BeReal were used less for video sharing, but of course, these platforms are also used for video consumption.

Before posting a video to earn impressions and shares, you might want to create relatable content. Then, consider your demographic and where they will most likely share videos.

The stats from our recent survey tell us that all demographics share content on select social media channels (Snapchat, Pinterest, Instagram, Lemon8, LinkedIn, Tumblr, Twitch, Reddit, Twitter, TikTok, Facebook, and YouTube).

There are a few exceptions:

  • Gen Z and Boomers do not share videos on LinkedIn at all.
  • Gen X and Boomer do not share videos on Lemon8 at all.

Here are the stats by platform and demographic.

Facebook

Of over 700 users surveyed, 40% use Facebook to share videos.

The data by demographic:

  • Gen Z 27%
  • Millennials 34%
  • Gen X 40%
  • Boomers 44%

YouTube

Of over 700 users surveyed, 14% use YouTube to share videos.

The data by demographic:

  • Gen Z 25%
  • Millennials 17%
  • Gen X 14%
  • Boomers 9%

Instagram

Of over 700 users surveyed, 29% use Instagram to share videos.

The data by demographic:

  • Gen Z 27%
  • Millennials 27%
  • Gen X 34%
  • Boomers 21%

TikTok

Of over 700 users surveyed, 15% use TikTok to share videos.

The data by demographic:

  • Gen Z 19%
  • Millennials 14%
  • Gen X 20%
  • Boomers 2%

Twitter

Of over 700 users surveyed, 17% use Twitter to share videos.

The data by demographic:

  • Gen Z 32%
  • Millennials 19%
  • Gen X 14%
  • Boomers 12%

Reddit

Of over 700 users surveyed, 13% use Reddit to share videos.

The data by demographic:

  • Gen Z 10%
  • Millennials 19%
  • Gen X 12%
  • Boomers 8%

LinkedIn

Of over 700 users surveyed, 7% use LinkedIn to share videos.

The data by demographic:

  • Gen Z 0%
  • Millennials 17%
  • Gen X 8%
  • Boomers 0%

Tumblr

Of over 700 users surveyed, 23% use Tumblr to share videos.

The data by demographic:

  • Gen Z 33%
  • Millennials 29%
  • Gen X 13%
  • Boomers 0%

Twitch

Of over 700 users surveyed, 18% use SnapChat to share videos.

The data by demographic:

  • Gen Z 29%
  • Millennials 23%
  • Gen X 10%
  • Boomers 14%

SnapChat

Of over 700 users surveyed, 29% use SnapChat to share videos.

The data by demographic:

  • Gen Z 18%
  • Millennials 28%
  • Gen X 35%
  • Boomers 33%

Pinterest

Of over 700 users surveyed, 14% use Pinterest to share videos.

The data by demographic:

  • Gen Z 22%
  • Millennials 13%
  • Gen X 15%
  • Boomers 10%

Lemon8

Of over 700 users surveyed, 28% use Lemon8 to share videos.

The data by demographic:

  • Gen Z 25%
  • Millennials 36%
  • Gen X 0%
  • Boomers 0%

Connor Gillivan, entrepreneur, owner, and CMO at TrioSEO, values video as a shareable asset on LinkedIn and X.

He says, “Video content has been one of my best-performing in the past year on LinkedIn and X, where I‘m most active. I’ve run tests where I post content with just an image versus a short video tutorial included, and the video content gets greater impressions and engagement each time.”

For social media specifically, Gillivan hypothesized and read that channels push video content more than others because there’s a high chance of keeping users on the channel for longer, as they watch the video content.

Some of Gillivan’s best videos have earned as many as 143,000, 95,000, and 82,000 impressions.

screenshot of gillivan video that was posted on linkedin

Image Source

2. Discovering New Products

As mentioned above, video is leading consumers to discover new products, and different demographics use video in different ways.

The table below shows the percentage of those who use video to discover new products and their favorable video type.

graph of demographic sets and which video type they use for discovery

Kevin Watts, president and founder at Raincross, has seen the conversion benefits that product video has on consumers.

He says, “Our strategy involves creating targeted, optimized content that speaks directly to viewers’ needs. For example, in the e-commerce sector, product demo videos have been crucial. Videos that clearly demonstrate the use of a product, emphasizing its benefits and ease of use, have led to an average increase of 30% in conversion rates.”

3. Production Quality and Demographics

As before, production quality is generally not as important as a brand creating content that is relatable and authentic, but it is true that demographics value production quality differently.

Gen Z is the only demographic to value video production quality (52%) over relatability and authenticity (48%).

Boomers significantly value relatability and authenticity (75%) over video production quality (25%).

For Gen X and Millennials, the differences are comparatively marginal. Gen X and Millennials both value relatability and authenticity (56%) over video production quality (46%).

Paul Chow, CTO and co-founder of 3DGearZone, credits editing with engagement. He says, “We’ve seen tremendous engagement with video content, particularly through our 3D printer review video podcast on YouTube). We found that viewers highly value high-quality editing.”

Crisp visuals, clear audio, and engaging cuts keep them hooked and wanting more. This translates to increased views, Chow says. In fact, his team is only seven episodes into a series and has reached thousands of views on YouTube, as seen from YouTube Studio.

The screenshot from 3DGearZone shows video engagements which is credited to the video consumption trend and preference for high production videos.

“We can see a higher number of visits to the website (we see it in our GA4 data), and ultimately, a deeper understanding of the 3D printing process for our audience,” Chow says.

Video software like Vidyard, Bonjoro, and TwentyThree makes it easy to record and send short video messages — like pitches, welcome videos, and more — to customers without needing a Hollywood budget.

Navigating Video in 2024

The video landscape is changing in favor of marketers who can adapt to new trends. Consumers prefer to learn about brands via video content and use it as a necessary tool in the information-gathering phase and even the buying phase of their buyer’s journey.

Video isn’t going anywhere but constantly expanding, changing, and evolving to fit new consumer needs and platforms.

As this content evolves with each new generation, marketers should continue researching video consumers’ interests and behaviors.

Editor’s note: This post was originally published in July 2020 and has been updated for comprehensiveness.

video-marketing-report

Categories B2B

Understanding the Impact of Google Consent Mode For Your Business in 2024

In a report from May 2023, Google states that “with Consent Mode in place, Air France’s visible conversions rose by 9% across Europe” after experiencing a 20% drop in conversions due to recent cookie guidance compliance.

Free Resource: Website Optimization Checklist [Download Now]

How can a company benefit from more accurate measurement as privacy regulations become increasingly strict? Consent Mode is the solution proposed by Google to continue providing valuable insights in a privacy-first digital world.

This guide has everything you need to know about Consent Mode, including what it is, why it should matter to website owners or advertisers, and how to activate it in no time. Let’s dive in.

Table of Contents

For visitors who do not grant their consent, companies are still able to get some crucial trends using existing data from consenting users. More on “how” later.

In a nutshell, we can say that Consent Mode helps advertisers, publishers, or website owners comply with the consent requirements set by data protection laws (like the GDPR) while still leveraging Google services (such as Analytics and Ads).

Who is Google Consent Mode for?

Consent Mode is a solution developed by Google for customers who use audience features for the following products:

  • Google Analytics
  • Google Ads
  • Floodlight
  • Conversion Linker

If you’re an advertiser, publisher, developer, or website owner with a presence in Europe, consent is usually required to carry out marketing activities. These include serving personalized ads or collecting analytics via trackers.

If that’s your case, I’d recommend looking into Consent Mode.

How does Google Consent Mode work?

Consent Mode strikes the perfect balance between respecting user privacy and collecting valuable data insights.

To respect user consent, it adjusts how Google tags behave based on the consent status for advertising or analytics trackers given on the website’s banner. When consent is denied, tags aren’t loaded and trackers aren’t used. No data is collected on the user.

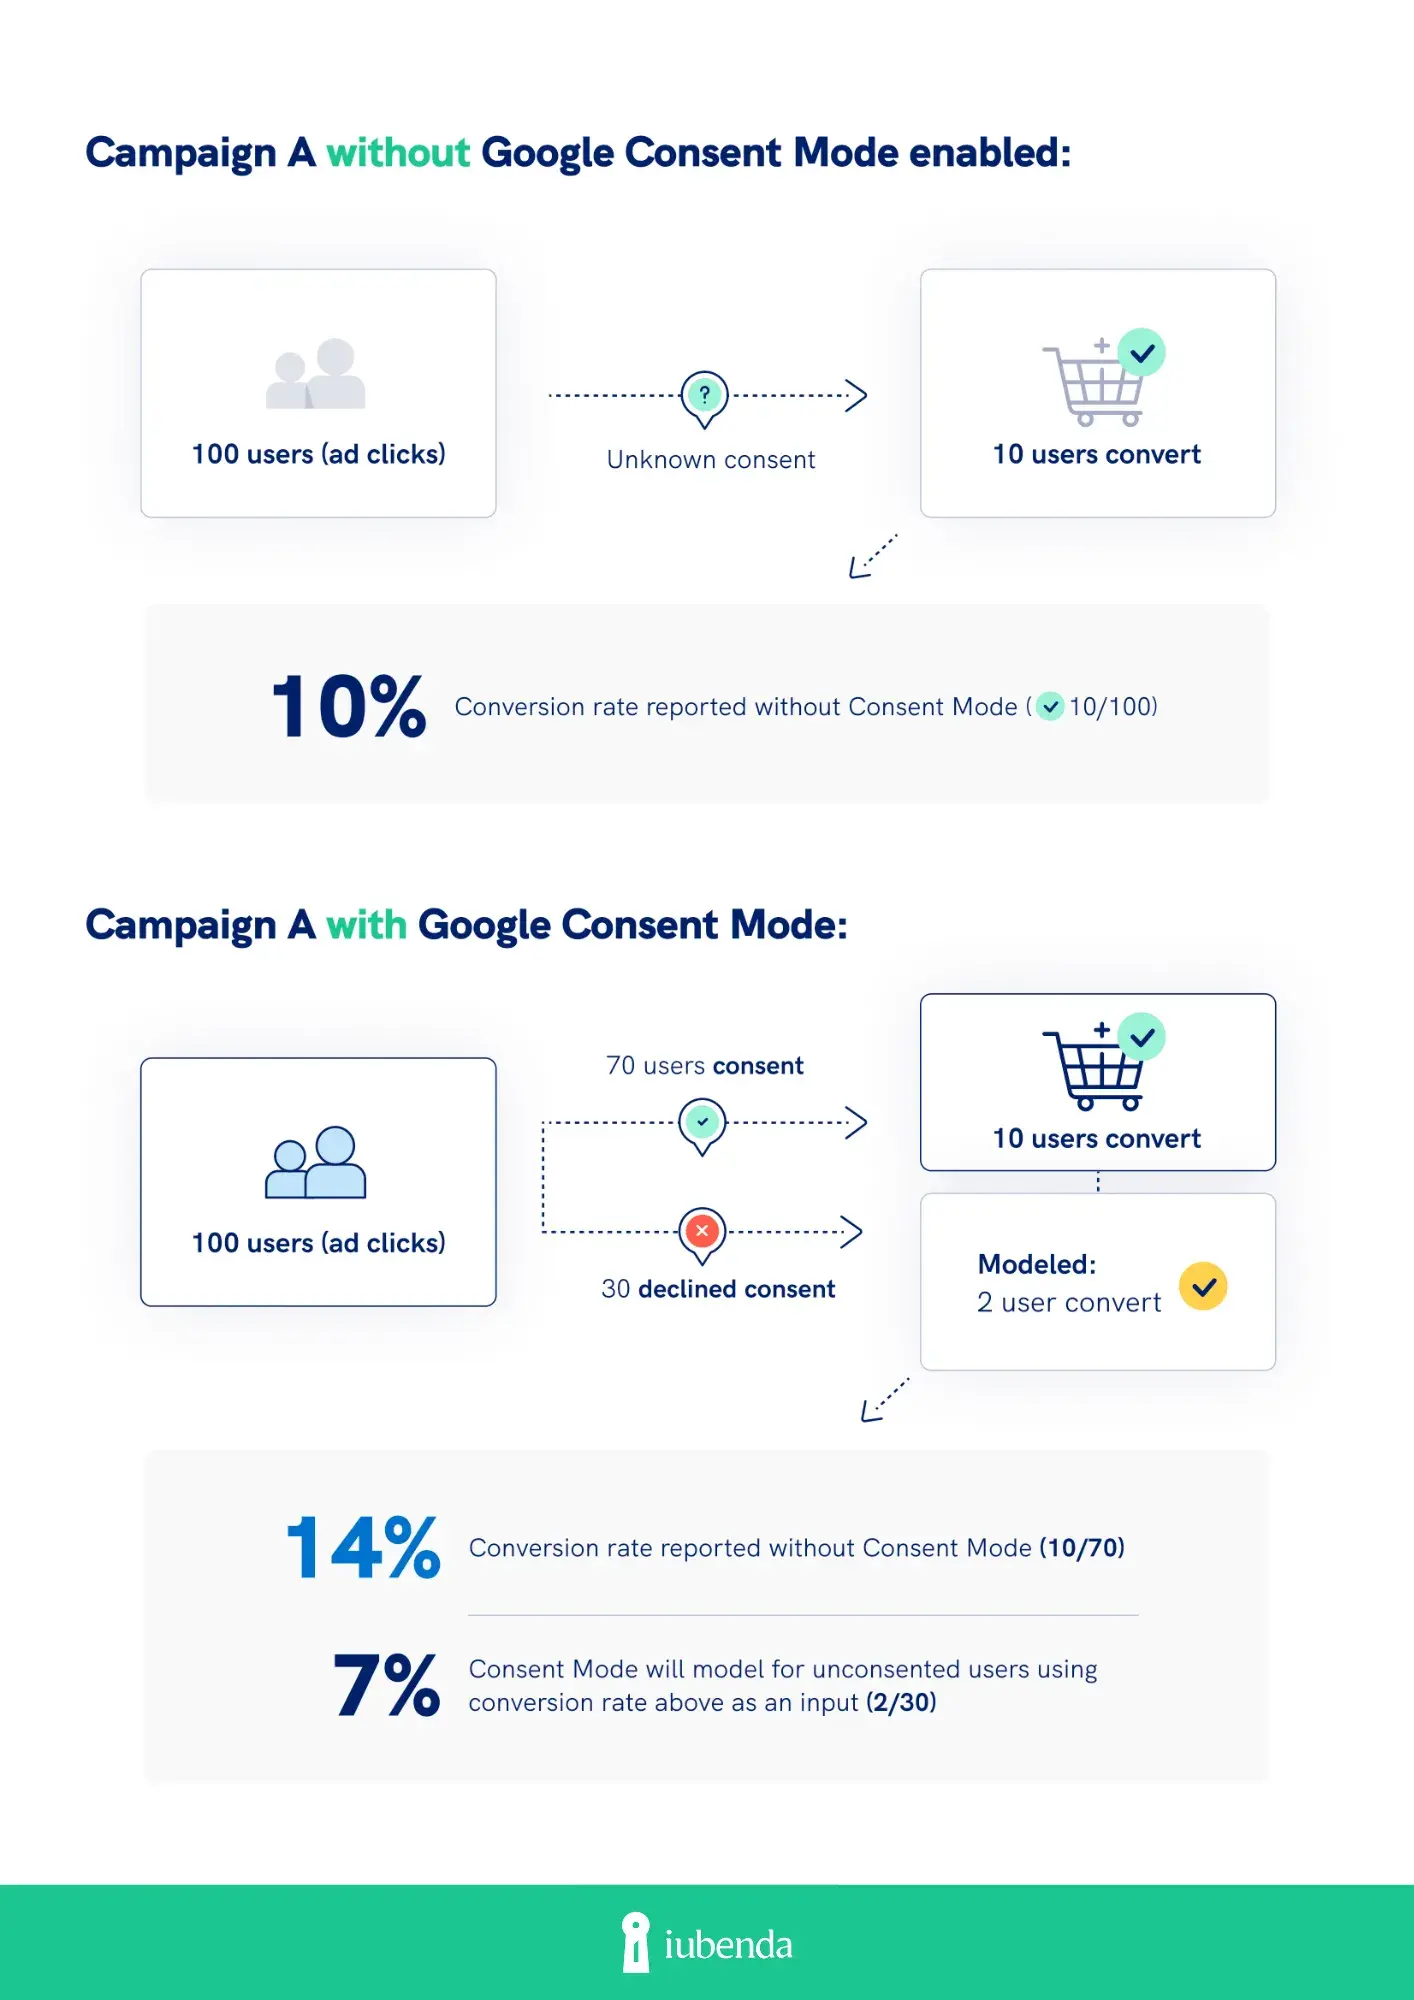
To add value for Google users, it uses a technology called conversion modeling to recover lost conversion data for users who didn’t consent and to get an improved view of performance.

More on Conversion Modeling

Without getting too much into the technical details, conversion modeling uses AI, probability, and machine learning to analyze observable data and trends from users who gave their consent.

It then models paths and quantifies the relationship between consented and unconsented users to report conversion data for all visitors.

The key takeaway here is that conversion modeling measures a significantly more accurate conversion rate without using any identifying information — so it doesn’t violate privacy.

conversion modeling comparison of a campaign with Google Consent Mode enabled vs without Google Consent Mode enabled

What are the benefits of Google Consent Mode?

Let’s start with a practical example.

Example: Volkswagen Belgium

This 2024 case study of Volkswagen Belgium is probably the best way to demonstrate the significant impact Google Consent Mode can have on your business.

As a car company, Volkswagen gathers data on potential car buyers through cookies to understand how they interact with their website.

This is crucial for them as “the more insights [they] have […], the more effective and efficient [their] campaigns can be.”

What they realized is that in the past years, users became more privacy-conscious. This led many to opt out of analytical cookies.

“For some brands, the consent acceptance rates dropped 20% in just two years,” cites the article. What did this mean? A loss of valuable data and a distorted view of reality since user activity could not be tracked.

They implemented Consent Mode and have been able to recover nearly all 20% of data lost from the drop in cookie acceptance.

In turn, this gave them a more accurate view of performance and helped with optimization, allocation, and ROI calculation of media campaigns.

Why Google Consent Mode Is Worth Using

Here are the reasons why I believe Consent Mode can become a game-changer for you:

  • With a legally-required consent banner in place on your site, users can deny consent to tracking.
  • For you, this means losing the opportunity to collect precious data on these users since you can’t track them.
  • This results in gaps in measurement and fewer insights from existing campaigns.
  • With Consent Mode activated, you respect user consent AND continue reporting conversions.
  • That means you’re learning more about your ad spend, and you can effectively attribute conversions to the right campaigns.
  • You can also leverage bids better, reallocate budget to your best-performing campaigns, or target specific audiences.

The bottom line: Google Consent Mode can allow you to better optimize your marketing efforts and boost your revenue.

How To Activate Google Consent Mode

There are various ways to implement Consent Mode, some more technical than others. That’s why I’ve decided to focus on the one method that was recommended by Google in their main user guide.

Best Practice: Use a Consent Management Platform.

A Consent Management Platform (CMP) is a software solution designed to collect, store and manage user consent for specific data collection activities (i.e., analytics, advertising, retargeting) via a consent banner on a website or app.

To simplify the Consent Mode activation process, Google has specifically selected a list of CMP Partners that can support this.

These Google-certified CMPs can help you install a banner on your website with Consent Mode built in. Some leading tools include iubenda, Didomi, consentmanager, or Osano.

These solutions are the key to a quick, simple, and reliable activation. They allow for a full banner customization that complies with major consent regulations like the GDPR and Cookie Law, as well as Google’s EUUCP policy.

When using a CMP, Consent Mode is usually enabled by default. It can also be configured via Google Tag Manager.

New Implications for 2024: Google Consent Mode Version Two

Initially introduced in 2020, Google Consent Mode was revised at a pivotal moment in the digital industry.

With a growing need for transparency and fairness online, the enforcement of a new EU law called the Digital Markets Act, and the new opportunities provided by AI, Google introduced an updated version of Consent Mode in March 2024.

What’s New in V2

The solution now runs with two new tags for better control and respect of user consent. This makes four in total:

  • analytics_storage: cookies installed for analytics purposes
  • ad_storage: cookies installed for advertising purposes
  • [New in V2] ad_personalization: defining whether personalized advertising can be enabled (e.g., for remarketing)
  • [New in V2] ad_user_data: defining whether user data can be sent to Google for advertising purposes

Now, Google also offers two levels of implementation to choose from when consent is denied:

  • Basic: Relevant tags stay entirely blocked, and no user data is collected.
  • Advanced: Relevant tags adjust their behavior, and conversion data is recovered through modeling.

The Latest Requirements

Consent Mode version two came along with new requirements for Google users in an effort to meet higher standards for consent throughout 2024.

Starting March 2024, you must do the following to keep using audience measurement and personalization features for European users within Google services:

You need to set up Consent Mode on your website to carry out activities like remarketing and conversion tracking in Google Ads and Google Analytics in Europe. If not, your access to these features will be limited.

What happens if you don’t implement Google Consent Mode?

Advertisers who don’t use Consent Mode will lose the ability to capture new European users in audience lists within Google products. In other words, you won’t be able to use audience functionalities for users in this region.

This is likely crucial to your marketing strategy and your overall performance, whether you’re serving ads or collecting analytics on your website.

You’ll also miss out on invaluable data that could be reported using conversion modeling for users who reject consent on your banner. Wouldn’t you want a more accurate view of your performance while respecting user consent?

Preserve and Enhance Your Marketing Efforts with Google Consent Mode

If you use Google services, like Google Ads or Google Analytics, it’s in your best interest to activate Consent Mode.

In fact, the release of Consent Mode version two and its new requirements have made waves in the advertising industry. This makes it major news for Google users.

As mentioned throughout this guide, its impact is a no brainer. Without it, you could lose access to audience features and miss out on valuable insights for informed decision-making.

While it is mandatory when targeting European users, every website owner, publisher, or advertiser should consider using Consent Mode.

It not only ensures compliance with privacy laws and Google’s latest requirements — it provides a more accurate view of marketing performance.

New Call-to-action

Categories B2B

Target Audience: My Tips for Finding the Perfect Fit [+ 5 Campaign Examples]

Recently, I noticed that every time I Google a product or service I want to buy — let’s say, available apartments for rent — I start getting ads on Instagram and Facebook from several companies offering this service.

→ Download Now: Market Research Templates [Free Kit]

I’m sure you can relate, too! This happens because we are those companies’ target audience.

Every product and service has a target audience, no matter how niche. And the only way a company can sell its product is if it caters its marketing strategy to its target audience.

Understanding target audiences is key to the success of any marketing campaign because consumers will feel as if they connect with your brand.

If you‘re unsure how to find your target audience, here’s what you need to know.

Table of Contents

They are also used to define the buyer persona of a business, as well.

Buyer personas are a representative overview of a business’s ideal customer drawn from data that makes up a target audience.

Some of these demographics and behavior areas are:

  • Location
  • Age
  • Gender
  • Employment
  • Income

This information helps understand customers and how they make purchase decisions. Targeting a specific audience will help your campaigns reach the people who will relate most to your company’s message and products.

Always make sure to understand the difference between target audience and target market. While similar, their difference is critical for marketers.

Essentially, you can describe your target market by finding your target audience. If a target market were “marketers aged 25-35,” the target audience would be “marketers living in Boston, Massachusetts aged 25-35.”

Types of Target Audience

When we talk about types of target audiences, we‘re talking about more ways to define who you’re creating a campaign for. You can segment your audience into groups or define them further using categories such as:

Demographics

Demographic segmentation divides a market into smaller categories based on variable characteristics such as age, race, gender, marital status, income, education, and nationality.

This method is one of the most common ways to define a target audience because it’s easy to acquire the data you need through censuses, market surveys, and analytical tools.

Each demographic factor can significantly influence consumer behavior and product preferences. For example:

  • Age. Product preferences can vary significantly between different age groups. A digital app might be more popular among Gen Zers, while luxury cruises would likely appeal more to older retirees.
  • Gender. Marketing strategies might differ when targeting men or women, as they may have different preferences in areas such as fashion, beauty, or health products.
  • Income. Economic status influences buying power, which affects what kinds of products or services consumers can afford.

Purchase Intention

This refers to groups of people looking for a specific product and wanting to collect more information before doing so.

Some examples include consumers buying a new laptop, vehicle, clothing, or television. This data is necessary to see how you can better direct your messaging to your audience.

Lifestyle

This involves categorizing consumers according to their interests, activities, opinions, values, and overall lifestyle.

This classification is less straightforward than demographics because it deals with subjective internal characteristics that can be harder to measure.

Lifestyle often reflects how consumers see themselves and what they aspire to.

For example, whether someone frequently participates in travels, sports, or attends cultural events can influence what types of products and services they’re interested in.

Similarly, a consumer’s beliefs in areas like environmental consciousness, politics, or preferences for domestic products can affect their purchasing decisions.

Interests

This is data about what people are into, like hobbies. Knowing this data helps you connect with your audience in a relatable way and unearth buyer motivation and behaviors.

For example, when the weather is warmer and road racing season begins, consumers who enjoy road biking as a hobby are likely most interested in new road bikes in the spring.

For example, suppose you find many potential audiences interested in traveling. In that case, you can figure out how to use that message in your marketing campaign to appeal to more potential buyers.

Subculture

These are groups of people who identify with a shared experience. An example of this would be a specific music scene or genre of entertainment.

People define themselves by subcultures; companies can use those cultures to understand who they’re contacting.

An example of reaching a subculture is thinking of how it relates to your business, especially if you have a large potential audience.

For instance, Netflix markets to their subcultures, people who watch specific types of content, such as parents. They use social media accounts directed to those subcultures — like Netflix Family.

As you’ve probably guessed, coming up with a target audience involves some research, which goes into fleshing out who you want to reach and how you can get there in a way that stands out from competitors.

If you’re ready to find yours, follow these steps below.

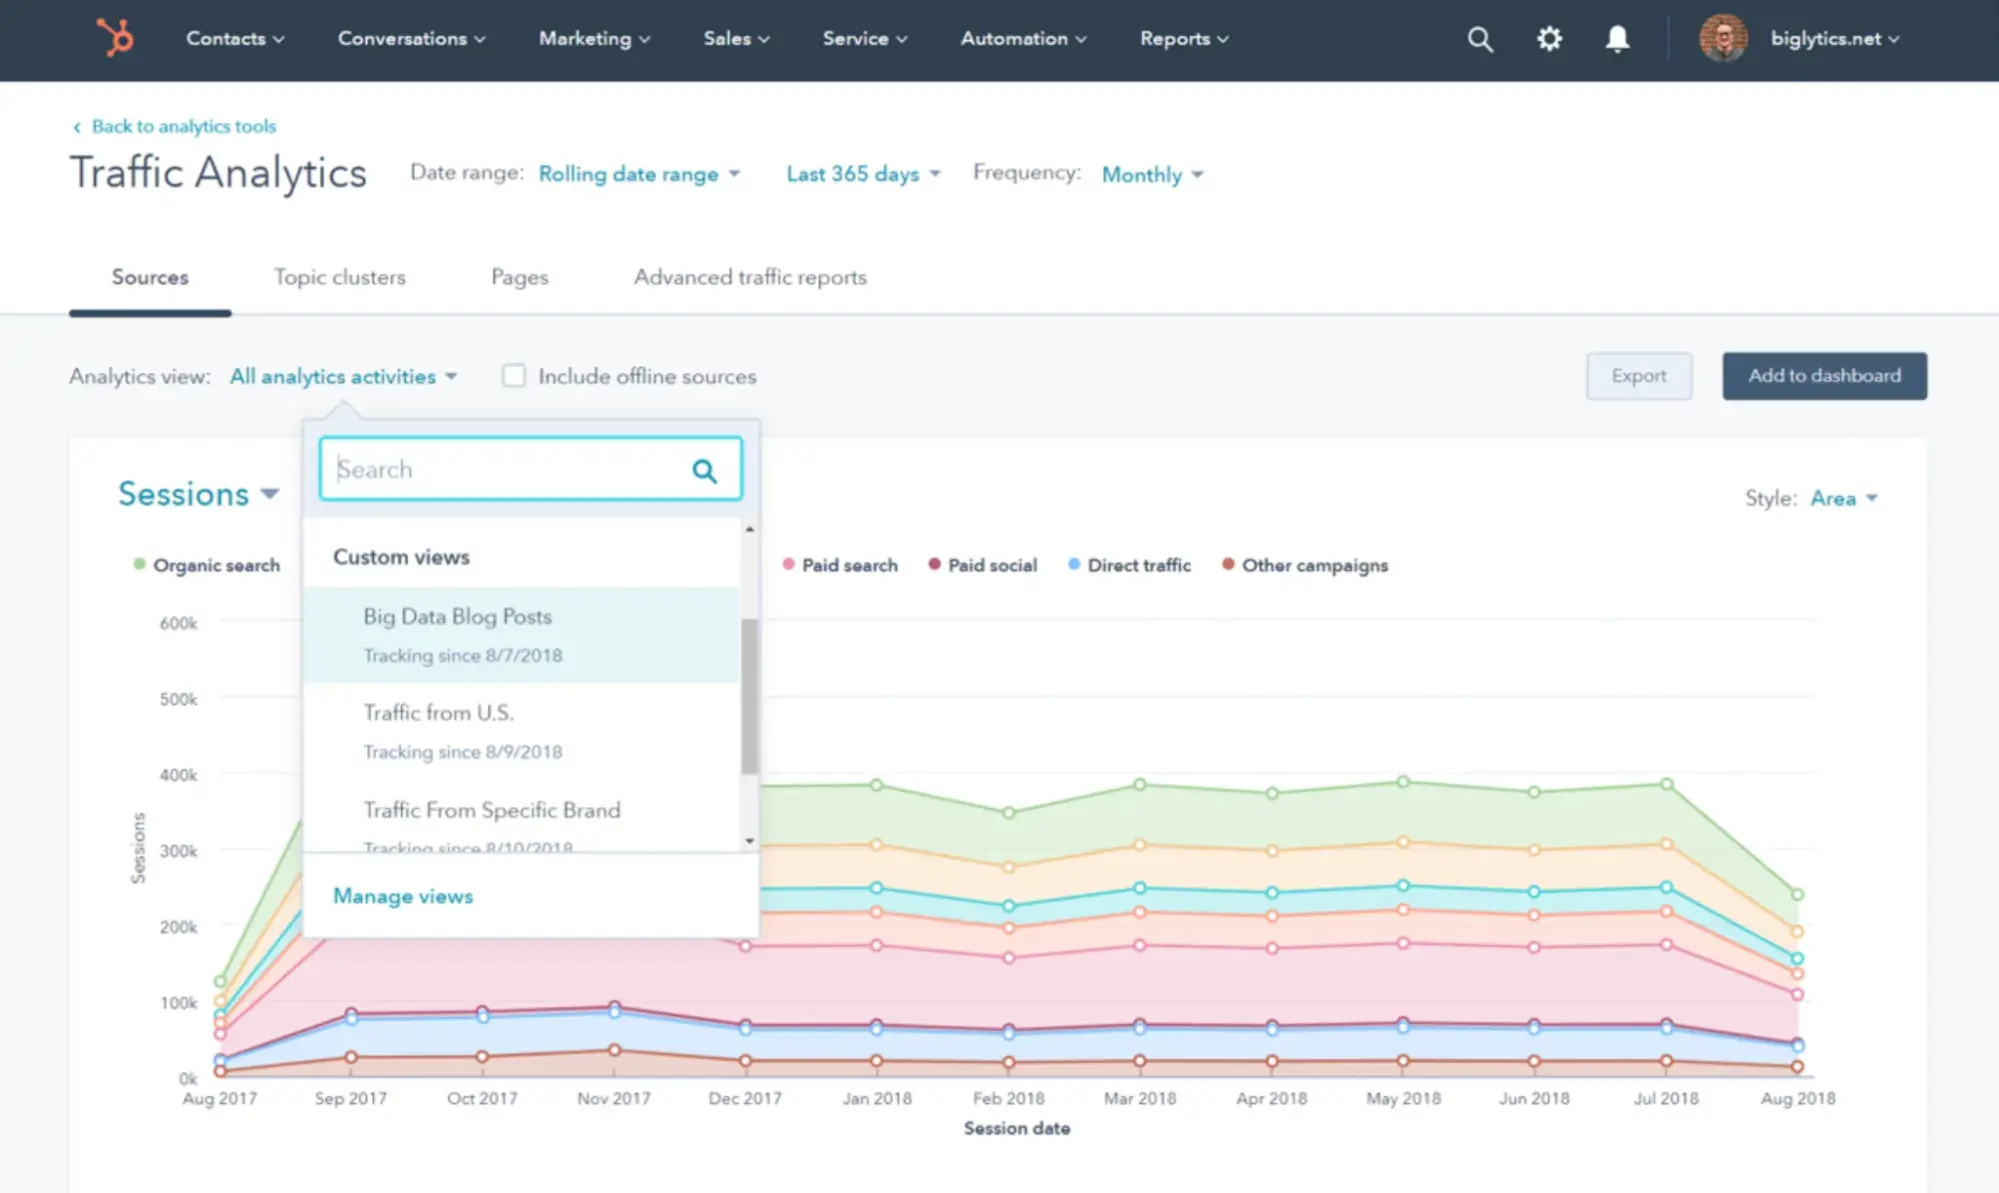
1. Use HubSpot Analytics to learn more about your customers.

According to HubSpot’s 2024 State of Marketing report, only 65% of marketers have high-quality data about their target audience, leaving 35% who don’t know their audience definitively.

If you don’t know enough about your target audience, HubSpot Analytics is an excellent tool for obtaining demographic details about them, as well as real-time analytics about your marketing campaign’s performance.

Here is some information you can find in the analytics dashboard.

Traffic Analytics

This tracks your website’s performance and other digital assets. It provides metrics like page views, unique visitors, bounce rates, and session duration.

You can also see your traffic sources (organic, direct, referrals, social media, etc.), which helps you understand which channels are driving the most engagement.

use hubspot traffic analytics to understand target audience

Conversion Analytics

HubSpot allows you to track how well your landing pages and other conversion tools are performing. This includes data on form submissions, lead conversions, and the effectiveness of different calls-to-action (CTAs).

You can also analyze the conversion paths to optimize the steps your visitors take from entering the site to becoming leads to becoming paid customers.

Campaign Analytics

HubSpot allows you to measure the performance of each marketing campaign you’re running. This includes impressions, clicks, conversions, sales, and ROI, helping you to gauge which campaigns are the most effective and why.

Custom Reports

HubSpot allows you to create custom reports that fit specific needs. You can pull together various data points from across marketing, sales, and service platforms to create comprehensive reports to meet your unique business requirements.

Pro tip: If you’re not using HubSpot analytics, you can connect your website to Google Analytics to find demographic data about your target audience, including their age, gender, interests, lifestyle, nationality, and more.

2. Create a reader persona to target blog content.

With reader personas, you‘ll never forget who you’re writing for. Your reader persona should be nearly identical to your buyer persona because your blog should contain content that will be useful for your readers.

For example, as a marketer and tech enthusiast, I’m always on the lookout for reputable blogs about digital media and technology trends.

The difference between a reader persona and a buyer persona is that a reader persona generally focuses on the challenges your persona might face. How can you write content that solves those challenges?

For example, if one of the challenges you’ve identified in your buyer persona is “Marketing Mario wants to find a solution to low ROI on ad spending,” you can use a reader persona to think of content surrounding helping that challenge.

Pro tip: If you’re unsure about the challenges your reader persona is facing, you can ask them using tools like polls, quizzes, surveys, or other forms of interactive content. Analyze the responses you receive and then create content to solve their pain points.

3. Look at social media analytics.

When are your followers most engaged with your social media channels?

Is it when you post a funny meme on Instagram or create a poll on Twitter?

By looking at these questions, you can get a couple of clues into what content your audience is interested in, thus filling in one of the parts needed to find a target audience.

Every social channel is different and has a diverse audience, so it’s essential to look at your analytics across all social platforms.

For example, as a Gen Z, I use Twitter (now X) more than I use Facebook, which is consistent with reports that Twitter tends to have a younger audience, while Facebook tends to have an older one.

On the same note, Twitter is based on short-form content; on Facebook, you can post long-form content and videos.

Instagram is a visually-based social media platform, so visually appealing content would thrive on the channel. Knowing these things, you can begin to plan your strategy accordingly.

Analytics can tell you who is looking at your profile. Moreover, they can tell you what’s working and not working content-wise. By posting content your audience is more interested in, you can gain followers in your target market.

Pro tip: Each social platform has unique features to help you reach and engage with your target audience. Instagram has Stories, Reels, and polls, and YouTube has Shorts. Use these features and check your analytics to see how well they’re working.

4. Use Facebook Insights.

If you have a Facebook page, Facebook Insights is precisely what you need. Facebook gives every page a vast set of insights for free.

These insights work similarly to Google Analytics — you’ll receive critical information required to create a target audience.

You can see who and from where your visitors are by accessing the People tab on your Insights dashboard.

Below is an example of how Facebook shows location demographics. It seems that the primary location is the East Coast, so it’s safe to say that part of the target audience for this page is located in cities on the East Coast.

use Facebook Insights to identify target audience

Other areas Facebook focuses on include interests and integrations with other social media platforms, like Twitter. The insights report tells your audience’s lifestyle, such as if they purchase items online.

Insights like these can help you far into your campaign planning, past finding a target audience, so it’s a valuable tool to check on now and then.

Pro tip: Use the detailed demographic information available on Facebook Insights to segment your audience and customize your marketing campaigns.

Tailor your content, messaging, and advertising strategies to match the characteristics and preferences of different audience segments.

For instance, if the insights reveal a significant portion of your audience is located on the East Coast, consider creating region-specific promotions or events.

5. Check up on website performance.

Monitor your website’s best and worst-performing content areas. Many of your target audience will use your website as their introduction to your company, so sprucing up what interests them is a great way to attract more members.

By looking at what blog posts or landing pages are captivating your audience, you can repurpose content that isn’t and promote the content that is.

For instance, if your blog post about email marketing was a hit with audiences, share it on your socials to expand your reach.

Pro tip: You may notice that some pages are doing better than others. While this can indicate that your readers are more interested in a certain topic, it’s also possible that they’re not finding the badly-performing pages on your site.

So, implement a streamlined navigation menu that prominently features your latest content and popular content so visitors can easily find them.

6. Engage with social media audiences.

Interacting with social media followers is so important because they‘re your audience. When you create your buyer persona, they’re the users you should look to. Remember to remember this step if you don’t have social media accounts yet.

Ask your followers what they want to see, and use tools like Instagram Stories and replies to get their response for how/what you’re doing.

Whatever engagement you get, positive or negative, can influence how you attract more audience members.

For example, try tweeting something that invites a CTA, like “Send us a picture of your favorite outfit to wear with our new hats!” This evokes a response, responses you can analyze the language of and imitate to grow your audience.

Pro tip: You can maximize engagement by incorporating user-generated content (UGC) into your social media strategy. When followers respond to your CTAs, like submitting pictures or comments, feature these contributions in your posts, Stories, or as part of a community highlight reel.

This signals to your audience that their input is valued, which enhances loyalty and attracts new followers.

Check out this example of how Stanley demonstrates engaging with social media audiences can help you build your audience.

1. Nike

Nike, the world’s largest supplier of athletic shoes and apparel and a major manufacturer of sports equipment, is a powerhouse at branding with its iconic Swoosh logo and its slogan “Just Do It.”

I believe that a huge part of Nike’s success is due to its ability to target the right audience via online platforms.

On Instagram, Nike showcases its products and lifestyle through visually compelling imagery and videos featuring athletes and influencers.

It also uses Instagram’s features like Stories and Reels to share content from brand partnerships and product launches.

This is effective because Nike’s target audience on Instagram is primarily young adults, athletes, and fitness enthusiasts who want to keep up with the brand.

Nike does a great job of speaking to their target audience

On LinkedIn, however, Nike’s audience consists mostly of business professionals, potential employees, and industry partners. So, the company shares posts about its corporate culture, sustainability efforts, charitable acts, and job openings.

It also publishes articles and updates on its corporate social responsibility initiatives and industry insights.

What I like: I like how Nike’s partnerships with different athletes across several sports not only allow these athletes to share their success stories but also target sports enthusiasts worldwide.

Instead of honing in on one sport, Nike reaches upcoming athletes across several disciplines globally by platforming their favorite star athletes.

2. Coca-Cola

Coca-Cola, the company that makes the beverage that I drink too much of, has clearly defined its target audience segments and creates content that caters to them.

Since it knows that Facebook is mainly used by millennials and older people, as opposed to Gen Zs, it posts family-friendly content, community stories, and nostalgic ads to its 109 million followers on the platform.

It also runs interactive campaigns and polls to engage a broad audience.

brand campaign from Coca-Cola

On Twitter (now X), Coca-Cola’s target audience shifts to younger, tech-savvy people, many of whom follow trends. So, it uses its Twitter profile for real-time marketing, trending topics, and customer service.

It posts stunningly shot videos that center sports teams, like the NFL, and artists like Jon Batiste, Camilo, and Cat Burns via Coke Studio. It also engages with its followers through hashtags, polls, quick updates, and responses to current events.

brand campaign on X from Coca-Cola

What I like: I like that Coca-Cola cleanly splits its target audience segments and uses Facebook and Twitter to reach them where they’re at. The audience on Facebook vastly differs from those on Twitter, yet Coca-Cola expertly creates content that resonates with both groups.

3. Sephora

Sephora is a French multinational retailer of personal care and beauty products. Featuring about 3,000 brands, along with its own label, Sephora sells beauty products, including cosmetics, skincare, body, fragrance, nail color, beauty tools, and haircare.

This means that its target audience is mostly beauty enthusiasts, makeup artists, and DIY beauty fans, many of whom are Gen Z.

Sephora targets these people through Instagram and YouTube.

On Instagram, the company focuses on sharing short (or sped-up) makeup tutorials, product showcases, and collaborations with influencers and celebrities like Simone Biles, Sydney Sweeney, and Mona Kattan, all of whom young people are familiar with.

The company uses Stories for behind-the-scenes content and Reels for quick beauty tips.

This is a smart move by Sephora, considering that short-form video is currently the best online content format, offering the highest ROI and will see the most growth in 2024.

Sephora uses short form video to reach target audience

On YouTube, Sephora moves from short-form videos to longer content, such as detailed makeup tutorials, skincare routines, and product reviews.

It collaborates with beauty influencers and founders like Olamide Olowe (Topicals), Lady Gaga (Haus Labs), and Diarrha N’Diaye (Ami Colé) for extensive product demonstrations.

Sephora uses Youtube videos to reach target audience

What I like: While Sephora’s target audience remains constant across all social platforms, I love how the company expertly uses each platform’s features to adapt its content to meet users’ expectations.

4. Red Bull

Red Bull is an energy drink originally based on a Thai drink called Krating Daeng, adapted to suit Western tastes.

The product, known for its distinctive slim silver can and its slogan, Red Bull gives you wings, is marketed globally as a drink that increases performance, concentration, and reaction speed, and enhances mental and physical vitality.

Red Bull takes a unique approach to marketing in that, instead of posting ads about the drinks it produces, it cultivates a strong presence in sports like Formula One racing, extreme sports, football, and eSports.

The brand is also known for its high-profile events, such as the Red Bull Air Race, Red Bull Crashed Ice, and music festivals.

On Instagram, Red Bull targets extreme sports fans, adventure seekers, and young adults by posting high-energy, visually stunning content featuring extreme sports, stunts, and events.

It also uses Stories and Reels to capture the brand’s adrenaline-pumping essence.

Red Bull targets extreme sports fans and adventure seekers on Instagram

Red Bull’s YouTube channel is an extension of its Instagram page, featuring longer videos of extreme sports events, documentaries, and athlete profiles.

What I like: Instead of going the regular route and posting beautiful videos of its products, Red Bull decided to engage in experiential advertising. Embedding itself into the world of extreme sports, Red Bull is able to use these athletes with otherworldly abilities as its representatives.

5. Patagonia

Patagonia is an American outdoor clothing company known for its commitment to environmental sustainability and ethical manufacturing practices.

While it originally began as a small company that made tools for climbers, Patagonia grew steadily due to its high-quality and durable products, as well as its activism on environmental and social issues.

Knowing that its target audience largely comprises outdoor enthusiasts and environmental activists, Patagonia uses Instagram to share stunning outdoor photography and videography, stories of adventure, and environmental activism.

Its content highlights sustainable practices and encourages followers to engage in conservation efforts.

how Patagonia reaches targets audience

On LinkedIn, Patagonia shares updates on its corporate social responsibility initiatives, sustainability reports, and company culture.

It also posts articles on environmental impact and business practices to inform people and attract like-minded professionals.

What I like: Patagonia knows that its audience doesn’t just comprise people who want to buy outdoor apparel; it also includes people who are passionate about the environment.

I love how the company’s online content caters to both groups of people equally. It gives its followers exciting outdoor activity ideas while spurring them to do something beneficial for the environment.

Identify Your Target Audience Like a Pro

I was able to see the ads from companies offering rentals because I embodied everything about their target audience, from demographics and purchase intentions to lifestyle and subculture.

Understanding your target audience gives you an idea of how to market to, engage with, and segment your customers.

If you’re having trouble identifying and defining your target audience, here’s a market research kit that can help you. Inside this kit, you’ll find an instructional guide, SWOT analysis template, survey template, focus group template, and more.

Whether you’re a new startup or a long-existing enterprise, this kit will help you conduct deep market research and competitive analysis to familiarize yourself with your prospective buyers.

Editor’s note: This post was originally published in January 2020 and has been updated for comprehensiveness.

New Call-to-action

Categories B2B

How I Write SMART Goals and Make Them a Reality [+ Free SMART Goal Templates]

When I started my career as a content writer, one of my biggest mistakes was underestimating the importance of systems and frameworks.

Download your free marketing goal-setting template here. 

Despite working tirelessly to achieve my goals of booking clients and expanding my skill set, I struggled to make meaningful progress.

Over time, I learned that while goals were important, a structured approach to setting and achieving them was vital. It wasn’t until I began using a SMART goal template that I saw real progress.

But what exactly is a SMART goal, and how does it differ from a regular goal? In this post, I’ll explain how to set SMART goals and walk you through four free templates to help you get started.

Table of Contents

What is a SMART goal?

The letters of SMART stand for:

  • Specific.
  • Measurable.
  • Attainable.
  • Relevant.
  • Time-bound.

The SMART acronym is a framework that will enable you to write goals that drive greater impact. Write goals with these aspects in mind, and you’ll be able to quantify how far you’ve come and how far you have left to go against your goal.

When you reach each milestone you articulated in your SMART goal, you can celebrate knowing that you achieved something tangible and impactful.

What does each aspect of the SMART acronym mean?

While I explain each aspect of the SMART goal framework, I’ll apply the framework to a real-world example.

Let’s start with a basic, non-SMART goal as our example and transform it into an attainable and measurable goal — “I want to get fitter.”

1. Specific

Goal setting is often associated with striving toward our highest aspirations, and reaching those aspirations can seem daunting. Specificity helps us determine the path between where we are and where we want to be.

→ Ambiguous goal: “I want to get fitter.”

There are innumerable ways to get fitter, and everyone has their own definition of fitness. For instance, do you want to lose weight? Do you want to complete more push-ups? Or do you want to cut a minute off your mile time?

When a goal is vague, it is impossible to tell whether your actions will help you achieve it. If your fitness goal is to increase the number of push-ups you can do, following a running plan will not help you achieve your true goal.

→ Specific goal: “I want to be able to do more push-ups.”

A specific goal makes your next steps clearer or, at the very least, narrows down the next steps you’ll need to take.

2. Measurable

When a goal is measurable, you can easily track your progress. Typically, this means that a number will be attached to your goal.

→ Immeasurable goal: “I want to be able to do more push-ups.”

→ Measurable goal: “I want to be able to do 25 push-ups in a row.”

A numerical goal is valuable for many reasons. In addition to giving you something to strive toward, you’ll be able to celebrate a victory when you reach the final benchmark.

If you say that you just “want to do more push-ups,” does that mean that you want to complete just one more push-up per session or that you want to double the number of push-ups you can do overall? One goal will take a lot more time and dedication than the other.

Let’s say I can do 10 push-ups in a row right now. To measure my progress against my final goal and to determine whether I’ve reached a milestone, I’ll edit my push-up goal to read, “I want to be able to do 25 push-ups in a row.”

3. Attainable

Big aspirations are admirable, but balancing long-term goals with more achievable, short-term goals is important.

Setting attainable goals involves evaluating your progress and adjusting your goals to be more realistic relative to your benchmarks.

To consider the point in more concrete terms, think about business growth rates if your company has been selling 2% more product each month for the past 12 months:

  • Unattainable goal: Sell 15% more product next month.
  • Attainable goal: Sell 3% or 4% more product next month.
  • Unattainable goal: 25 push-ups.
  • Attainable goal: 20 push-ups.

Keep in mind that 2% growth is the status quo. Selling 4% more product would still be doubling your month-over-month growth.

Attainable goals are useful because they help you maintain momentum. It can be discouraging to miss huge targets, but consistently making small gains will encourage you to continue delivering wins.

Each month, you’ll aim for the familiar satisfaction of hitting your target rather than dreading another seemingly major miss.

Of course, a significant amount of work is still required to get to where I want to be. Still, I’ll be able to celebrate a huge achievement like doubling the number of push-ups I can do and use that momentum to drive me to set a goal of doing 25 push-ups soon after I achieve my goal of 20.

Consider what you’ve done in the past in relation to the goal you’re in the process of setting, and adjust it accordingly.

4. Relevant

Relevant goals will help you move in the direction you truly desire. You can allocate your time to infinite activities, but which activities will push you closest to your ultimate goals?

It’s a common trap to feel like we’re being productive when we’re busy, even if our action isn’t creating a meaningful impact.

In the beginning, our example goal was to “get fitter.” To ensure our goal is relevant, we need to ask ourselves if following through on this goal will help us get to where we want to be.

In the case of our push-up goal, the answer is yes.

  • Irrelevant goal: “I want to be able to do 20 push-ups in a row.”
  • Relevant goal: “I want to be able to do 20 push-ups in a row to improve my overall muscular fitness.”

Push-ups engage several muscle groups, including your back, arms, shoulders, and core, and consecutively doing a significant number can elevate your heart rate.

Executing this goal will improve my muscular strength and perhaps even my cardiovascular strength, which are key elements of overall fitness.

Ask yourself if the goal you’ve set will have a real impact on your overarching targets, and if the answer is no, adapt it or identify a way to track its impact.

5. Time-Bound

The final letter of the SMART acronym stands for time-bound. You should always aim to accomplish your goal within a specific time period. Adding a time frame will motivate you to take consistent steps every day toward your goal.

In addition, setting a timeline or time boundaries allows you to track how much progress you’ve made toward your goal based on the amount of time that’s passed.

  • Goal that isn’t time-bound: “I want to be able to do 20 push-ups in a row to improve my overall muscular fitness.”
  • Time-bound goal: “I want to be able to do 20 consecutive push-ups two months from now to improve my overall muscular fitness.”

If I aim to increase the number of push-ups I can do from 10 to 20 in two months, I can set a midpoint milestone of adding five more push-ups in the first month.

However, if a month passes and I’ve only increased the number by three, I’ll know I need to ramp up my efforts, re-evaluate my strategy, or perhaps adjust the time frame I initially chose.

A time frame can help you chart your progress. Now, I have a goal that clarifies the path to where I want to be.

Before I made my goal SMART, it would’ve been easy to make excuses. It wasn’t clear how I’d measure my progress or keep myself on track toward my goal.

Still need some help creating your SMART goals? There are various templates at your disposal to help you establish SMART objectives. Here are some of my favorites.

1. Hubspot’s SMART Goal Template

Hubspot’s SMART Goal template

Image Source

What It Is

HubSpot’s SMART goal template helps you design effective marketing goals with measurable, time-bound results. It’s particularly useful if your key objectives are related to increasing traffic and conversions across your online properties.

The template lives on a Google Sheets file, which makes it ideal for collaborative SMART goal setting. Everyone on your team can access, comment on, and edit the file with a Google Workspace account.

Each tab on the Google sheet walks you through a step of the goal-setting process with clear instructions included alongside each field you need to complete.

For this demonstration, I’ll create a SMART goal based on the broad objective of “building an email list.”

How It Works

Smart goal template, example of filled out template.

Step 1: Write your initial goal. For this example, it’s “I want to build an email list.”

Step 2: Make the goal more specific. The prompt suggests setting a goal you could “share with your CEO in 10 seconds that clearly explains what you’re trying to improve.” My specific goal is: “I want to build an email list of qualified leads from our blog to promote our upcoming Black Friday sales.”

Step 3: Make the goal measurable. The prompt is to attach a number to the goal so you can track your progress while working toward it. My measurable goal is: “I want to collect emails from 50 qualified leads per month from our blog to add to an email list of prospects to promote our upcoming Black Friday sales.”

Step 4: Make the goal attainable. The prompt is to set a realistic goal based on your past performance and existing capabilities. My attainable goal is “Since we currently generate around 200 leads per month from our blog, I want to collect emails from 50 leads per month to add to an email list of prospects specifically qualified for our upcoming Black Friday sales.”

Note: On the next tab in the Google sheet, there’s a calculator to help you set realistic numbers for your customers, visits, and lead goals based on your current performance. This is a great resource to consult if you need help.

Step 5: Make the goal relevant. The prompt is to clarify why you’re setting the goal and how it relates to overall business impact. Here’s what I came up with: “I want to collect 50 qualified leads per month from our blog to add to an email list of prospects to promote our upcoming Black Friday sales because a recent similar promotion to a targeted list for a different offer converted at 3x our typical rate for promotions to our general email list.”

Step 6: Make the goal time-bound. Here, you need to set a timeline for achieving your goal. I simply added this bit to the end of my goal: “I’ll have 250 leads on my email list in five months.”

Step 7: Evaluate your SMART goal. The third and final tab in the sheet is designed to help you reflect on the goal you’ve just set. It’ll prompt you to the following answer questions:

  • Is this goal realistically attainable in the time frame you’ve set?
  • How many hours per week can you dedicate to inbound marketing?
  • What is the biggest marketing challenge preventing you from achieving this goal?
  • What steps can you take to reduce or remove that challenge and succeed in reaching this goal?

Here’s how I filled out this section:

Smart goal template, evaluating your smart goal.

What I like: This template is easy to follow, with clear explanations, examples, and even a calculator to guide your input at each stage.

2. Organized 31’s SMART Goals Template

Organized 31’s SMART Goals Template

Image Source

What It Is

This simple SMART goal worksheet by Organized 31 is an excellent fit if you’d like to create your SMART goals as quickly as possible. It provides five boxes to fill out, each dedicated to a letter of the SMART acronym.

A big plus? You can use it both at work and home.

How It Works

Smart goal template, specific and measurable boxes.

Step 1: Set a clear and specific goal. The template prompts you to consider the following: who is involved in the goal, what exactly you want to accomplish, where the goal will take place (if applicable), which resources and skills you will need, and why the goal is important.

Let’s use the same goal as our previous template. So, my clear and specific goal is: “I want to use targeted lead magnets on our blog to build an email list to promote our upcoming Black Friday sales.”

Step 2: Make the goal measurable. The template instructions are to set a number that determines when you’ve achieved your goal. This is also the benchmark against which you’ll track your progress. Ask yourself, “How many?” or “How much?”

For my example, I’ll specify that my goal is to collect 250 email addresses.

Step 3: Review your goal to ensure it’s achievable. While the template encourages you to set challenging goals, it also emphasizes the importance of realistic goals based on the resources, skills, and available time.

For my example, I already considered this while filling out the previous template.

Step 4: Make sure your goal is relevant. This template defines a relevant goal as supporting and aligning with your mission.

Step 5: Set a deadline or due date for your goal. For my example, I’ll modify my goal to include a deadline of December 2025.

Smart goal template, example of a smart goal.

What I like: This is a very simple, no-frills template that is versatile and adaptable for a variety of goals, both personal and professional.

Also, the worksheet includes an extra page for creating an action plan for achieving your goal.

3. Hirebook’s SMART Goals Template

Hirebook’s SMART Goals Template

Image Source

What It Is

This SMART goals worksheet from Hirebook lives on a Google Docs file, making it an excellent choice if you want your team to collaborate on one document.

It also offers the simplicity of Organized 31’s template with a more workplace-friendly color palette.

How It Works

Step 1: Decide what you want to achieve. It’s okay if your goal is a bit broad at this stage. Let’s go with “Getting a promotion” as my goal for this walkthrough.

Smart goal template, starting with a simple goal.

Step 2: Get specific. The template includes a few questions, such as “What do you want to accomplish?” and “Who needs to participate in this with you?” to help you narrow the focus of your goal as much as possible.

Here’s how I made my goal more specific:

Smart goal template, example of making your goal specific.

Step 3: Define how your goal will be measured. Determine how you will quantify the goal. How much do you need to increase or decrease a metric to reach your goal? How will you know that the goal has been met? Write the answers to these questions here.

In this example, my goal is already measurable because getting promoted to the senior marketing strategist role is the marker of success.

Smart goal template, quantifying your goal example.

Step 4: Make sure it’s achievable. After making your goal measurable, review it carefully to ensure it’s achievable. Ask yourself the following: What past experiences have you had that make you capable of achieving the goal? Do you have access to the resources you need to accomplish the goal? Is this goal realistic when you consider time and financial limitations?

Step 5: Be certain your goal is relevant. After confirming that your goal is achievable, review it again to ensure that it is also relevant to you, your business, and your long-term needs.

Here’s what I’ve written as my reason:

Smart goal template, defining the relevance of your goal.

Step 6: Set a deadline. Finally, to keep yourself accountable, you need to set a deadline for accomplishing this goal. When should this goal be completed? What can you do today to work towards achieving your goal?

For example, I could set a target of accomplishing this goal within 12 months and set deadlines for tasks I must complete.

Smart goal template, example of how to make your goal time-bound.

What I like: This template encourages you to think deeply about your goal. Rather than simply modifying it at each stage, the sections are designed to make it more tangible and actionable.

4. SpriggHR’s SMART Goals Worksheet

SpriggHR’s SMART Goal template

Image Source

What It Is

SpriggHR’s goal-setting worksheet is available in three file types: a fillable online PDF file, an Excel spreadsheet, and a Word document.

Because it offers three flexible options, it’s a great choice if you don’t want to use a Google Docs document or force your team to use a certain file type. You and your team members can choose what works best individually.

How It Works

Step 1: Set a “simple goal.” This goal will be the basis of your SMART goal.

My simple goal for this walkthrough is to “create a marketing video for an upcoming launch.”

Smart goal template, starting with a simple goal.

Step 2: Specify your goal. After creating a simple goal, the next step is making it specific. What exactly do you want to accomplish, and why? Who should be involved in this process? Where will the process take place? Write the answers to these questions in the provided box.

Here’s how I answered some of these questions:

Smart goal template, stating your goal more specifically.

Step 3: Make your goal measurable. How will you measure progress? How will you know when you’ve successfully attained your goal? The template suggests that you set milestones to mark the start of the project, track your progress, and determine the successful completion of your goal.

I decided to focus on milestones rather than a single outcome for this specific goal. Here’s what this looks like:

Smart goal template, measuring your progress.

Step 4: Check feasibility. Make sure your goal is attainable with your current skills and resources. If not, can you obtain new skills and resources to help you attain the goal?

Step 5: Look at the big picture. Decide if the goal is a priority and how it aligns with your team’s objectives. In my example, we’ll assume that the answer is yes.

Step 6: Establish a timeframe. Finally, after ensuring your goal is relevant, the next step is making it timely. Specifically, what is the deadline to achieve this goal?

In my example, I’ll add deadlines to each milestone I created earlier.

Smart goal template, establishing a deadline.

Step 7: Rewrite your goal. The last step of this worksheet is taking your answers from the previous sections and rewriting your simple goal as a SMART goal. Here’s mine:

Smart goal template, rewriting your simple goal as a smart goal.

What I like: This template is an excellent resource for setting project goals because it helps evaluate the practical steps needed to achieve your goal.

Start practicing smarter goal setting.

Each template in this post is a great resource for setting SMART goals, so where should you start? Well, it depends.

HubSpot’s SMART Goal Template is fantastic for marketers. Organized 31’s template is a simple yet versatile option that works well for personal and professional goals.

Hirebook’s and SpriggHR’s worksheets strongly emphasize the practicality and actionability of your goals, making them perfect for setting project-based goals.

Ultimately, the best template for you will depend on your specific needs and objectives.

Editor’s note: This post was originally published in September 2019 and has been updated for comprehensiveness.

New Call to action

Categories B2B

AI Experiment: Hacking HubSpot Chat to Improve the Customer Experience

We integrated AI into our website chat and our KPIs flew off the charts. Here’s exactly how we did it and what we learned along the way.

Key Outcomes:

  • 43% increase in chat conversion rates
  • >50% improvement in the value per chat
  • CSAT scores matched human-led interactions

I like to joke that one of my dumbest moments in early HubSpot history was realizing that potential customers preferred to talk or chat to us directly about buying our product, instead of filling out forms or sending emails.

This seemingly obvious insight was a key turning point, however, as it led to the integration of chat on our HubSpot website.

This simple change ensured that users could instantly connect with our sales and support teams. Since then, chat has been one of our most valuable channels for driving customer satisfaction and acquisitions.

Now, with the expanding capabilities of AI, we’ve been wondering: what would happen if we integrated AI into our chat process? Would AI be able to match the effectiveness of our human team?

Download Now: The Annual State of Artificial Intelligence Report

In the latest episode of Marketing Against the Grain, Emmy Jonassen, VP of Marketing for Demand Generation at HubSpot, and I walk you through this exact experiment — and the lessons we learned along the way.

The Hypothesis: Using AI for Unstructured Data Analysis

Given AI’s particular effectiveness at interpreting unstructured data, such as free-form text in chat interactions, we hypothesized that integrating AI into our chat system would improve the customer experience by providing faster and more precise responses.

We also believed that this strategy would free up our human agents to focus on more complex inquiries and high-intent customers.

As Emmy explained during the episode, “If we could use AI to truly understand what people are looking for and be able to answer their questions when they come to our website, we anticipate meaningful improvement in user satisfaction.”

But we still were unsure about how significant these improvements would be — and whether AI would be able to capture the personable, empathetic tone of our support teams.

The Set-Up: Choosing Our Test Pages and KPIs

To set up the experiment, we first decided to integrate the AI chatbot on webpages with high traffic and lower risk.

“This would allow us to test, gather data, and iterate very quickly, without significantly disrupting the user journey,” Emmy explains.

Our knowledge base pages, where customers ask practical, straightforward questions, were the ideal candidates.

We then determined our key performance indicators (KPIs):

  • Conversion rates: are we providing people with the information that they’re looking for, as fast as possible and as relevant as possible?
  • Value per chat: how much benefit are we gaining from each chat interaction, e.g., lead qualification, customer retention?
  • Customer satisfaction (CSAT) score: is the chatbot delivering a positive, personalized user experience?

With these details in place, we were ready to launch our AI experiment and track its impact on customer interactions.

AI Chatbot Experiment Adjustments and Results

After launching the first AI chatbot, we initially saw a decline in CSAT scores — but this was more or less expected, as the model was new and needed training.

To improve this, a team member (shout out to David G.!), began manually annotating chat transcripts to improve the AI’s responses, editing each one to be more accurate and contextually relevant based on the users’ questions.

By the end of the experiment, the results were impressive:

AI chat experience results graphic

  • 43% increase in conversion rates
  • >50% improvement in the value per chat
  • CSAT scores matched human-led interactions

While both the conversion rate and value per chat were exciting, the CSAT score was a game-changer. “Any time you can get automation on par with a human experience, that is a huge win,” says Emmy.

Given the positive results of the experiment, we felt confident about integrating the AI chatbot onto other pages with different intents.

AI Chat Test Next Steps and Thinking Ahead

Our next major AI chat test is now happening on the pricing page.

Here, the AI chatbot has been trained to not only handle product-related questions — but also to help prospective customers understand our packages and pricing, even enabling touchless purchases in some cases.

While we’re still testing and analyzing, we’re very excited to see the final results and expect similar, if not better, outcomes.

We’re also hard at work developing an annotation user interface that allows more team members to participate in training the AI model.

“The annotation piece is really one of the most important pieces through all of this,” says Emmy. “But it’s also the most time-intensive.” So by involving more people in this process, we aim to speed up the AI’s training and improve the accuracy of our chatbot even further.

4 Tips for Using AI to Improve the Customer Experience

While the sheer volume of AI technologies can be intimidating, it’s critical for marketing leaders to stay current with these advancements and begin implementation now.

To learn how to incorporate AI into your workflow, download our AI Guide for Marketers and follow the tips and insights below.

1. Start experimenting now.

“Get your AI experiment to a good enough place, get it out in the wild, and then iterate based on real-world feedback,” Emmy says. “That’s where you’ll see the magic start to happen.”

While it may be tempting to aim for perfection, this will delay your progress and put you behind the competition. Put those concerns aside and get started now.

2. Aim for dramatic results.

There are still marketers who are optimizing for a 5% improvement. Those days are over. AI gives you the ability to build entirely new systems, programs, and automation that get you 100%, 300%, even 500% gains.

The potential for exponential improvement is there, and the opportunity cost of settling for minor gains is too high.

3. Be transparent with customers.

We made a choice early on at HubSpot to be 100% transparent that customers are speaking with an AI assistant in chat.

AI transparency builds trust and helps manage user expectations, which again improves customer satisfaction. This transparency can also help mitigate any potential concerns about privacy or data usage.

4. Start with chat.

If you’re really not sure where to start, I always say that chat is a great, low-stakes option. AI chatbots are key for curating a seamless user journey by giving users exactly what they need and, as we demonstrated in our experiment, can be tested without drastically interrupting the user experience.

To watch our entire discussion about our AI experiment, check out the full episode of Marketing Against the Grain below:

This blog series is in partnership with Marketing Against the Grain, the video podcast. It digs deeper into ideas shared by marketing leaders Kipp Bodnar (HubSpot’s CMO) and Kieran Flanagan (SVP, Marketing at HubSpot) as they unpack growth strategies and learn from standout founders and peers.

Categories B2B

Disruptive AI Video Trends that are Transforming Marketing in 2024

AI-generated video content is turning the marketing world on its head. But what trends should marketers be focusing on to stay ahead of the competition?

If you’ve been following the latest buzz in AI marketing trends — and you should be — you know that AI video tools are at the forefront of this change.

Whether it’s trained ad avatars or hyper-personalized video scripts, these technologies are irreversibly changing how we create content and engage with our audiences. But with such rapid innovation, what’s actually worth the hype?

Download Now: The Annual State of Artificial Intelligence Report

Kieran and I experimented with some of these new developments in a recent episode of Marketing Against the Grain, including a viral AI video on Twitter and an AI-generated ad created in less than 15 minutes.

Among the many AI video options available, these four trends have been particularly notable — and are worth paying close attention to.

1. Avatar actors and likeness licensing are the new norm.

Instead of hiring an actor to read a script or act in an ad, businesses can now license an actor’s likeness, use it to train an AI model, and then use that model to create ads and avatars. This enables marketers to quickly generate a variety of content, testing, and refining different approaches and messages without the logistical constraints of traditional video shoots.

For example, this viral video ad features a woman casually talking about a product while seated inside her car. What’s so significant about it, however, is that while she’s a real actress hired off of Fiverr, the video itself is generated by AI video, using tools like Arcads.

“This produces video content that is human-trained but AI-agent delivered,” Kieran explains. “That’s quite an unbelievable concept to think through.”

2. Low-quality but authentic content is driving engagement.

Polished, high-budget video ads are quickly becoming a thing of the past — or at least, less favored by audiences. Instead, low-production, personable videos are taking the lead, outperforming traditional ads on platforms like TikTok and Instagram Reels.

Take, for example, the viral video I mentioned above: it’s not polished or high-budget. Instead, it’s set in a poorly-lit car, with an unflattering angle. Yet people are more likely to engage with it. Why?

“Because it feels authentic, relatable, and personable,” Kieran explains. “It’s how a real person would talk about a product.”

For marketers, this shift means experimenting with AI tools like HeyGen and InfinityAI, which quickly create videos that drive engagement, despite — or even because of — their imperfections.

3. Video personalization and customization are must-haves.

Hyper-personalized videos that cater to customers’ accessibility needs, languages, and preferences are essential for successful marketing campaigns.

During the episode, we highlighted how AI tools can use customer data from your CRM platform — like call logs, support tickets, and emails — to craft personalized video scripts. This enables marketing teams to deliver tailored content that feels uniquely targeted and relevant to each individual viewer.

We also experimented with HeyGen’s groundbreaking Avatar in Motion, which creates customized avatars based on your own likeness. Move your hands, make gestures, or use unique tones of voice, and HeyGen will flawlessly track, translate, and lip-sync your video with any customizable input text.

4. Accelerated iteration is driving innovation.

AI tools significantly speed up the iteration cycle for creative video content and limit lengthy and expensive production cycles. For example, during the episode, I showed Kieran how I designed and launched a video ad in less than 15 minutes.

To stay ahead, marketers need to quickly and constantly innovate, as the ease of copying and templatizing creative work will lead to a rapid commoditization of content.

Standard approaches to AI-powered video content may outperform current methods in the short term because they’re new and different. But effectiveness is likely to peak within the first six to twelve months. Then, it will taper off as audiences get used to it and become aware of its widespread use.

“Your best-performing content will now be ‘best-performing’ for a much shorter period of time,” says Kieran. In other words: your iteration of ‘creative’ as a marketer will have to increase exponentially. Differentiation will rely heavily on the unique 10-20% of creative input, putting increased pressure on marketers to continually produce new and distinctive ideas.

Three Tips for Integrating AI into Your Video Marketing Strategy

Learn how to incorporate AI into your video workflow by downloading our AI Guide for Marketers and following the tips below.

1. Experiment. Experiment. Experiment.

Test different AI video tools to understand their benefits and limitations, helping you find the best fit for your campaign needs and goals. This keeps your team ahead of the competition, identifying new opportunities to capture the attention of your customers.

2. Enhance the Tools You Already Use

Not sure where to start? Try using AI video features that already exist in your current marketing tech stack. For example, platforms like Facebook, Instagram, and Mailchimp offer AI-powered capabilities that boost your marketing effectiveness by automating production processes and offering more detailed performance insights for iteration.

3. Monitor Legal and Ethical Considerations

As AI video production becomes more prevalent, legal considerations around likeness licensing and content use will become increasingly important. Invest in the proper training and resources now to ensure you are using AI effectively and ethically in the future.

To watch our entire AI video discussion, check out the full episode of Marketing Against the Grain below:

This blog series is in partnership with Marketing Against the Grain, the video podcast. It digs deeper into ideas shared by marketing leaders Kipp Bodnar (HubSpot’s CMO) and Kieran Flanagan (SVP, Marketing at HubSpot) as they unpack growth strategies and learn from standout founders and peers.

New Call-to-action

Categories B2B

How to Use Medium: What I Learned from Writing, Publishing & Promoting on the Platform

Wondering how to use Medium and how to make money on Medium? You’ve landed at the right place.

→ Download Now: 6 Free Blog Post Templates

I started writing on Medium in 2016 when blogging was my hobby. A few months later, I realized the monetary potential of this blogging platform, and it’s proven to be a great start for my writing career.

Although I ditched Medium years ago to solely focus on my blog, it is still one of the best blogging platforms to make money in 2024 — especially for the budding writers.

In this guide, I’ll show you the best ways to make money on Medium, how to effectively use Medium, and what I’ve learned in the years using the platform.

Here’s what this guide covers:

Popular topics on Medium range from mental health to social media, from world affairs and trending news to productivity hacks. This makes it a solid choice for anyone who wants to start blogging.

medium website

Image Source

As Medium founder (and Blogger creator/Twitter co-founder) Ev Williams wrote when he launched the platform in 2012: “Medium is not about who you are or whom you know, but about what you have to say.”

How does Medium work?

The first thing you’ll notice on the Medium website is its site design.

As former HubSpot Senior Content Strategist Erik Devaney says, “It’s minimalistic, featuring lots of white space and limited formatting options. Want to change the header typeface to Comic Sans? You can’t. Medium won’t allow for such atrocities of design.”

This decision makes great writing the focus. But that’s just one of many nuances of Medium.

Medium is for two types of people — writers and readers — who are focused on online content publishing. When I started my career in content writing and strategy, I wasn‘t sure what that meant.

I discovered Medium because I was trying to figure out where to build my writing portfolio. I’d heard Medium was a good choice, but the first time I signed up, I wasn’t sure how to use it.

If you‘re just getting started on the platform, there’s a fair amount to learn before you hit publish. Let’s get into it.

Quality Leads to Discovery

Many writers go years without sharing their writing publicly. But once you decide to become a writer, whether you’re finishing a first novel or writing content for brands, you need to find a way to share your skills.

Medium is great for writers who invest time and energy in their work. It rewards in-depth, well-researched, and useful articles, not just popularity or brand awareness.

Platform-Enabled Reader Engagement

Comments and likes are popular in online media. But when you‘re new to writing, it’s helpful to know exactly what people are responding to and why.

To meet this need, Medium gives readers a chance to highlight and comment directly within the text of each article. This process is like the way professional editors engage with writers.

Curation and Publications

Medium has curators who review articles for quality. If a curator chooses your article for wider distribution, it gives you a chance to introduce your content to more readers.

This might include highlighting your article on the platform, showing your post to readers they think will want to read it, or adding it to subscriber emails.

how does medium work

Most curators are publication editors. Some of the most popular publications on Medium in 2023 include:

  • The Startup.
  • Towards Data Science.
  • Personal Growth.
  • UX Collective.
  • The Writing Cooperative.

Medium’s curation and publication models aren’t just great for writers. They also give avid readers and fans a chance to support their favorite writers.

Paid Opportunities

Medium also gives writers the chance to earn money with their stories. As a member of the Partner Program, you can put stories behind a paywall to earn income.

In this program, you can increase earnings with repeat readers, engagement signals, and more.

Writing for Medium

Anyone who has a Medium account can write for Medium — there’s no other vetting process involved.

To get started, simply sign up for a free Medium account (or upgrade to a $5/month membership for unlimited access), and you’re ready to start writing from there.

It’s important to know that articles must adhere to Medium‘s content guidelines and rules. For instance, as a writer I can’t promote controversial or extreme content on my Medium account. I can‘t do third-party advertising. And there’s a separate set of policies if I want to write about cryptocurrencies.

Affiliate marketing links are allowed, but writers must tell their audience that they’re including these links. For the full list of rules for content, take a look at this post on Medium Rules.

how to make money on medium, medium rules

As a marketer, Medium presents an opportunity for you to reach a new audience with your content. The platform is open, so some topics lean toward sharing longer-form, more well-thought-out content, while others are short and topic-focused.

In this way, Medium is like marketing on many other channels, because success in writing for Medium isn’t just about great writing. It takes some research into audiences and publications in a specific area of interest. So, what makes Medium a great channel for writers?

In the next section, I’m going to get into the topic above, and talk about how I chose between Medium and WordPress.

Medium vs. WordPress

This post offers an exceptional breakdown of WordPress vs. Medium for pricing, blogging, and SEO from a business perspective. So, I want to use this space to share my personal experience with the two platforms.

How I’ve Used WordPress as a Content Writer

I worked with a designer to build my personal website on WordPress and built a separate side project on my own with Elementor.

I‘ve also used WordPress professionally as a content manager and freelance writer. Altogether, I’ve been using the platform for 6+ years to create and promote content.

WordPress is an excellent platform for sharing content online inexpensively. It also makes it easy to add plugins, features, and tools to connect my sites to other relevant channels, like social media feeds or payment gateways.

I like WordPress as a content writer because it lets me run independent sites online that I can use to test ideas before widely broadcasting them.

That said, it took years of learning about search engine optimization (SEO) to begin generating traffic on my personal sites.

With the rapid recent changes in SEO, I’ve been investing more time in researching social channels for marketing and promotion.

How I’ve Used Medium as a Content Writer

As you can see above, I chose to go with WordPress for my portfolio. But, I started using Medium when I was managing content for a small ecommerce startup.

I was looking for effective ways to promote content for our blog. I wanted a channel that could help expand the influence of the excellent writers on my team. So, we started with Medium.

I asked writers on my three-person team to write an original piece for Medium once a month in addition to their scheduled blog assignments.

While some posts sat on our brand’s Medium page without much traction, a few grabbed valuable attention. Specifically, we had the most success with posts that we submitted to popular publications on the site.

For example, I submitted this post about Ecommerce Easter Eggs to the Marketing and Entrepreneurship publication curated by Larry Kim, and Bryce Patterson submitted this piece on the content writing process to the publication The Writing Cooperative.

These publications have dedicated audiences, which helped us show our writing to more people and build followers for our branded Medium account.

WordPress vs. Medium — which is right for you?

While these are both excellent platforms to showcase writing, they’re quite different. I use both platforms, but I spend more time on WordPress because of my goals as a creator.

But many writers will find that Medium is the best platform for them because of its focus on writer discovery, monetization, and community-building.

At this point, you may be ready to try using Medium. Let’s take the first step.

Getting Started With Medium

1. Create an account.

Anyone can view free Medium content. But to publish and interact with folks on the platform, you need to have an account and log in.

So, the first step is creating an account. Signing up was super easy for me.

I headed to Medium.com and clicked the “Get started” button at the top of the page. From there I had three different sign-up options to choose from: Google, Facebook, or email.

how to make money on medium, join

Image Source

I used my Gmail account to create an account first, which was super fast and simple. They even made adding my name to my profile easy, because it auto-filled based on my email.

I also set up a separate account, this time signing up with email. All I needed to do was click a link in my email to complete setup, and the process was otherwise the same.

how to make money on medium, email confirmation

During sign-up, it helped to remember that Medium is part social media. It‘s not just a platform to write blogs, it’s a space to share, comment, and curate content within a community.

So, I felt like some parts of the sign-up, like choosing topics, felt more like signing up for Twitter (X) or Pinterest than creating an account on a blogging platform.

how to make money on medium, topic selection

I like keeping my blogging and social media accounts separate, but Erik Devaney recommends signing up for Medium using Facebook.

He says, “That way all of your existing connections from Facebook who are on Medium will automatically be following your account once it’s created. This saves you the trouble of having to build up a new audience entirely from scratch.”

Regardless of what you go with to start, you can always link your Twitter (X), Mastodon, or Facebook to your Medium account later in the “Security and apps” tab in the Settings menu.

The Settings menu is also where you can update your username, profile page URL, profile design, and more. You can also control what email notifications you receive from Medium in this menu.

how to make money on medium, profile information

To complete my profile, I added a photo and wrote up a short (160-character max) bio for my Medium profile page.

I use the same bio across my social media accounts, so I just copied and pasted this from my Instagram account, emojis and all.

2. Follow people, publications, and topics.

In a Medium feed, the content that‘s surfaced comes not only from the accounts of the people and organizations you follow but also from publications and tags.

What’s more, when searching for content on Medium, people, publications, and topics all show up in the results.

how to make money on medium, baseball

People

First, figure out who you want to follow. Whose writing do you want to read? Who’s making content you can learn from as you begin your new writing adventure?

There‘s a wide variety of writers on the platform, and I’m interested in a little bit of everything, so this step was quick to complete.

Whether you’re interested in politics or people-watching, computer science or world travel, you’re likely to find some writers you want to follow too.

Publications

Medium publications are collections of stories based around a common theme. Anyone can create them — yourself included — and the way they work is fairly straightforward.

As the creator of a publication, you’re an editor by default. This means you have the ability to:

  • Add writers to your publication.
  • Edit and publish the stories submitted by your writers.
  • Review the metrics for all the stories that are part of your publication.

As the publication‘s creator, you’ll also have the ability to appoint new editors (so they can do all that stuff I just mentioned).

Creating a publication is easy to do. First, I needed to submit payment to become a Medium member.

Then, I clicked on my profile image in the top right, and scrolled down to “Manage publications.” A pop-up appeared, and I clicked “Create a new publication.”

how to make money on medium, manage publications

This led to a new page where I needed to enter information on the name, description, social accounts, and topic for my publication. I also needed images ready to add an avatar and logo.

how to make money on medium, new publications

The avatar image appears on featured pages around Medium, while the logo image appears on the homepage of the publication. You can learn about image sizes for these requirements and more in this Medium post.

Once I finished entering this information, I had a chance to create a custom design for the home page of my new publication.

This publication will give me a chance to not only share my own writing, but also connect with other writers on the topics I care about.

Topics

Once called “Tags,” Topics are the hashtags of the Medium ecosystem. When you publish a story on Medium, you get the option to add up to five topics, which appear at the bottom of your story.

So, when I click a topic it brings me to a page where I can see more stories with the same topic. It also gives me suggestions for other topics I might be interested in.

Instead of surfacing content based solely on the social graph (for example, the people/publications you follow), Medium uses topics to surface content that’s based on specific interests.

For example, this article from Beth Dunn, a recent Marketing Fellow at HubSpot, includes five topics:

  • User experience.
  • UX writing.
  • UX design.
  • Inclusive design.
  • Content strategy.

how to make money on medium, topics

Following topics like these can help personalize my Medium experience and make it easier for my readers to find more of my content.

Now that I‘ve set up an account, started following some accounts, built a publication, and followed some topics, let’s start engaging with content.

How to Interact With Medium Content

1. Recommend, share, and bookmark content.

Clapping hands are the “Like” of the Medium world. It’s a way to show that you support and appreciate the content that someone has shared.

When reading a story on Medium, you can support it at both the top and the bottom of the actual story, where you see the clapping hand symbol.

how to make money on medium, interact

In either case, I just click on the clapping hand icon to support a story. Once clicked, the hands will change from an outline to solid black.

The first time I supported a story, I accidentally clicked the number beside the clapping hands icon. This was a happy accident because it let me see the full list of people who recommended that story.

Note: You can clap up to 50 times per post, and you can clap for as many posts as you want.

When you recommend a story, the writer, by default, will receive an email notification. (But that‘s something you can control in Settings). The more support a story receives, the more likely it is to be shared around the Medium network.

Stories that receive the most likes within a given time period get featured on Medium’s home page.

In the same two locations where you can recommend a story, you can also save, listen to, or share that story.

To save a story I wanted to spend more time reading, I clicked the bookmark icon, and it saved the story to my reading list. I can also create specific reading lists in this part of the platform.

how to use medium, save

To listen, I just clicked the play icon, but if you want to use this feature, it‘s good to know that it’s for members only. Finally, I shared the story by copying the link or sharing it on LinkedIn, Twitter (X), or Facebook.

how to use medium, copy link

When you bookmark a story, it will appear on your reading list, which you can access from your Medium profile page or from the Medium homepage at the bottom of the right-hand sidebar.

2. Highlight specific words.

Now that I know how to support, share, and bookmark Medium stories, it’s time to unlock a second level of interaction. I do this by selecting sections of text with my cursor.

Once I highlight some text, a pop-up menu will appear that gives me four options:

Highlight

how to use medium, highlight

Clicking the highlighter icon (highlighter symbol) puts a green highlight around the text I selected. This is visible to my Medium followers. By default, a story’s writer will get a notification when anyone highlights a section of their stories.

Response

how to use medium, response

Clicking the speech bubble icon lets me write a response to the story I‘m reading. The section of text I’ve highlighted appears at the top of my response. (More on responses in a second.)

Text Shot

how to use medium, text shot

Clicking the Twitter icon generates a “Text Shot,” which is a tweet that automatically pulls in the text I highlighted as a screenshot.

Private Note

how to use medium, privacy

Some stories will also show a lock icon in a speech bubble. Clicking this icon lets me send the writer a private note. If you don‘t see this icon, it’s because the author has turned off private notes.

You can choose this on or off in your settings, but I chose to leave it on because I read that editors sometimes use private notes to offer feedback to writers before publishing.

3. Write responses

Unlike traditional blog comments, Medium responses are treated as individual stories. Besides appearing at the bottom of the stories I respond to, I can also publish my responses to my profile page.

This is helpful for me because it lets me engage with people on the platform without having to commit to writing a full-blown story. It also helps me come up with blog ideas or stories.

how to use medium, responses

Medium’s approach to responses gives comments the potential to take off and get circulated just like traditional stories.

A quick note: Responses are engagement signals on the Medium platform. And, responding is a tip that shows up in many articles about how to promote your writing on Medium.

For me, this makes it important to respond genuinely. While responses are a way to increase my visibility on the platform, I work to be thoughtful in the ways I support and engage with the writers I respond to.

How to Write and Publish on Medium

1. Format text in your posts

Ready to start writing my first Medium post, I click “Write” at the top right-hand corner of the Medium home page. I can also get there by clicking on my profile icon at the top-right of the Medium page and then scrolling to “Stories.”

I can create a new story by clicking the green “Write a story” button. That action pulls up a screen that’s ready for my content that looks like this:

how to use medium, format

As Erik Devaney says, “Writing in Medium’s editor is highly intuitive and — from a stylistic perspective — nearly impossible to screw up.”

As usual, it’s the writing that’s tough, but a tool can help with the details. When I write, I often use a template, like one of these free blog templates.

Then, I copy and paste my writing into my chosen publishing platform. Medium makes this step easy. It retains links and other formatting from pasted text.

If I want to make a change to the text, All I have to do is highlight a section to reveal several basic format choices such as bold, italics, or hyperlinking. It also lets me designate text as an H1 or as an H2 using the big T or little t:

how to use medium, format

And I can choose between two different styles of block quotes —

Option A:

how to use medium, format

Or Option B:

how to use medium, format

If I really want to get fancy, I use Medium’s drop caps function.

Know those enlarged, stylized letters you sometimes see at the beginning of sentences? Those are drop caps. According to the Medium team, they’re useful for “pacing, starting a new chapter, or just a little typographical delight.”

how to use medium, format

Another option for creating some separation between different sections of a story in Medium is to use a separator. To insert one, I click the little plus icon that appears on an empty line of a story:

how to use medium, format

Clicking that plus icon will open up a menu with six options. The one on the far right — the icon with the two little lines — is the separator.

how to use medium, format

Here’s what it looks like on the page:

how to use medium, format

Check out this story for more formatting how-tos, such as adding inline code, mentions, or emojis.

2. Add images and media.

Adding images, videos, and embeds to a Medium story can be as simple as copying and pasting URLs into Medium‘s editor. The editor, in most cases, can automatically recognize the media’s format and render it accordingly.

For example, I want to add a couple videos to my in-progress post. For the first video, I just copied and pasted the YouTube URL, and then clicked “Enter.”

Then I added a TikTok video by clicking the video icon that shows up after clicking the plus icon. The final result was the same no matter which steps I followed.

You can add a range of media to your Medium story including:

  • Uploading an image from your computer.
  • Adding stock photos with Unsplash.
  • Inserting a video with a URL.
  • Inserting an embed code for approved media.

There are also different size and orientation options for displaying media.

For example, the options below appeared in a pop-up menu after I inserted my YouTube video. There are three choices for sizing a YouTube video on Medium:

how to use medium, youtube

3. Share drafts and publish posts.

When I finished my story and was happy with how everything looked, I headed up to the top navigation to choose between two options: “Publish” and an icon with three dots. The three dots highlight a range of choices for writers.

These include sending a draft link, checking the appearance of the post, unlisted publishing, and more.

how to use medium, settings

For example, “Share draft link” generates a link to the draft of my story, which I can share with anyone — even if they don’t have a Medium account. And the people I share the draft with can also leave me notes.

Clicking the “Publish” button, meanwhile, opens a menu where I can choose up to five topics for my story.

It’s a sort of pre-publishing dashboard, with reminders to add a featured image and a link to learn more about what happens after publishing. I like that it also offers a chance to schedule my post if I want to share it later.

how to use medium, publish

It’s also where I hit the “Publish” button to share my story with the world.

4. Measure your results.

I published my first Medium story and I’m set to earn money on the platform, but the impact I can make with Medium will depend on how my stories perform.

To see metrics for my Medium content, I clicked my profile icon in the top right-hand corner of the Medium homepage and scrolled down to “Stats.”

When I arrived on the “Stats” page, I didn‘t see much (yet). But soon, I’ll see the aggregate number of views and claps my stories and responses have received over the past 30 days.

how to use medium, measure

There’s also a graph that provides day-by-day granularity, with details on follower counts and highlights.

how to use medium, measure

Image Source

As I scrolled down the page, I had the option to click on specific stories to view individual stats. The Medium team is also making changes to the Stats pages.

It looks like most of these changes are for tracking payment metrics or helping writers tie payment to performance.

Here’s a quick rundown on what metrics Medium currently tracks:

  • Claps — the number of claps a story receives.
  • Responses — the number of responses a story receives.
  • Lifetime earnings — the total amount a story has earned.
  • Views — the number of people who visited a story’s page.
  • Reads — tracks when someone views a story for 30 seconds or more. Scrolling to the bottom of the story used to be required but isn’t anymore. Views and reads for individual stories live on story detail pages.
  • Member read ratio — tracks member reads divided by member views.

Quick note: Member-only and non-member activity is tracked separately in Stats.

How to Get Paid on Medium

Now that I‘ve gone through how to use Medium, I’m thinking about how to make the most of it. I’ve done some research and found a few ways writers monetize with this platform.

Medium Partner Program

First off, there’s the Partner Program. If you want to earn money with your stories, this is an exciting way to get paid on Medium.

how to make money on medium, tipping

The Medium Partner Program pays writers directly each month. To get paid on Medium, you’ll first need to become a paid Medium member. Then, it’s time to apply for the Partner Program. The requirements for this are simple. You need to:

  • Be a Paid Medium member ($4/month or $40/year).
  • Have published at least one Medium story in the last six months.
  • Be 18 years or older.
  • Live in an eligible country (here’s the list).

Once you’re part of the Partner Program, you can put new and already-published stories behind a paywall for premium members. However, you’ll have to earn a few badges before completely getting your articles behind a paywall.

Now, there are two ways to get your stories behind the paywall for premium readers:

  • Total read time of the Medium article.
  • Bonus earned when a non-member signs up within 30 days of reading your piece.

It uses engagement metrics to decide how much you’ll get paid for each story, connecting what readers love to what you make from the platform as a writer.

However, the money made through the Partner Program won’t suffice your needs. A vast majority of writers earn up to $100/month through the Partner program. Only a few reach the $1,000/month mark.

I’ve found this good guide to help you calculate your earnings on Medium.

Crowdfunding

While I‘ll be trying the Partner Program to earn on Medium, I’m also curious about other options.

This is a good way to make money on Medium if you have a large number of followers on the platform and you don’t wish to become a paid member.

Even if you’re a paid member, you can ask your subscriber for a tip for your valuable writing.

For example, I set up tipping by going to “Settings,” then “Publishing” and updating the settings under “Manage tipping on your stories.”

I can add a payment link, and I’ll be able to receive tips from readers. There are options to use Patreon, PayPal, and other popular platforms.

how to make money on medium, tipping

Promotions

The hidden gem to earn money through Medium is Affiliate marketing. If you’ve a large following or are good enough with SEO, affiliate marketing can turn out to be a lucrative option.

Here’s how it works: You write a blog mentioning the product or service. Next, you’ll place the affiliate link within the piece. When the readers learn about the product through your blog, they’ll be enticed to buy it using the link.

For every purchase, the affiliate vendor will pay you a commission. So, if you have around 20,000 reads in a month and say, 2% of the readers have purchased the product that pays you $70 in commission.

The total turns out to be $28,000 a month.

Well, that’s a massive amount of money to make!

Selling Your Products and Services

I’ve seen a lot of businesses, especially educators selling their courses on Medium. It all starts with showing that you are knowledgeable about the subject and winning your reader’s trust.

Once you’ve a significant engagement on your posts, it’s time to promote your products or services on Medium. For example, Jay Baer, the founder of digital media Convince & Convert has 55k followers on the platform.

While his posts gain massive attraction from the readers, what I liked here is his strategy to incorporate his service within.

Medium screenshot of Jay Baer article

Image Source

In the post about optimizing for voice search, Jay contextually promotes his digital marketing service, offering services to create your content strategy.

Once your creative ideas are flowing, try our blog topic generator to help build out a pipeline of standout content ideas for your audience.

The Medium App

I travel frequently, so consuming and interacting with content on the go is best for me. For this, I’m using the Medium app. The app includes the same stories and content I can find on my laptop, with the added bonus of a mobile-first interface.

how to make money on medium, app

On the app, I can surface content related to my interests. These curated lists depend on the tags, publications, or authors I follow.

I also use the app‘s Explore feature to find new, interesting content and to engage with fellow readers, joining conversations as they’re happening.

I was hoping I could start drafts in the app, but no. That said, I can check story stats wherever I am, which is helpful.

Use Medium for Writing and Sharing Your Best Stories

Medium is a powerful platform for writers and content creators to share ideas, engage with readers, and even earn money.

By following the steps I shared in this article, you can unlock the full potential of Medium. So, start writing and exploring the possibilities.

Your audience is waiting.

Editor’s note: This post was originally published in August 2021 and has been updated for comprehensiveness.