Categories B2B

How to Find and Remove Duplicates in Excel

“I’ve never been a natural, all I do is try, try, try.”

These Taylor Swift lyrics, in the song “mirrorball“, perfectly explain my relationship with numbers, math, and anything concerning data analytics.

However, as a marketer, data analysis is one of the most important aspects of my job. But like most marketers, who prefer strategy and creativity, numbers and Excel reports don’t come naturally to me.

That’s why it’s important to know how to work in Excel and find shortcuts to help make the process easier.

Today, we’ll dive into one of those processes — how to find and remove duplicates in Excel.

Download 9 Excel Templates for Marketers [Free Kit]

1. Find and highlight duplicates in Excel through conditional formatting.

The first step of removing duplicates will be to find them. An easy way to do this is through conditional formatting.

You can do that by following these steps:

  1. Make sure you’re on the Home tab. Screenshot of Excel home tab.
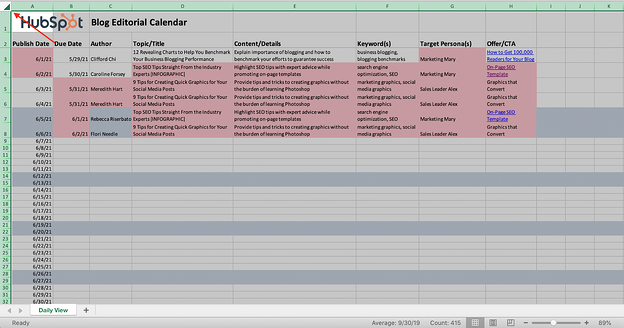
  2. Select the entire table by hitting the button on the top left.Screenshot of an Excel doc with the entire sheet highlighted.
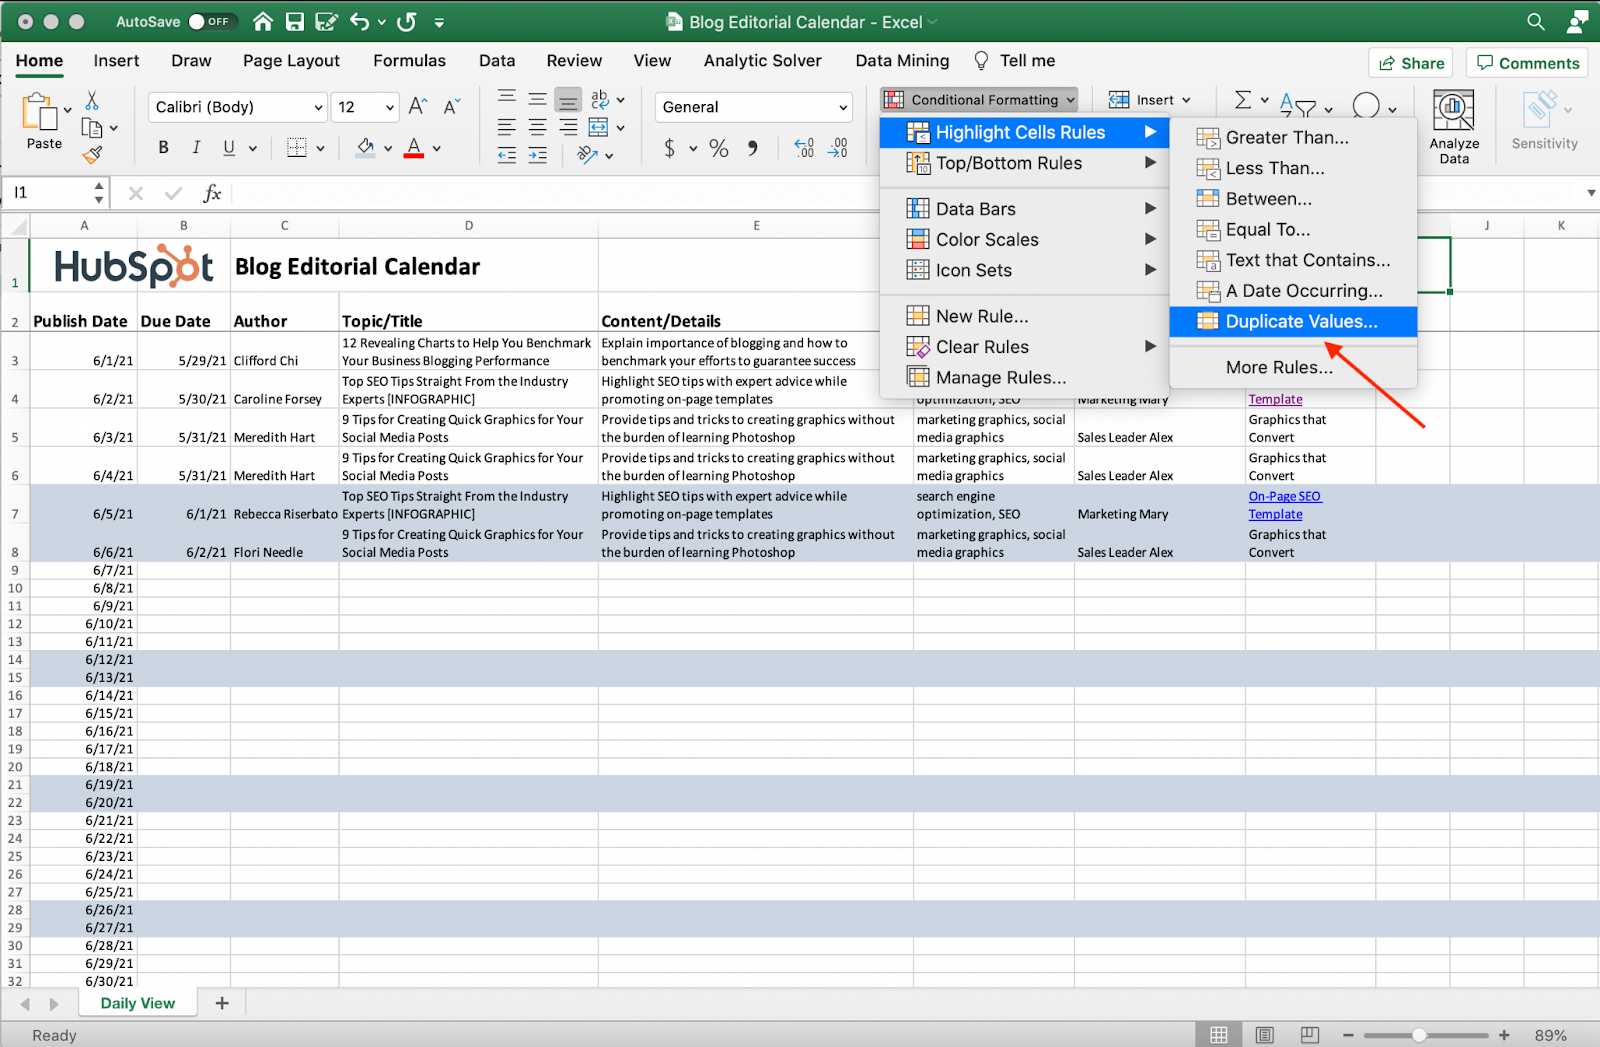
  3. Click Conditional Formatting → Highlight Cells Rules → Duplicate Values.Screenshot of removing duplicate values in Excel.
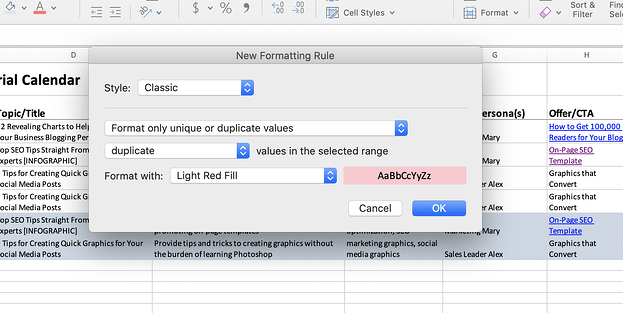
  4. In the area titled “Format With”, change how you want duplicates to be highlighted. You can choose highlighting, bolding text, changing the color of text, etc.

Excel screenshot of formatting rules.

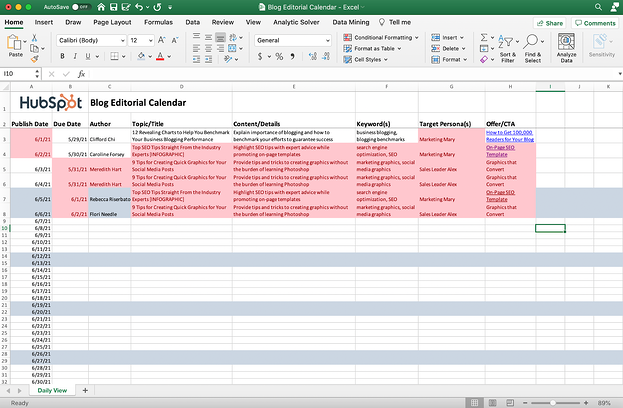
And voila. Your duplicates are now highlighted. It should look something like this:

Excel sheet with duplicates highlighted.

2. Count duplicates in Excel.

Now that you’ve found your duplicates, you might want to count them and see how many there are, especially if you have a large dataset.

To do this, you can use this formula =COUNTIF(A:A, A2). The formula means that Excel is going to count how many times a certain value is used in a certain place.

The column A:A stands for the data table you’re looking at. This will probably be a different value on your Excel sheet. Then, A2 references the value you want to count the frequency of.

To do this, follow these steps:

  1. Create a new sheet in your Excel doc.

    I found that the easiest way to count duplicates in Excel is to create a new sheet in your Excel workbook.

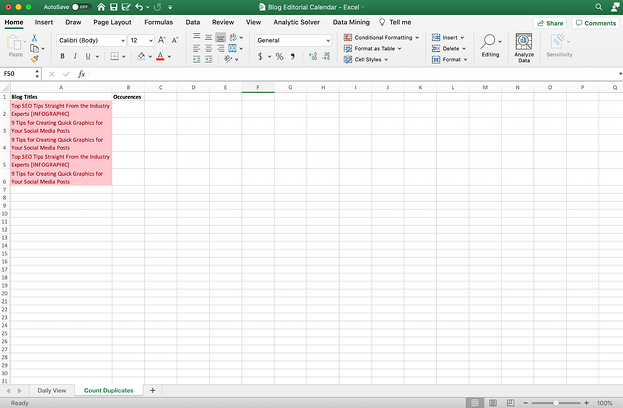
    Then, copy and paste the column that you want to count duplicates in. In the example below, I copied and pasted the blog titles from the editorial calendar to see if there were any duplicate titles.

    Then, create another column for “occurrences.” This is where we’ll put the formula. Your new sheet should look something like this:

    Excel sheet with duplicates counted.

  2. Insert the formula.

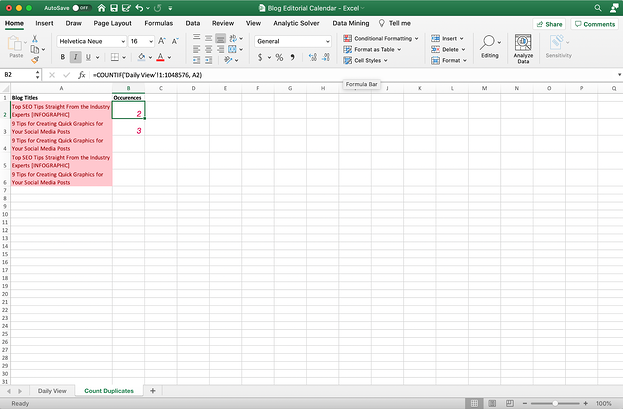
Now, you can insert the formula in the first cell under occurrences. You’ll type in or copy and paste the formula. Then highlight A:A (we’re going to replace this with your dataset), and click on the sheet in your Excel doc that has the data. Now, you can click on the top left to select the entire sheet, or you can just highlight the column or rows with your data.

For the second value, you’ll want to go back to your second sheet, highlight the A2, and choose the value next to it on the left. In most cases, this will stay A2, A3, A4, etc.

See what this looks like in action here:

Excel doc with a count formula.

3. Remove duplicates with the remove duplicates feature.

Now it’s time to remove the duplicates from your dataset.

Before you do this, I’d recommend duplicating/copying your dataset into another sheet or a whole other workbook altogether. You always want to keep your original data intact, even though you can use Excel to remove and filter the data you want. You don’t want to lose data because of a wrong click.

Once you’ve made a copy of your data, it’s time to remove the duplicates.

To remove duplicates, follow these steps:

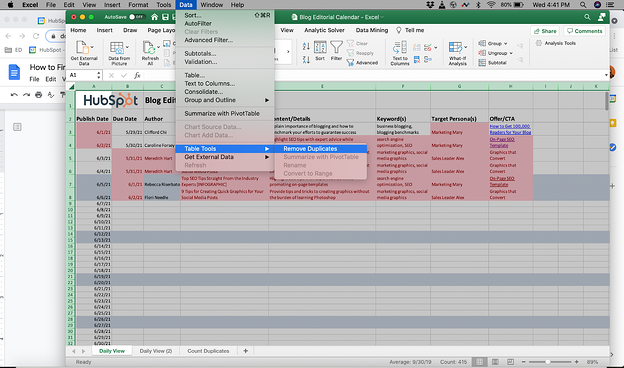
  1. Select the worksheet that has duplicate values that you want to remove. Click Data → Table Tools → Remove Duplicates.Remove duplicates Excel function.
  2. Choose the columns where you want to remove the duplicates.

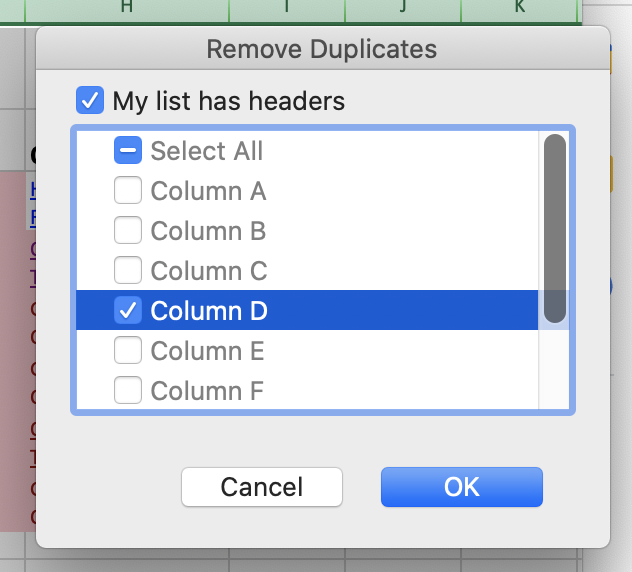
    In this case, I only want to remove duplicate blog titles. So I’ll choose column D. I kept “My list has headers” checked because there are two rows of headers before the data starts on this sheet.

    Remember that Excel will remove the entire row where the duplicate value is.

    Remove duplicates column selector on Excel.

  3. Review data.

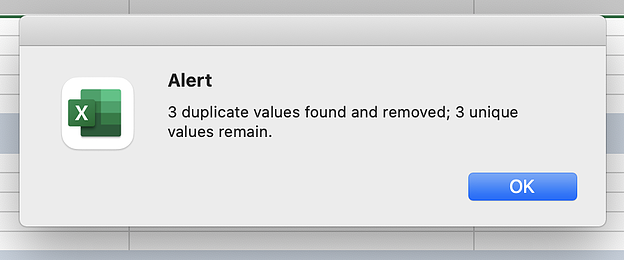
Excel will now show you have many duplicate values were found, removed, and how many unique values remain.

Screenshot of an Alert from Excel.

Now you can review your data. Comparing my first dataset to this dataset, you can see that all the rows containing the same blog title were deleted.

This is what the sheet used to look like:

Screenshot of a dataset in Excel.

And this is what it looks like now:

Screenshot of a dataset in Excel.

When you remove duplicates from Excel, it’s important to note which column you want to remove duplicates from and remember that Excel is removing duplicates within a selected table range. You can highlight the whole workbook or you can just highlight the rows that have data in it.

Excel will automatically keep the first occurrence of the value.

Working on marketing reports or any marketing Excel sheet can leave you frustrated and banging your head against the wall (is it just me?). That’s why using Excel templates and following these simple instructions on formulas can help you level up your game.

New Call-to-Action

Categories B2B

The Top 3 Reasons Consumers Read Blogs & How to Attract Them in 2021 [New Data]

In 2021, there’s no question that blogging is beneficial to any marketing strategy.

But, while blogging has been known to help brands boost leads, SEO, and credibility, many busy marketers might still worry that blogging’s effectiveness could be losing steam.

Fears that “blogging is dead” haven’t been eased by research. Recently, when we polled over 300 people to ask them how often they read blogs, roughly 40% said “never.” This followed HubSpot’s Not Another State of Marketing Report, which revealed that blogging fell from the first to third-most-common content strategy between 2018 and 2020.

But, before you get wrapped up in all the negative data, it’s important to remember that blogging is still incredibly valuable to marketers — but the way you approach blogging matters more than ever. And, while our past survey found that 40% of people never read blogs, it conversely revealed that 60% of consumers read this content regularly.

The truth is, blogging is alive and well. You’ll just need to work a tiny bit harder to persuade people to read your content than you have in the past.

So, what’s one way to get into a consumer’s head and figure out how to motivate them to read your blog? Performing another survey.

Rather than asking more than 300 people, “Do you read blogs?”, I recently launched a follow-up Lucid survey that asked, “Why do you most commonly read blog posts?”

In the survey, which asked participants to select the most common reason that they consume blog content, answer options included, “To learn how to do something new,” “To be entertained,” “To learn more about products or brands,” and “To learn about news and trends in my job industry.”

With the number of leads that business blogs are known to generate, you might assume that a large chunk of people read blogs to learn about brands or products. But, actually, you might be surprised — and a little concerned — by the highest and lowest-ranking reasons for blog readership:

In fact, only four percent of consumers say they read blogs to learn about brands or products.

According to the results of the survey, more people are actually driven to read blogs that teach them how to do something new. While 33% selected this reasoning, 20% said they read blogs to be entertained, while 12% read blogs to learn about news or trends in their job industry.

Additionally, 9% said they’re driven to read blogs for all of the reasons given.

What exactly do the results above mean?

To win over blog readers, you’ll need to create content that provides some type of informative value or entertainment, rather than purely using your blog to discuss your brand or product.

In this blog post, I’ll walk you through the top three reasons why the general consumer population is driven to read blogs. I’ll also show you how to create blog content that fulfills your reader’s needs while still subtly spreading brand awareness.

→ Download Now: 6 Free Blog Post Templates

3 Reasons People Read Blogs

1. People read blogs to learn something new.

By far, the most common reason that people will read a blog post is to learn something new. This result doesn’t surprise me at all.

Why? Posts that include guides, step-by-step processes, tutorial videos, or fast-facts often gain a large amount of search traffic. This is because people are looking up instructions for how to do things on Google every day.

Even when posts aren’t informing people of how to do something on a granular level, blogs that discuss complex topics such as studies, trends, or topics people are less familiar with can pique a person’s curiosity.

Psychologically,  researchers have reported that humans crave valuable information similarly to how they crave food and financial wealth. As a blogger, you can harness this to create content that both piques curiosity, while discussing topics related to your brand, service, or products.

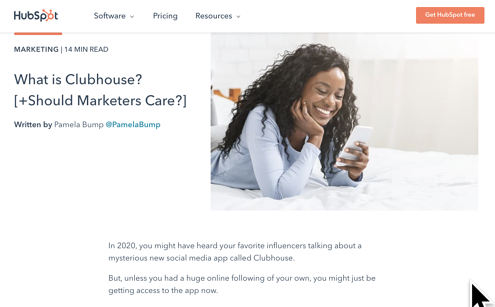
For example, on the Marketing Blog, we might show our readers how to use a new social media network, like Clubhouse. By doing this, marketers or social media users who want to learn how to do this could find our content in search or on social media and read it to learn how to create this content.

On a broader scope, our blog might create multiple pieces of content that discuss a trend from multiple angles. For example, when the app TikTok emerged, we wrote a few blog posts to answer common marketer questions like, “What is TikTok?”, “How do brands market themselves on TikTok?”, or “How do you leverage influencer marketing on TikTok?”

Aside from helping our readers, guide or trend-related blogs allow us to highlight the level of research and knowledge we’ve gained as marketers. This could also demonstrate to a prospect that HubSpot is a credible company that sells quality products within the marketing industry.

2. People read blogs to be entertained.

While people crave knowledge, they also like to be entertained. Each day, people might read blogs that tell interesting stories, make them laugh, or intrigue them in some other way.

This lines up well with 2020 research noting that more consumers were watching videos and consuming online content for the sake of fun and escapism. 

But, as a business blogger, You might be asking yourself, “How can I entertain my readers while still keeping my blog professional?”

The truth is, when you think creatively, there are a number of ways you can entertain your audience while still staying on brand.

For example, you could create a fun infographic or photo post about a viral trend in your industry, While your readers might not be willing to invest in this viral trend, the imagery and information about the trend might entertain them. In one of our posts, we highlighted funny memes that marketers used in their actual campaigns.

Example of a post where we highlighted marketing memes to entertain our readersAlternatively, you could also create a fun, but informative, video or podcast to go with your blog post. With this added layer of content, you could dive deeper into discussing a viral marketing trend, or interview an industry expert that people in your field follow. While this might not be “entertaining” for people outside of your industry, it might be more interesting than the average blogs people in your field might be reading.

Here’s an example of a blog post that combines text and video for a better reader experience:

including videos in your blog posts can make them more entertaining

3. People read blogs to learn about trends related to their job industry.

While people might not be interested in reading blogs that specifically discuss your product or brand, they could be more intrigued by a blog that discusses an industry your product is affiliated with.

While the poll result noted in the introduction came from general consumers with mixed professional backgrounds, it’s likely that those in the workforce will read a blog if it educates them or provides them with valuable information about their industry.

When looking at the HubSpot Blog readership and data, it’s clear that our audiences enjoying reading content related to trends in the marketing, sales, service, or website industries. And, when we get tips from experts or data on how to navigate these trends, our readers are even more engaged. 

For example, our industry recently started buzzing about the social media audio app, Clubhouse. While HubSpot had been watching this trend while the app was still primarily used by celebrities, we started to churn out content about it once every-day users and brands began to get invited to join the app.

On top of just explaining what Clubhouse was and why the app was going viral, we also added to the post by including quotes and opinions from social media marketers about the social platform’s brand potential.

Here’s an example of one of the posts we wrote that discussed the viral new trend and app. 

Example of how the HubSpot Blog responded to the Clubhouse trend
Aside from responding to trends, you can additionally write about breaking news related to your field. For example,
here’s another post where we discussed how a third-party cookie phaseout could impact marketers.
 
By responding to trends and news on your website, you position your blog as the go-to place for the latest industry trend insights, as well as educational information and general tips. 

Creating Content That Fulfills Reader Needs in 2021

So, how do you create engaging content that pulls in audiences with all different reading motivations while still spreading brand awareness about your product or service? Consider publishing blog posts that combine industry trends, how-tos, and entertainment. After all, nine percent of the survey recipients polled above said they read blogs for all of the reasons on the list I gave.

Here are two examples of how you can create content that fulfills the interests of multiple groups of blog readers.

Teach your readers how to do something in your industry.

At the HubSpot Blog, each of our posts teaches readers about something specific. For example, the post you’re currently reading highlights the research we’ve done about how people read blogs and shows you how to leverage these results.

In other posts, we’ll also inform marketers by giving them a step-by-step guide to a marketing tactic or examples of how brands leverage promotional trends. Regardless of what we write about, we’re always trying to teach readers something valuable.

When you create content that educates people about strategies related to your industry, it’s also easier to subtly discuss your product in a way that doesn’t seem shameless of over promotional.

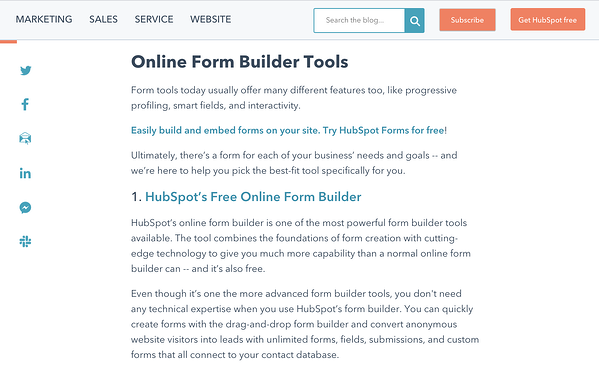
For example, when we’re discussing a strategy that HubSpot can help with, we might subtly link readers to a tool or resource we offer that can help them. Here’s an example of a HubSpot mention in a post about form building tools:

blog post about form builder tools

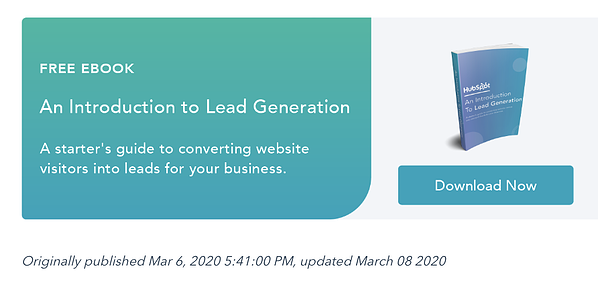
We also like to include free offers related to our content at the end of each blog post. When we do this, a reader can learn more about the topic we’ve just taught them about. And, when they fill out a simple form requesting the free resource, they can choose whether or not they’d like to be contacted about one of our products. This allows the reader to feel like they are receiving valuable information without being forced to learn about our products.

an offer given at the end of a hubspot blog post related to the offer

Even when you don’t specifically acknowledge a product, an industry blog focused on informing readers can show off your company’s level of expertise. When your brand is seen as highly knowledgeable about your industry, readers might think that your products were also created by your staff of industry experts.

Entertain industry readers while still informing them.

Even though an industry blog will likely target company employees or leaders, this doesn’t mean your content can’t be informative and entertaining. For example, you can use videos, GIFs, imagery, or interactive blog assets to add to your content while keeping it interesting for the reader.

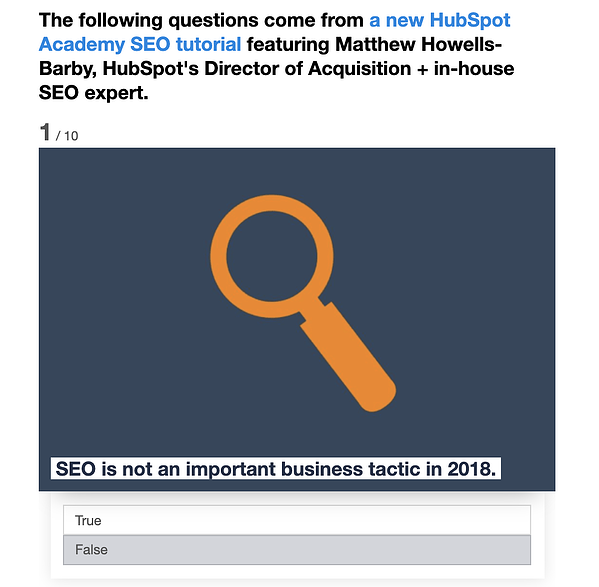
For example, you could consider embedding a trivia or personality quiz related to your industry, as we did in this blog post:

HubSpot blog post quiz

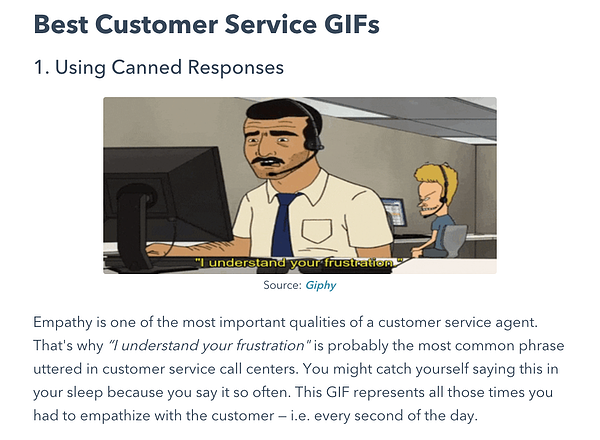
On occasion, you could also create a fun, suitable for work posts that your industry readers can relate to. For example, here’s a Service Blog post where we highlight GIFs related to working on a customer service floor:

Funny HubSpot blog post featuring GiFs

Entertaining blog content on an industry blog can similarly show off your expertise. But, importantly, this content also allows your reader to relate to your brand on a more human level.

Building an Effective 2021 Blog Strategy

While it can be great to run with one successful content type, the blogs with the most credibility and quickest growth often have a mix of content that entertains or informs readers, makes them aware of brands or products, or teaches them something new. And, with 9% of consumers in the poll above saying that they’ll read blogs for “all” reasons listed, there’s a good chance that a mix will intrigue and fulfill the reading needs of multiple different groups.

To learn more about how to drive internet users to your blog, check out this post. For tips on how to be a blogger, check out this post with advice from our own blog team.

Editor’s Note: This blog post was originally published in May 2020 but was recently updated for comprehensiveness and freshness.

Categories B2B

The 12 Best Free Graphic Design Software for Marketers and Beginners

When it comes to website success, what you see is what you get. While compelling text, blog, and social media content can help set your brand apart from the competition, the visual appeal of your site is the first thing users see when they follow backlinks or click through search engine results.

Recent research found that it takes just 2.6 seconds for users’ eyes to focus on a specific area of your website. What’s more, it takes just 0.05 seconds for visitors to form a general first impression of your site — meaning you’ve got just one opportunity to change their minds or reinforce this impression, and it happens in the first three seconds of arrival.

As a result, it’s critical to create webpages that are both aesthetically appealing and contextually relevant. For larger businesses, this often means hiring dedicated graphic designers to develop eye-catching designs and deploy them consistently across web pages, but SMB budgets may not support this type of spending.

Take our free Graphic Design Essentials Course on HubSpot Academy to learn  design fundamentals and how to create simple designs.

What is the Best Free Graphic Design Software?

If your research turns up a problem — your images aren’t compelling, your text is hard to read and your color scheme hurts the eyes — you need a simple solution.

Free graphic design software offers the ability to customize the look and feel of your site without breaking the bank. But with a host of options on the market, which is the best fit for your business?

Two broad factors impact this outcome: Your current graphical ability and your potential use case. For example, if you have no experience with graphic tools, look for a solution that’s simple, streamlined, and does most of the work behind-the-scenes. If you have a graphic design background or natural inclination, tools with more robust customization and control may be a better fit.

If you’re planning to revamp your entire site with new colors, images, logos, and menus, you’ll need an in-depth solution that provides this level of control. If you’re starting small with minor changes to your color scheme or image quality, this kind of granular adjustment isn’t necessary.

So which software tool is the best fit for your business? Here’s a look at some of the best free graphic design tools and some pros and cons for each.

The Best Free Graphic Design Software for Marketers and Beginners

1. DesignWizard

Platform: Windows

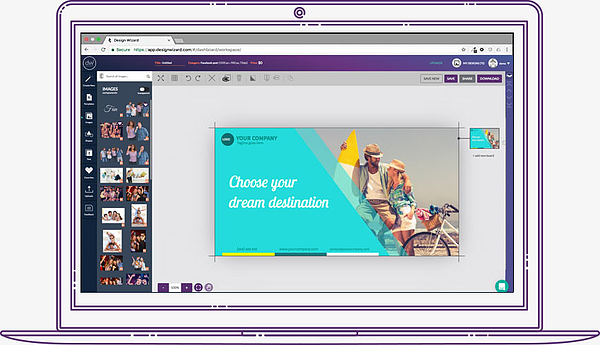
designwizarrd interface

DesignWizard ranks among the best free graphic design software for beginners. The tool offers a large database of images along with a host of free templates (over 10,000), plus a simple, easy-to-use interface. While you can also quickly create custom templates, DesignWizard excels as a front-line, free graphic design tool for beginners.

Despite an easy-to-use interface and no upfront costs, it’s worth noting that most of the more powerful options in DesignWizard are only available in its for-pay version.

2. Setka Editor

Platforms: Windows, Mac

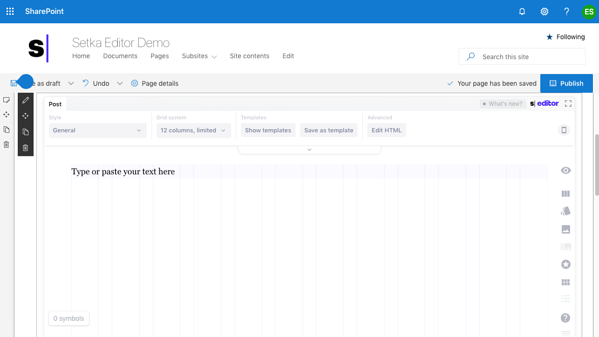
Setka editor user interface

Setka bills itself as “everything you need to create content that converts.” This graphic design software is primarily focused on delivering enhanced content branding across your website, ad campaigns, and social media posts — and works from within your current CMS or in the cloud.

The caveat? Although the Setka Editor is free to try for two weeks, companies will need to select a plan — Starter, Pro, or Enterprise — to unlock the full feature set and keep using Setka.

3. Canva

Platforms: Windows, Mac, Android, iOS

Whether you’re looking to create an ebook, infographic, business card, or email header, Canva has a template to simplify your process. The free web design tool, developed by non-designers, offers professional, easy-to-customize templates for just about any design need you can think of.

The drawback? You might need to invest in the paid version or try one of the more advanced free graphic design softwares as you skill up. While Canva’s free version is great for new designers working with templates, you can access more complex tools and features such as team sharing in the paid version.

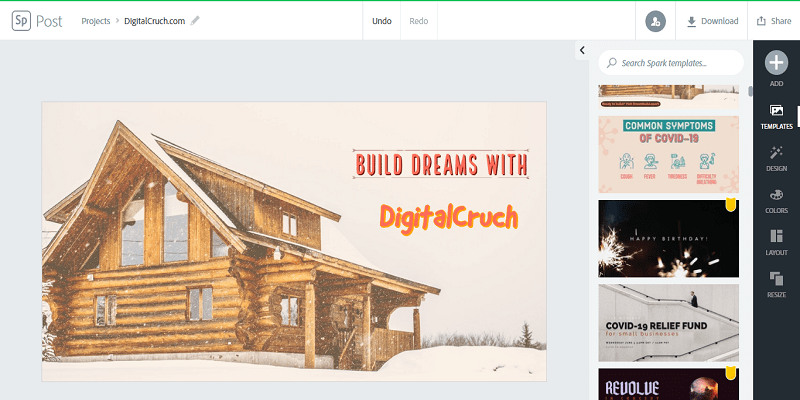
4. Adobe Spark

Platforms: Windows, Mac, Android, iOS

adobe spark user interface

Adobe Spark is a free alternative to the company’s popular, for-pay Adobe Illustrator. While it’s not nearly as full-featured, it does support integration with other Adobe products. It’s easy to use and it comes with a host of free templates. If you’re looking to quickly create posters or videos for ad campaigns, Spark is a great choice.

The potential drawback? A limited feature set makes this a great starting point for beginners but less useful for more in-depth projects or experienced designers. The good news is that Spark is available for both web and mobile, meaning you can design anywhere, anytime.

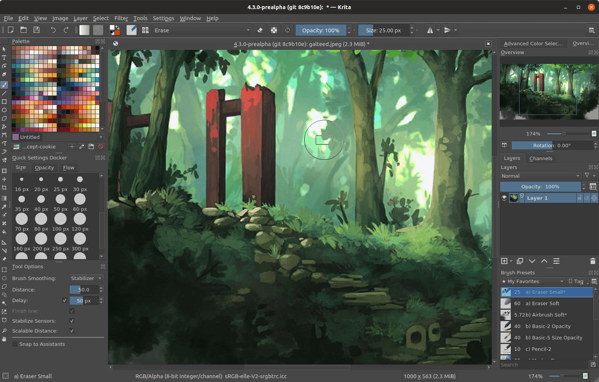
5. Krita

Platforms: Windows, Mac, Android, Linux

Krita is a free, open-source painting program made by artists, for artists. Ongoing development of this tool depends on donations and is driven by the needs of the designer community at large. It’s no surprise, then, that Krita includes a customizable user interface, feature-rich toolset, and a comprehensive resource manager.

For businesses looking to boost their graphic design impact, Krita is a great tool — if they have the help of an experienced designer. For companies in need of simple, streamlined solutions, other software on this list offers a better fit for beginners.

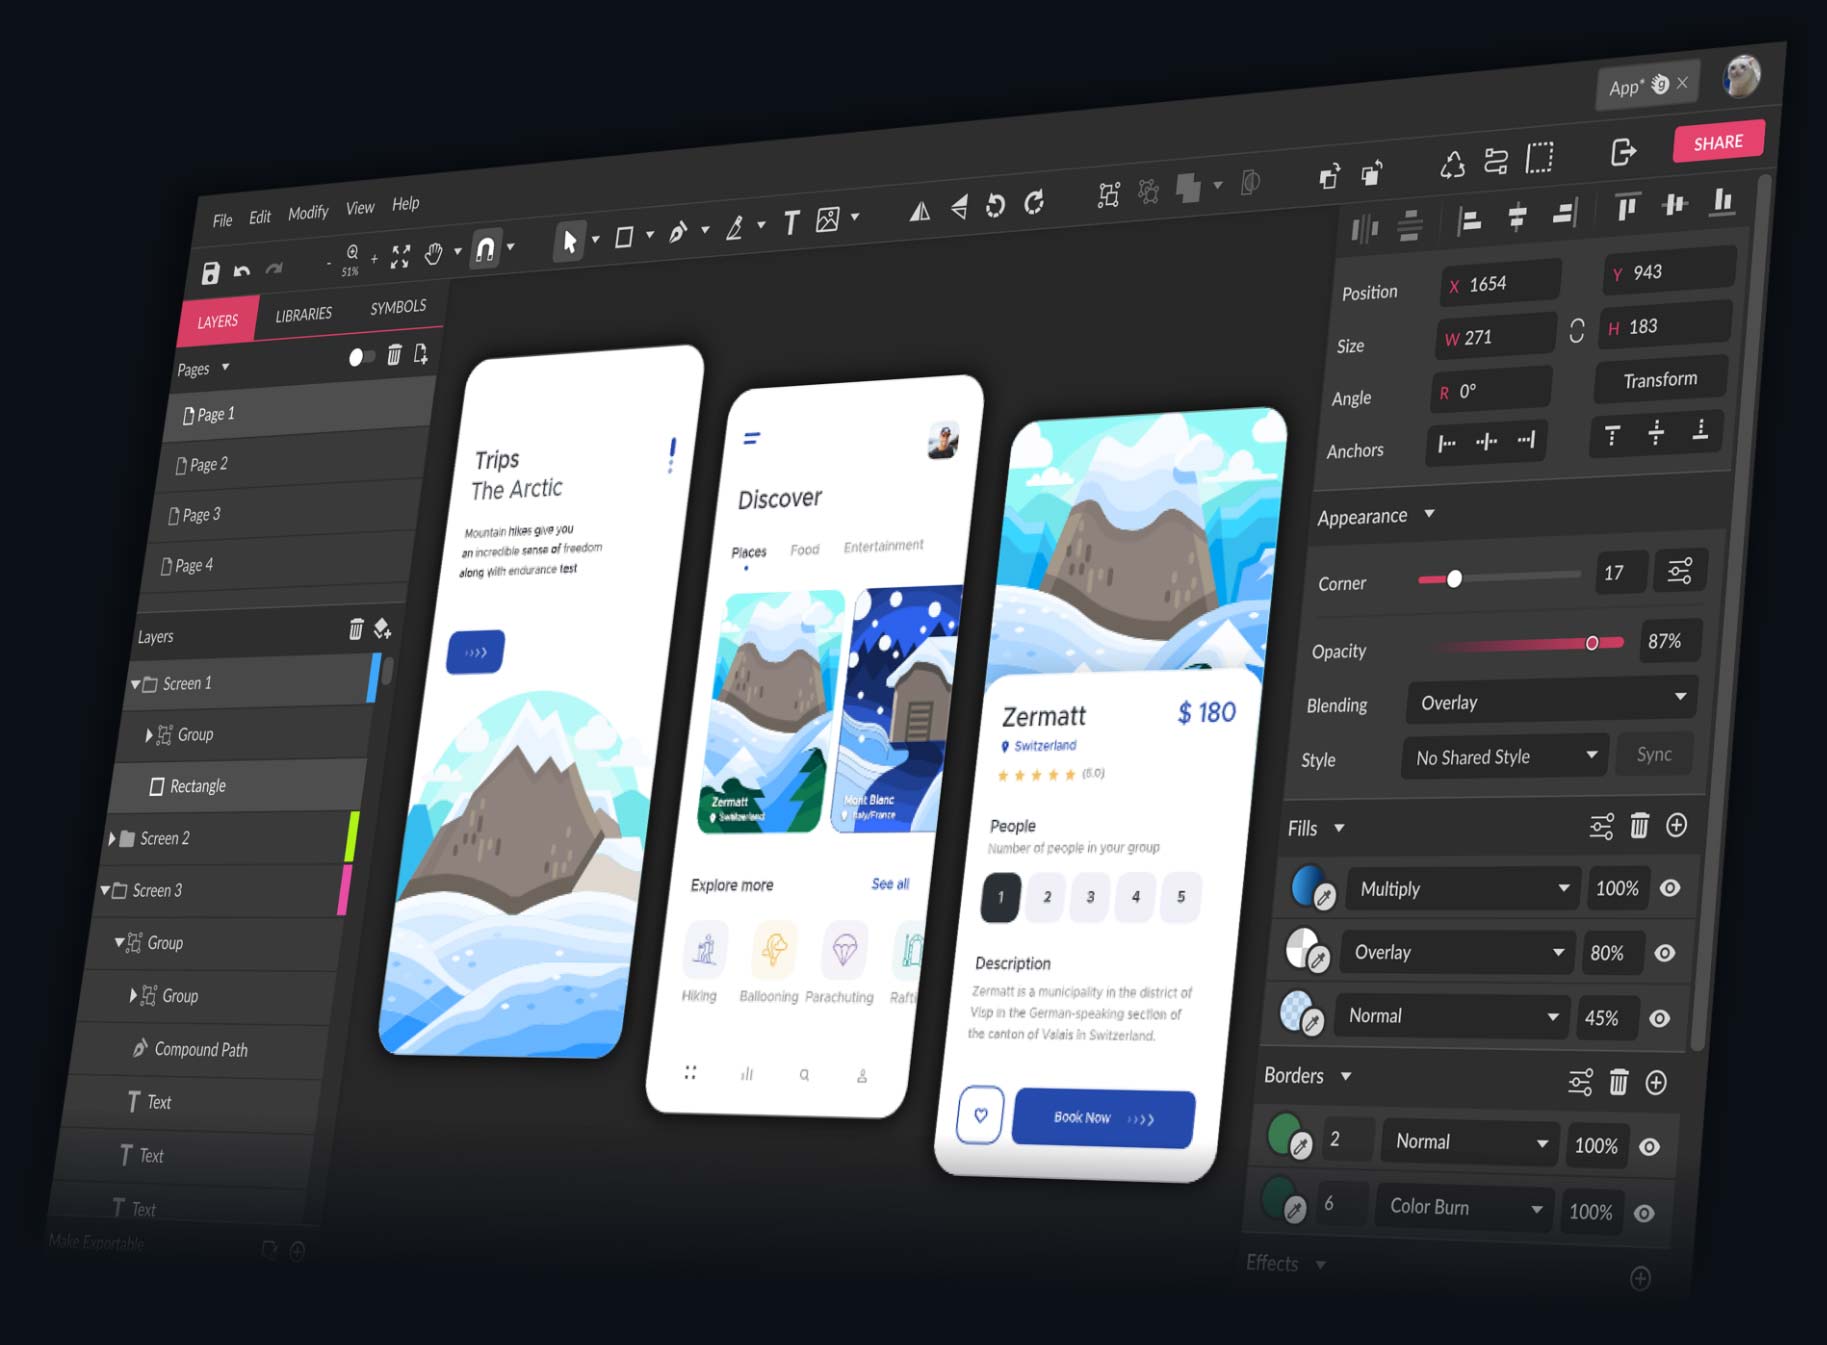
6. Gravit

Platforms: PC, Mac, Chrome OS, Linux

graphic designer software

Image Source

Gravit is a vector design application created by the makers of Corel Draw. With a host of tools for creating vector art and a self-adjusting interface, Gravit earns its place among the best free graphic design software for Mac and Windows — the tool is also available for ChromeOS and Linux.

Worth noting? When you sign up for a free trial of Gravit you automatically get access to “Pro” features, including the ability to work offline and see version history. However, you lose these features when your trial is up unless you’re willing to pay for a subscription.

7. Blender

Platforms: Windows, Mac, Linux

Blender Graphic Design Software

Blender is an open-source, 3D creation suite that makes it possible for graphic designers to create everything from rigging to animation to rendering and motion tracking. It also provides support for 2D animation and has an active community of users committed to helping Blender improve.

While Blender is a powerful tool, it’s not ideal for beginners — complex menus and a massive amount of design options mean you need to know your way around graphic design basics to make the best use of this tool.

8. Inkscape

Platforms: Windows, Mac, Linux

Inkscape - Free - Graphic Design Software

Its tagline is “draw freely” and Inkscape lives up to that mantra — there’s no cost for this graphic design tool and it packs a host of features for both beginners and experienced marketers. 

In addition to cross-platform support and an active community, Inkscape is known for superior vector art options and wide format compatibility. One drawback is that the sluggish controls can frustrate some users if they’re looking to quickly create and publish designs.

9. SketchUp

Platforms: Windows, Mac

SketchUp Free Graphic Design Sofrware

SketchUp offers both free and paid design plans, with its no-cost version still offering substantial advantages for designers. A robust modeling platform, it’s a great tool for creating 2D or 3D designs for furniture or other complex objects. 

With an easy-to-use interface and great support, SketchUp is a great tool if you’re looking to create product pages that feature in-depth images and dimensions. Potential drawbacks include limited storage space for free plans and no mobile support.

10. Gimp

Platforms: Windows, Mac, Linux

Gimp Free Graphic Design Software

One of the most popular open-source design tools, Gimp is often compared to its closest for-pay competitor, Photoshop, with users on both sides making passionate arguments for one platform over the other.

Gimp gets high praise as a free design tool for its support of all file formats, ease of digital retouching, and ability to quickly create new designs from scratch. In addition, Gimp features a customizable interface that allows more experienced designers to make use of the tool’s capabilities. Worth noting? Gimp does not support any Photoshop plugins.

11. Genially

Platform: Windows

Genially Free Graphic Design Sofrware

Genially makes design easy with a user-friendly interface and robust options that allow designers to create their own artwork from scratch. With this software, you can leverage pre-built templates or add interactive features such as buttons, layers, and hidden text. The free version of Genially has no limits on the number of projects you can create and there are now more than 12,000,000 users worldwide designing with Genially and supporting the community. 

There is a caveat, however. While the free version is substantive, some features — such as offline viewing and brand personalization — are reserved for paid plans only.

12. Paint 3D

Platform: Windows

Paint 3d Free Graphic Design Software

The classic Microsoft design tool is back, free, and updated to deliver more functionality. While it can’t compete with some of the more robust design tools on our list, Paint 3D comes with realistic textures, 2D cutout creation, and a host of 3D tools and effects.

If you’re a beginner looking for an easy bar to entry for straightforward graphic design, Paint 3D is a great place to start. There’s virtually no learning curve and since it’s made by Microsoft, the tool naturally works well on all Windows 10 devices.

Picking the Right Platform for Graphic Design

Most of the tools on this list are available on multiple platforms — including PC, Mac, and mobile — but is there a distinct advantage to selecting one platform over the other?

The short answer: Not really. These tools offer the same functionality regardless of which platform you choose.

The not-so-short answer? For beginners, opting for PC or mobile is probably your best choice. While Macs remain a powerhouse for graphic design, their user interface (UI) is less intuitive than their PC and mobile counterparts. This presents a learning curve you likely don’t need if you’re just getting started with graphic design.

For graphic design professionals and marketing experts, Mac-based solutions may be preferable for their focus on function over form.

Creating a Great First Impression

The first thing users see when they land on your website significantly impacts their perception of your brand — and their likelihood to become paying customers. The right graphic design software ensures your site delivers visual value from first impressions to eventual purchases and streamlines the process of ongoing aesthetic adjustment.

This post was originally published in Dec 2020 and has been updated for comprehensiveness.

New call-to-action

Categories B2B

Robots.txt: The Deceptively Important File All Websites Need

The robots.txt file helps major search engines understand where they’re allowed to go on your website.

But, while the major search engines do support the robots.txt file, they may not all adhere to the rules the same way.

Below, let’s break down what a robots.txt file is, and how you can use it.

→ Download Now: SEO Starter Pack [Free Kit]

What is a robots.txt file?

Every day, there are visits to your website from bots — also known as robots or spiders. Search engines like Google, Yahoo, and Bing send these bots to your site so your content can be crawled and indexed and appear in search results.

Bots are a good thing, but there are some cases where you don’t want the bot running around your website crawling and indexing everything. That’s where the robots.txt file comes in.

By adding certain directives to a robots.txt file, you’re directing the bots to crawl only the pages you want crawled.

However, it’s important to understand that not every bot will adhere to the rules you write in your robots.txt file. Google, for instance, won’t listen to any directives that you place in the file about crawling frequency.

Do you need a robots.txt file?

No, a robots.txt file is not required for a website.

If a bot comes to your website and it doesn’t have one, it will just crawl your website and index pages as it normally would.

A robot.txt file is only needed if you want to have more control over what is being crawled.

Some benefits to having one include:

  • Help manage server overloads
  • Prevent crawl waste by bots that are visiting pages you do not want them to
  • Keep certain folders or subdomains private

Can a robots.txt file prevent indexing of content?

No, you cannot stop content from being indexed and shown in search results with a robots.txt file.

Not all robots will follow the instructions the same way, so some may index the content you set to not be crawled or indexed.

In addition, If the content you are trying to prevent from showing in the search results has external links to it, that will also cause the search engines to index it.

The only way to ensure your content is not indexed is to add a noindex meta tag to the page. This line of code looks like this and will go in the html of your page.

<meta name=”robots” content=”noindex”>

It’s important to note that if you want the search engines to not index a page, you will need to allow the page to be crawled in robots.txt.

Where is the robots.txt file located?

The robots.txt file will always sit at the root domain of a website. As an example, our own file can be found at https://www.hubspot.com/robots.txt.

In most websites you should be able to access the actual file so you can edit it in an FTP or by accessing the File Manager in your hosts CPanel.

In some CMS platforms you can find the file right in your administrative area. HubSpot, for instance, makes it easy to customize your robots.txt file from your account.

If you are on WordPress, the robots.txt file can be accessed in the public_html folder of your website.

the robots.txt file in the public_html folder on your WordPress website

WordPress does include a robots.txt file by default with a new installation that will include the following:

User-agent: *

Disallow: /wp-admin/

Disallow: /wp-includes/

The above is telling all bots to crawl all parts of the website except anything under the /wp-admin/ or /wp-includes/ directories.

But you may want to create a more robust file. Let’s show you how, below.

Uses for a Robots.txt File

There could be many reasons you want to customize your robots.txt file — from controlling crawl budget, to blocking sections of a website from being crawled and indexed. Let’s explore a few reasons for using a robots.txt file now.

1. Block All Crawlers

Blocking all crawlers from accessing your site is not something you would want to do on an active website, but is a great option for a development website. When you block the crawlers it will help prevent your pages from being shown on search engines, which is good if your pages aren’t ready for viewing yet.

2. Disallow Certain Pages From Being Crawled

One of the most common and useful ways to use your robots.txt file is to limit search engine bot access to parts of your website. This can help maximize your crawl budget and prevent unwanted pages from winding up in the search results.

It is important to note that just because you have told a bot to not crawl a page, that doesn’t mean it will not get indexed. If you don’t want a page to show up in the search results, you need to add a noindex meta tag to the page.

Sample Robots.txt File Directives

The robots.txt file is made up of blocks of lines of directives. Each directive will begin with a user-agent, and then the rules for that user-agent will be placed below it.

When a specific search engine lands on your website, it will look for the user-agent that applies to them and read the block that refers to them.

There are several directives you can use in your file. Let’s break those down, now.

1. User-Agent

The user-agent command allows you to target certain bots or spiders to direct. For instance, if you only want to target Bing or Google, this is the directive you’d use.

While there are hundreds of user-agents, below are examples of some of the most common user-agent options.

User-agent: Googlebot

User-agent: Googlebot-Image

User-agent: Googlebot-Mobile

User-agent: Googlebot-News

User-agent: Bingbot

User-agent: Baiduspider

User-agent: msnbot

User-agent: slurp     (Yahoo)

User-agent: yandex

It’s important to note — user-agents are case-sensitive, so be sure to enter them properly.

Wildcard User-agent

The wildcard user-agent is noted with an (*) asterisk and lets you easily apply a directive to all user-agents that exist. So if you want a specific rule to apply to every bot, you can use this user-agent.

User-agent: *

User-agents will only follow the rules that most closely apply to them.

2. Disallow

The disallow directive tells search engines to not crawl or access certain pages or directories on a website.

Below are several examples of how you might use the disallow directive.

Block Access to a Specific Folder

In this example we are telling all bots to not crawl anything in the /portfolio directory on our website.

User-agent: *

Disallow: /portfolio

If we only want Bing to not crawl that directory, we would add it like this, instead:

User-agent: Bingbot

Disallow: /portfolio

Block PDF or Other File Types

If you don’t want your PDF or other file types crawled, then the below directive should help. We are telling all bots that we do not want any PDF files crawled. The $ at the end is telling the search engine that it is the end of the URL.

So if I have a pdf file at mywebsite.com/site/myimportantinfo.pdf, the search engines won’t access it.

User-agent: *

Disallow: *.pdf$

For PowerPoint files, you could use:

User-agent: *

Disallow: *.ppt$

A better option might be to create a folder for your PDF or other files and then disallow the crawlers to crawl it and noindex the whole directory with a meta tag.

Block Access to the Whole Website

Particularly useful if you have a development website or test folders, this directive is telling all bots to not crawl your site at all. It’s important to remember to remove this when you set your site live, or you will have indexation issues.

User-agent: *

The * (asterisk) you see above is what we call a “wildcard” expression. When we use an asterisk, we are implying that the rules below should apply to all user-agents.

3. Allow

The allow directive can help you specify certain pages or directories that you do want bots to access and crawl. This can be an override rule to the disallow option, seen above.

In the example below we are telling Googlebot that we do not want the portfolio directory crawled, but we do want one specific portfolio item to be accessed and crawled:

User-agent: Googlebot

Disallow: /portfolio

Allow: /portfolio/crawlableportfolio

4. Sitemap

Including the location of your sitemap in your file can make it easier for search engine crawlers to crawl your sitemap.

If you submit your sitemaps directly to each search engine’s webmaster tools, then it is not necessary to add it to your robots.txt file.

sitemap: https://yourwebsite.com/sitemap.xml

5. Crawl Delay

Crawl delay can tell a bot to slow down when crawling your website so your server does not become overwhelmed. The directive example below is asking Yandex to wait 10 seconds after each crawl action it takes on the website.

User-agent: yandex  

Crawl-delay: 10

This is a directive you should be careful with. On a very large website it can greatly minimize the number of URLs crawled each day, which would be counterproductive. This can be useful on smaller websites, however, where the bots are visiting a bit too much.

Note: Crawl-delay is not supported by Google or Baidu. If you want to ask their crawlers to slow their crawling of your website, you will need to do it through their tools.

What are regular expressions and wildcards?

Pattern matching is a more advanced way of controlling the way a bot crawls your website with the use of characters.

There are two expressions that are common and are used by both Bing and Google. These directives can be especially useful on ecommerce websites.

Asterisk: * is treated as a wildcard and can represent any sequence of characters

Dollar sign: $ is used to designate the end of a URL

A good example of using the * wildcard is in the scenario where you want to prevent the search engines from crawling pages that might have a question mark in them. The below code is telling all bots to disregard crawling any URLs that have a question mark in them.

User-agent: *

Disallow: /*?

How to Create or Edit a Robots.txt File

If you do not have an existing robots.txt file on your server, you can easily add one with the steps below.

  1. Open your preferred text editor to start a new document. Common editors that may exist on your computer are Notepad, TextEdit or Microsoft Word.
  2. Add the directives you would like to include to the document.
  3. Save the file with the name of “robots.txt”
  4. Test your file as shown in the next section
  5. Upload your .txt file to your server with a FTP or in your CPanel. How you upload it will depend on the type of website you have.

In WordPress you can use plugins like Yoast, All In One SEO, Rank Math to generate and edit your file.

You can also use a robots.txt generator tool to help you prepare one which might help minimize errors.

How to Test a Robots.txt File

Before you go live with the robots.txt file code you created, you will want to run it through a tester to ensure it’s valid. This will help prevent issues with incorrect directives that may have been added.

The robots.txt testing tool is only available on the old version of Google Search Console. If your website is not connected to Google Search Console, you will need to do that first.

Visit the Google Support page then click the “open robots.txt tester” button. Select the property you would like to test for and then you will be taken to a screen, like the one below.

To test your new robots.txt code, just delete what is currently in the box and replace with your new code and click “Test”. If the response to your test is “allowed”, then your code is valid and you can revise your actual file with your new code.

the robots.txt tester on Google Support

Hopefully this post has made you feel less scared of digging into your robots.txt file — because doing so is one way to improve your rankings and boost your SEO efforts.

SEO Starter Pack

Categories B2B

The 9 Best Ways to Send Large Files

We all know the frustrating feeling — maybe you’ve finally finished the script for your next marketing video, or you’ve collected all the images you need for your next campaign. But when you go to press “Send” you’re told, “Sorry. File too large.”

Unfortunately, our email accounts can’t carry as much storage as you might think. Gmail, for instance, can only hold files up to 25 MB.

Additionally, large files can eat at your storage space, even if it’s just sitting in your Sent folder.

If you’ve got a file you can’t send the traditional way, don’t worry — we’ve got nine easy and cheap alternatives, to ensure the largest of files can be sent to whoever, within minutes.

Download Now: How to Be More Productive at Work [Free Guide + Templates]

1. Upload your files to a cloud storage space, and share them or email them to others.

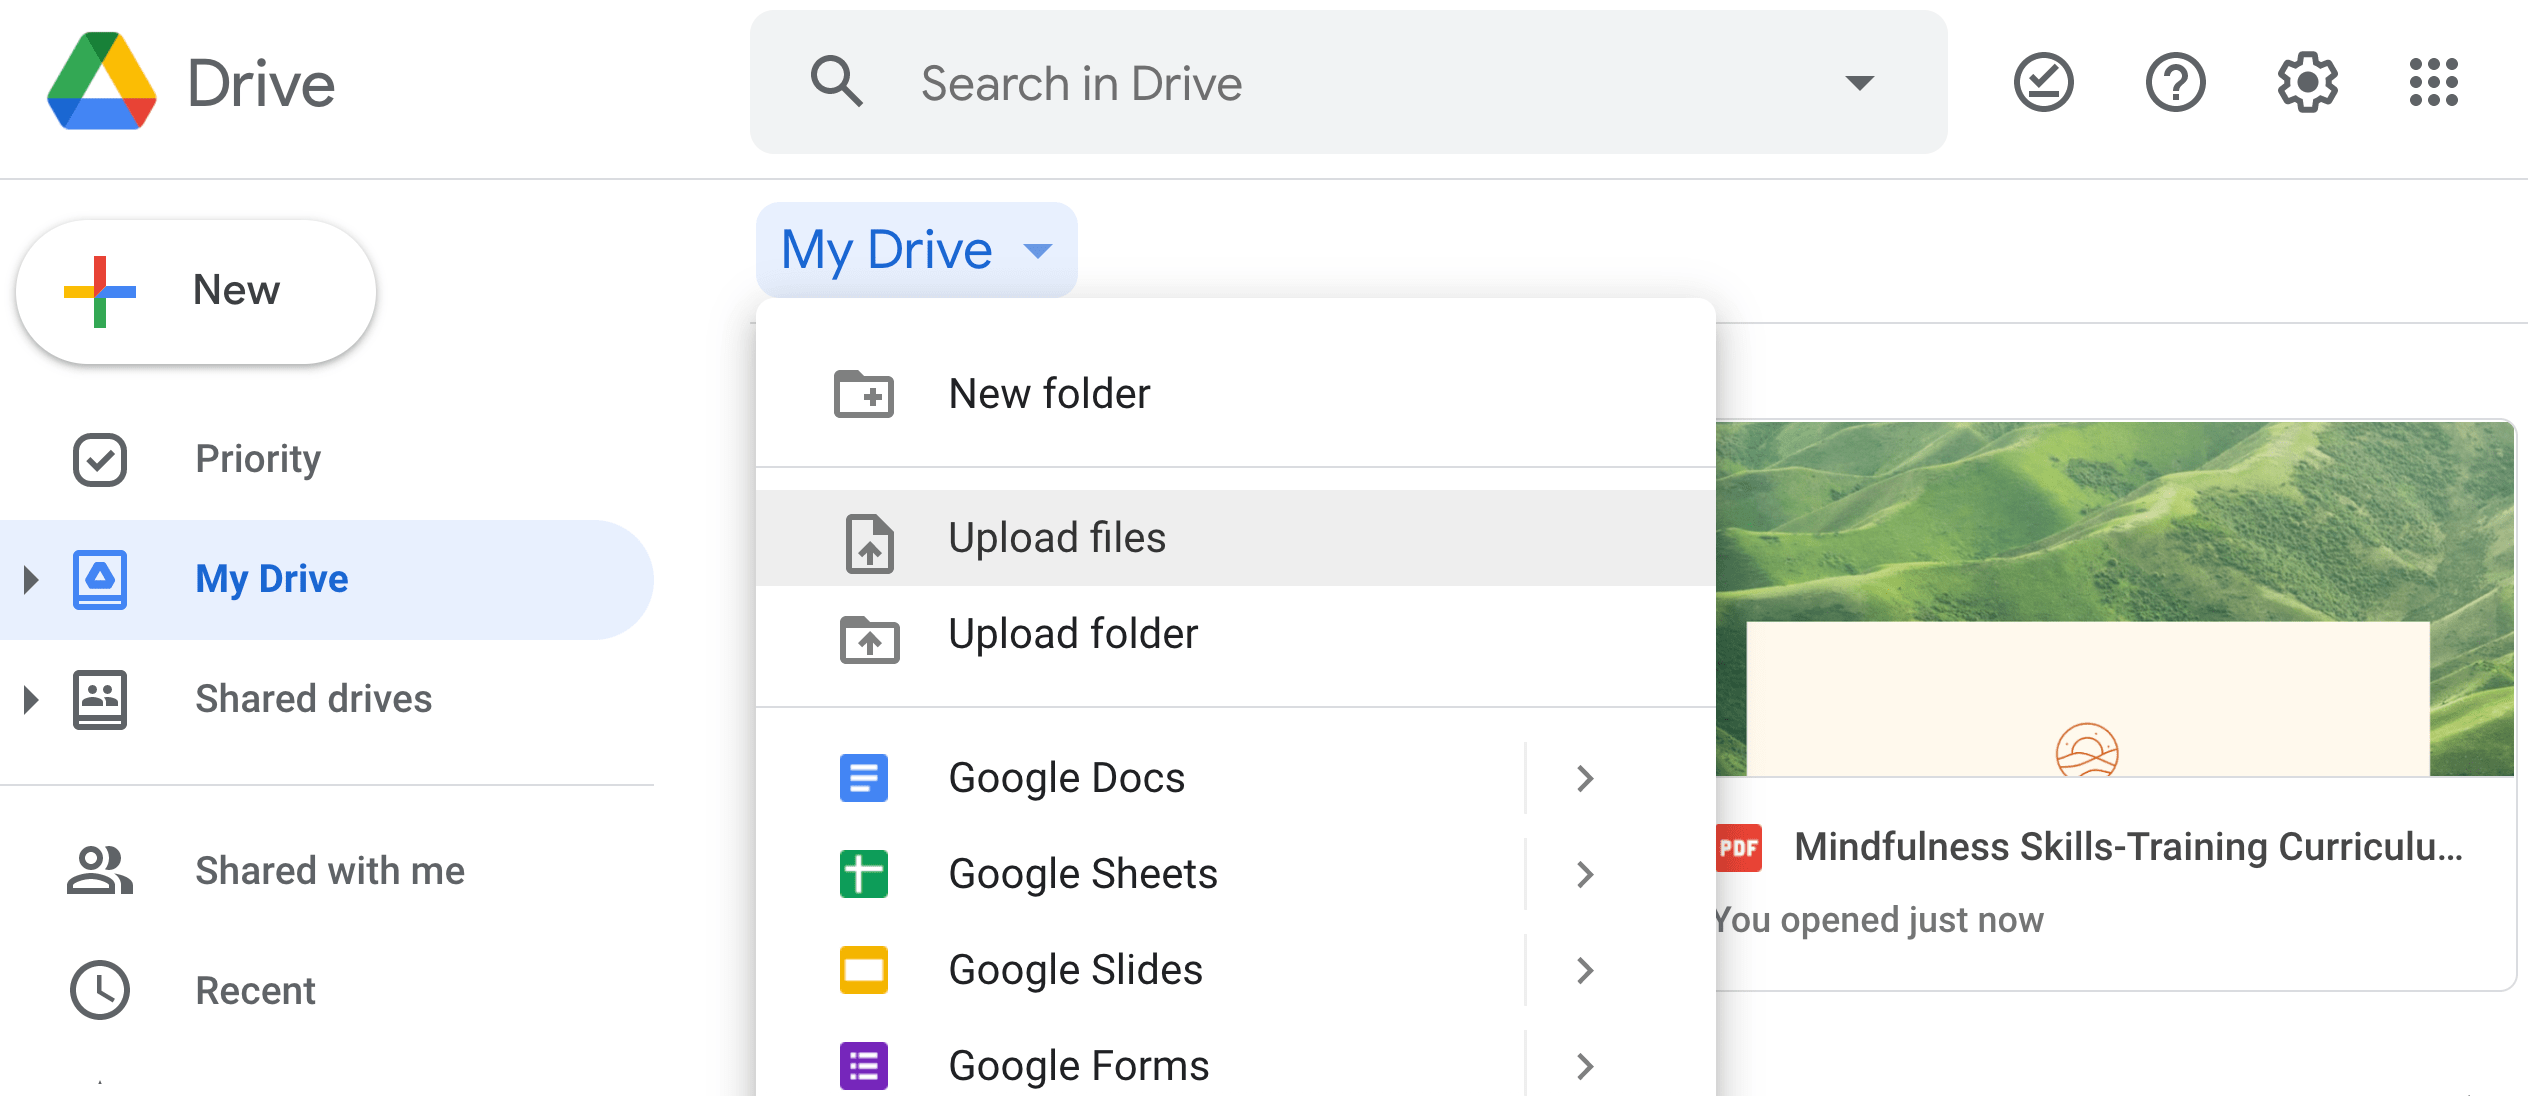
Using a cloud storage space like Google Drive, Dropbox, or OneDrive is one of the easiest and most popular methods for sending large files. Depending on your email provider, you’ll likely be able to use a corresponding cloud storage — like Google Drive for Gmail, or OneDrive for Outlook.com.

If you’re sending an attachment within a provider like Gmail, you’ll see the Google Drive button already integrated. Simply press it, choose your file, and then send it like a regular attachment.

Alternatively, Dropbox allows you to upload large files and then send a web link via email or text to your recipient. With Dropbox’s free tier, you’ll receive 2 GB of storage space. For $9.99 per month, you can increase your storage to 1 TB.

Specific Use Case: Ease-of-use when sending attachments through your email provider. Most likely to use when sharing files internally with colleagues. 

Google Drive homepage to share large files

2. Use file compression software, like 7-Zip.

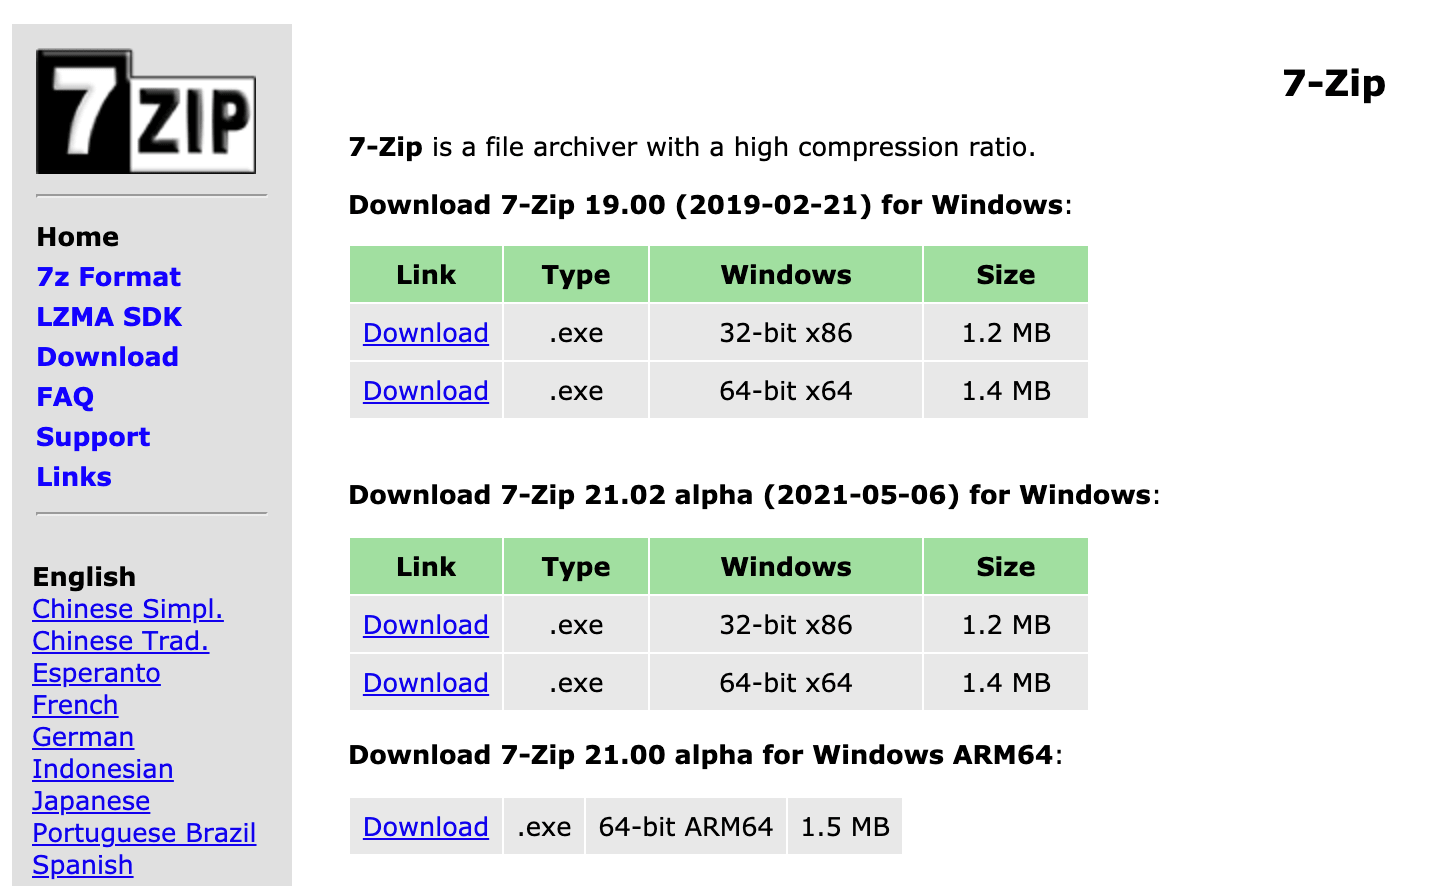
If you have multiple files, you might consider using a free compression software like 7-Zip, which can compress an entire folder of files at once. Zip files in general support lossless data compression, and are good for saving time and space while ensuring your files remain intact. Most operating systems can extract Zip files easily, without additional software.

7-Zip is available for Windows, Mac and Linux. You can also provide a password for your files with 7-Zip, to ensure they’re safe to send online.

Specific Use Case: Sending a folder full of files at once to a recipient. 

The 7-zip dashboard for sending folders to colleagues

3. Purchase a USB flash drive.

If you want to collaborate on a project or video with a large storage size, you might consider uploading it to a USB flash drive, which can range in size from 2 GB to 1 TB. This might allow you to pass your files more easily between coworkers, or back your files up for additional protection.

Best of all, if you use a USB you can take some strain off your computer, extending its data storage.

Specific Use Case: If you’re interacting with your team in-person, a USB flash drive is a good option for physically handing files to team members, and takes some of the storage strain off your devices. Alternatively, a USB flash drive is safe to use as a back-up, so if your computer crashes you don’t lose access to your files or folders. 

4. Use Jumpshare, a free online service.

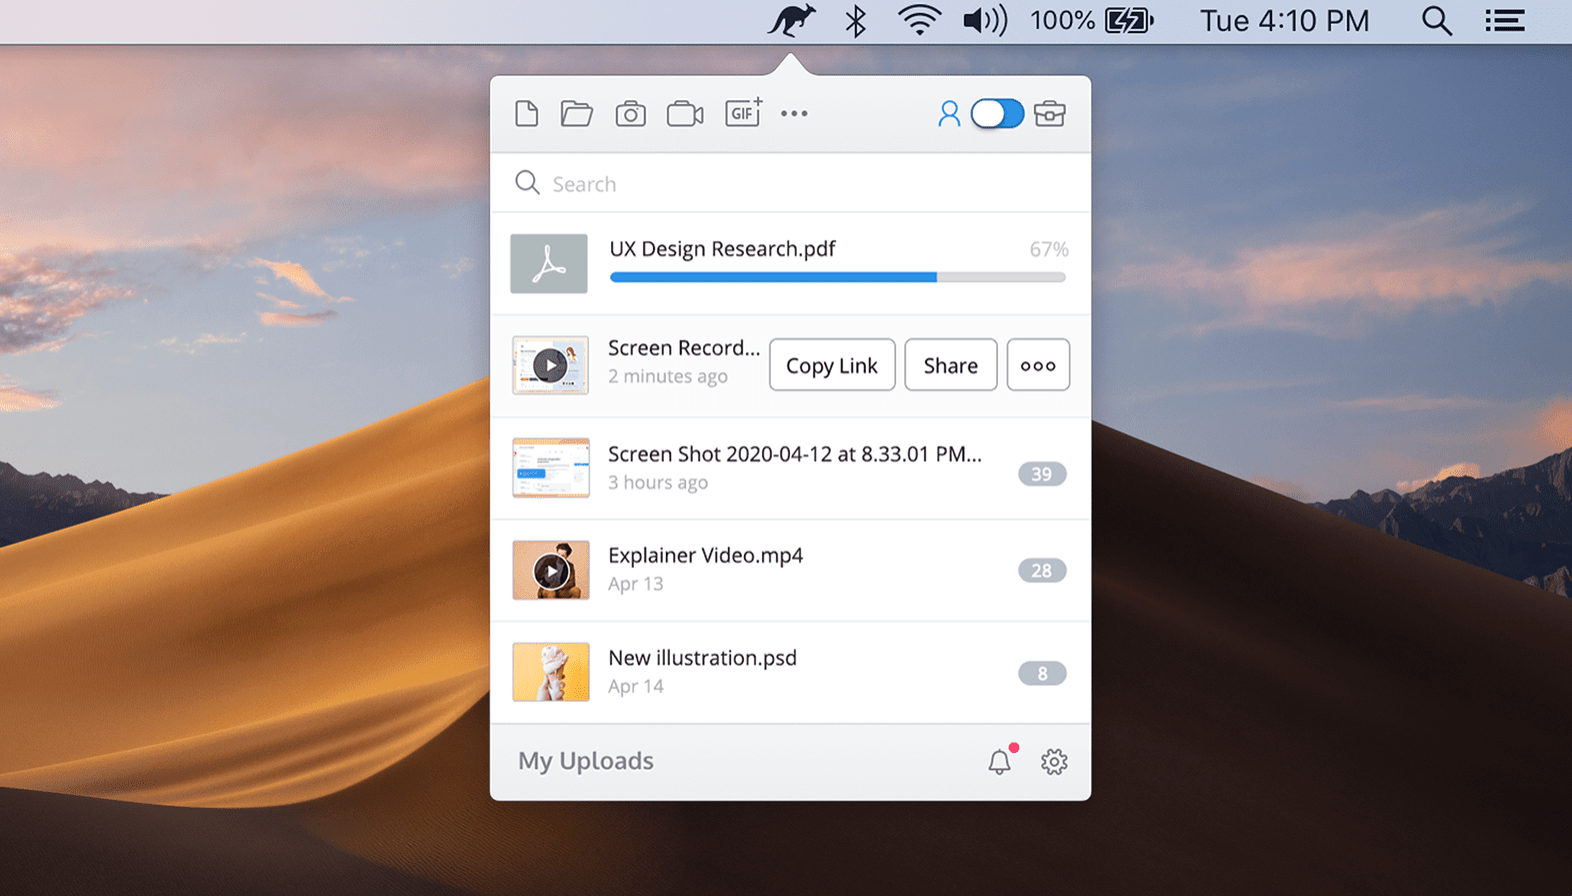
There are plenty of free online services that make uploading and sending large files both easy and incredibly quick. Jumpshare, for instance, lets you send up to 250 MB worth of files with a free account — simply upload a file or folder, and Jumpshare provides you with a link to share the files.

Plus, you can download the Jumpshare icon to your desktop. When you drag-and-drop files onto it, a link will be copied to your clipboard, which you can send to anyone, even if they don’t have their own Jumpshare account.

Specific Use Case: Easily, and quickly, sending files via links to colleagues. Best used for files or folders for which there isn’t too many privacy concerns, since the link is shareable with anyone. 

Jumpshare's desktop icon for uploading files quickly

5. Try Sendy PRO.

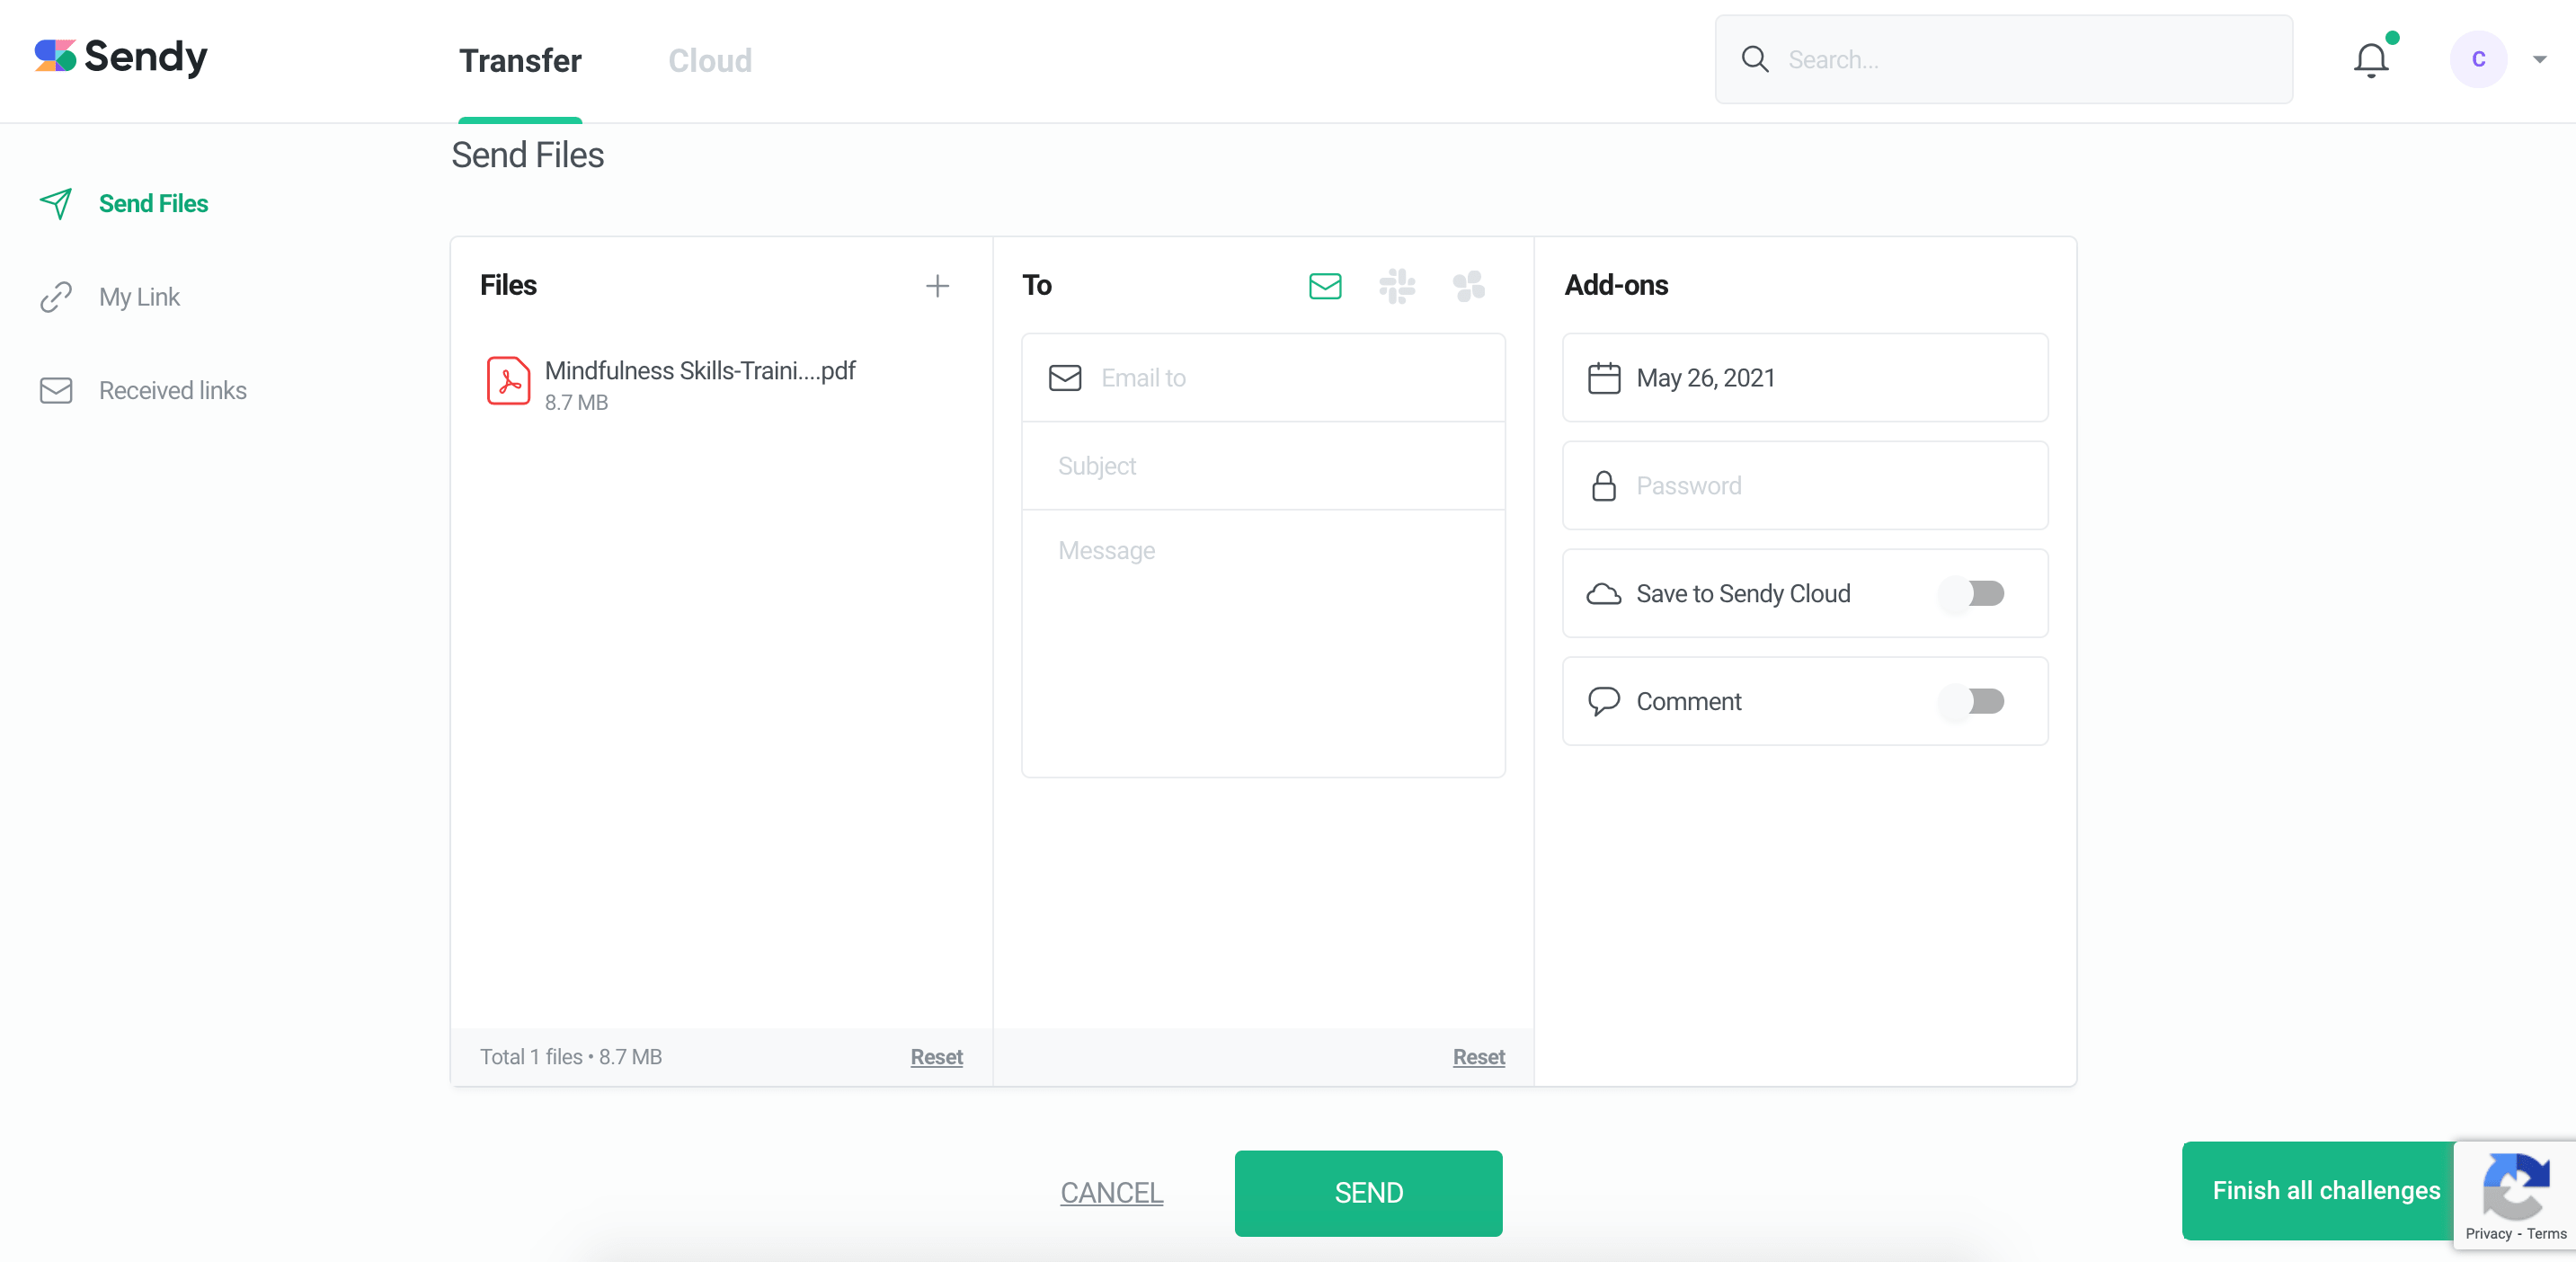
Sendy PRO, the paid version of Send Anywhere, provides 1 TB of cloud storage and unlimited Cloud storage to transfer large files. What sets this tool apart from the rest is the ability to send your files using a 6-digit key with recipients, so you can share files without needing access to everyone’s email addresses.

Alternatively, you can send a link through email or a company messenger, like Slack, when you don’t need to transfer the files in real-time. 

Sendy PRO enables you to attach big files using Chrome Extension, Outlook add-ins, and Send Anywhere’s website. It’s $7.99/month for the PRO version — or you can try the free version if you don’t need the PRO features.

Specific Use Case: The 6-digit key enables you to quickly message or send files to anyone, without needing an email address. This might be good for quickly Slacking files to colleagues, or texting a file to a friend. 

Sendy pro for sending large files

6. Use a VPN.

A VPN, or Virtual Private Network, is a service that protects your data and provides you with more privacy when you’re online by routing your internet connection through a server. A VPN can protect you from hackers, or even online ads, and is a secure option, particularly if you’re often using public wi-fi.

Some internet service providers (ISP) use broadband traffic management to moderate upload bandwidth — if this is the case for your ISP, you can use a VPN, which will prevent your ISP from recognizing how large your files are, enabling you to send them.

However, this isn’t the best option in our list for two reasons — one, the large file could slow down your VPN connection, and two, your files aren’t guaranteed to be intact upon delivery. To ensure a high-quality delivery, you might want to try an alternative option, like a Zip compression.

Specific Use Case: If you’re using public wifi and you’re sending private documents, this is a good option for increasing security measures. However, this may not be the best option if you need to ensure high-quality delivery. 

7. Transfer files using SFTP.

FTP, or File Transfer Protocol, is an option for transferring files online by uploading a file to your hosting server. However, the disadvantage of FTP is that it isn’t that secure — which is where SFTP comes in. 

SFTP — or Secure File Transfer Protocol — is a protocol that works in a similar way to FTP, except it uses secure shell for encryption. This is a good option for limiting accessibility to those outside your recipient list. Some of the other options in this list, including file transfer options that rely on email, are likely less secure than an SFTP. 

Specific Use Case: A more secure option than traditional online file-sharing, to be used when sending highly classified files to colleagues or clients. 

8. Upload the file and generate a link to share via MyAirBridge. 

MyAirBridge is a free tool that enables you to upload and share up to 20 GB through an email, shared link, or downloaded to your own storage space. You can use your own mobile device to upload files. For larger files the uploading takes a while, and it may not be the cleanest interface on the receiving end (the link your recipient receives takes them to direct download), but it gets the job done for personal or small team use. 

MyAirBridge also offers plans ranging from Basic ($2.99/month) to Enterprise ($65.99/month). With the Enterprise option, users have access to 15 TB of storage, unlimited uploads of up to 100 GB, and the option to password-protect files for extra security. 

MyAirBridge is a good option if you want to download various files (including music or video files, game applications, or documents) to your own storage space. For instance, you might use the tool to download music from your mobile device to your computer. 

Specific Use Case: Download files to your own storage device, or use when downloading music, gaming, or video files. 

MyAirBridge's homepage for sending or saving large files

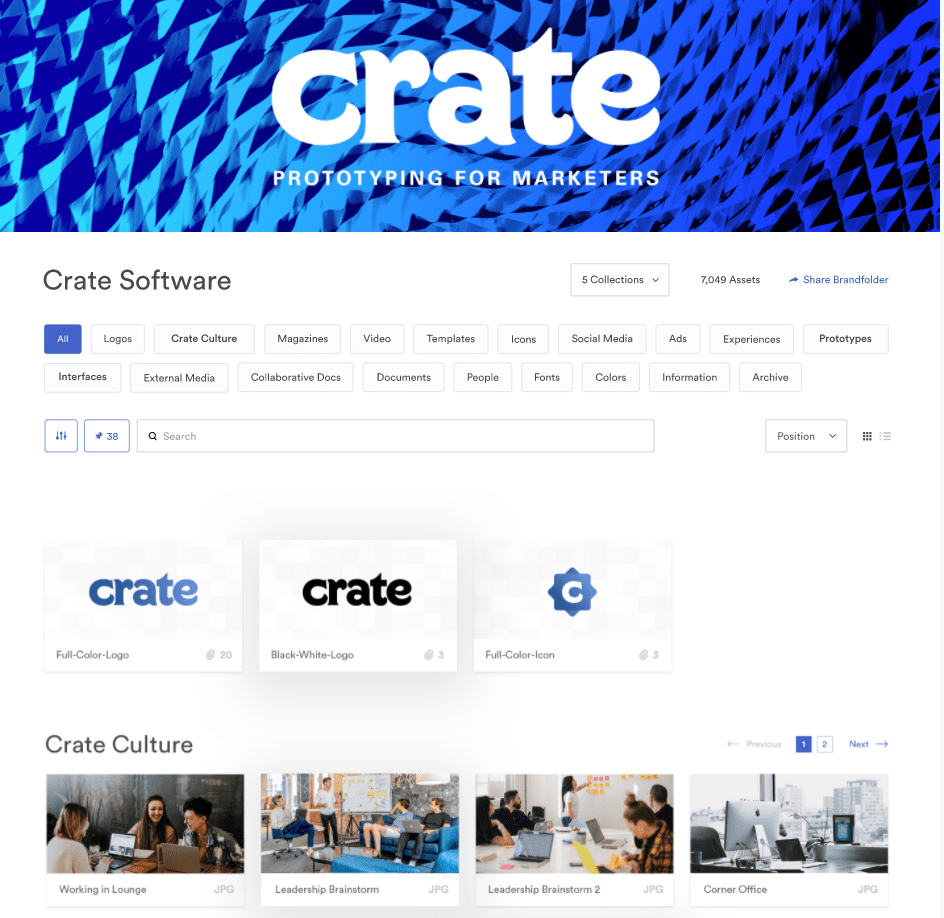
9. Share a collection of assets to your team via Brandfolder.

Consider sharing brand assets, or a collection of assets, with your team, partners, or customers using Brandfolder. Brandfolder lets you use tiered access to share files with intended individuals, and even measure performance of each asset using Brandfolder’s Brand Intelligence feature. 

Used by major brands including Slack, Bumble, and Hotels.com, Brandfolder enables you to store all brand-related assets in one place. Brandfolder is cloud-based, and uses user-level permissioning to ensure employees and clients only have access to the appropriate files and folders.  

Brandfolder offers Premium and Enterprise options. Request a quote to learn how much it would cost for your team to implement. 

Specific Use Case: A more professional-looking option when sharing brand-related assets with clients or agencies, and a good long-term solution for storing all major files in one place for your team to access easily. 

brandfolder example screen for Crate Software

Take me to Projects

Categories B2B

Ultimate Guide to Hero Images [Best Practices + Examples]

Whether or not you realize it, you judge every website by its visual appeal. And it only takes about 0.05 seconds to form an opinion. That means the hero image (the first photo, graphic, or video people see) has to be eye-catching enough to keep people scrolling the site.

High-quality hero images are the key to a great first impression. If done well, they represent the essence of your brand identity and the overall theme of your web page.

Yes, it’s a lot of weight for one piece of visual content. That’s why it’s the most heroic of all.

This guide will explain how to level up your website with the perfect hero image, from choosing a graphic inspired by the latest design trends to ensuring your image is the optimal size. We’ll also walk through hero image examples to spark ideas for your own website. Get ready for some design eye candy.

→ Download Now: 50+ Free Social Media Image Templates

Hero Image In Web Design

If engaging visuals are the sprinkles on top of every great design system, a hero image is the shiny, red cherry. It draws your eye in and makes you want more.

In web design, a hero image is the first photo, graphic, illustration, or video people see on a web page. It typically incorporates both an image and text in order to convey a company’s core message. Hero images sit above the fold and often feature a call to action (CTA) that encourages people to dive deeper into the website. The goal of this image is to add energy and excitement to a page. You want it to show off your brand’s style, share the purpose of your site, and make people excited to explore.

A good hero image can elevate your traffic and conversions by making people want to interact with your site. Animation, carousels, and scroll-triggered effects are ways to flex your creativity beyond typical stock photography. But a bad image can bring down an otherwise great design. Off-brand visuals, large files that slow loading speed, and meaningless copy can ruin the user experience.

One common mistake when designing a hero image is getting the right file size. Too large, your loading speed plummets. Too small, everything looks pixelated. Let’s walk through the different hero image sizes so you can create a stunning image every time.

Hero Image Dimensions

Finding the right aspect ratio and cropping can get confusing when sizing a hero image. Banner hero images aren’t the same as full-screen images, and every image has to scale to fit the space. You also have to consider that no one browses in exactly the same way. Personally, my screen is usually zoomed in to 120%, but others may have dozens of tabs open that are all different sizes.

Some image cropping is bound to occur as your hero image scales to fit a variety of screens, so it’s best to think of the following dimensions as guidelines, not rigid rules.

1. Full-Screen and Banner Image Dimensions

The ideal size for a full-screen hero image is 1,200 pixels wide with a 16:9 aspect ratio. For a banner hero image, the ideal size is 1600 x 500 pixels.

If you need crystal-clear images, or your target audience browses on large screens, you may have to size up to 1,800 pixels. Keep in mind this can result in a large file size that slows down your site.

You can check your loading speed for desktop and mobile with Google’s PageSpeed Insights. It gives a comprehensive look at which site content loads first and where there’s room for improvement. Aim for a page load time of one to two seconds because you’ll likely lose people if it’s over five seconds.

2. Mobile Hero Image Dimensions

The ideal size for a mobile hero image is 800 x 1,200 pixels.

While it’s important to consider how your hero image looks on a desktop, you can’t ignore the mobile experience. Nearly 55% of global website traffic in 2021 is generated on a mobile phone.

Your hero image design must be responsive and fit a vertical (phone) and horizontal (tablet) orientation. Dynamic hero images, like videos, do well on a desktop, but they often have to be swapped out for a static image for mobile. Videos take more time to load, and no one wants to take a massive hit to their data plan just to see your site.

3. Hero Image Compression

You want to compress your hero image if you have a large file size (anything over 1MB is too big). You can use sites like TinyJPG, Compress JPG, or Adobe’s Photoshop Compressor to decrease the size without reducing quality. Just make sure to get the dimensions right beforehand or the image may appear blurred or stretched.

When sizing a hero image, check your Google analytics to see the typical screen resolution of your website visitors. Then, design with that target audience in mind. Just remember to test out your hero image on multiple browsers, screens, and phones to see how it scales. Once you have the dimensions right, it’s time to work it into your web page using HTML and CSS.

Hero Image HTML

HTML is a coding language made up of elements used to give structure to a web page. It creates order and lets you embed content (like hero images) into a site.

Creating a hero image with HTML ensures your visual appears on a web page, while CSS makes it look good on a screen. Both require coding skills, so you may need to brush up on your HTML and CSS knowledge or enlist the help of a developer.

The main things to keep in mind are:

  • The hero image needs to be centered.
  • The text needs to be easy to read.
  • It has to look great on all screen sizes.
  • The image should cover the entire viewport.

Follow these steps to set up an eye-catching hero image. Note: The examples below include HTML elements and CSS rules, but I’ll explain the difference between the two later on.

1. Create the structure.

Set up two containers for your hero image using the coding conventions of your website. For instance, the first example below uses .hero for the structure and .hero-content for the image, text, and button, while the second uses .image-container and .inner-container.
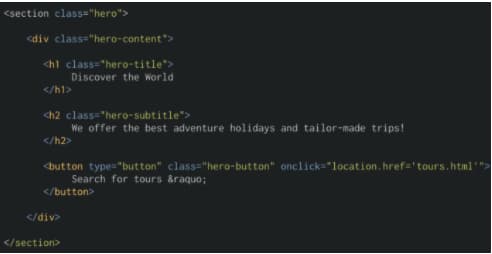
how to create an HTML structure for hero imagesImage source

hero-image-html-structureImage source

2. Add your content.

Once the structure is in place, it’s time to personalize your image. Add an image, choose a custom font, craft a header and subheader, and create a button with an enticing CTA. If you want to add a filter to your background image (without applying it to the text), DeveloperDrive recommends including the filter before your .hero-content code.
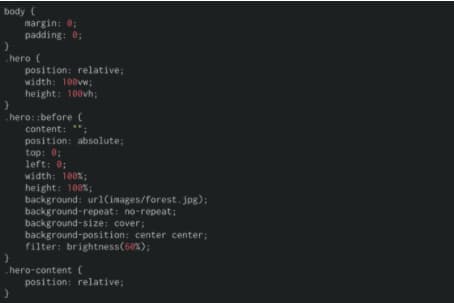
how to personalize your hero image with HTML

Image source

Notice how the width and height under the .hero section are set to 100vw and 100vh. This ensures the image fits the entire viewport, both vertically and horizontally, so it spans the whole screen.

No hero image is complete without a button that drives people to take action. Incorporate one into your image with the <button> element. Just make sure to include the font-family since the text doesn’t automatically translate from the .hero-content element.

3. Center the content.

Not all hero images have centered text, but most have a centered image. To align your background image, you can make a flex container by incorporating display, justify-content and align-items under your .hero element.

how to center content in hero images

Image source

For centered text, include a .text-align: center rule under your core content element. In the following example, the text is nested under the .hero-content code.

the center rule in HTML

Image source

4. Make it responsive.

You want your hero image to look good no matter the screen size. Setting media queries allows you to create parameters so your image is responsive at a particular screen width.

how to create a responsive hero image in HTML

Image source

5. Test the view.

Congratulations, your HTML structure is set! Test out how the image, text, button, margins, padding, and centering look on different screen sizes. If something seems off, comb through your code to see if you can find issues. For detailed instructions on creating and troubleshooting with HTML, check out this article from DeveloperDrive. All look good? It’s time to add style with CSS.

Hero Image CSS

While HTML creates order, CSS (Cascading Style Sheets) adds flair. It’s a rule-based language that complements the HTML elements by applying stylistic effects. For example, CSS lets you turn the text in a hero image header bright yellow so it pops against the purple background.

If you don’t include CSS within your hero image, the HTML elements default to the basic browser properties like the example below.
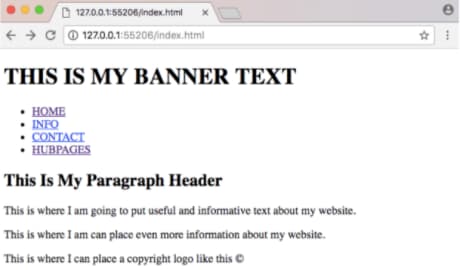
CSS for hero imagesImage source

That’s not the most attractive web page, right?

By including CSS rules, you can develop an image that draws in visitors instead of scaring them away. The above HTML examples include CSS rules, but let’s walk through a basic design so you can work it into your own image.

The following template outlines the basic HTML and CSS needed to create a full-screen hero image. You can adjust the style by changing the rules under the .hero or .hero-text elements, like font-family, color, border, or padding-top.
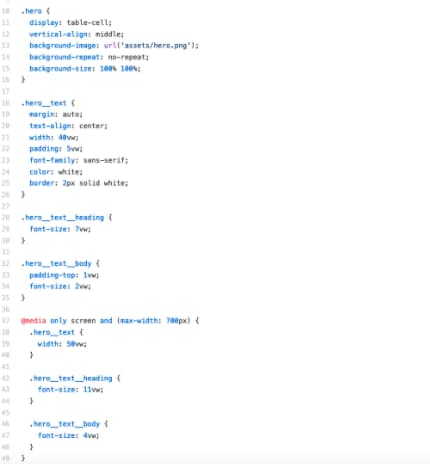
how to create a full screen hero image in HTML and CSSImage source

For more information and inspiration on ways to use CSS for images, look to the hero-image forum on GitHub. Now, it’s time to check out what good hero image coding can do for a company’s web page.

Hero Image Examples

Like all creative mediums, hero images are influenced by trends. Remember when clipart was cool? How about when every news site hit you with a splash page?

To create a relevant hero image today, look to these design trends.

1. Parallax and Scrolling Animation

We experience parallax every day when watching cars pass by or walking down the street. It’s the optical illusion that makes objects close to us appear to move faster than objects farther away. In web design, parallax uses foreground and background to recreate this effect. The result seems like magic. Just make sure not to overwhelm visitors by incorporating too many moving elements. Simplicity is key here.

Scrolling animation makes participation the goal. A good scrolling animation encourages people to keep scrolling before offering up a unique, engaging experience. Scrolling animations come in a variety of packages and work well across a number of industries, like retail, creative services, news publications, education, and more.

2. Abstract Compositions

Circles, triangles, stripes, and color blocks are back in vogue. Instead of restricting space and making sure everything is in its place, abstract hero images evoke a sense of freedom and creativity. You can find this trend taking over tech companies and startups, like this example from Zendesk that incorporates video within an abstract semi-circle to keep the design playful.

3. Soft Color Schemes

The average adult spends nearly eight hours per day with digital media — and that can lead to a lot of eye strain. Web designers have taken note and are starting to lean toward hero images with neutral, pleasing color palettes. This trend is popping up on retail, wellness, and medical websites to offer a more comfortable experience that’s easy on the eyes.
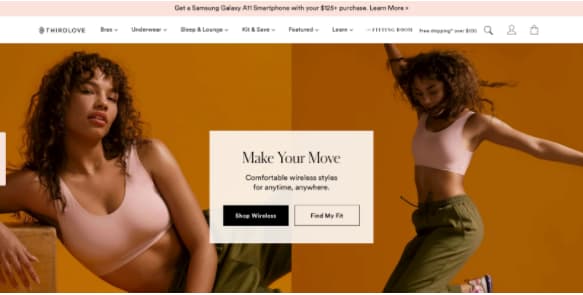
An example of a hero imageImage source

4. Products as Design Elements

Products are the star of the show when it comes to hero images. Companies want to show their offerings and entice visitors to learn more about the features. For hero images, it’s common to see products being used as graphic elements or deconstructed so visitors can dig into the details. Tech and retail companies often use this type of hero image, but it can work for any brand looking to put its product at the forefront.

Design elements using productsImage source

An example of products in hero imagesImage source

5. Lifelike Color

So long flat colors, hello fine 3-D shading. This trend in hero image web design is all about making people feel like they’re inside the screen. Designers create these realistic experiences using gradients, shadows, and blended colors. While this trend will likely stay in tech and apps, it’s great for pulling people into the world of your website.

An example of lifelike color in hero imagesImage source

6. Videos

Research by Wyzowl found that 84% of people have been convinced to buy a product or service by watching a brand’s video. This makes video the perfect visual content for an attention-grabbing hero image. If you decide to use a video, it’s best to keep it under 30 seconds long and on a loop. As mentioned above, you’ll want to switch out the video for a static hero image for your mobile site so it doesn’t eat up data or take long to load.


Hero Image Best Practices

Trends are only one part of creating a great hero image. The rest of the magic relies on tried-and-true design standards. Even if you’re not a trained designer, you can follow these best practices for a hero image that hits home with your audience.

1. Size

We already talked about the best dimensions for hero images above (1,200 pixels and a 16:9 aspect ratio), so consider this a reminder of how important it is to have the right size. You don’t want the browsers to resize an image for you or you might wind up with a funky, stretched visual that puts off visitors.

Pro tip: Experiment with PNG and JPG files to figure out which results in a faster page loading speed.

2. Harmony

People are instantly distracted by bad design and will click off your site if your hero image doesn’t harmonize with the rest of your layout. Keep your aesthetic in sync by carefully selecting the fonts, sizes, colors, navigation, visuals, and copy.

It’s helpful to reference your brand identity and guidelines when coming up with a hero image concept. You don’t want people to lose interest before getting to the good stuff.

3. Organization

Part of creating a harmonious design is having excellent organization. Your hero image content should have a logical hierarchy and flow, so every piece builds on what came before. This is incredibly important for pairing images with copy.

When a relevant image is paired with information, people can remember 65% of the information three days later. But only 10% is remembered from information alone. Make sure your message is clear and connects with your visuals. It’s helpful to set up a simple wireframe for how your hero image will be organized on the page.

4. Originality

Stock photos are a core part of content marketing, but they may be hurting more than helping when it comes to hero images. While 40% of content marketers said original graphics helped them reach their marketing goals, only 13% of content marketers said the same thing about stock photos.

You can flex your creativity by creating original hero images with Canva or get inspiration from Behance. Lacking quality photos? Browse Unsplash or Pexels for a variety of high-quality photos that can be used for commercial and non-commercial purposes.

5. Consistency

The biggest struggle to create engaging visuals? 43% of marketers say it’s producing them consistently. To get on a set schedule, set aside the time and resources you need to create visuals — even add it to your marketing budget.

If you’re crunched for time, consider revamping your old graphics. It’s a smart way to save time, and 51% of companies have found it’s efficient and effective.

There’s nothing worse than landing on a web page that looks like it was made in the dotcom bubble. It looks sketchy, and you’re afraid to click on anything in case it redirects you to some kind of virus. On the other hand, being greeted by a beautiful hero image makes you want to stay and explore the page.

As the first touchpoint people have with your brand, hero images have a major impact on your brand perception, website traffic, and conversion. So it’s time to put your newfound knowledge into practice and design one that draws people in from the first look.
social Media images

Categories B2B

Where Will People Shop When Businesses Fully Reopen? [New Data]

For the last year and a half, many of us have gotten used to doing everything — including shopping — from home.

Now, it seems full reopenings are closer than ever in the U.S. as the CDC now says that fully vaccinated Americans no longer need to wear masks or social distance unless there is a federal, state, local, workplace, or tribal mandate requiring them to.

But as cities, offices, stores, and restaurants reopen to full capacity, many of us are beginning to think about how life will be after the global pandemic ends.

As an individual, a post-pandemic world might be quite exciting to think about. But, as a marketer, entrepreneur, or manager, you might be wondering, “Will shopping go back to normal after reopenings?”

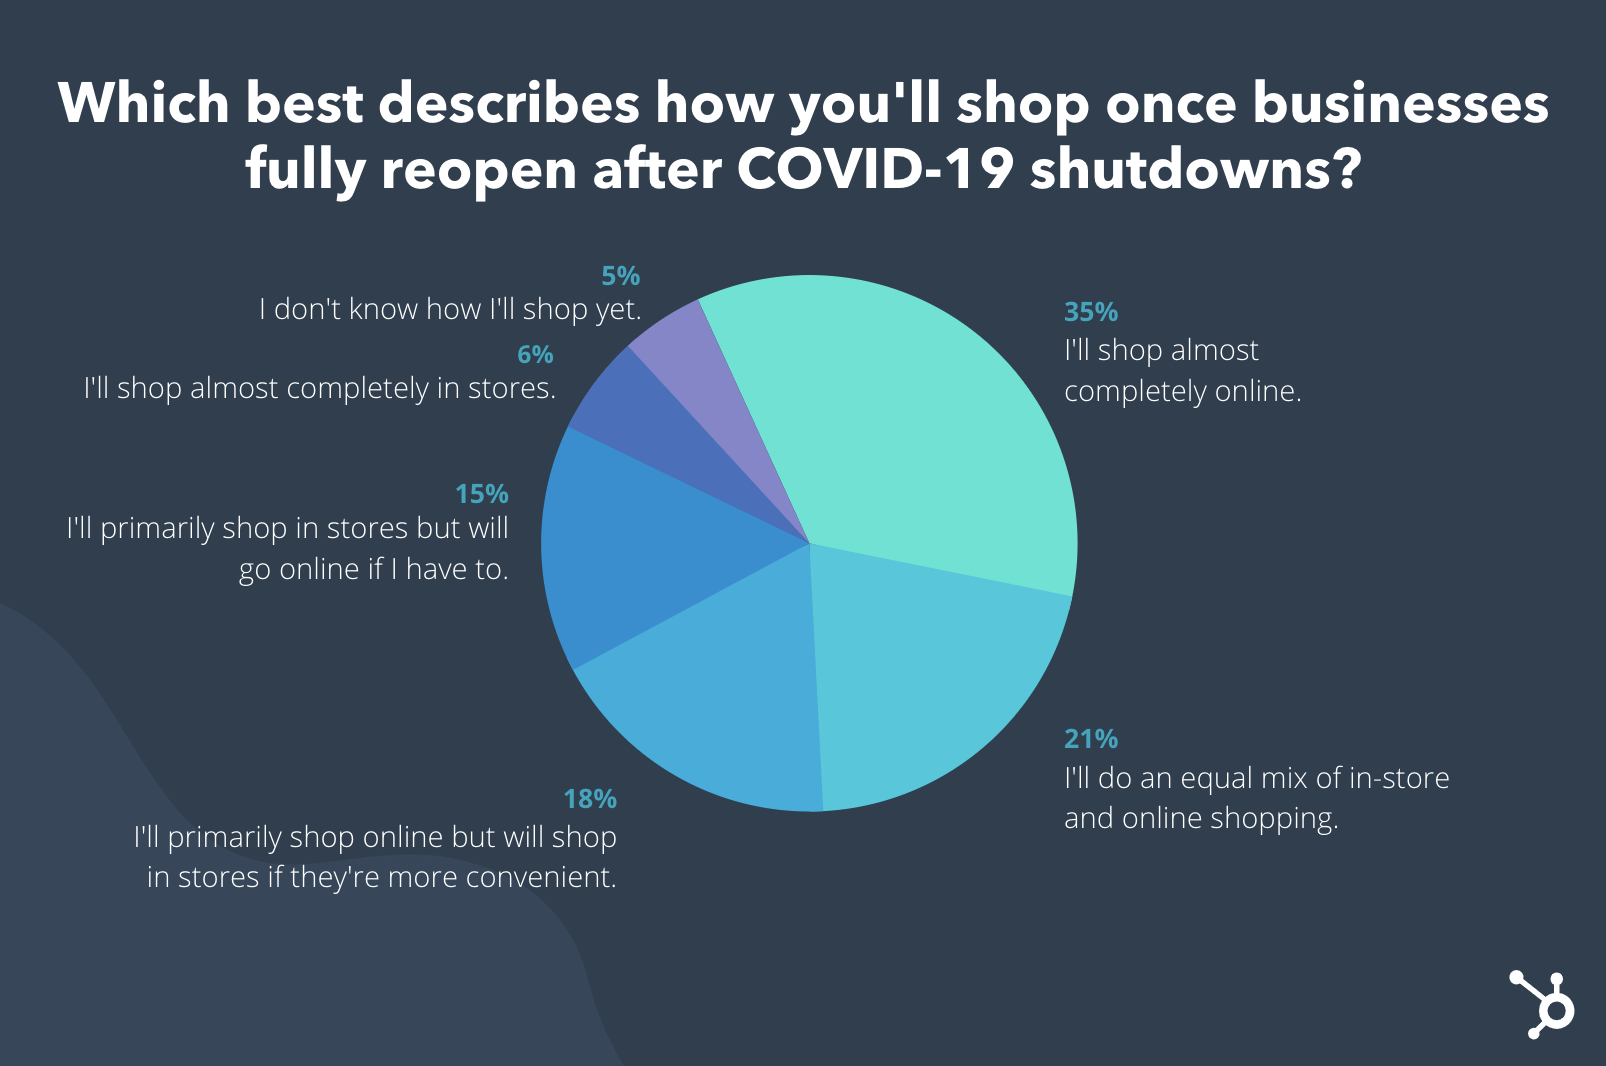
To help brands in the U.S. navigate and plan for reopenings, we used Lucid to ask more than 300 North American consumers, “Which best describes how you’ll shop once businesses fully reopen after COVID-19 shutdowns?”

The results might or might not surprise you.

35% of respondents plan to shop mostly online after store reopenings.Data Source

Just over one-third, or 35% of respondents say they’ll “shop almost completely online.” Meanwhile, 21% predict they’ll do an even mix of online and in-store shopping, while 18% will primarily shop online but go to stores when they’re convenient.  

If you’ve built a strong brick-and-mortar brand, don’t panic. First of all, this is just one general consumer survey with a small pool of respondents. Additionally, aside from the respondents who plan to do a mix of online and in-store shopping, 21% of respondents plan to shop primarily or completely in physical stores after economies fully reopen. Had we asked about specific products or polled people in another country, the results might have been different. 

While this is just one data point to think about, it’s worth noting because it shows that there will likely be a strong interest in online shopping — even when every physical store re-opens to full capacity.

So, how can you navigate changing future shopping behaviors? Whether you run or work for an online or physical business, here are a few tactics to embrace.

→ Download Now: Free Marketing Plan Template

How to Reach Shoppers After Reopenings

1. Launch or expand on your website.

Even if you can’t launch a robust online store yet, a basic website can allow potential customers to discover you online, learn more about your business, and find your contact information.

Once you have a basic website that explains what your brand does, how they can reach you, and where you’re located, you can continue to optimize it for audiences by adding:

  • Pricing pages that explain the price range for each of your services or higher-priced products.
  • Images or videos of your team providing a service, your store, new products people can find there, or customers who consent to be featured on your site.
  • A few blog posts that give more information about your brand, topics related to your brand, or tips related to your industry. For example, if you sell construction products, your blogs could give people tips for simple fixes they can make at home without needing to hire a professional.
  • A landing page or contact form where people can contact you for more information, a product demo, or to schedule a service.

For more about what audiences look for when they visit a business’s website, check out this data-filled blog post.

2. Consider adding online shopping or ordering options.

Not a tech-savvy web expert who can create their own online store quickly? That’s okay, If you’d like to explore selling products online, there are still tools that can help you,

During COVID-19, many online shopping platforms emerged to help brands sell products or services online. While many restaurants began to leverage delivery or pick-up order apps, small stores and boutiques could build stores with tools like Shopify, Facebook Shops, and Instagram Shops.

But, although having an online store might be a great idea, it does pose its challenges. For example, you’ll want to make sure your shipping and delivery strategy is ready for online orders so you don’t sell out if a product or service is very popular. You’ll also still need to spend some time putting product shots, descriptions, and your store’s basic design together.

If you’re not ready for an online store or service just yet and want to continue to vet the idea, you can keep reading for other tips that don’t require a full ecommerce experience. If you’re ready to launch your first online store, check out our Ultimate Guide to Ecommerce.

3. Embrace online marketing.

Even if you don’t have an online store, you should still consider leveraging social media, review sites, and email marketing to spread the word about your business online.  

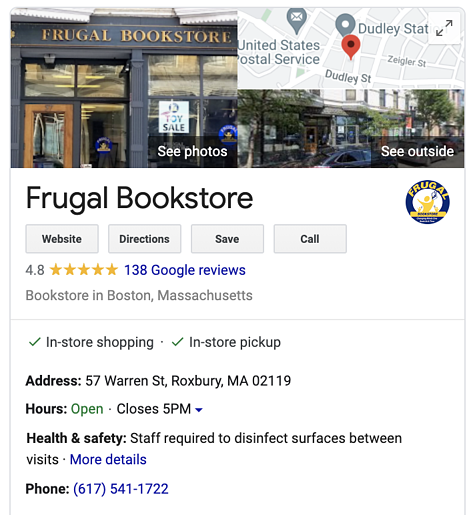
If you’re completely new to the world of web marketing, a great place to start is by setting up a free Google My Business profile. This will allow your business’s name, address, details, website, and reviews to show up when people are looking for products or services you sell in your area.

Frugal Bookstore Google My BusinessFrom there, you can also consider venturing on to review sites like Yelp, while encouraging happy customers to give you reviews there.

If you’ve already taken the steps above, the next places to embrace will likely be social media and email marketing. Through these channels, you can let customers know about sales or new offerings, send them helpful content related to your brand, or share happy customer stories. This way, even if you don’t have an online store, people will be able to gain awareness for your brand on the web.

4. Immerse your audience in virtual experiences.

During the early days of shutdowns, we saw a handful of physical brands come up with ways to bring virtual experiences or product offerings to their audiences and customers.

For example, Planet Fitness offered gym members videos from personal trainers, hair studios guided customers as they gave themselves haircuts over video calls, and petting zoo patrons could pay for animals to attend their conference calls.

There are plenty of creative ways to bring virtual experiences to your audiences. And, while you can’t always charge for them, they could certainly grow your online awareness and help more prospective customers learn about your brand and physical store.

5. Prepare your physical business for new shopping behaviors.

Although we’d love to imagine the world going completely “back to normal” overnight, this will still take time. People will likely continue to remain cautious even if they’re vaccinated and their state is loosening regulations.

For example, customers will likely still want to see that businesses are making efforts to keep them safe. In 2020, a McKinsey Report suggests just this as many consumers said they’re more likely to buy from companies that show care for their customers.

With data like McKinsey’s, you’ll still want to take some precautions by following the most updated CDC guidelines — which can be found here.

Aside from getting your business ready for health-conscious customers, you’ll also want to zone into strategies you can use to make it convenient for customers.

As we saw in our consumer poll above, 18% — or almost one-fifth of our survey pool — said “I’ll primarily shop online but will shop in stores if they’re more convenient.” This means that if you have products or services that aren’t easily accessible or often sold out online, you might earn customers that would have otherwise shopped on the web.

The data above could be good to consider as you determine which services, products, or sales you’ll market when you fully reopen. If there’s something shoppers can get in-store that they couldn’t get online — like a product, in-person testing, or another interesting experience, be sure to tell your audiences that.

Diving into Digital Transformation

Because the global pandemic has accelerated many digital transformations that were already underway, it’s essential to embrace at least some digital strategies when running or marketing a brand — even if it is brick-and-mortar.

Luckily, because so many businesses are pivoting to digital tactics, there are plenty of free or affordable tools that can help you embrace online marketing.

Aside from tools, HubSpot also offers a handful of free downloadable templates and resources for marketers or entrepreneurs at every level, like the one featured below.

Marketing Plan Template

Categories B2B

What Are the 4 Ps of Marketing? The Marketing Mix Explained [Example]

If you’ve been a marketing professional for years now, learning about the four Ps of marketing might seem like a throwback to you.

However, for those of us who work in the industry but didn’t study marketing in college, it’s entirely possible you haven’t heard of the marketing mix.

Below, let’s learn about the four Ps of marketing and how they’re still relevant in today’s marketing landscape.

→ Free Resource: 4 Marketing Mix Templates [Access Now]

The four Ps are meant to help marketers consider everything about a product or service when they’re deciding how to market it for their business. Framing your marketing around the four Ps will help you learn what the competition is doing and what customers want from you.

You can use the four Ps to answer questions about the product, price, place, and promotion of your product or service.

For example, you can ask yourself:

  • Product: How does your product meet your customer’s needs?
  • Price: What is the value of your product?
  • Place: Where are customers looking for your product?
  • Promotion: How can you differentiate your product from competitors?

Thinking about your marketing in terms of the four Ps will help you strategize how to reach your customers. The four Ps of marketing are also known as the marketing mix.

To develop a marketing mix, you’ll need to think about how you can uniquely position your brand amongst the competition. The most important part of thinking about the marketing mix — or the four Ps of marketing — is to understand the customer, the competition, and your company. You’ll evaluate your product and how to promote it.

But getting started isn’t easy. That’s why we’ve created the ultimate collection of marketing mix templates you can use to visualize your marketing mix and share it with your employees or investors. Use the templates to organize your initiatives and activities by the right section.

Featured Resource: Marketing Mix Templates

Four P's of marketing templates.

Click here to download the templates for free.

Use the template to follow along with the 4 Ps of marketing below.

The 4 Ps of Marketing (Example)

1. The First P of Marketing: Product

When you think about your product, consider exactly what you’re selling. Is it a specific product? Or is it a service? Your product can be a physical product, an online app, or a service such as house cleaning. Really, anything that you’re selling is the product.

Then, think of your brand messaging, the services you offer, and even packaging. When you define your product, think about what problem your product solves for your customers. Consider how your product is different from competing products. What features are unique to your product?

It’s important to know your product intimately so you can market it.

Product Example

We’ll use Marketing Hub as an example.

What is it? “Marketing automation software to help you attract the right audience, convert more visitors into customers, and run complete inbound marketing campaigns at scale — all on one powerful, easy-to-use platform.”

Who is it for? Modern marketers who juggle too much data and who are stuck with impossible-to-use software solutions that make their job harder, not easier.

Which features does it have? Marketing Hub offers blogging, SEO, social media management, email marketing, and ad tracking tools in a single, intuitive platform.

What problem does it solve? Marketing Hub simplifies the marketing automation process for busy marketers by bringing all data and tools under one roof.

2. The Second P of Marketing: Price

When it comes to price, you have to consider how much you’re going to charge customers for your products or services. Of course, you need to make a profit.

When coming up with your pricing strategy, you also need to think about what competitors are charging for the same product or service and how much customers are willing to pay. You can also think about what discounts or offers you can use in your marketing.

When you decide on a price, you want to think about perception. Do you want to be known as a cost-effective option in your industry? Or perhaps you’re a luxury brand and the price is slightly higher than competition on the market. Keep in mind that pricing SaaS products is a little different than pricing physical products.

Either way, the language you use to market your product will be greatly impacted by the price of your product.

Download a sales pricing calculator for free.

Price Example

Marketing Hub is priced to grow with you as you grow.

We offer the following subscription tiers:

  • $0/month (Free)
  • $45/month (Starter)
  • $800/month (Professional)
  • $3,200/month (Enterprise)

3. The Third P of Marketing: Place

When it comes to place, this might mean the physical location of your company, but it could also be defined as anywhere you sell your product, which might be online.

The place is where you market and distribute your product.

Remember that not every place makes sense for every product. For example, if your target market is seniors, then it won’t make sense to market on TikTok. It’s important to choose the right places to market your product and meet your customers where they’re at.

Think about possible distribution channels and outlets you could use to sell your product. Be sure to take into account whether your business is B2B or B2C.

At this point, you’ll need to think about how to market your product on all the various channels that make sense for your company.

Place Example

As a provider of a SaaS product, we offer Marketing Hub directly on our website.

Marketers can sign up for Marketing Hub by creating an account directly on our platform. We’ve created a convenient sign-up page for free subscriptions — or they can request a demo from our friendly sales team.

4. The Fourth P of Marketing: Promotion

Promotion is the bread and butter of marketing. This is when you’ll think about how to publicize and advertise your product.

Additionally, you’ll discuss brand messaging, brand awareness, and lead generation strategies.

When it comes to promotion, keeping communication in mind is of the utmost importance. What messages will resonate with your target market? How can you best promote your product to them?

Think about where, when, and how you’ll promote your brand.

Promotion Example

We want to be where marketers are. Most importantly, we want to help them grow in their careers — as well as grow their businesses.

Our inbound marketing strategy will focus primarily on organic acquisition. We’ll promote Marketing Hub over the following channels:

Use the 4 Ps of Marketing to Create a Winning Marketing Strategy

Even though marketing has changed since the four Ps were developed, the foundational elements of the industry haven’t. You can apply the concepts of the marketing mix to create winning marketing strategies that help you profitably launch and promote your company’s products.

Editor’s note: This post was originally published in October 2020 and has been updated for comprehensiveness.

marketing mix

Categories B2B

How to Write a Letter of Interest in 2021 [Examples + Template]

It’s one of the worst feelings in the world.

You’ve spent weeks perfecting your resume and crafting the perfect cover letter, and you’re finally ready to submit your application for your dream job.

But when you scan the company’s careers page, panic starts pouring over you. The job you wanted to apply for is no longer open. It’s gone. And as you stare at your laptop screen in shock, you can’t help but think you’ll never be able to join your dream company.→ Click here to access 5 free cover letter templates [Free Download]

What should you do in this situation? You can’t just put your job search on pause until the company opens the position again. How do you express interest in joining a company when the position you want isn’t currently available?

One of the most effective ways to grab a hiring manager’s attention and get your foot in the door is by writing a letter of interest to the company.

What is a letter of interest?

A letter of interest lets a company know that you want to work for them in a role for which they’re currently not hiring, or haven’t actively posted about on a careers page.

In hopes that the company will contact you when they do open this position or another relevant position, your letter of interest focuses on how your skills can benefit the company, not how the company can benefit you. You can send a letter of interest at any time, regardless of whether the company is actively hiring.

Sending a letter of interest is a great way to introduce yourself to a company, and it shows them you’re willing to take the initiative to proactively reach out.

This can keep you top-of-mind when the company starts recruiting for the job you inquired about. If hiring managers are particularly impressed, they might even create a position just for you.

Other times, sending a letter of interest can lead to a coffee chat or an informational interview with the hiring manager of the team for which you want to work.

Writing a letter of interest sounds like an easy way to get your foot in the door at any company, but it’ll only pique a hiring manager’s interest and elicit a response if it actually resonates with her.

To do so, we recommend following a formula called problem-agitate-solve. It’s modeled after an old copywriting framework and has helped one job seeker skyrocket her cover letter response rate from 0% to 55%. We’ll flesh it out below.

How to Write a Letter of Interest

To compel a hiring manager to read your letter, respond to it, and consider you for a job, there are four crucial elements you need to include in your letter of interest. 

Featured Resource: 5 Professional Cover Letter Templates

Cover Letter TemplatesDownload These Templates for Free

1. Hook the hiring manager with proof that you understand her problem.

Hiring managers don’t hire people just to be nice. They hire people to help them run their team better. To immediately grab a hiring manager’s attention, you should show how you understand the problems she’s trying to solve, like the hook below:

“As a two-year blogging veteran in the marketing technology industry at companies like Return Path and SlideBatch, I know how hard it is to write well. I also know how challenging it is to get found on Google.”

By describing a similar experience you’ve had at your current or prior job, you can relate to her on a deep level, which will engage and prompt her to read the rest of the letter.

The hardest part of this step is discovering the hiring manager’s problems. One way to figure it out is by listing off the job’s responsibilities and asking yourself why these tasks are important to her team. If you keep analyzing until you reach a dead end, you’ll usually find her needs there.

2. Highlight the problem to remind the hiring manager she needs a solution.

How do you make a hiring manager realize how valuable a solution could be? You remind her just how painful her problems are. And to make her visualize her dreaded problem as vividly as possible, you need to be specific, just like the example below:

“According to HubSpot’s careers page, you’re not currently hiring, but, in the future, if you’re looking for someone who can not only engage an audience with clear, concise, and compelling blog posts, but also optimize them for search engines, while hitting every deadline, you can count on me.”

When she realizes how much pain she’s actually in, she’ll have more of a sense of urgency to resolve it. And this’ll push her to respond to you because you might be her fastest route to a solution.

3. Prove that you’re the solution with an example of your skills and experience.

If you’re really the solution to her problems, you must prove to the hiring manager how you’ve used your skills to solve similar paint points in previous experiences. Then, you should describe how you’ll be able to use those learnings to help solve her current problems. Check out the example below:

“Last year, at Return Path, I was the top performing blogger, writing weekly posts that averaged 7,500 views, 1,000 social shares, and 35 new blog subscribers gained. The year before, at SlideBatch, I devised and implemented a new keyword strategy that increased organic page views for our Visual Marketing 101 blog series by 15%.

I’ve read HubSpot’s blog every day since I started my content marketing career, and I’m inbound, content, and email marketing certified, so I strongly believe I’ll be able to hit the ground running if I were to work on HubSpot’s blog team one day.”

By quantifying your accomplishments and researching the company’s pain points, you’re proving your worth. But if you just list your skills and work experience, you’re only proving to the hiring manager that you’ve failed to make an impact.

4. Confidently request to move on to the next step.

At the end of your letter, you should express your interest in exploring upcoming opportunities or ask her to keep you top of mind when an opportunity opens up, like the call to action below:

“I’d love to learn about any upcoming roles on your team or be considered for a position later down the road. My resume is attached, and my contact details are listed in my email signature below. Thank you for your time! It was a pleasure connecting.”

These call-to-actions are crucial because they tell her how to get the ball rolling. If you don’t tell the hiring manager what to do next, then nothing will happen.

Letter of Interest Samples

All together, a successful letter of interest might look like this:

Google Doc Version

Letter of Interest Template

Hi [Hiring Manager’s First Name],

As a [X]-year [Your Profession] veteran in the [Space You Work In] industry at [Most Prominent Companies You’ve Worked For], I know how hard it is to [Pain Point #1]. I also know how challenging it is to [Pain Point #2].

According to [Company] careers page, you’re currently not hiring, but, in the future, if you’re looking for someone who can not only [Solution for Pain Point #1], but also [Solution for Pain Point #2], you can count on me.

Last [Specific Timeframe], at [Current or Old Company], I was the best performing [Your Profession], [List Your Responsibilities and Describe the Impact You Made]. The [Specific Timeframe] before, at [Current or Old Company], I [List Your Responsibilities and Describe the Impact You Made].

[Show Hiring Manager that You’re a Voracious Learner and You Regularly Keep Up with Company News], so I strongly believe I’ll be able to hit the ground running if I were to work on [Company] team one day.

Whether I’d be [What the Team is Working on Now], I’m confident my skills and experience can help your team crush their goals.

I’d love to learn about any upcoming roles on your team or be considered for a role later down the road. My resume is attached, and my contact details are listed in my email signature below. Thank you for your time. It was a pleasure connecting!

Sincerely,

[Your Name]

Steps to Take Before You Send Your Letter of Interest

After you finish writing your letter of interest, you need to make sure the company will actually open it. So before you send your letter, it’d be ideal if someone on the team personally knows who you are.

To do so, ask your connections or alumni that work at the company to introduce you to the team’s hiring manager. If you can’t do that, you could add the hiring manager on LinkedIn, tell her why you want to connect, and send her your letter of interest.

Getting your foot in the door will ultimately help you stand out from the crowd of job seekers who are all sending the same “hire me” pitch to her.

Editor’s Note: This post was originally published in May 2018 and has been updated for accuracy and comprehensiveness.

Professional Cover Letter Templates

 
New Call-to-action

Categories B2B

What Domain Authority Is (and Isn’t), and How to Increase It

Some companies and brands use Domain Authority (DA) to study and evaluate the results of their digital strategies.

But what does this metric really mean? Should we really strive to improve it? Will a high domain authority help us rank better on Google? 

Domain authority can be a very useful metric to know the status of a website in relation to similar competitors, but we must emphasize that it is not a ranking factor for Google. 

In this post, we’re going to define what domain authority is — and what it isn’t — and what you’ll want to take into account to optimize it. 

→ Download Now: SEO Starter Pack [Free Kit]

What is domain authority?

It is really important to define what domain authority is and what isn’t in order to point your digital strategy in the right direction. 

Domain Authority (DA) is a metric first developed by Moz that predicts how likely a domain is to appear in the SERPs compared to its competitors:

Domain authority metric exampleIt’s important to highlight that Google doesn’t use Domain Authority as a ranking factor to decide how to rank websites. So it isn’t a metric that will improve your ranking in the search engine results page (SERPs). However, domain authority is a good indicator that will help you assess the performance of your website in relation to competitors.

Nowadays, this metric is not only used by Moz. Different SEO tools such as SEMrush have developed their own Authority metric — which is an algorithm that uses data from backlinks, referring domains, or search traffic, among others, to decide the Authority score. So, although it isn’t an official ranking factor used by Google, it’s a useful metric to know your site health in relation to your competitors. 

What’s a good domain authority score?

Moz’s Domain Authority search engine ranking score ranks from 1 to 100, with the higher numbers meaning probability of better results in the SERPs. To define this metric, the SEO tool takes into account both the quantity and quality of links that a webpage receives. 

If a page has backlinks from pages with a high authority — such as Google, Wikipedia, governmental pages, renowned newspapers or magazines — it will have a higher probability of having a better score. 

Depending on the type of industry or the characteristics of the website, it will be more likely — and more useful — to get some backlinks over others.

For instance, a training center may seek links from national newspapers, universities, and academic articles or government sites. A local business website, on the other hand, likely prefers being linked to by regional newspapers or industry magazines, since those backlinks are more valuable to the business’ target audience, even if they don’t have the highest domain authorities.

Determining good domain authority, then, is different for each business. Ultimately, it’s important you analyze your top competitors and draw conclusions tailored to your own website, based on your ranking as well as the rankings of your competitors. 

How can I check my Domain Authority?

On Moz, you can check your website’s Domain Authority for free through Link Explorer. You just need to enter your domain’s root URL (like HubSpot.com) and your webpage’s Domain Authority score will appear automatically.

link explorer domain authority moz wikipedia

The digital tool provides other features, as well — such as the number of unique external linking domains (Linking Domains), the number of unique pages linking to a page (Inbound Links), and the total number of keywords for which this website is ranking within the top 50 positions on Google (Ranking Keywords), among other metrics. 

wikpedia check domain authority example

Domain Authority vs. Page Authority

While Domain Authority measures the probability of an entire web domain to rank in the SERPs, Page Authority focuses specifically on the probability of ranking each of the pages of the website individually. 

This enables you to determine the performance of individual pages — such as blog posts or product pages — to analyze which ones might need some fine-tuning to obtain a higher score. 

page authority moz seo wikipedia

The Page Authority indicator can help you prioritize and define the next actions to develop within your digital strategy based on the pages with the most scope for improvement. 

page authority optimization

How to Build Domain Authority

Now, let’s take this into practice: how can you build domain authority and rank better than your competitors?

As Google points out, It isn’t just about the total number of links to your site or the total number of domain links, but the quality of those links, the ones that are relevant to understand what your website is about. 

To build Domain Authority, here are a few tips to keep in-mind: 

  • Quality, before quantity. Prioritize relevant backlinks, before thousands that aren’t significant. 
  • Analyze your backlinks, and make sure that all the interesting sites with backlinks have a do-follow. 
  • Create quality content, which makes it easier for you to get natural backlinks.
  • Generate content focused on your core audience, which can be attractive to them and go viral.
  • Update your older content. Go through those pages with unindexed content or with a low page authority score and add new information of interest for the user.
  • Identify your competitors and compare yourself to them. Analyze things that you do and don’t do that can help you increase your website’s visibility.
  • Study where your main competitors get the backlinks from. Can you get similar ones, too?
  • Spread your web content, in an original and unique way, through other channels such as social media or newsletter.

Building your Domain Authority is a long-term strategy — it takes time and you don’t see immediate results. However, following these practices will help you increase your website visibility on SERPs with the aim of increasing traffic to your site.

Work on these actions to focus on increasing the quality and quantity of leads rather than just your Domain Authority score.

SEO Starter Pack