Categories B2B

How Sorority Rush Became Big Social Media Business

Sorority recruitment has transformed from a secretive process to big social media business.

In the fall of 2021, sorority rush at the University of Alabama took TikTok by storm, effectively becoming RushTok. During that recruitment season, sorority hopefuls posted daily TikTok vlogs sharing everything from their outfits of the day, to what they’re carrying in their bags, documenting the entire process until the sororities made their final selections.

Audiences worldwide quickly became captivated by the process, choosing their favorite recruits to follow and root for. To date, the hashtags #BamaRush and #RushTok have 4B and 2B views, respectively.

Potential new members (PNMs) curated their social media feeds months in advance, hoping to make a good impression. Some PNMs who documented the process via TikTok used the week of events to jumpstart careers as influencers, continuing to deliver (sometimes branded) content to the audiences amassed during recruitment.

It’s not just the potential recruits using social media to make an impression — the chapters also use social media as a recruitment tool. Plenty of RushTok videos also showcase highly choreographed dance routines and friendship-based content to woo potential new members.

How RushTok Became A Marketing Engine

What started as engaging content in 2021 has evolved into a powerful marketing engine that brands want in on. As potential new members shared their experiences and gained popularity, they also caught the attention of brands.

Scrolling through the comments of RushTok videos, the accounts of major brands are among those rooting for certain participants. It’s a simple social listening play to garner visibility in the comment section of popular posts during a key social media event.

Beyond social listening, major brands such as Rent the Runway and Amazon, along with local Alabama brands like the Pants Store took things a step further by working with RushTok creators on sponsored content deals.

Last year, cosmetics brand Tarte sent free products to 90 sororities and 100 sorority hopefuls who received high engagement while using the hashtag #RushTok. The move generated valuable social impressions for Tarte.

Image Source

Though college students may not be every company’s target demographic, the RushTok audience spans wider. Users of various age groups and backgrounds have been locked into recruitment content for the past three years and are actively participating in the comments section of RushTok posts alongside various brands.

As RushTok continues to grow, marketers will find more creative ways to get in on the action, and the process will likely continue to introduce audiences to the next generation of creators.

New call-to-action

Categories B2B

Creating a Fulfilling Workplace: 5 Guaranteed Ways to Boost Job Satisfaction on Your Team

Job satisfaction is like a warm, cozy blanket on a cold winter day. It‘s waking up and being excited to go to work. It’s the feeling of achievement and gratification after completing a task. In other words, job satisfaction is the degree of joy and fulfillment a person attains from their selected occupation.

Would you like your workforce to be driven, devoted, and efficient? Then, you need to focus on their job satisfaction. Research has revealed that content, happy employees are likely to remain in the organization, take fewer absences due to illness, and be more efficient.

Download Now: Free Company Culture Code Template

It falls upon you as a manager to ensure that your team members are satisfied and dedicated to their work. This article will explore five guaranteed ways to boost job satisfaction on your team, backed by data and research so that you can improve productivity, retention, and overall success in your organization.

Table of Contents

What is job satisfaction?

Job satisfaction refers to the overall fulfillment, contentment, and positive emotions an individual experiences towards their job.

It’s influenced by factors such as meaningful work, autonomy, fair compensation, opportunities for growth and development, and work-life balance.

According to a global survey run by LinkedIn and Imperative, 74% of job candidates desire employment where their work matters.

High levels of job satisfaction can lead to increased motivation, and a strong desire to stay with a company.

Overall, job satisfaction is a crucial element in a fulfilling and successful career.

When people feel fulfilled at work, they tend to exhibit greater commitment, motivation, and productivity. Ultimately, this leads to enhanced job performance and organizational achievements.

Why is job satisfaction important?

Picture this: An office full of employees with smiles on their faces, eagerly tackling their work with enthusiasm and energy. It‘s a scene any employer would want to see, and it’s all thanks to job satisfaction.

Here are five of the biggest reasons job satisfaction is important.

1. Boosts Employee Engagement and Productivity

Satisfied employees are more engaged, motivated, and productive.

In fact, a University of Warwick study shows that happy workers are 12% more productive than unhappy ones.

However, according to a Gallup poll, only 34% of US employees are engaged at work, meaning that most workers aren’t fully committed to their jobs.

To put it in perspective, companies with engaged employees earn 147% more than their peers. Prioritizing job satisfaction can help companies enjoy these benefits and more.

2. Increases Customer Satisfaction

Employees who are happy in their jobs often provide better customer service.

A Gallup study revealed that employees engaged with work have a greater likelihood of improving customer satisfaction ratings by 10% and boosting sales by 20% compared to those who are disengaged.

3. Promotes a Positive Company Culture

Cultivating a workplace that emphasizes the importance of employee satisfaction and well-being can have widespread effects within an organization.

By valuing and supporting employees, there’s a greater likelihood that they’ll approach colleague and customer interactions with positivity and enthusiasm. The result can be a more collaborative, productive company culture.

4. Reduces Turnover Costs

Employers invest considerable effort and resources in attracting and preparing new staff members. Retaining employees by ensuring job satisfaction can save costs associated with high turnover rates.

In fact, a Gallup study found that replacing an employee can cost up to 200% of their annual salary.

By prioritizing job satisfaction and creating a positive work environment, businesses can retain valuable employees and save on turnover costs.

5. Improves Employee Health and Well-Being

The effects of job satisfaction go beyond employee performance, as it also greatly impacts employee health and well-being.

Some research shows that employees who are satisfied with their jobs are likely to experience less stress and better overall health.

According to a study by the University of Michigan, workers who experience job satisfaction have a lower risk of heart disease compared to dissatisfied team members.

Famous Companies Take On Job Satisfaction

Enhancing job satisfaction is a critical element for organizations to retain high-performing employees, improve productivity, and foster a favorable corporate environment.

Here are three examples of famous companies that have prioritized job satisfaction in their workplace — with success.

Google

Google recognizes that job satisfaction is vital to employee engagement and retention. An array of benefits, such as onsite wellness services, high-quality meals, and access to healthcare, help ensure employee satisfaction.

The company encourages creativity and ownership among employees by providing them with the opportunity to devote 20% of their time to personal projects.

This may result in heightened job satisfaction and a feeling of pride in the organization’s offerings.

What we like: Google’s focus on employee satisfaction and happiness is a key part of their corporate culture, and it shows.

By offering unique benefits and encouraging creativity, they’ve created a workplace where employees are excited to come each day.

Best for: Organizations seeking to cultivate an environment of ingenuity and inventiveness while also prioritizing the contentment and welfare of their workforce.

Procter & Gamble

Procter & Gamble (P&G) is a global consumer goods company that’s implemented several initiatives to improve job satisfaction for its employees.

One of the company’s most notable programs is its “Connect + Develop” open innovation strategy, which encourages employees to collaborate and share ideas with colleagues from different departments and locations.

This approach fosters a sense of teamwork and belonging and offers opportunities for personal and professional growth.

What we like: P&G’s focus on collaboration and innovation helps build a positive company culture while also creating a more fulfilling work environment for employees.

P&G has fostered a collaborative work climate where employees share ideas and work towards a shared objective, leading to a workplace where individuals feel appreciated and driven to succeed.

Best for: Companies looking to promote teamwork and collaboration among employees while encouraging innovation and personal growth.

P&G’s Connect + Develop program offers a model for building a culture of creativity and collaboration, leading to increased job satisfaction and improved business outcomes.

Adobe

Adobe prioritizes employee engagement and satisfaction by offering a variety of programs and benefits.

One example is their “Life@Adobe” program, which provides employees with a range of resources, such as health and wellness programs, financial counseling, and career development opportunities.

They also encourage a culture of transparency and open communication through employee feedback and regular town hall meetings.

What we like: Adobe shows its commitment to employees’ well-being by providing a variety of benefits, including health and wellness and professional development opportunities.

They encourage a culture of openness and communication in the workplace so that employees feel valued and appreciated.

Best for: Organizations that aim to cultivate an environment of open communication and transparency, prioritize employee well-being, and encourage professional growth.

How to Boost Job Satisfaction

1. Give consistent praise, and focus on impact.

Office Vibe’s State of Employee Engagement research report found 63% of employees don’t feel they get enough praise.

By consistently telling your employees when they‘ve done a good job, you’ll make them feel more proud of their work and provide them with incentives to work harder in the future.

Additionally, as previously stated, employees need to feel like their work matters.

Rather than saying, “Good job on that Facebook campaign,” consider explaining to your employee how her work makes a difference for your team and the company as a whole.

Your employees will feel less dispensable if you focus on how their work relates to long-term company goals.

For instance, you might say, “I’d like to take the time to thank you for the effort you put into your last Facebook campaign.

The campaign helped attract an audience of over 17,000, and 12% of that audience turned out to be quality leads, which is incredible.”

With this praise, you‘ve demonstrated to your employee that her work matters to the company’s bottom line and to the future success of your team. This positive reinforcement could go a long way toward increasing her job satisfaction.

2. Offer career development, training, or education opportunities.

Nowadays, career development is no longer just a nice perk.

In fact, a LinkedIn Workplace Learning report found 94% of employees would stay at a company longer if it invested in their career.

By offering career development and actively seeking out opportunities to help your employees grow, you’re signaling how much you care about their long-term success.

Training your employees and allowing them to expand their skills will also help your team become more successful long term.

For instance, HubSpot offers master classes, which are classes in which employees teach other employees skills such as video production or SEO.

As employees gain these skills, they can apply them to their roles, making them more well-rounded and innovative.

A Leadership Training program is also a chance for you to prepare your employees to become managers and team leaders down the road. This can reduce turnover and enable your employees to grow with the company.

3. Show you care about your employees’ mental and physical well-being.

Your employees can‘t be satisfied in the workplace if they feel they’re sacrificing their physical or mental well-being.

To boost job satisfaction, it‘s critical you make an effort to show employees that their health matters. Plus, if your employees take the time to recharge throughout the day, they’ll be more productive on the job.

To show you care about your employees’ physical well-being, consider how you might incorporate physical activity into the workplace.

It‘s okay if you don’t have the budget to install a gym — simply creating a culture in which it’s okay to leave early to catch a workout class can help.

Additionally, it’s important you create opportunities to reduce stress and promote mental well-being.

For instance, perhaps you offer flexible hours, so employees can avoid a stressful commute in the morning. Alternatively, you might create lunchtime mindfulness sessions, like Google, Nike, and Apple.

At the very least, take the time to check in with employees and ask them how they’re feeling about their workload. If they seem stressed, consider how you might help delegate tasks to help them get back on track.

4. Foster an environment in which coworkers can bond.

The majority of people dedicate more hours to their jobs than to their significant relationships with spouses, children, or friends.

To boost job satisfaction, it’s critical you find ways to help your employees connect with one another and form genuine friendships.

To foster workplace connections, consider adding games or activities to your shared space — for instance, you might purchase a ping-pong table or game console to encourage employees to engage with one another.

Alternatively, you might plan weekly “breaks” from work, like Friday happy hour or Monday team lunches.

It‘s also important you plan regular team outings to get outside the office. Your employees are more likely to form authentic friendships outside the office when they don’t feel they need to act as strictly professional.

For instance, you might take them to an arcade or baseball game. A new environment could help employees bond on a deeper level.

Additionally, taking the time to celebrate major milestones in employees’ lives can help them feel appreciated. For example, you could gather a group for a coworker‘s birthday or another coworker’s engagement.

5. Conduct job satisfaction surveys.

You‘ll never know if your strategies are working if you don’t regularly conduct surveys to see how happy and satisfied your employees are. Job satisfaction surveys will help you see areas of improvement you might’ve otherwise missed.

Additionally, job satisfaction surveys show your employees that you care about how they feel. By allowing them to voice their opinion, you’re showing them they are important to the company.

Ensure your survey is anonymous so employees feel comfortable voicing their concerns.

The eNPS (employee Net Promoter Score) is a good tool to measure employee engagement. Alternatively, you might create your own company survey using SurveyMonkey or Google Forms.

Job Satisfaction Statistics

To understand the measurable difference job satisfaction can make for your company, take a look at the following statistics.

  • Engagement-driven organizations outperform non-engaging organizations by 202% (Business2Community).
  • When employees are given new challenges, they are 83% more likely to stay with their organizations (ReportLinker).
  • When it comes to choosing a job, 42% of millennials say learning and development is the most important benefit (Udemy).
  • Globally, only 15% of employees are engaged at work (Gallup).
  • Over 80% of full-time workers are actively seeking or passively open to new job opportunities (Ajilon).
  • 77% of job seekers consider the culture of the workplace before seeking a job there (Business News Daily).
  • 92% of employees said they would stay with their jobs longer if their bosses showed more empathy (Businessolver).
  • When employees feel they have the chance to use their best strengths and abilities at work, they are 15% less likely to quit their jobs (Gallup).

Invest in your employees’ happiness today.

The level of job satisfaction among employees plays a substantial role in their engagement, retention, and the overall performance of a company.

By implementing these five guaranteed ways to boost job satisfaction on your team, you can improve the workplace environment and create a culture of positivity, creativity, and productivity.

Keep in mind that contented employees are more driven, and the returns on investing in their happiness are significant over time.

company culture template

Categories B2B

What is Public Relations? PR Definition Explained

Image is an important aspect of brand awareness, which influences whether your potential customers know, like, and trust you. Where publicity is outside a brand’s control, public relations (PR) is an effective way to contribute to the conversation.

Download Now: Free Press Release Template

In this article, we’ll define what public relations is and what to expect if choosing it for a career path.

Skip to:

There’s an old saying: “Advertising is what you pay for; publicity is what you pray for.”

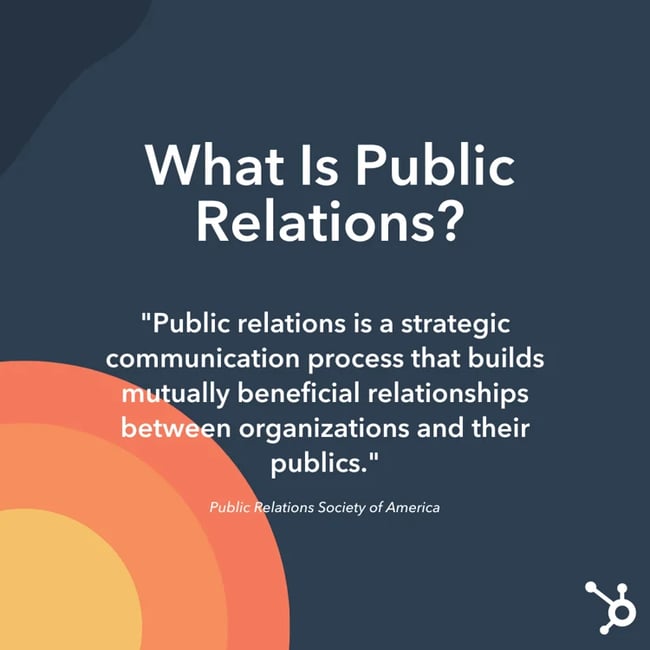
Public relations isn’t an easy profession to define. In fact, in 2012, the Public Relations Society of America (PRSA) accepted a few thousand submissions before finally agreeing on one:

public relations definition: PRSASo how can an organization take its beneficial relationship to the public and turn it into good press? Are you really “praying” for something, like the old saying goes, if you’re using a strategic process to get results?

If public relations is a bridge for that relationship, then public relations professionals are the bridge builders. Let’s talk about them a little more specifically:

What is a public relations professional?

A public relations professional is in charge of creating and executing a PR strategy, helping a business or individual cultivate a positive reputation through various unpaid or earned channels and formats, including press, social media, and in-person engagements. They also help clients defend their reputations during crises that threaten their credibility.

Working in PR

The path to becoming a PR professional is not linear like one for something in STEM. Instead, PR professionals often come from a variety of backgrounds including communications, political science, business, or journalism.

Despite having disparate backgrounds, most people working in PR are scrappy, problem-solvers who can think of solutions on the fly. They have great written and oral communication skills combined with an eye for detail and strong critical-thinking muscles.

Since all organizations need some form of PR, those looking for a career in the field have options across multiple industries. This makes it easy to choose a niche that interests you most. From tech to government to nonprofits — public relations professionals are in demand.

Public Relations Types

In larger companies, public relations functions are often split into different departments. Below are some of the most common.

Media: Media relations is responsible for fostering favorable relationships with external media like news organizations, blogs, and industry-related organizations.

Community: This department focuses on building a brand’s reputation within a specific community or niche. For example if a company sells camping equipment and hiking gear, it makes sense to form relationships with outdoor enthusiast organizations.

Government: Government relations is responsible for managing the relationship between a brand and a governing body. PR professionals in this role aim to influence politicians and lawmakers to get favorable outcomes for the brand. This could mean influencing certain policies or providing feedback to decision-makers about industry-specific topics.

Investor: Found in publicly traded companies, investor relations departments manage communication between shareholders and analysts.

Internal: Internal relations is responsible for communication between a brand and its employees. This department not only disseminates important company information, but also acts to quell employee dissatisfaction before it hits a public forum.

Production: This department handles one-off projects like new product or service launches, manages communication around a particular product change, or other special marketing campaigns.

In order to understand how all these PR facets work together, you must first consider the two sides of PR: the positive storytelling side and the negative damage-control side.

Positive Public Relations

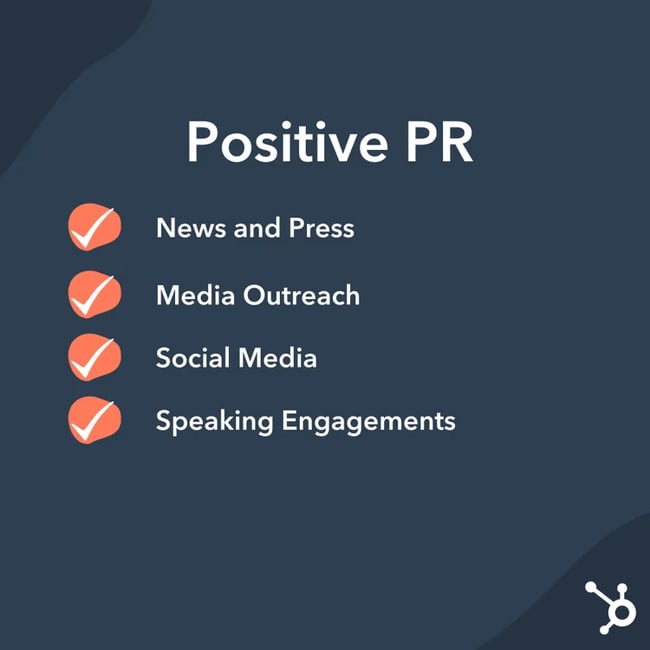
postive public relationsIf an organization is proactive about their image, they will likely be investing in positive public relations where a PR professional helps portray the brand’s reputation, idea, product, position, or accomplishments in a positive light.

So, in a sense, you can think of PR professionals as storytellers. Unlike advertisers, who tell stories through paid methods, PR professionals tell their stories through unpaid or earned media.

These unpaid or earned avenues include:

  • News and press
  • Media outreach
  • Social media
  • Speaking engagements

Keep in mind that a PR professional isn’t just trying to reach a paying customer … they’re trying to reach everyone.

Example of Positive PR

Let’s say you work for a small interior design company, and your business just won an award: “Best Interior Design Company in Chicago.” A PR specialist might draft a press release and conduct outreach to reporters to write a story about this accomplishment to spread the news to the public.

Along with building a credible reputation for your interior design business, the PR professional is also helping the public receive relevant information about this accolade. If I’m a consumer looking for an interior designer, this announcement could help me, too.

Public relations extends to government, too. PR professionals can execute political campaigns or explain a government’s new policy to the public. In this case, you can see how PR professionals work to maintain a healthy and productive relationship between their client (the government) and the general public, who have a right to hear about new policies.

Damage Control in PR (Negative Public Relations)

Damage control: how to handle negative PR

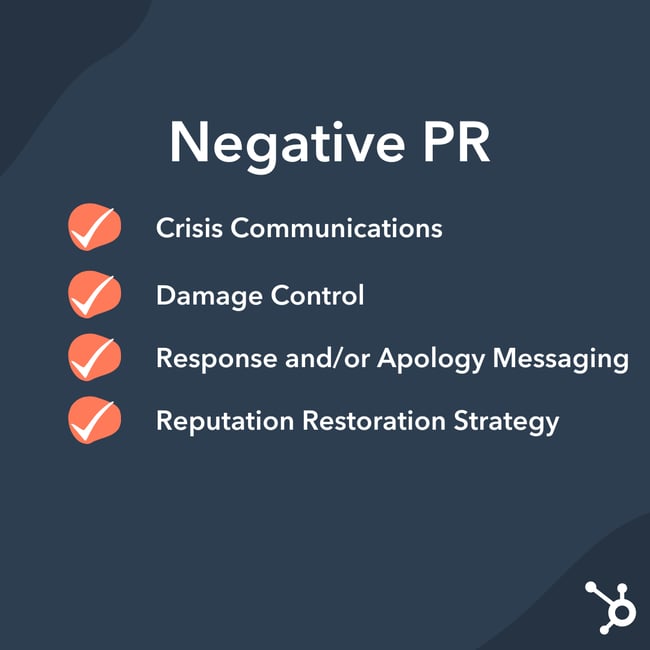
PR isn’t just used for positive storytelling. It’s also used to mitigate any damage that could weaken a client’s reputation.

If public discourse around a particular brand has a negative sentiment, perhaps as a result of negative publicity or news, a PR professional’s job is to advise the organization on how to proceed.

After all, if conversations are being had, then an organization should share its side of the story. However, how they respond will have an impact on the public’s perception. If done poorly, it could make the situation worse.

A PR professional will then be tasked with:

Example of Damage Control in PR

In the early 1980s, numerous bottles of Johnson & Johnson’s Tylenol product were laced with cyanide by an unknown person, killing seven people. This led to widespread panic and could have resulted in the end of Tylenol products.

Johnson & Johnson took aggressive PR measures to mitigate the damage: First, the company pulled all of its Tylenol products off the shelves and issued a national statement warning consumers not to purchase or use Tylenol. Then, Johnson & Johnson created a new tamper-resistant seal and instructed 2,000 sales personnel to deliver presentations to the medical community to reintroduce these new, safer Tylenol bottles.

This effective PR strategy saved Johnson & Johnson’s reputation as well as their product — in fact, Tylenol shares climbed back up to 24 percent just six weeks after the cyanide crisis.

In the case of Johnson & Johnson, a simple advertising campaign wouldn’t have worked. Instead, PR was necessary: PR professionals were able to spread a story that portrayed Johnson & Johnson as a company that puts consumers ahead of profit. Along with mitigating damage to Johnson & Johnson’s reputation, PR was used to save more people from consuming cyanide-laced Tylenol, and then used to inform the public that Tylenol was safe again. A win-win-win.

PR as an Important Marketing Strategy

In these examples, you can see PR professionals are adept at handling a wide variety of both good and bad circumstances and must address these events so the public and client can maintain a beneficial relationship. PR specialists also play a role in advising management on the best policy decisions or actions to take and conducting programs, such as fundraising or networking events, to help the public understand the organization’s goals.

PR isn’t just used to influence a story after it happens — it’s also used to write that story in the first place.

Editor’s note: This post was originally published in April 2018 and has been updated for comprehensiveness.

New Call-to-action

Categories B2B

How to Use Google Calendar: 21 Features That’ll Make You More Productive

Some things you think will be simple actually end up getting really complex. Google knows this all too well, which is why Google Calendar has plenty of nifty features to simplify scheduling.

Your Google Calendar comes with your personal Gmail address, and you won’t believe how simple it is to use and set up. However, when working at a company with a corporate Google account you suddenly have to find out how best to integrate your personal calendar with your weekly meeting schedule.

Forget back-and-forth emails. Try our free meeting scheduling tool!

Below are some of our favorite tips, tricks, and features available in Google Calendar.

Skip to:

21 Google Calendar Features That’ll Make You More Productive

1. Create new calendars for different parts of your life.

When you first start out on Google Calendar, you’re given one calendar to start with — it’s the one with your name under “My calendars,” as shown in the screenshot below.

So, if you want to use your calendar for multiple purposes — like managing your actual schedule, planning periods of focused work time, and scheduling repeating reminders — you only have one place to do it. But when you’re only working with one calendar, all of those things get treated equally — meaning you can’t quickly and easily pull up the non-repetitive, important tasks you have for the day.

To combat this, just create a new calendar for each part of your life you’d like to keep track of on your Google Calendar.

How to Use This Feature

To create a new calendar, click the little plus sign (+) next to “My calendars,” and you’ll see the option, “New calendar.” Select this option, name your new calendar, give it a description and time zone, and voilà — you’ve got yourself another calendar.

calendartips_26

Pro Tip: You can even color-code each calendar to make it easy for you to pick out what you’ve got to do each day.

2. Schedule meetings with groups using “Find a time” or “Suggested times.”

Do you ever need to arrange a meeting with several people who have busy schedules? It can be really annoying to try to figure out when you’re all free. Thankfully, Google Calendar actually has two features that can do the heavy lifting for you: “Suggested times” or “Find a time.”

How to Use This Feature

To use either of these two options, first make sure you’ve added everyone to the event who needs to attend. Then, if you’d like Google to suggest a time for you to meet, simply select the “Suggested times” link below your guests’ names. A dropdown window will appear with a list of times when every meeting guest, including you, is available with no conflicts.

List of suggested times for an event in Google Calendar

“Find a time” is the other way to quickly find a time that works for every guest included on the meeting invitation. To use this feature, choose the tab next to “Event details” called “Find a time,” and you’ll see everyone’s schedules side-by-side for the day of your intended meeting. When you see a time when none of your guests have conflicts, click this line of the calendar to highlight the time and press “Save” at the top of your Calendar.

Find a time feature Google Calendar

Pro tip: you can also use a free product like HubSpot Meetings to easily schedule meetings without back-and-forth emails. With HubSpot’s Meetings tool, you can send a generic link and ask customers or prospects to choose a time on your calendar that works for them, or choose the sales rep who has the soonest availability.

3. Sync meetings with your CRM.

Use a CRM daily? It can be annoying to back and forth between your Google Calendar and your CRM. Instead, dive into your CRM settings to see if there’s an existing integration with Google Calendar.

HubSpot CRM users, you’re in luck — it’s quick and easy to set up this integration. Learn how to do this here.

4. Sync your calendar with your marketing software.

If you want to make your Google Calendar align even more with your marketing activities, you can integrate it with your marketing software.

For HubSpot customers, you can use Zapier to set up some pretty nifty workflows, such as creating a social media message every time an event starts. Check out this page for more on how you can set up that integration, as well as some ideas for ways you can integrate the two.

5. Hide your event details.

Sometimes, the meetings you host or attend are sensitive in nature. Keep in mind, however, that a closed door isn’t the only way for others to know what’s going on inside. The event’s details in Google Calendar can also reveal more to the rest of the office than you’d like.

To ensure you have as much privacy as you need during more sensitive meetings, set your event to “Private.” This makes it so nobody viewing your weekly schedule sees the details of the event — meeting name, attendees, attachments, and so forth. By default, the public label on the event block will simply be, “Busy.”

How to Use This Feature

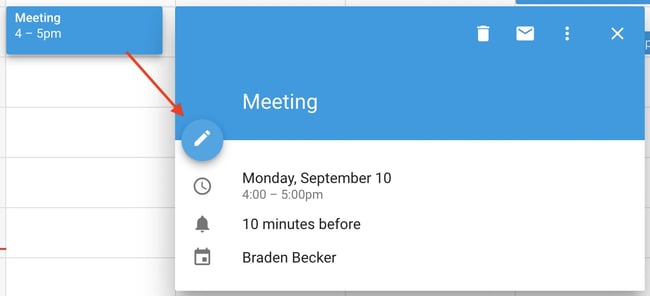
To privatize the details of certain events on your calendar, click the event from your calendar view and select the pencil icon to edit the event’s details. In the window that appears, find the briefcase icon just above the event description field.

With the first field set to “Busy,” click into the second field and select “Private” from the dropdown, as shown below. Hit the blue “Save” button at the top of your screen and you’ll be all set.

calendartips_14

6. Add a Google Meet to your event.

Need to easily set up a face-to-face remote meeting? Just click the link to “Add Google Meet,” and Google will set up a video call for your event attendees to use. (Learn more about Google Meet here)

how to use Google Meet

7. Add attachments.

I don’t know about you, but I often find myself attending meetings that require me to reference a relevant document. Maybe we’re all working off one Google Doc, or perhaps we’re pouring over an intricate spreadsheet.

Regardless, it’s best to make sure all meeting attendees have the materials they need before the meeting begins so they don’t have to go hunting in their inboxes for it. Google Calendar can help you do this, allowing you to attach documents directly to the event for guests to open and review.

How to Use This Feature

To attach a document to your event, click on your event block from the calendar view and select the pencil icon to edit the event, as shown below.

calendartips_18

Once you’re in the event’s edit screen, look for a paper clip icon right above the description section, as shown in the screenshot below. Click this icon and a large window will appear where you can upload files to attach directly from your Google Drive.

Feature for adding attachments to events in Google Calendar with paper clip icon highlighted in red

Pro tip: When you reach the upload window, you can toggle to the “My Drive” tab to attach Google Docs, Sheets, and Slides that already exist in your Google Drive. Or, you can click the “Upload” tab on the far left of the window to attach offline files from your computer.

8. Enable your world clock.

Do you work with teammates who live around the world? You might find it’s difficult to figure out what time is appropriate to schedule meetings with them. Fortunately, you can — by enabling “World Clock” in your Google Calendar settings.

How to Use This Feature

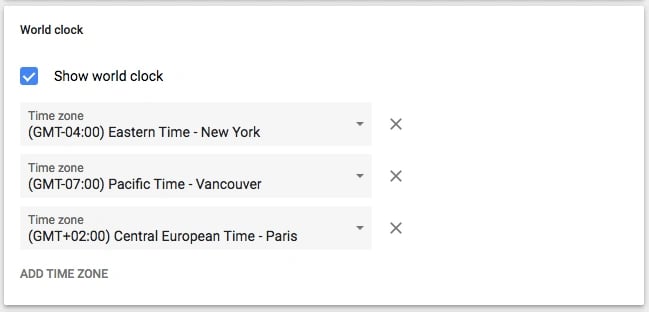
To quickly check multiple time zones when arranging meetings, click the gear icon on the top-righthand corner of your calendar view. These are your settings. Then, navigate to the “World clock” section, check the first blue box, and select the time zones you want to see from your calendar view.

calendartips_5

Once you’ve chosen the time zones you want, return to your calendar view and you’ll see the following on your Google Calendar’s lefthand sidebar:

how to use google calendar: World Clock

9. Enable working hours.

Not everyone is a 9-to-5 worker, but they might work quite a bit with those who are. If you have an unconventional work schedule that none of your colleagues seem to remember, this feature is for you.

“Working Hours” is a setting that alerts people if they try to add you to a meeting that lies outside a range of hours set by you in Google Calendar. Hey, it beats having to hit “Decline” and then follow up with the meeting organizer to remind them you’re unavailable during that time.

A Google Calendar tipthat John Hall, Co-founder of Calendar, advises people to use is speedy meetings. “Beneath the default meetings duration settings is the option to create Speedy Meetings. Check the box and 30-minute meetings will automatically be scheduled to last 25 minutes while longer meetings will be cut by ten minutes. That way your working hours become more productive since you end meetings sooner and have time to catch up on todos that don’t keep you beyond working hours.”

How to Use This Feature

To enable specific working hours on your Google Calendar, click the gear icon from your calendar view to access your settings. Navigate to the “Working Hours” section, as shown below. Here, you’ll be able to specify when you’re in and out of work each day of the week.

Working hours feature

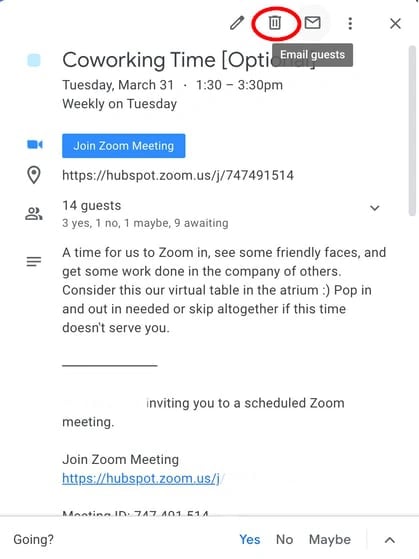
10. Email event guests.

Remember the time you tried to email a large group of people about an event? Maybe you were trying to coordinate a team outing — or just let everyone know they should bring their laptops to the all-hands meeting. Regardless, I’ll bet it was annoying to figure out who was actually going to the event and ensure you didn’t forget anyone.

Well, this Google Calendar feature will come in handy next time.

How to Use This Feature

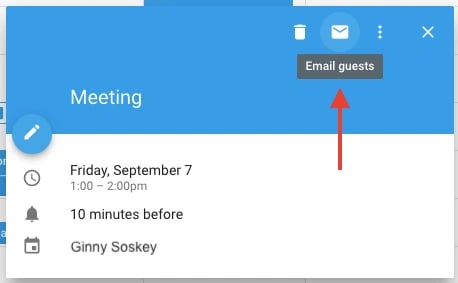
As long as you’ve added everyone to the event that needs to go, you can easily email everyone in the group by clicking on the event block from your calendar view and clicking the envelope icon.

calendartips_20

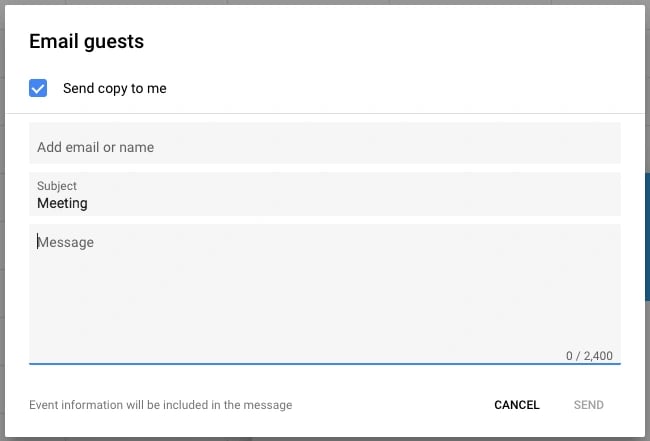
Once you click on the envelope icon inside the event block, an email compose box will appear. Simply type in your message, type in the email addresses of the people you want to receive it, and hit send.

calendartips_1

11. Add specific meeting locations.

I wish I’d known about this feature the last time I got coffee with someone in downtown Boston. We agreed to meet at Starbucks … but thanks to the multitude of Starbucks locations in Boston, our conversation went something like this:

“Okay, so let’s meet at the one on State Street,” I said.

“Oh, the one by the Court House?” he asked.

“Well, it’s kinda by the Court House, but further down State Street,” I replied.

“Oh, you mean the one by Downtown Crossing?” he clarified.

How to Use This Feature

The logistics of a meeting can get fuzzy without a specific address or conference room. Thankfully, Google Calendar has a feature that’ll fix all that. Instead of having the back-and-forth, I could’ve just sent my friend a calendar invitation with the specific address in the “Where” box. It integrates with Google Maps so it’s super easy to figure out where you’re meeting and how to get there.

how to use google calendar: Meeting location

12. Use desktop notifications.

As you probably can tell by now, I love Google Calendar … but there is one feature of which I am not a fan.

If you have your Google Calendar open as a tab in your browser when it’s 10 minutes before your next event, the 10-minute warning interrupts everything you’re doing and takes over your screen. Forget about what you were working on — Google Calendar will suddenly surface its tab with a big pop-up alert coupled with an annoying sound. It’s the worst.

Luckily, there’s a setting in Google Calendar that you can use to make notifications much less annoying: “Desktop notifications.” Rather than interrupting your work, you’ll see a much gentler box slide in from the top-righthand corner of your computer screen, displaying the name of the event that’s 10 minutes away.

How to Use This Feature

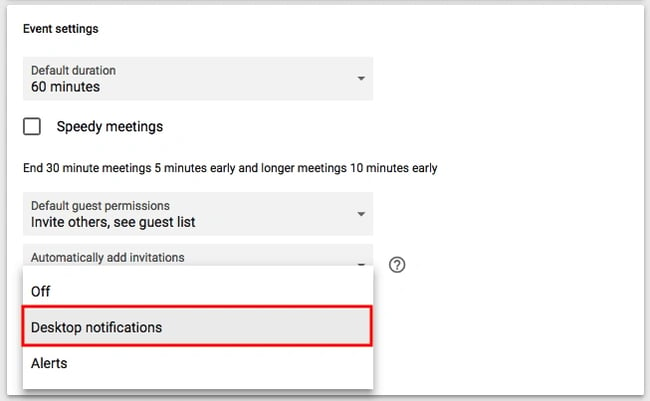
To enable “Desktop notifications” in Google Calendar, click into your settings using the gear icon on the top-righthand corner in your calendar view. Scroll down to “Event settings” and click the “Notifications” box, as shown below.

calendartips_11

By default, your notifications might be set as “Alerts,” causing each event’s 10-minute warning to hijack your computer screen. Instead, select “Desktop notifications,” return to your calendar view, and you will have successfully enabled gentler meeting notifications.

13. Change the event notification time.

In the previous tip, you learned how to soften the notifications you receive in advance of a meeting. But did you also know you can change the number of minutes before the event you want to be notified?

How to Use This Feature

By default, Google will notify you 10 minutes before the event’s start time. To change this warning time for a particular event, click on the event from your calendar view, and select the pencil icon to edit the event’s settings.

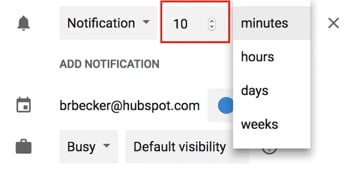
In the event details, find the bell icon just below the video conferencing line. Hover your cursor over the box listed “10” and toggle up and down using the small arrow keys that appear to the right to change the number of minutes in advance you want to be notified. As you can see below, you can tell Google to notify you hours, days, or weeks in advance, too.

calendartips_17

Pro tip: To the left of the “10,” you can change “Notification” to “Email” if you’d rather be told about upcoming meetings via email instead of a desktop notification.

14. Arrange appointment schedules.

Ever thought about incorporating “office hours” so other folks in your company can book time with you? Maybe you’re a part-time consultant with limited hours to book meetings, or want to limit the times your team can book time with you to certain times of day.

If any of the above scenarios resonate with you, think about using Google’s Appointment schedules.

Google’s Appointment schedules allow you carve out specific times of day on your calendar and then share these times with select people via a private calendar link. When these people click the link, they can schedule meetings with you at any of the times you carved out for them.

If your link recipients find a time they like, all they have to do is select it to book a private event with you, including all the information they’d need for the meeting.

How to Use This Feature

To set up your own Appointment slots, start by clicking anywhere in your calendar view to create an event. When the event options appear, click “Appointment schedules,” as shown below at the very top of the window. Set the date range of the slots you’d like to open up for appointments, as well as how long each appointment should be by default next to “Slots with duration.”

how to use google calendar: Appt schedule

If you’d like more control over your Appointments, click “More Options,” and you’ll be taken to the window shown below. Click “This calendar’s appointment page” for the link you can then share with those whom you’re willing to arrange appointments.

15. Browse calendars of interest.

Want to make sure you’re keeping track of holidays in other countries, your favorite sports team’s schedule, or just the time the sun rises and sets each day? You’ll find these calendars (and more) on your Google Calendar’s lefthand sidebar.

How to Use This Feature

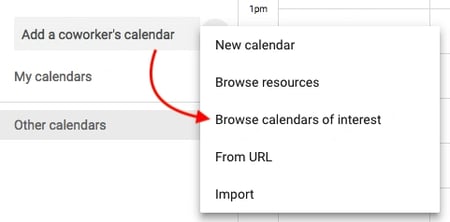
To browse and add interesting calendars, click the plus sign (+) next to “Add a coworker’s calendar.” Then, choose “Browse calendars of interest.” From there, choose the calendars you’d like to subscribe to.

calendartips_26 (1)

16. Implement a custom view.

When you first set up your calendar, you’ll have the option to view it as a week, month, the next 4 days, or as an agenda. That “4 days” option? You can switch that out with a different interval in your “Custom view” options.

How to Use This Feature

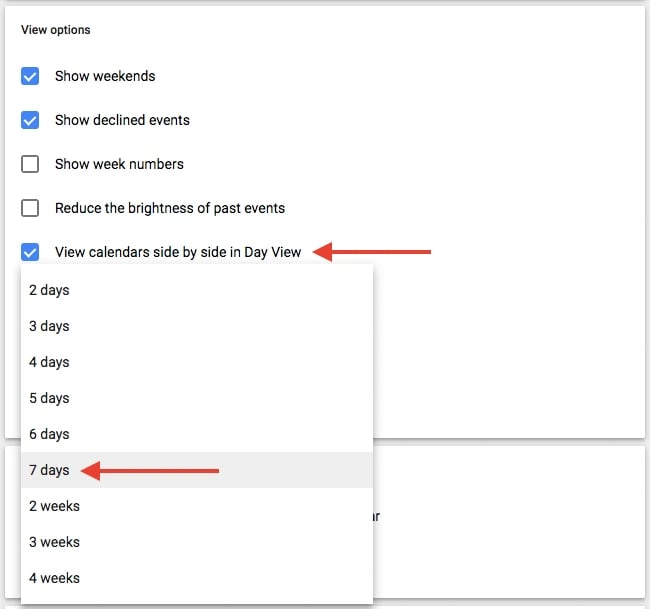
To adjust the number of days you see in your calendar view, click into your settings using the gear icon on the top-righthand corner of your screen. Scroll down to “View options.” Click “Set custom view” and select how many days you want to see at one time from your calendar view, as shown below.

calendartips_0

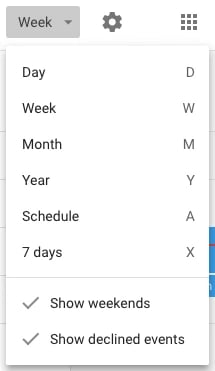
You can also make quicker, more general adjustments to your user interface right from your calendar view. Next to your settings’ gear icon, you’ll see a box that, by default, might say “Week.” Click it to reveal a dropdown menu where you can customize your view further, as shown below.

calendartips_10

17. Share your calendars with others.

If you’re using Google Apps for your company, you can also control who sees your calendar, what they see, and whether they have permissions to edit it. (If you have an assistant, this tip will be very important to remember.) You can also make your calendar public, if you wish.

How to Use This Feature

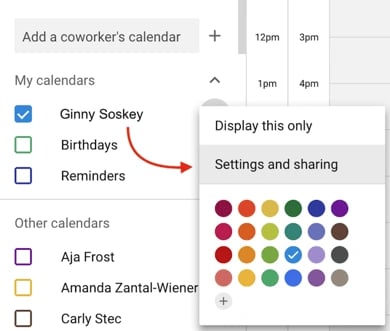
To change your sharing settings, click on the plus sign (+) next to the preferred calendar and choose “Settings and sharing,” as shown below.

calendartips_2

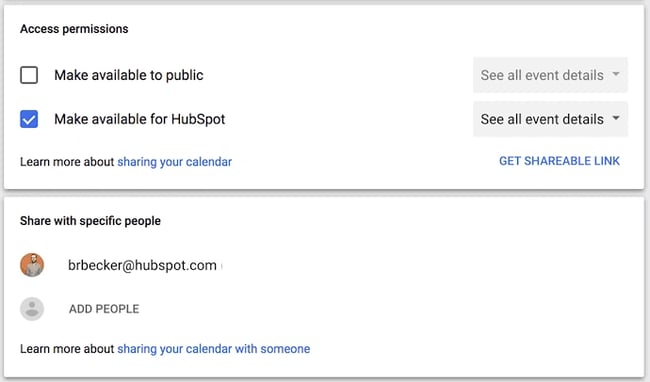
Then, you’ll be taken to the page shown below. Here, you can choose to do any of the following:

  • Make the calendar public.
  • Choose to show event details to everyone in your company, or just free/busy information.
  • Add someone to your calendar and choose their individual permissions (see all details, make changes to events, hide all details, etc).

calendartips_12

When you’re done, click the back arrow on the top-lefthand corner of your screen to return to your calendar view. Google will automatically save your new calendar settings.

18. Use keyboard shortcuts.

Are you looking to really streamline your Google Calendar efforts? Google Calendar’s got a ton of keyboard shortcuts to use, such as:

  • t = Move your calendar view to today
  • c = Create an event
  • q = Quick Add an event

Check out the full list here.

19. Use quick shortcuts to find a time or jump back to your current time.

Rather than manually scrolling through each month to find a time far in the future, you can type the letter “G” when you’re on your Google Calendar to quickly find a date in the future.

how to use google calendar: go to date

Alternatively, if you’ve scrolled toofar and want to find your way back to the current time with manually scrolling, type the letter “T” to return to the current date/time.

20. Email all invited guests.

I’ll admit — I’ve been guilty of creating events and then missing a recipient or two when I’ve attempted to email the entire group a friendly reminder, or necessary information to peruse prior to the meeting.

Fortunately, with Google Calendar you don’t have to manually type-in every name on the invite. Instead, go to the top of your event and click the Email icon, which enables you to email all your guests from within the calendar itself:

calendartips_22

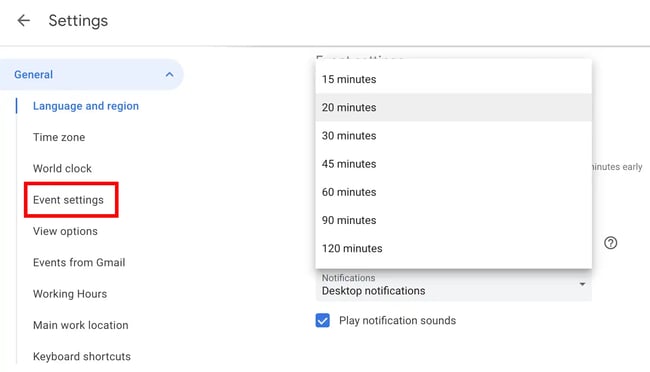
21. Set a “Default Duration” to make shorter meetings, or a “Default Time” to eliminate weekends from your Calendar overview.

If you’re feeling overwhelmed by the 30-minute or hour-long meetings that consistently deprive you of your ability to get other work accomplished, consider setting a “Default Duration” of 15 or 20-minutes for meetings so that, when you’re planning quick check-ins on auto-pilot, you’ll ensure you’ve planned your time efficiently.

Of course, for certain meeting topics, 30-minutes to an hour is necessary. But if the majority of your meetings are “catch ups” or brief 1:1’s with colleagues, consider whether you can communicate the major points in 20 minutes or less, and save the more minor details for a follow-up email.

calendartips_24

Alternatively, if you’re like me, you only use your Google Calendar for the workweek — why, then, do you need the added space of Saturday and Sunday?

A while ago, I clicked the “Week” toggle at the top of my calendar and de-selected “Show weekends” to ensure I felt I could visualize exactly how my workweek was going to look — and saved my weekends for relaxation and more casual plans I could save in my phone if necessary.

how to use google calendar: default duration

Streamline Your Schedule

Google Calendar can start to feel a lot less simple the more events you have on your agenda. Luckily, these hacks and under-the-radar features make your life in Google Calendar much easier to organize.

Ideally, you’ll use one (or a few) of these features to ensure you’re using Google Calendar to youruniquebenefit and to fit your own lifestyle and work preferences, rather than accepting the default settings.

Editor’s note: This article was originally published in March 2019 and has been updated for comprehensiveness.

calendartips_23


Categories B2B

The Beginner’s Guide to LinkedIn Marketing & Networking

Did you know LinkedIn has over 774 million users across the globe? This metric alone makes the platform one of the top social networks today.

Is your business using LinkedIn to its fullest potential to improve brand awareness, build your network, boost leads and conversions, and increase revenue? With new social networks sprouting up constantly, LinkedIn is a platform that’s often underutilized. The truth is, LinkedIn can be a powerful addition to your social media content strategy.

This guide is chock full of LinkedIn tips you can begin implementing immediately to help you learn how to use the platform to improve brand awareness, share your marketing content, and grow your business.

Free Guide: How to Use LinkedIn for Business, Marketing, and Networking  [Download Now]


When you use LinkedIn to market your business, you gain access to useful features related to analytics, connections, and brand-building, just to name a few. (Don’t worry, we’ll review all of these in-depth momentarily.)

Why is marketing on LinkedIn important?

When it comes to social media marketing, you may be tempted to put all your resources toward the big three: Facebook, Instagram, and Twitter. Those are great platforms for reaching your target audience, but excluding LinkedIn is doing your business a huge disservice. As the world’s largest professional network, LinkedIn generates leads 227% more effectively than Facebook and Twitter, so it’s an essential platform for your business when it comes to marketing.

But first, here’s a quick primer for those of you who may be new to LinkedIn.

About LinkedIn

LinkedIn launched in 2003 with a focus on networking, building careers, and sharing ideas. The platform enables its members to connect and share content with other professionals including colleagues, potential employers, business partners, competitors, new employees, and customers.

This is why having your business on LinkedIn is so powerful — the platform is a fantastic marketing tool.

For a quick guide on the tips below, check out our video on “How to Use LinkedIn for Business and Marketing.”


Now, let’s review the ways you can use LinkedIn to market and grow your business.

LinkedIn allows you to drive traffic to your website, identify quality leads, share your expertise through thought-leadership content, and grow your network. It’s also a great way to market job openings and attract new talent to your company. These are just some of the reasons why LinkedIn is an ideal platform for all businesses to market on. Here are a few more tactical ways you can incorporate LinkedIn into your social media content strategy.

1. Use hashtags.

Hashtags are often used to add emphasis to your LinkedIn post, but they actually serve a purpose that can change your marketing strategy for the better. These simple phrases preceded by a hashtag symbol are goldmines for tapping into new audiences, industries, and niches. But using too many, or worse — the wrong ones, can hinder your reach.

That means you’ll want to strike a balance between relevant and popular hashtags by doing hashtag research on LinkedIn. Use the search bar to query a broad hashtag first. For example, if you work in growth marketing, start by searching #growthmarketing to see how many people are following the hashtag, and how often it is being used.
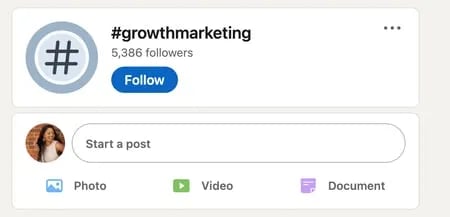
Linkedin hashtag example for growth marketing

From here, start with three to five hashtags that reach the audiences you want to speak to. These hashtags should vary in the number of people following them, so don’t get too fixated on high numbers. Related but lesser-known hashtags can narrow your reach to an audience who would be likely to engage with your LinkedIn content.
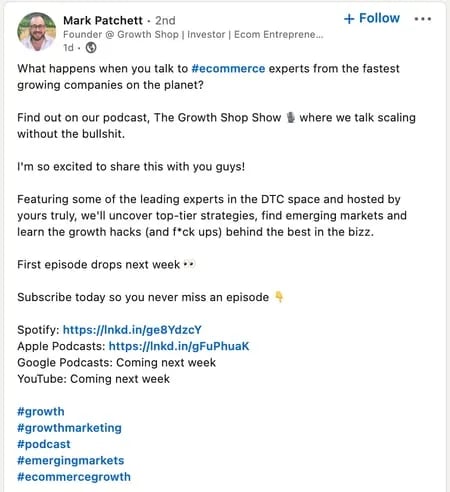
example of a linkedin post using several related marketing hashtags

Image Source

2. Know when to use a LinkedIn Profile vs. a LinkedIn Page

LinkedIn Pages are able to be followed without sending a connection and waiting for approval. That means when a LinkedIn user shares your Page with their connections, those individuals will be able to follow your page and see your business’ content right away which has the potential for high engagement. LinkedIn Pages and LinkedIn Profiles serve different purposes in LinkedIn marketing. Pages are public and used primarily by businesses. Profiles are private and used by individuals. Each of them works with the LinkedIn algorithm, but you’ll have different tools that you can leverage to grow your audience.

LinkedIn Profiles can be followed as well, but what makes them unique is the ability to have one-on-one, private conversations with connections who request to join your network. If you’re a consultant, work in direct sales, or prefer to take an individualized approach to your business, you’ll want to have a LinkedIn Profile to capitalize on this feature.

Both of these LinkedIn entities can work in tandem to create the ultimate marketing workflow. For example, you can list yourself as an employee of your business by listing your business’ LinkedIn Page as your employer on your personal Profile. That way, when a visitor lands on your Profile, they’ll see your Page, too.

3. Create posts of varying lengths.

Quick, bold posts pack a punch on LinkedIn. Long-form stories capture the readers’ attention and lead to a longer dwell time on the app. Both of these types of posts should have a place in your LinkedIn content plan.

You don’t want to become known as the person who only shares monologues because your network won’t always have time to read them. Along the same lines, too many short posts can come across as lacking substance which could make you seem less authoritative as a thought leader.

Varying the length of your posts (as well as adding images and videos) can keep your content fresh and relevant to your network. You’ll have content that gets people excited to see what gems you drop next.

4. Share external articles on the platform.

Unlike other platforms such as Instagram, LinkedIn’s algorithm supports external links to blogs and websites. So long as the content you post has value and is relevant to your audience, you’ll find success posting other people’s content on the platform.

Although you don’t have to worry about formally crediting the author if you’re linking directly to their website, it’s not a bad idea to tag them in your post or use their hashtag to give credit. Sometimes, they’ll share your post with their own followers, or comment under the post which introduces your Profile to their audience. How cool is that?
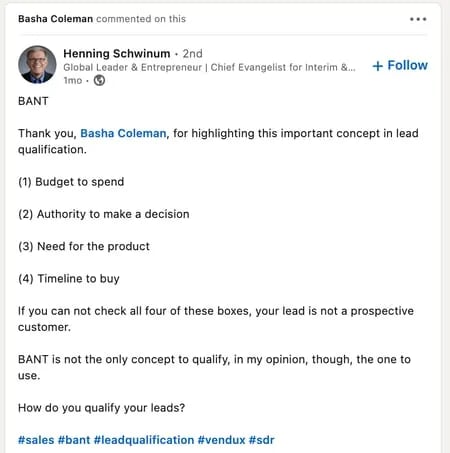
example of sharing external articles on linkedin

Image Source

5. Keep your publishing schedule consistent.

Known as the platform for having one of the longest content lifespans, LinkedIn is a platform that doesn’t need a ’round-the-clock publishing schedule. What it does need is a consistent one.

Whether you publish every day, every other day, or even once a week, your network will come to expect your content regularly which builds trust. Choose a schedule that makes sense for your business and stick to it for a month. See what days and times are yielding the best engagement and make those part of your publishing schedule.

Below, we’ll cover some effective ways to use the LinkedIn platform. These tips can be tailored to your needs — whether you have a personal LinkedIn page, business page, or both — no matter your industry or size. However, you’ll notice some of the points we’re going to cover are more suited for businesses looking to boost brand awareness or share content while others are more tailored towards those looking to recruit and hire new talent.


1. Customize your public Profile URL.

Make your Profile look more professional, and easier to share, by customizing your LinkedIn public Profile URL. Instead of a URL with confusing numbers at the end, it will look nice and clean like this:

http://www.linkedin.com/in/amandazantalwiener.

You can do this by clicking View Profile and then clicking Edit Public Profile and URL. Here you can change your URL to anything you’d like — such as your first and last name or business name — assuming it hasn’t already been taken by another LinkedIn user.

2. Add a LinkedIn background photo to your Profile.

Give your LinkedIn Profile a little bit more personality by adding an on-brand background photo. Although one is automatically provided to you, you can update it to showcase your personal brand, special interests, or catch the eyes of hiring managers and recruiters.

LinkedIn recommends a background photo size of 1584 x 396 pixels, and it must be a JPG, PNG, or GIF file under 8MB.
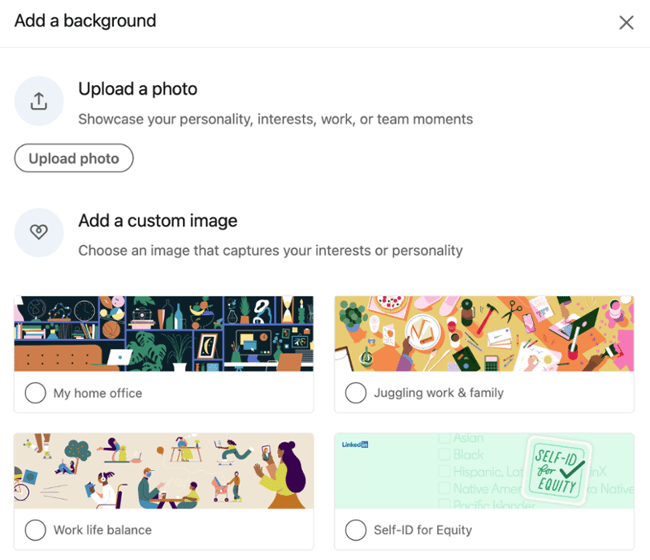
linkedin profile background image options

3. Add, remove, and rearrange sections of your Profile.

You can edit and reorder sections of your LinkedIn Profile to highlight specific pieces of information in any way you see fit. When you’re in edit mode, simply hover your mouse over the double-sided arrow in each section. Your mouse will turn into a four-arrow icon, at which point you can click, drag, and drop to another position on your Profile.

4. Optimize your LinkedIn Profile for the search engines.

Search engine optimization (SEO) isn’t limited to blogging — you can also optimize your Profile to get discovered by people searching LinkedIn for key terms you want to be found for. You can add these keywords to various sections of your Profile, such as your headline, your summary, or your work experience.

Download a free SEO starter pack to learn everything you need to know about optimizing your business’ content.

5. Become a service provider on LinkedIn.

You can become a service provider on LinkedIn by saying you’re open to providing services on your profile.
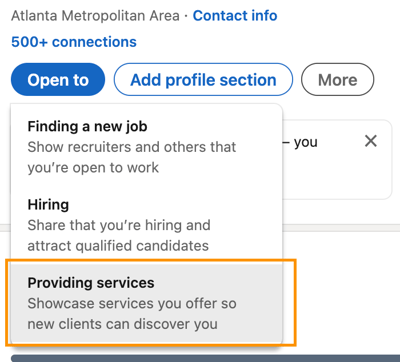
linkedin networking tips: open to featureThis is used to identify freelancers within LinkedIn’s user base. This service matches contractors with project managers who are seeking help.

Freelancers can display a badge on their Profiles to show prospective clients their skills, expertise, and recommendations. Plus, they get a standalone service page like this one:
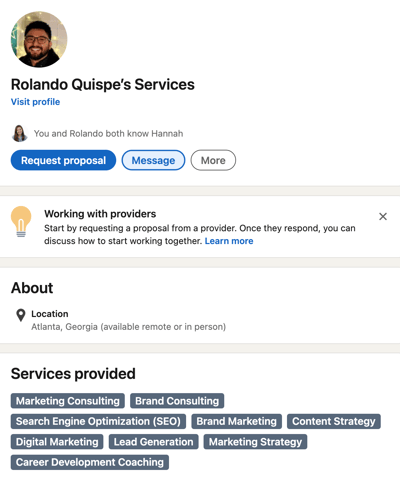
linkedin service provider: rolando Quispe

Image Source

6. Take advantage of the blog and website links on your LinkedIn Profile.

You can add portfolio links and social networks to your LinkedIn page. Links to your content and business information can also be added to your Profile to increase clicks. This feature allows you to draw greater attention to specific areas of your page to drive traffic elsewhere.

For example, if you produced a podcast, you can share links to your episodes on LinkedIn (e.g. SoundCloud tracks) to promote your work.

7. Check your Network Updates (or share your own).

Found on your LinkedIn homepage, Network Updates are essentially LinkedIn’s version of the Facebook News Feed. Check this feed periodically for a quick snapshot of what your connections, customers, competitors, and others are up to and sharing. You can also share updates of your own, such as details about your products or services and noteworthy content your business has created and published.

You may choose to sign up for email notifications or sort by “Top Updates” and “Recent Updates” to filter your feed in any way you choose.

8. Be identifiable.

Your LinkedIn connections should recognize your Profile the moment they look at it. A great way to make your Profile easily identifiable is by ensuring your Profile’s name, headline, and other simple identifiers are easy to see.

Note: You should always have your Public Profile setting enabled as well, to be visible and identifiable for your audience.

9. Check out who’s viewed your LinkedIn Profile.

Learn a little about your audience members, potential leads, and customers who are viewing your Profile and marketing content that you’re sharing on LinkedIn.

How? With the Who Viewed Your Profile feature.

This tool, which is accessible in the main navigation via the Profile drop down, enables you to identify the exact people who have visited your page. You can see how you stack up against the Profile views for your connections, other businesses like yours, and more.

10. Design all aspects of your LinkedIn page.

The design of LinkedIn pages has changed a lot over the years. Make sure yours is set up correctly and optimized for the latest layout, featuring a compelling and high-quality banner image.

Take a look at what HubSpot’s Company Page looks like for inspiration:
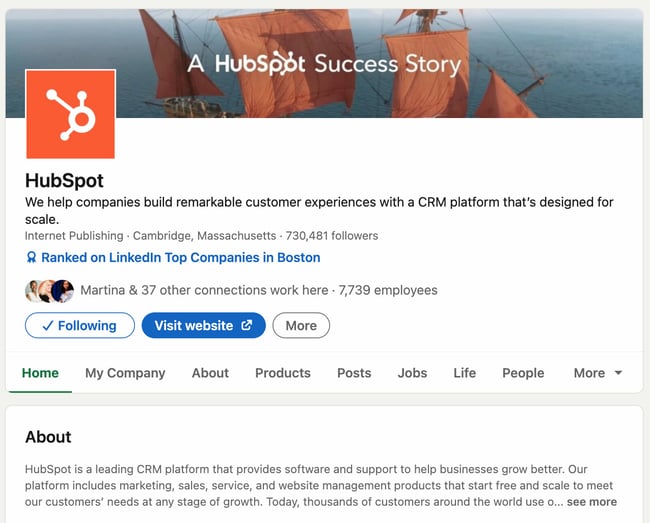
hubspot linkedin page design and layout

Use guides and templates to discover the best ways to design your LinkedIn page for optimal business, marketing, and professional networking.

Next up, we’ll go over some LinkedIn networking tips so you can grow your network. 

LinkedIn Networking Tips

Networking on LinkedIn may feel nerve-wracking, but remember that the worst thing you can hear is the word “no.”

If you’re using your personal LinkedIn profile to network with clients, or if you’d simply like to use LinkedIn to network with those in and outside of your industry, use the following tips.

1. Optimize your profile to invite connection requests.

If you want the right people to find you and hit “Connect,” it’s essential to optimize your profile and make networking with you as appealing as possible. For that reason, you’ll want to:

  • Showcase your unique value proposition: Highlight what sets you apart from others in your field. Share specific accomplishments, quantifiable results, and notable projects — that way, you can demonstrate your expertise.
  • Include images and videos: Make your profile visually appealing and engaging by adding multimedia elements. Text alone can work, but to network more effectively  you’ll want a few pictures to do the talking. Videos, presentations, infographics, relevant projects — everything is game.
  • Optimize your professional headline: Instead of using just your job title, how about highlighting your key skills or the problems you solve? This helps you stand out and piques the interest of potential connections or employers. Have fun with it (but not too much fun!).
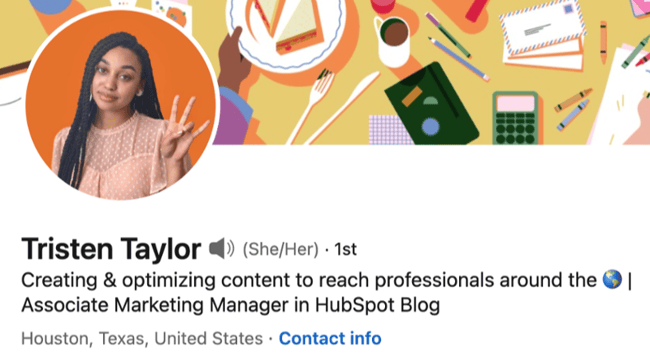
linkedin networking tips: optimize headline

Image Source

2. Personalize your connection requests.

By far, the most important thing you can do to network on LinkedIn is personalizing your networking requests.

Instead of sending generic requests, take a moment to write a note for each one. You can mention where and how you met, for instance, or explain your interest in connecting. This personal touch increases the likelihood of your request being accepted.

It sure worked when the young man below sent me a connection request, but I didn’t recognize his face! When he explained why he wanted to connect with me, I immediately accepted it. It turns out that we were both recipients of the same scholarship.
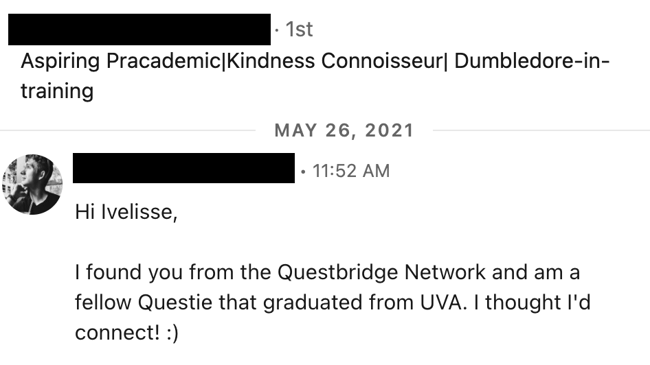
linkedin networking tips: custom connection message

Something important to note is that your connection request message gets converted into an inbox message. This gives you a chance to start a conversation. Consider asking a question or an icebreaker to get people to interact with you after they click “Accept.”

After connecting with someone on LinkedIn, follow up to maintain the relationship. Engage with their content, congratulate them on achievements, or simply reach out to check-in periodically. Networking on LinkedIn isn’t just about having hundreds of connections — it’s about nurturing each one.

3. Engage with other people’s LinkedIn posts.

This one could be a bit obvious, but networking on LinkedIn requires interaction. Remember, we’re not just trying to have a long list of connections, but have a trackable presence. Interacting with other people’s content is one key way to build that presence and meaningfully connect with others.

LinkedIn not only has a feed, but it also sends you a notification when someone in your network has posted or interacted with another post.
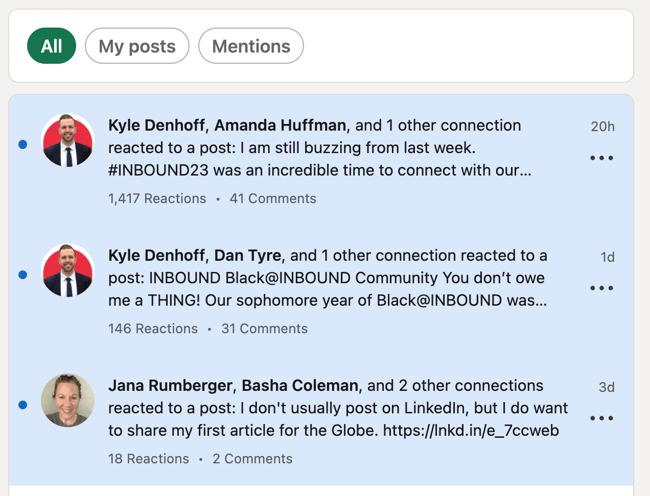
linkedin networking tips: reaction notification

These are all prime networking opportunities. But I especially love the curated notifications from LinkedIn, because they offer an opportunity to interact with content posted outside of your immediate network.

Plus, if your existing connections are interacting with that person’s posts, then chances are that they’re a good prospect to add to your network!

Then, it’s time to interact, but not to fear: It doesn’t have to be too complicated, either. You can regularly engage with posts, articles, and comments on LinkedIn with a simple like or share.

If you’re in the mood, you can also leave thoughtful comments, which can more effectively build relationships and increase your visibility within your network. This also demonstrates your expertise and willingness to contribute to discussions.

4. Join and participate in LinkedIn Groups.
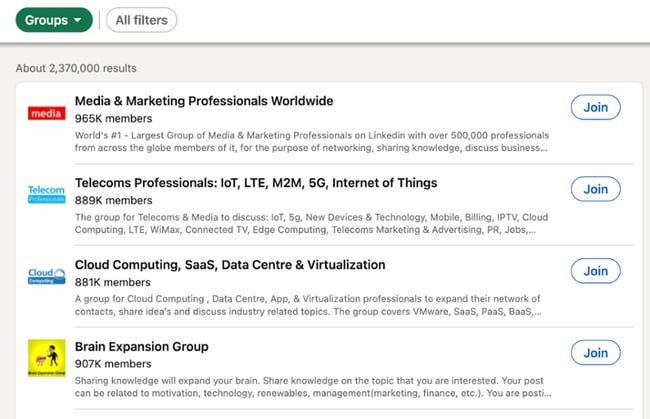
linkedin networking tips: join linkedin groups

LinkedIn Groups are a goldmine of networking opportunities. It’s so essential that we’ve mentioned it twice in this post. It’s good not just for marketing yourself or your business, but for expanding your network.

The best part is that you can find new networking opportunities based on an affinity or identity — which is much more organized than simply using LinkedIn search (although you should definitely use search).

I highly recommend joining relevant LinkedIn groups to connect with like-minded professionals in your industry or field. Now, don’t do it willy-nilly; be selective and choose groups that are relevant, or will become relevant in case of a career change.

Also, look for active groups with a significant number of members where the discussions align with your professional interests. If the posts don’t interest you, don’t clutter your feed with the group’s updates.
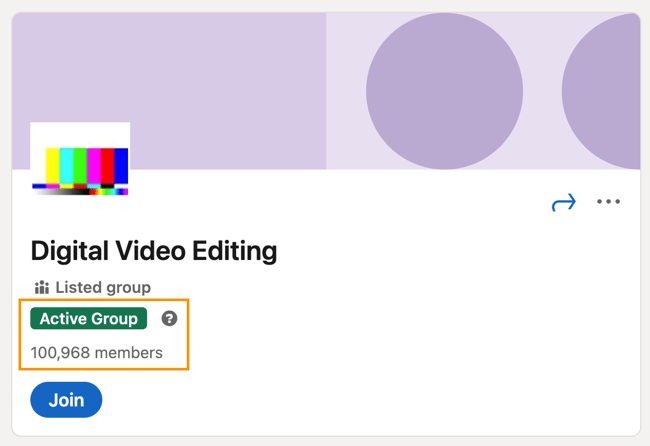
linkedin networking tips: linkedin group example

There are a few ways to get the most out of LinkedIn groups:

  • Start meaningful discussions: Post thought-provoking questions, share interesting articles or resources, or seek advice from group members
  • Share insights and expertise: Share valuable insights, offer advice, and provide solutions to common challenges in your field
  • Scout for potential connections: Engage with individuals who share similar interests, connect with them, and interact with their content and posts

5. Request and give recommendations to other LinkedIn users.

A recommendation is the LinkedIn equivalent of a hug. If you really want to nurture your existing connections — and make it clear that you’re a valuable connection — consider giving your past and current colleagues a recommendation, even before they ask for one.

(Plus, that makes it easy to request one later!)
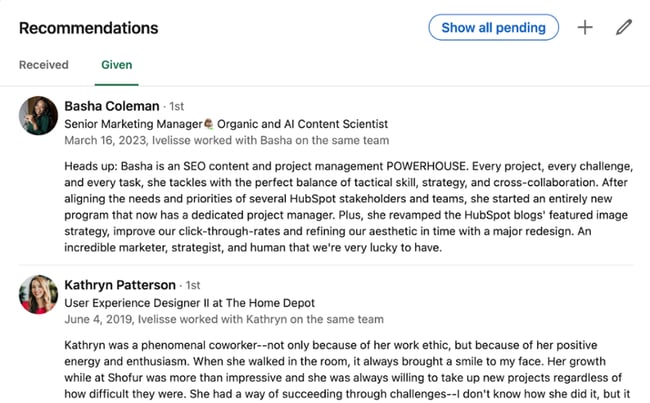
linkedin networking tips: give recommendations

Now, I can’t emphasize the importance of requesting recommendations enough. By getting recommendations from colleagues, clients, or partners you’ve worked with, you can build credibility — which makes you a valuable addition to any network. That makes it easier for people to click ”‘Connect.”

Don’t have time to recommend colleagues, or feeling shy about requesting a recommendation? Consider endorsing a colleague’s skill on their profile instead. It’s simple and easy. It may not be as satisfactory as a hug, but it can be like a pat on the back, and that’s enough to keep you top-of-mind.
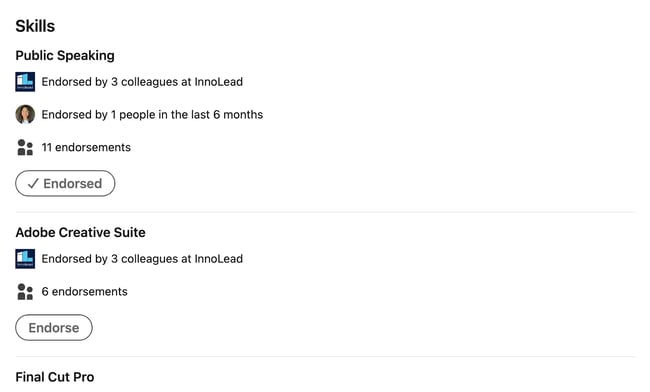
linkedin networking tips: endorse skills

Image Source

6. Send thoughtful direct messages.

Sending direct messages on LinkedIn is one of the best ways to strengthen your existing network. But you have to be strategic about the direct messages you send. They should be thoughtful, have a clear purpose, and make it clear you’re genuinely interested in that person.

Make sure your message is personalized, concise, and valuable. Maybe even try to offer something relevant to the person, such as an interesting article or helpful insight.

Direct messages are a uniquely powerful way to nurture your existing network and expand your number of connections. Why? Because it’s private, personalized interaction — almost like having a conversation at a professional convention.
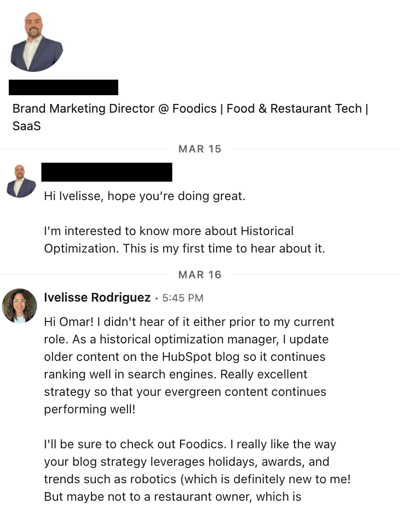
linkedin networking tips: direct message

Plus, thoughtful direct messages help shape your professional brand and reputation on LinkedIn. When you consistently send well-crafted messages that add value, you establish a positive image as a proactive, thoughtful, and valuable connection.

7. Use LinkedIn’s advanced search features.

Once you’ve joined groups, perused your notifications, and even looked through your connections’ network, it’s time to use LinkedIn’s advanced search to find more potential connections.

I recommend taking this step once you’ve sufficiently “warmed” your existing network, or are in need of additional opportunities.

To start an advanced search, simply input a term into LinkedIn’s search bar, which will take you to a results page with a wide variety of filters.
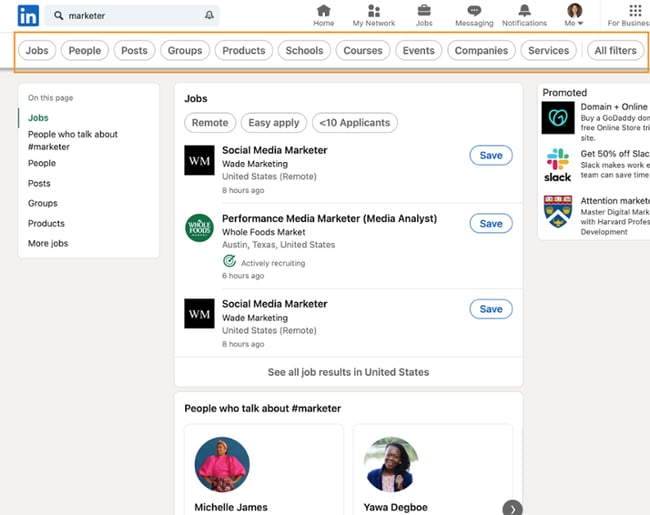
linkedin-networking-tips-advanced-search

You’ll want to click the “People” bubble so you can see whom you can connect with. From there, you can filter by common connections, location, or current company.
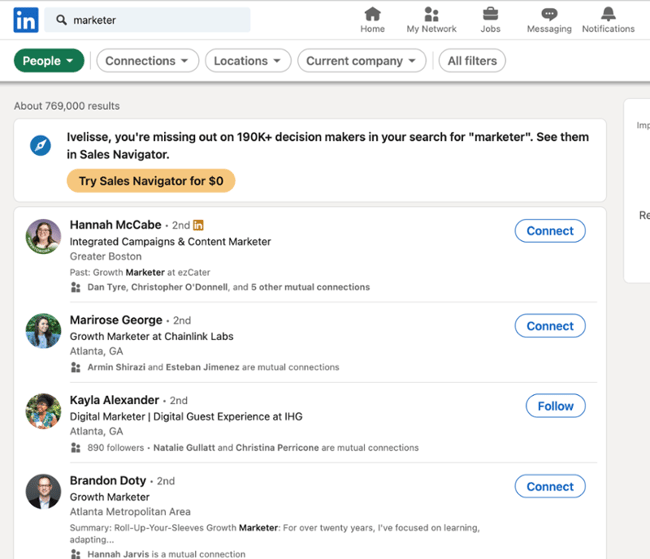
linkedin networking tips: people search

If you click “All filters,” you can go even further, filtering people by alma mater, industry, or even whom they follow (which is handy for finding those with common interests!). All of this enables you to strategically connect with like-minded professionals.

8. Use LinkedIn’s “Open to” feature.

If you want to network on LinkedIn specifically for the purpose of finding new job opportunities, hires, or clients, enable the “Open to” feature.

Under your profile headline, tap “Open to,” then tap your preferred option. You have three:

Finding a new job: This places an “Open to work” banner on your image.

Hiring: If you’re a recruiter, you can use this option to signal you’re hiring.

Providing services: This places a banner in your profile that showcases the services you’re providing.

linkedin networking tips: open to feature

Not only is this useful for advertising your services directly to your network, it also allows new clients to find you via LinkedIn Search. Voila — more networking opportunities right at your doorstep with business potential, too.

9. Publish valuable content on your LinkedIn profile.

While most successful networking entails you interacting with others, you’ll also want to provide that opportunity for others by posting content.

That not only allows your network to interact with you, it also allows you to share your expertise — strengthening your LinkedIn brand and positioning you as a thought leader.

Plus, it can help you broaden your reach. Your posts have the potential to go beyond your immediate network through LinkedIn’s algorithm and content discovery features.

This means that your valuable insights can resonate with a wider audience, attracting new connections. For instance, when my colleague liked the below post, it showed up on my feed, even though I don’t follow the original poster.
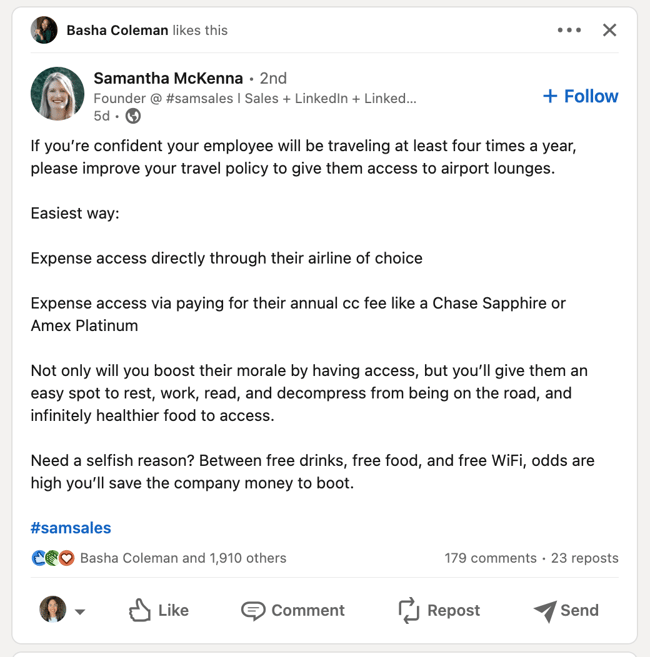
linkedin networking tips: a post liked by a colleague

If you post valuable content, you can increase your chances of showing up in users’ feeds and earning a follow or a connection request.

10. Read or participate in LinkedIn collaborative articles.
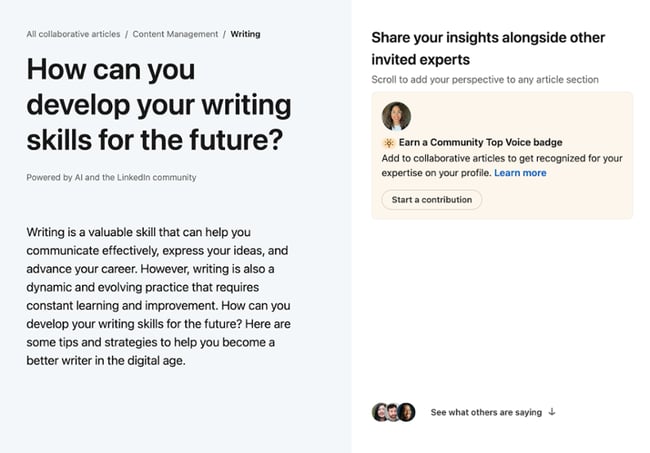
linkedin networking tips: collaborative article

LinkedIn has recently rolled out something called “collaborative articles,” where you can post your insights on a pre-written article generated by AI.

The ability to contribute has been made available to a limited number of users by invitation, but you can always read collaborative articles to find new networking opportunities.
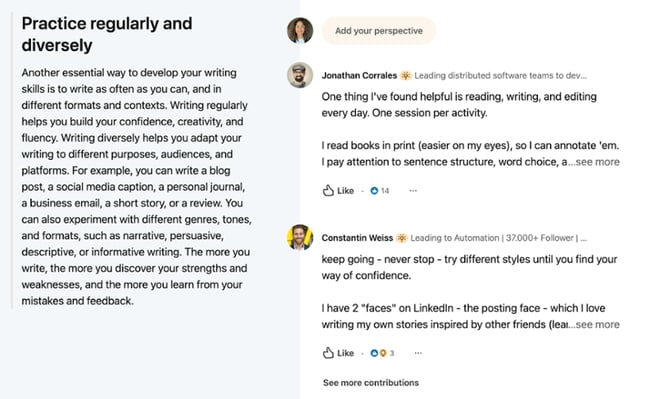
linkedin networking tips: collab article contributions

You can like contributions and access each contributor’s profile. From there, you can easily send a personalized connection request and start a conversation. This feature is currently in beta, but I hope it gets fully rolled out in the next year.

Now that you know how to use LinkedIn and how to expand your network, let’s learn how to market yourself or your business on the social media platform. 

1. Use Saved Searches and Search Alerts in LinkedIn Recruiter.

If you use LinkedIn Recruiter, you can use Saved Searches to save your search criteria — if you’re marketing job opportunities via LinkedIn, this is a great addition to your tool belt.

With the feature, you can save as many searches as you want and receive alerts when new candidates match your filter refinements and criteria. You can elect to receive daily or weekly search alerts from the system about relevant results via the Recruiter homepage.
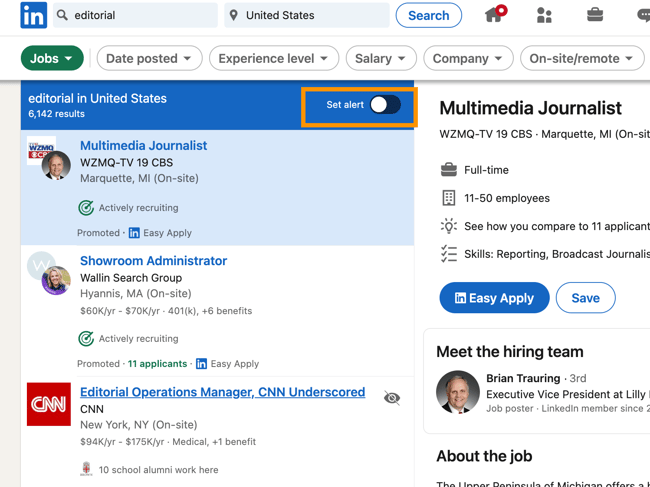
linkedin saved search for jobs

2. List job opportunities and recruit new talent with LinkedIn’s job postings.

And speaking of your business’ open job opportunities, don’t forget to add and market your new positions on the LinkedIn Jobs page.

Here, candidates can learn about your business and openings by searching for specific keywords such as job title, industry, location, salary, experience level, and more.
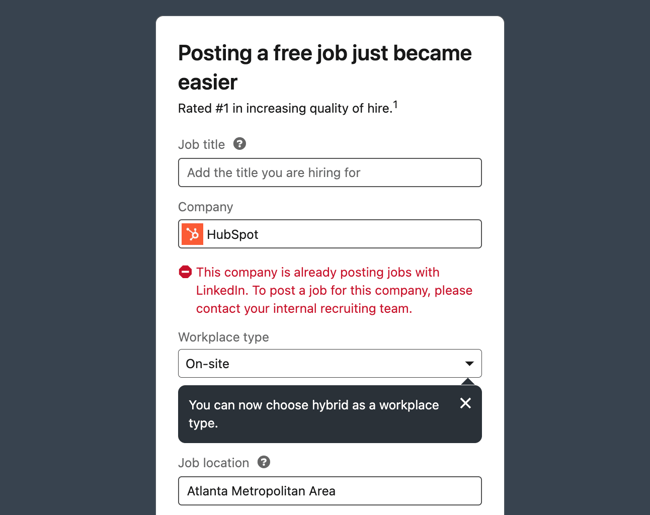
linkedin marketing tips: post a job

3. Take advantage of LinkedIn Endorsements.

LinkedIn offers a feature called Endorsements — this allows you to recognize people you work with by endorsing their skills.

You can promote and endorse the skills of the people you work closest with to help refer them for other work, make their Profiles more impressive, show your support, and more. 

Or, as mentioned, you can use this to nurture your existing network. 

linkedin networking tips: endorse skills

4. Use Open Profile to send messages to people you’re not connected to.

To branch out and make new connections with potential partners, customers, and other industry leaders, you might want to send them a personalized message.

With the exception of fellow LinkedIn Group members, the platform only allows you to send messages to people with whom you share a first-degree connection. But did you know some people let you send them messages anyway, even if you’re not connected?

Here’s how that works: The ability to be part of the Open Profile network is only available to Premium account holders, but it allows those users to be available for messaging by any other LinkedIn member regardless of membership type.

Additionally, there are options for sending messages to those with whom you’re not yet connected, similar to sending a request to connect with a note (though we don’t recommend overusing this technique). Additionally, if you have a premium account, you can use InMail.

5. Export connections.

Now, it’s no secret that you can use the connections you make on LinkedIn to drive traffic to your site and grow your base of paying customers. Exporting your connections — to a contact management system, for example — is a great place to start.

Simply go to “Settings”, “Data Privacy”, then click “Get a copy of your data” to start exporting your LinkedIn connections.
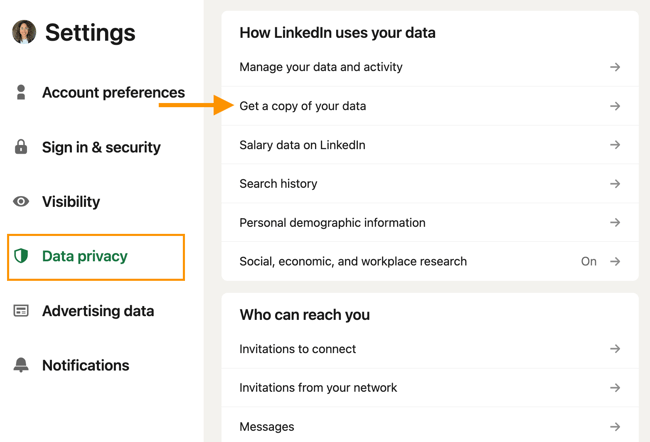
export data from linkedin

6. Customize your Connections to grow your professional network.

LinkedIn offers features to help you grow your professional network and make valuable connections. There are several ways to do this depending on what you’re looking to accomplish.

Here are some examples:

  • Add, view, and remove connections depending on their level of value to your business.
  • Control who can see your connections — maybe you do or don’t want your competitors to see that list of people.
  • Leverage your second and third-degree connections to grow your network and build new relationships.
  • Import and sync your contacts from your email and other sources to stay in touch with colleagues, partners, leads, and customers across the board. These connections will see your content in multiple places so they learn more about who you are as a business, deepening their relationship with your brand.

7. Join LinkedIn Groups.

LinkedIn Groups are a great way to make connections with people who work in, or are interested in, your industry. They serve as a hub for you and other members to share content, grow your contact list, establish yourself as an expert in the field, and boost brand awareness.

There are several other benefits that come from joining LinkedIn Groups. For example, by joining Groups related to your industry and participating in discussions within those groups, you’ll inspire thought leadership in your industry.

Additionally, by joining Groups, you can view complete Profiles of other members of the same group without being connected. Also, if you’re a member of the same group as another user, LinkedIn allows you to send up to 15 free 1:1 messages to fellow group members per month (typically, you can only do this if you’re a first-degree connection).

8. Create your own LinkedIn Group.

Consider creating a LinkedIn Group of your very own, like HubSpot did with the popular Inbound Marketers Group.
create your own linkedin group: inbound marketersYou can use your group to establish yourself as a thought leader in your industry, grow a community of advocates, generate new marketing content ideas, promote brand awareness, and generate new leads.

9. Communicate with your LinkedIn Group.

And on that note, there are more reasons to create your own Group on LinkedIn. In fact, one of the perks of managing a LinkedIn Group is that LinkedIn makes it simple to interact and communicate with the members of the Group you’re in charge of.

You can either send messages to group members or create a group post. Sending messages allows you to write a member of your group directly, or share content with them, from your group’s page. This is great if you have something to share with a specific person in your group. Creating a group post allows you to share any content you’d like on your group’s page which is ideal for initiating a discussion.

10. Share your LinkedIn status updates on other platforms.

Consider using a social media tool such as Marketing Hub’s to cross-post your LinkedIn status updates on other platforms. This is also a great way to boost your followers across a wide variety of channels and increase youur LinkedIn connections.

social-inbox-screenshot-1 (1)Cross-post on LinkedIn and other platforms using HubSpot’s social media management software. 

For example, if you’re posting an update to LinkedIn that you’d also like your Twitter followers to see, you can easily syndicate that update by creating a new post in Marketing Hub and selecting both LinkedIn and Twitter. Just make sure that the post is apt for both audiences. 

11. Leverage @mentions in your status updates.

Want another LinkedIn user or company to see your status update? On LinkedIn, you can tag — or @mention — users and other companies in your status updates much like the way it works on Facebook, Twitter, or Instagram.

Include the @ symbol immediately followed by the user’s/ company’s name in your status update or post. As a result, that user/ company will be alerted that you mentioned them, and their name will also link to their Profile and Page in the status update itself. This is a great way to boost engagement and interaction on your content as well as improve brand awareness.

12. Create LinkedIn Showcase Pages.

LinkedIn Showcase Pages are niche pages that branch off your business’ page to highlight specific initiatives and campaigns or feature specific content you’re working on.

Think of Showcase Pages as extensions of your main page that allow you to promote specific products or cater to your marketing personas — this provides a more personalized and targeted experience for your page visitors. This is a great way to expand your network on LinkedIn because other users can choose to follow your Showcase Page(s) even if they haven’t followed your main page.

13. Post company status updates and target them.

Publish status updates for your business on your LinkedIn page for your followers to see. This keeps your LinkedIn connections engaged and in the loop regarding your business’ latest developments, work, content, and updates. In your status updates, you can share written information, images, videos, documents, and more.

You can also post Targeted LinkedIn Status Updates tailored towards specific people and groups within your audience. To do this, use criteria such as company size, industry, job function, seniority, geography, language, or by including/ excluding company employees.

These targeted updates will appear on your page — or Showcase Page — as well as on LinkedIn for the targeted users (specifically, in their Network Updates feed).
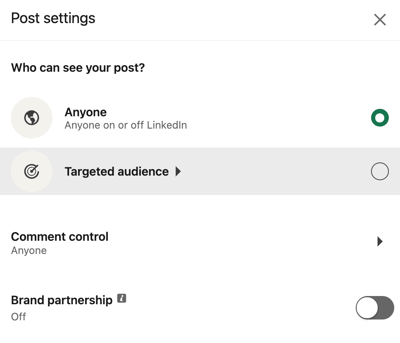
linkedin marketing tips: target your audience

14. Experiment with LinkedIn Sponsored Content and Native Ads.

If you’re looking to complement your organic LinkedIn marketing efforts with some paid advertising, LinkedIn Ads are a smart choice. One of the biggest benefits of LinkedIn advertising: the targeting options.

LinkedIn’s PPC ads let you target specific job titles, job functions, industries, or company size, to name a few — you know, the people who are more likely to want/ need what you sell.

If you want to get started with LinkedIn’s advertising platform, check out our free guide to advertising on LinkedIn.

15. Share content through LinkedIn’s publishing platform.

Good news! You no longer have to be a LinkedIn influencer to publish new articles on LinkedIn. Publishing is available to all users on the platform. Experiment with how this feature can support your marketing goals by creating content and promoting it on your business’ LinkedIn page.

For example, you might experiment with syndicating content from your blog to LinkedIn — this way, you can promote subscriptions to your blog via LinkedIn.

16. Add a Page Follow button to your website.

Add the LinkedIn Company Follow button to your website to promote your company’s LinkedIn presence and the content you share on the platform. When your website visitors follow your LinkedIn page via your site, they’ll automatically become connected to you and be able to view your company’s latest updates on the platform.

Using this method, you can boost your engagement and number of connections on LinkedIn by driving traffic to the platform directly from your website.

18. Analyze your LinkedIn marketing performance.

So … how are your LinkedIn marketing efforts faring? Analyzing your efforts and making necessary adjustments is critical to your success on the platform.

LinkedIn has in-depth page analytics as well as reporting tools for businesses to evaluate overall performance. There are specific data about how effective your status updates, content, and reach are as well as details about your page’s engagement and followers (like audience member demographics).

LinkedIn Marketing Options

LinkedIn allows you to drive traffic to your website, identify quality leads, share your expertise through thought-leadership content, and grow your network. It’s also a great way to market job openings and attract new talent to your company. Using ads will amplify all of these benefits to make them even more useful for your business. There are four different types of ads you can use on LinkedIn, each one is crafted to help you achieve different goals for your business.

1. Sponsored Content

The LinkedIn homepage for users features a news feed that is custom to each profile’s network. Sponsored content will show up in the LinkedIn news feed and reach a highly engaged audience. This content is labeled as “promoted” so it stands apart from the regular news feed. Sponsored content can include single image ads, video ads, carousel ads, or event ads.

2. Sponsored Messages

Each user on LinkedIn has an inbox to connect with other users. Only 48% of businesses use messaging to engage with potential leads, so there’s a great opportunity for you to be ahead of the curve with it. There are conversation ads that are in the style of “choose your own path” and message ads which are direct messages to potential leads.

3. Lead Gen Forms

Converting leads is the goal of your ads, and easily collecting their information makes the process streamlined for them and your business. These are pre-filled forms that help you collect and record leads on LinkedIn.

4. Text Ads

The LinkedIn platform has a right rail that can also feature ads. These can be text, spotlight, or follower. These are smaller, more condensed ads compared to the sponsored content.

Market Your Business on LinkedIn

Are you ready to get started marketing your business on LinkedIn?

With so many updates and additions to LinkedIn on the horizon, we can’t wait to see how the network continues to make itself an integral resource and platform for marketers, job seekers, candidate seekers, and other professionals. Get started marketing on LinkedIn by experimenting with one of these best practices.

Editor’s note: This post was originally published in August 2017 and has been updated for comprehensiveness.
New Call-to-action


Categories B2B

How to Run a Perfect Kickoff Meeting

Starting your project without a kickoff meeting is like hiking without a map. Sure, you might enjoy some cool trails, but you’ll probably get lost without a map and a clear plan.

The same happens when launching projects without a kickoff meeting. Only with solid communication and a plan can you keep your project on track. It’s like a GPS helping you reach your destination.

→ Download Now: 8 Free Customer Onboarding Templates [Free Kit]

Let’s learn more about it.

Table of Contents

What is a kickoff meeting?

A kickoff meeting sets the stage for success by clarifying project goals, defining roles and responsibilities, and outlining the project timeline.

Altogether, this results in smooth project execution. Think of it as the official start of your project — like the opening ceremony of the Olympics.

There are two types of kickoffs — internal and external. Internal kickoffs focus on aligning the internal team, while external kickoffs bring together external stakeholders or partners involved in the project.

The Benefits of Kickoff Meetings

1. Improved Alignment and Communication

The beauty of kickoff meetings? They allow everyone to share their priorities, insights, and plans. This means your team can align and agree on critical elements from the get-go.

Sage Journals conducted a community-based study highlighting the importance of kickoff events for research projects.

These events involve collaborating throughout each meeting stage, building relationships by challenging each other’s perspectives, and sharing expertise.

Kickoff meetings are suggested to facilitate dialogue among team members and promote equitable partnerships.

Pro tip: Open up a dialogue to tap into your team’s collective expertise, generate valuable insights, and foster a sense of shared ownership.

2. Streamlined Project Planning and Execution

Kickoffs are like the starting whistle of a game — you assign roles and recognize potential conflicts.

This helps a team save an immense amount of energy and time, allowing you to hit the ground running with a solid project management plan in place.

Heather Negley strengthens this point in her book titled The Salesforce Consultant’s Guide: Tools to Implement or Improve Your Client’s Salesforce Solution:

“The kickoff meeting is one of the most important meetings on a project.

It is the time that the team makes the all-important first impression and talks to the client about their goals for the project. The project methodology is also taught to the client.

“During discovery, the project team conducts business analysis using a variety of techniques to gain an understanding of the current and future processes. Project members write users’ stories to prepare for the build phase.”

3. Clear Milestones and Deadlines

Picture a group of highly motivated individuals coming together to turn a plan into reality.

They meticulously execute each milestone from the planning stage to the final tests, keeping an eye on the clock and communicating openly about their progress.

This level of collaboration ensures a seamless process and timely delivery of the finished product. Jean Kang, strategic program manager at Figma, says:

“Launch your program with a bang by hosting a 30-min kickoff meeting.

  • Set goals, introduce team members, and establish an execution plan.
  • Define sources of truth for resources, who to go to for what, and the right comms channels (Slack, Intake form, Microsite).
  • Share the decision-making framework like DACI, RACI, or RAPID.”

4. Early Feedback

The top five project management tools and techniques most commonly used are the “kickoff meeting,” “progress meetings,” “progress reports,” “requirements analysis,” and “activity list,” according to João Varajão, Gabriela Fernandes, and Hélio Silva.

These methods are vital for project success as they enable teams to receive early feedback and make necessary adjustments in real time, leading to more accurate and efficient project completion.

Pro tip: Use Slido’s emoji cloud to pose simple questions and get feedback by using emojis. With this gamification, you can collect qualitative and quantitative feedback and mitigate any tense and uncomfortable feelings.

Image Source

4 Types of Kickoff Meetings

Internal Kickoff Meeting

Best for: Project Team

The internal kickoff is a pivotal meeting that brings together a project team and sets the tone for the larger or upcoming project. It’s commonly called the project kickoff and allows team members to get to know each other.

Goals of an internal kickoff meeting:

  • Establish clear communication channels, meeting frequency, and workflows.
  • Identify potential bottlenecks and develop a timeline to mitigate them.
  • Ensure all team members have the same understanding of project information.
  • Align priorities and expectations for the project.

Ideally, an internal kickoff should cover the roles of team members, project background, project framework, and purpose.

Seasonal Kickoff Meeting

Best for: The Ahead Season

A seasonal kickoff helps energize the company for the upcoming season or year and also celebrates the previous year/season’s achievements.

Large companies often conduct a seasonal kickoff meeting at the start of the financial year, a new season, or a new year.

This internal event can be department-specific or for the entire company. It typically lasts for a day, though it can be completed in a few hours.

Goals of seasonal kickoff meeting:

  • Strengthen company culture and team confidence.
  • Set priorities and goals for the new season.
  • Resolve some past issues.
  • Motivate everyone for the work ahead.

New Team Kickoff Meeting

Best for: Building Trust in New Team Members

A new team kickoff, also known as the “getting-to-know-you” meeting, ensures proper introductions and alignment among new and current team members.

Typically held off-site, this meeting offers an opportunity for networking, inspiring speeches, collaborative brainstorming, and productive breakout sessions.

By the end of the day, team members leave with a clear understanding of how to work together effectively and achieve their goals.

Goals of new team kickoff meeting:

  • Infuse a positive attitude.
  • Demonstrate everyone’s roles.
  • Decide on meeting frequency, communication channels, and more.
  • Build trust and get to know everyone.

External Kickoff Meeting

Best for: Uniting With Clients

Imagine meeting a new client for the first time. You don’t know their work style, their preferences, or their expectations. That’s where an external kickoff comes in.

This meeting brings together the company and the client to align their goals, define the project’s scope, and establish a clear line of communication.

During the external kickoff, set expectations for work reviews and determine the best way to collaborate. A formal deck will be a nice addition, too. Explore kickoff meeting deck templates.

Goals of external kickoff meeting:

  • Define the project scope.
  • Create a project roadmap.
  • Identify and engage with project stakeholders.
  • Establish protocols for regular status reports.

Image Source

How to Run a Successful Kickoff Meeting

If you’ve never planned a kickoff, the following step-by-step guide will show you exactly how to do it.

1. Prep

Decide on the meeting attendants and the duration of a kickoff. The nitty-gritty details depend on the formality and purpose of a kickoff meeting. Here are some basic factors to consider during the preparation:

  • Finalize the invite list.
  • Schedule the duration and time, and leave some time for questions.
  • Craft an agenda.

You can use this pre-project kickoff checklist.

Image Source

Pro tip: Assign a note-taker so that any absent attendees can receive a recap. Also, if the kickoff is being held virtually, record it.

2. Intros

Introducing a new team member or meeting with a client for the first time? Don’t underestimate the value of a warm introduction. Starting off on a positive note can set the tone for a productive and successful meeting.

Example:

“HubSpoters, let’s welcome our newest team member, Sarah! Sarah is a Marketing expert who can’t wait to share her wisdom with us. We’re happy to have you here!

“Sarah, would you like to tell us a bit more about yourself?”

Pro tip: Consider funny icebreaker questions to lighten up the mood. For instance, “Tell us about your worst hair day.” But make sure the responder is comfortable with such questions.

3. Project Purpose

Ensure that everyone on the team is on the same page. They all must know why the project matters and what result they can expect.

Unfortunately, a shocking 74% of employees feel disconnected from their company’s objectives. Actually, they don’t even understand how their work fits into the bigger picture, which is pretty sad. Don’t let your team fall into that statistic.

Instead, take the time to explain your goals to each team member. And most importantly, show them why their role matters in achieving success.

Pro tip: Make sure to have a 1:1 talk with everyone (if possible).

4. Project Plan

Include this super important component in the meeting agenda to allow attendees to dive into the details before the event.

During the kickoff, focus on the primary information that really matters — core deliverables, key milestones, and the project timeline.

Pro tip: Encourage questions during this phase.

Image Source

5. Project Scope

Once you’ve outlined the core project plan, clarify what’s in scope and what’s not.

This gets everyone on the same page and prevents any confusion around deliverables and unexpected surprises down the road. Then, clearly define the project’s boundaries.

Pro tip: Include landing pages, resources, objectives, and creative demands in your project scope.

6. Project Roles

Decide on your project roles — who will be the executive sponsor and the main point of contact? Will there be an approver for the project?

This will provide clarity and direction for the team. Remember, a little planning upfront can save a lot of headaches later on.

Pro tip: Share a RACI chart as an action item. It’s a useful project management framework for clarifying roles and responsibilities for specific tasks and deliverables.

Image Source

7. Project Updates and Data

We’re all prone to waste a lot of time scouring documents and collecting information. The result? Less time to focus on high-impact work.

Therefore, establish a central source of truth for the project-related information. When team members know where to look to gain the information they need, you can expect more productivity.

Pro tip: Ensure real-time updates, deliverables, milestones, and documents are accessible in an easy-to-locate place. Use Notion, for example, as your central knowledge hub.

8. Questions

After the meeting is wrapped up, don’t leave your team in the dark. Let them ask questions regarding the project. This extra step can lead to greater alignment and insights.

Pro tip: Encourage active participation by dedicating ample time for questions.

9. Kickoff Meeting Agenda

To make this all easier for you to understand, we have crafted a sample kickoff meeting agenda.

Introduction

Allow the meeting attendees to introduce themselves. Lighten things up by asking some fun and inventive questions that are bound to spark a smile or two.

Background Information

  • Explain why this project is essential to your team’s goals and the company’s success.
  • Share suitable information about previous projects and clients to help the team understand the scope of the project and what’s at stake.

Project Objectives

  • Discuss the project scope and objectives in detail.
  • Define the metrics to measure the success of the project.

Prominent Tasks & Timeline

  • Keep your project on track by outlining a clear timeline with key milestones.
  • Define the roles of each team member to ensure everyone knows what’s expected of them.
  • Discuss the timeline and milestones in detail, and clarify the responsibilities of each team member.

Image Source

Logistics

  • Establish clear communication channels and protocols to ensure effective collaboration.
  • Share contact information for all team members to facilitate communication and collaboration.
  • Agree on reporting tactics and frequency to keep everyone informed and on track.

Possible Assets & Challenges

  • Discuss potential opportunities that may arise during the project and brainstorm ways to leverage them.
  • Evaluate existing resources and determine if additional resources are needed.

You can also use the Smartsheet template to record attendance and minutes of your project kickoff meeting.

It covers agenda items, action items, follow-up plans, meeting rules, project objectives, roles and responsibilities, and potential issues.

Image Source

6 Kickoff Meeting Best Practices

Mastering meetings takes years of practice. Luckily, the last section of our guide will share nuggets of wisdom to further boost your kickoff skills.

1. Exude positive energy.

Ditch the formal attire and leave your cold exterior at the door. Instead, bring your sunny disposition and warmth to the table.

Adrian Neumeyer, Creator at Tactical Project Manager, shares his top five personal tips for achieving a phenomenal kickoff:

According to Neumeyer, the key to a great kickoff is positive energy. By embracing challenges and setbacks with a “can-do” attitude, you can motivate your team and lay the foundation for a successful project.

2. Define goals.

Success means different things for every company and team, so ask yourself what the definition of success is and share it with everyone. Set a measurable goal so that team members can automatically take action and make efforts to achieve it.

Ask team members how the project can be successful, discuss the targets for each metric, and determine how to measure everything.

“A big part of any successful kickoff meeting is defining goals for the entire project. You should take this time to explain why this particular project is important and how it fits into the overall goal or mission of your company.

By doing so, everyone on the team will understand why their work matters — and be more motivated to complete their tasks accordingly,” says Thad Heiges, U.S. government contracts project manager at ANDECO Institute and PMs coach.

3. Keep tabs on how everyone feels.

Sometimes, certain members may feel that the project is veering off course or may be disappointed by the lack of collaboration. Of course, no project manager wants to have disengaged or apathetic team members.

Pro tip: We recommend sharing thoughts and feelings after the meeting to make sure everyone is aligned. If you notice a team member behaves somewhat off, take them on 1:1 as soon as possible to hear and resolve the cause.

Also, consider Stephanie Middaugh’s creative way of getting feedback from teams after events or training.

Stephanie, CEO at Phoenix GTM Consulting, turned a Kahoot! quiz into a survey and found most of the sales team wanted straightforward information.

Middaugh says it’s important to adapt to the current tough times and use various methods to gather feedback.

4. Share assignments in advance.

Share all essential documents with your team before the kickoff.

Instead of sending a dull email with a pile of attachments, organize materials in one knowledge hub. Encourage team members to explore it beforehand, ask questions, and share their thoughts.

5. Support engagement.

Yes, you might be the project manager. But that doesn’t mean that only you should talk during the meetings.

Encourage your team and stakeholders to share their thoughts and ideas. They might surprise you with their brilliant contributions.

Pro tip: Consider giving different team members a chance to run different sections of a kickoff. This not only takes some pressure off you but also makes the meeting more interactive and enjoyable for everyone involved.

6. Send a follow-up email.

Strike while the iron is hot and shoot off a follow-up email within 24 hours of a meeting. Don’t wait until your conversation partner has forgotten all about your interaction.

Use a follow-up template:

Hi everyone,

What a great kickoff meeting we had! I’m lucky to be leading such a fantastic and motivated team. Let’s keep the ball rolling by recapping our discussion and highlighting our next steps.

  • Recap. During the meeting, we covered [the project timeline, team roles and responsibilities, and potential roadblocks]. We also brainstormed some creative ideas for our project deliverables and discussed ways to stay on track and communicate effectively. These are: …
  • Next steps. Over the next few days, I’ll be sending out detailed action items and assignments based on our discussion. We’ll be scheduling our next team meeting to review our progress and stay connected on [date].

A big thank you to everyone for contributing to our successful kickoff meeting. Our achievements are a team effort.

Best,

Your Name

Finalize Your Kickoff Like a Boss

Boom! You’re now armed with the tools, templates, and frameworks to take charge of your kickoff like a boss. Let your energy and enthusiasm shine through and make everyone feel valued and inspired.

customer onboarding templates

Categories B2B

How to Switch Platforms as a Creator and Amass New Followers

Nowadays, it seems like new social media platforms are cropping up while older ones crumble.

Think about how the fall of Vine gave way for Instagram videos to gain popularity and how many Vine content creators had to pivot to platforms like Instagram and, later, TikTok.

Social media influencers and content creators must always be ready to jump to new platforms or incorporate them into their marketing strategy.

This article will discuss seamlessly switching platforms as content creators or influencers while retaining momentum and gaining new followers.

Download Now: The 2023 State of Social Media Trends [Free Report]

7 Tips for Switching Platforms as a Creator

Go where your audience is.

Make your new platform recognizable.

Be consistent.

Inform your audience.

Post valuable content.

Collaborate with other creators.

Repurpose content.

7 Tips for Switching Platforms as a Creator

Below are tips from content creators with experience pivoting to new social media platforms.

Go where your audience is.

Podcaster Jacqueline Snyder of The Product Boss encourages creators to switch to platforms they know their audience frequents.

“Choose a platform where you know your audience is already hanging out,” Snyder said. “For example, if you know your audience isn’t into video, TikTok can be crossed off the list.”

Suppose you need to figure out what other platforms your audience frequents. Use tools like surveys, analytics, and polls to find out. You can also use this method to determine the content your followers want to see on the new platform.

Make your new platform recognizable.

Using a different profile or username on a new platform can be tempting. After all, it’s a unique environment for your content and personality.

However, you want your audience to recognize you on all platforms, so keep things like your profile photo, username, and handle consistent with other social media and your brand.

“Your username or handle should be the same across all channels,” John Lee Dumas of Entrepreneurs on Fire said, “so if you already have other social media profiles for your content, stay consistent!”

For example, if you’re a video game-based content creator who streams on Twitch and wants to switch to streaming on YouTube, use the same Twitch username and profile photo.

If you cannot use the same username or handle on the new platform, create a similar username by adding an extra digit or symbol.

Be consistent.

“Set up a posting schedule to let your audience know you’re all in,” John Lee Dumas of Entrepreneurs on Fire said. “The cadence will depend on the platform itself, but whatever you go with, stay consistent so your audience can start to rely on your content and engagement being there regularly.”

Research the best days and times to post on your new platform and try to experiment to see when your audience is most active. You may also discover specific types of content perform better at certain times.

For example, your long-form YouTube videos may perform better when posted at 9 a.m., but your YouTube Shorts may get more engagement in the afternoon.

Inform your audience.

“We just did this with Threads, so I would say make sure that you let your followers on your biggest social media platforms know you’re on another platform — and ask them to follow you,” Snyder said. “Share content from the new social platform onto your old existing platform to excite them about following you.”

Snyder also says to include a call-to-action in your content, guiding your audience to your new platform.

“Only send your audience to one place — the place you want to build. For example: ‘Follow me on Instagram or Threads for tips on [blank].’”

Post valuable content.

Of course, the most significant incentive for your audience to follow you on a new platform is high-quality content that provides value to your followers.

“Always ask yourself: ‘Is the content I’m sharing providing real solutions to my core audience?’” Dumas explained. “Your audience wants real solutions to their problems, not fluff that requires their bandwidth while providing no value.”

If you haven’t already, get to know your audience and think about the content they want to see from you and the type that offers the most value.

Additionally, try experimenting with new content styles and formats, like live-streaming, short-form videos, stories, or audio rooms to showcase your creativity. Just make sure your content is consistent with your brand.

Doing so will allow you to uniquely connect with your followers while attracting new followers who prefer to see that type of content on the platform.

Collaborate with other creators.

A great way to grow your audience after switching platforms is to collaborate with more established creators in the space. These creators can introduce you to their audience and help you carve your niche on the new platform.

If you‘re pivoting to TikTok and want to expand your audience, collaborate with a TikTok creator in your niche. Do a live stream, stitch each other’s videos, participate in a challenge, or do a giveaway.

Repurpose content.

As Dumas mentioned, you must provide valuable content to your followers to grow your audience. However, that doesn’t mean you must create brand-new content for every new platform.

Repurpose your existing content to fit different contexts to save time and money.

You can also repost content from the previous platform to the new platform to give it a second life and an opportunity to reach new people.

For example, you may have a few Instagram Reels you can repurpose as YouTube Shorts. You can also repurpose content from a podcast into a blog post or a video into a carousel post on Instagram.

Amassing followers after switching to a new platform can be intimidating, but it’s definitely possible with the right strategy. If you want to switch platforms, you now have the expert tips to start building your audience.

New call-to-action

Categories B2B

A Conversation with Hotjar: How They Scaled Organic Traffic Into Millions

User empathy is at the heart of everything we do at Hotjar, and that extends into our content strategy.

It is how we grew non-branded organic search traffic by 734% in just 3 years (2022 versus 2019). More importantly, it is also how we were able to turn this traffic into 1,398% growth in new paying customers during the same time period.

Our annual non-branded new visitor numbers are now in the multi-millions, and the heights we’ve hit in the last two years in particular are a testament to the user-centric approach we’ve applied.

→ Download Now: SEO Starter Pack [Free Kit]

So how did we do it?

We’ve been able to achieve the growth we have by painstakingly balancing the needs of existing and potential Hotjar users with the demands of search engines.

We’re relentless in our commitment to satisfying our readers, but we’re not naive to playing the search engine game. To succeed at a high level there is a great deal of nuance that goes into getting this right. For us, that breaks down across a number of areas but there are a handful of core fundamentals that stand out:

  • Embracing product-led content
  • Clustering content around the user journey
  • Powering keyword research with customer insights
  • Leveraging qualitative and quantitative data
  • Nurturing your historical library

Before we go deeper though, I would be remiss not to cover the very fabric that holds all this together: without deep synergy between our Strategic and Editorial experts, the growth we’ve achieved just simply wouldn’t have happened.

The creation of a candid, respectful, and ongoing dialogue between these two areas is the rocket fuel that lit the touchpaper to the growth we’ve seen. Recognizing the equal importance between these two disciplines and fostering collaboration between the two areas will be vital to how successful you ultimately are.

With that in mind, let’s dive into those fundamentals:

Embracing Product-led Content

Product-led content can supercharge your ability to convert organic visitors into paying customers, and it’s been key to Hotjar’s organic content success to date.

Start with the common pain points for your target audience and their common jobs-to-be-done. Then, use these insights to power your keyword and topic selection. Finally, structure your content to solve those pain points, and explain why your product is key to doing that.

To get this right, you have to have a deep understanding of your product. You should also be obsessed with your customers. Without these two things, you’re unlikely to succeed.

A product-led approach is central to our guides content, where we always provide several examples of how Hotjar can help with problems related to a broader topic our target audience is interested in, like behavior analytics or website tracking.

screen recording on beginner guide to behavior analytics

Clustering Content Around the User Journey

The age-old principle of content clustering is a method that’s driven SEO success for many years. But you can take the traditional approach to another level by inspiring readers towards a multi-touch, connected journey across the clusters you create.

This point is particularly relevant at a time where the risk of zero-click search is greater than ever. You have to do everything you can to keep people on your website and compel them to dig further into your content, particularly if they’re only at the demand gen phase when they enter your website.

At Hotjar, our content clusters are our guides, and we have a lot of these. They remain one of our core drivers of growth from SEO. As a result of this, we have a strong understanding of what works vs what doesn’t. With this in mind, there are two important things you can do to improve content cluster performance beyond the basics linked to ranking the pages:

  • Build an understanding of the different points of intent a potential customer might have across one of your target topical areas
  • Work with UX/UI to help funnel readers through your clusters from their initial entry point down to the point of conversion

This boils down to a simple summary. Develop a clear understanding of what the education, consideration, and purchase phases look like for your readers. Then, use UX/UI to make it as simple as possible for readers to navigate through those phases.

usability testing screen recording

Powering Keyword Research with Customer Insights

It’s daunting to come up against the biggest competitors in your industry for SEO, but all of these websites started out somewhere. That was the case for Hotjar, too.

Our monthly content output might now be up to 10x higher than it was 3 years ago, but back then we were still able to dominate our most important organic verticals, despite producing just a handful of content pieces each month. We did that with a modest budget, too.

Success for us then was reliant on the same things it is today: identifying a niche set of customer-driven verticals at the intersection between projected business value, satisfying search engines, and solving common audience problems.

Our approach here has enabled us to establish authority with Google, but it’s also ensured that we’ve built deeper trust with our audience. This ultimately translates to more conversions. More conversions means more potential to spend, and with that additional investment you can strengthen your position.

Getting the balance right here still requires constant collaboration between our content, SEO, product, and product marketing teams. Without this, we wouldn’t be able to create content deeply relatable to our ICP.

It sounds obvious, but too few companies still fail to start with that. Customer needs must always come first. Without a deep understanding of what your audience needs, you’ll never build a content library that satisfies them or Google.

Be Obsessed with Data — and Balance Qualitative and Quantitative Data Usage

True SEO success is reliant on data analysis and manipulation. For a lot of companies, that ends up being primarily quantitative. This is clearly an important part of the analytics picture, but quantitative data only tells you what’s happening. It doesn’t tell you why. That’s why you need to take care of the qualitative part too.

I won’t deny that I spend more time with quantitative data. But I am forever surprised how qualitative analysis can help to reduce bias and assumptions that are based on numbers alone. It’s something we discuss and act on a lot at Hotjar.

We believe in the importance of user feedback and our content and SEO staff regularly use our own product. Recordings, heatmaps, surveys, and on-site feedback help inform our team with everything from topic to format selection. We also actually speak to customers. This is so often neglected but it’s so important.

On the numeric data, we use 40/20/40 attribution to try and build a fairer reflection of the increasingly multi-channel/multi-touch conversion journey. Of course no attribution is perfect, but this at least helps to spread credit more realistically.

Our SEO team spends hours every day with this data. We’ve built filtering around demand gen vs demand cap, target themes, user personas, and much more. This all helps us to refine how we select content topics that can power our growth.

Nurture Your Historical Library

The need to drive growth is constant, and it can be hard to hit the pause button on the creation of new content. Often, though, your greatest organic opportunities are hidden in the content you’ve already created. So don’t be afraid to slow production occasionally to allow time to improve the content you already have.

At Hotjar, we now have a library of more than 1,000 content pieces. Nurturing that content effectively is becoming increasingly time-consuming, but it’s also where we find some of our biggest wins.

There are so many reasons to spend time auditing and updating your content. It boils down to ensuring that what is right for Google remains right for your readers. Here’s how we think about it:

  • The needs of our readers are constantly changing. What was helpful to them several years ago may no longer be
  • Just because Google still ranks a piece in position 1, doesn’t mean the content is still doing its job. In fact, if the piece includes outdated information, you actually risk damaging your brand perception
  • Our product is constantly evolving. Old features may reach the end of the line and new features may enhance former capabilities. When you have hundreds of pieces talking (or not talking) about those features, it becomes a problem if you don’t update your content accordingly
  • Search algorithms are transient, particularly when it comes to how the SERP displays. For example, failure to appreciate a new snippet type could mean you still hold position 1, but you’re losing traffic due to someone else holding the snippet

Ultimately, we spend considerable time and effort crafting each piece we work on. We care deeply about what we deliver to our users, and how the search engines perceive that. So nurturing the content we already have is just as important to us as building new content streams.

Place Customer Needs at The Heart of Your Approach

Whilst the fundamentals laid out in this piece are not all-encompassing, they are the foundations that continue to support Hotjar’s success with organic search. Woven throughout all of them is a commitment to placing customer needs at the heart of our approach. Not only does this help us to build trust and transparency with our audience, it also means we do a better job of driving business growth.

SEO Starter Pack

Categories B2B

How to Mix Data Science and AI Without Expertise in Either (Expert Tips & Tools)

As a marketer, you‘ve likely noticed data’s importance in decision-making and strategizing. You’re also probably tired of being bogged down with manually collecting and reporting data.

Data science is integral to the marketing world, but time is money, and the time you spend working with large datasets could go toward performing other tasks, such as content marketing.

Fortunately, artificial intelligence can blend with data science in many ways to make your job as a marketer easier without neglecting essential practices like data reporting.

We will explore the connection between data science and AI and tools you can use as a marketer regardless of your skill level in data analysis.

Free Report: The State of Artificial Intelligence in 2023

Difference Between Data Science and Artificial Intelligence

Data science is an umbrella term that describes analyzing, managing, and interpreting large amounts of data to inform decision-making.

Artificial intelligence is a field in which a computer or a robot completes tasks that typically require human intelligence and discernment.

Though data science and artificial intelligence are different fields, they often combine to streamline tasks, improve efficiency, solve problems, or increase productivity.

For instance, AI often depends on data scientists to study, clean, and feed data so the machine can learn and improve. However, data science is less dependent on AI since the science can analyze and explain datasets on its own.

However, AI can extract information from data in a way that isn’t possible with typical data science techniques. This is especially the case with rich data types like video or large volumes of data.

Examples of AI in Data Science

Below are some examples of AI in the world of data science.

AI in Survey Drafting

It’s common to use surveys to gather data and information about your audience and consumers, and AI is often leveraged to automate many aspects of the survey process.

AI surveys eliminate the need for human intervention in tasks such as data entry and survey report analysis.

Leveraging AI with survey drafting and execution allows organizations to automatically collect responses from various channels like online forms and chatbots.

From there, AI can categorize the information based on predetermined criteria, analyze patterns and trends, and generate a report based on its findings quicker than if done manually.

AI in Data Collection

One way AI typically works in data collection is web scraping, which involves using automated bots or scripts to extract data from websites. AI allows these bots to quickly and efficiently pinpoint patterns and insights in the data.

In turn, organizations can make data-driven decisions about their products, services, or marketing strategies.

AI data collection also helps deliver a more personalized user experience on a website. AI can collect user behavior and preferences data to recommend products or content tailored to each visitor.

Personalized experiences improve the likelihood of conversion and engagement. This process is prevalent and helpful to e-commerce websites.

Many e-commerce sites use AI to collect and analyze data on customer behavior and use that information to provide personalized product recommendations or targeted campaigns.

Data Tools that Use AI

Here are some helpful AI tools for collecting and analyzing data you can leverage in future projects.

1. Tableau

This analytics and data visualization tool allows users to interact with their data and is an excellent platform if you have little to no coding or data analyzing experience.

With Tableau, you can create and share reports across desktop and mobile platforms.

Tableau also supports complex computations, dashboarding, and data blending, which combines data from various sources into one helpful dataset.

2. GitHub Copilot

GitHub Copilot is a programming assistant that provides autocomplete suggestions to coders. Developers can use GitHub Copilot while writing code or using basic natural language prompts that tell Copilot what they want it to do.

The data tool can complete many coding tasks and is proficient in many coding languages, such as Python, Go, and JavaScript. Even better, you don’t have to know how to code to use it.

3. ChatSpot

ChatSpot is HubSpot’s conversational CRM bot that sales, marketing, and service professionals can connect to HubSpot to boost productivity and streamline different processes — data reporting.

Professionals can use chat-based commands to direct ChatSpot to pull reports, create new segments, and manage leads.

4. Microsoft Power BI

Microsoft’s business intelligence platform lets users sort through and visualize data for insights. Users can import data from almost any source and build dashboards and reports immediately.

Furthermore, Microsoft Power BI allows users to build their own machine-learning models and use other AI-powered features to analyze data.

5. Akkio

Akkio’s business analytics and forecasting tools help users analyze their data and predict potential outcomes. The tool is meant for beginners and is especially useful for sales, marketing, and predictive analysis.

With Akkio, you can upload your dataset and select the variable you want to predict, which helps Akkio build a neural network around that variable.

How to Pick the Right Tools

Finding the right AI tool to help you collect, manage, and analyze data can be challenging, but it isn’t impossible. You must assess your skills and preferences to find the best tool for your next data science endeavor.

Ask yourself what part of the data process you are trying to streamline or improve. How proficient are you in reporting or coding? What is your skill level?

For example, if you‘re familiar with programming languages like Python, you’ll want to find tools that are compatible with this language. If you’re currently using tools like Microsoft or HubSpot, find compatible or built-in tools.

You don’t have to be a scientist or a masterful coder to use AI in your marketing or sales data projects. All you need is the right tools that fit your knowledge and needs.

New Call-to-action

Categories B2B

How to Get to Inbox Zero in Gmail, Once and for All

We’re inundated with email daily — making it hard to keep track of tasks and manage your workflow. However, organizing your emails doesn’t have to be a pain. In fact, it’s possible to get your Gmail inbox to zero in as little as 15 minutes.

While we can’t stop new emails from coming in, we can help you organize it better.

→ Download Now: The Beginner's Guide to Email Marketing [Free Ebook]

I stumbled upon Andreas Klinger’s inbox zero method for Gmail years ago and his method still works for me to this day. In this post, I’ll show you how to organize your Gmail inbox according to Klinger’s method so it’s clean, systematized, and easy to navigate — making you a more efficient, productive, and overall happier human being. I’ll also show you how I adapted his labeling system for content marketers.

Skip to:

How to Get to Inbox Zero in Gmail

Before we get into the nitty-gritty, let’s go over the basic methodology:

  • You set up multiple inboxes in Gmail and give each of them a name, like “Needs Action/Reply” and “Awaiting Response.”
  • Your general inbox will then appear on the left, and your labeled inboxes (which Gmail calls “panes”) will appear on the right, like so:

inbox zero

  • You know that yellow star icon you can press to mark an email as important? Turns out you can turn on other colored stars and icons in Gmail, too, like bangs (i.e. exclamation points)and question marks. Gmail calls these icons “special stars.” In this methodology, each pane is represented by a different special star.
  • Every time you get a new email in your inbox, you’ll want to:
    • Reply to the ones you can right away. For those you want to keep track of as “Awaiting Reply” or “Delegated,” mark with the appropriate special star.
    • Label the emails you need to deal with later by marking them with the appropriate special star.
    • For the ones that you don’t need to deal with or aren’t current, either archive them without special stars or delete them entirely.
  • In the end, archive everything. This way, your inbox stays at zero and everything else is either in its designated pane, archived, or deleted.

The result? A clean inbox that’s easy to navigate and lets you triage new emails with little effort.

Here’s how to set this up in Gmail.

The Step-by-Step Guide to Getting to Inbox Zero in Gmail

Step 1: Prepare for your new inbox layout.

To make this whole process work, you’ll need to get rid of the Social and Promotions tabs. (Pro Tip: If you’re worried about getting an onslaught of social notifications and promotional emails in your inbox each day, then take this opportunity to set up filters so your social notifications are automatically archived or deleted, and mass unsubscribe to the promotional emails you don’t read using a tool like Unroll.Me.)

In “Settings,” go to the “Inbox” tab and do the following:

  1. Change the Inbox Type to “Default.”
  2. Deselect all the tabs (except “Primary”).
  3. Choose “No Markers.”
  4. Choose either “Use my past actions…” or “Don’t use my actions…” — it won’t directly affect your new system.
  5. Choose “Don’t Override Filters.”

gmail setting

gmail setting

Click “Save Changes,” and Gmail will automatically reload.

Step 2: Make the display density of your inbox compact.

Click the gear icon and choose “Compact” from the dropdown menu.

compact density

Step 3: Enable multiple inboxes.

Click the gear icon and choose “Settings” from the dropdown menu. Go to the “Labs” tab, and enable multiple inboxes. (These are the different”panes.”)

enable multiple inboxes

Scroll to the bottom and click”SaveChanges.”

Step 4: Turn on the right special stars.

In “Settings,” go to the “General” tab and scroll down until you see the section labeled “Stars.” Add the stars you want to use to represent each of your panes.

As a content marketer, I chose:

  • Yellow bang: for “Needs Action/Reply”
  • Red bang: for “Needs Action/Reply” items that are urgent
  • Purple question mark: for “Awaiting Reply” (so I can follow up if needed)
  • Greenstar: for “To Write”
  • Bluestar: for “To Edit”
  • Orange guillemet (double arrow): for “Delegate,” meaning emails I delegated to someone else (so I can follow up if needed)

choose special stars

Not a content marketer? Klinger uses the pane names “Needs Action/Reply,” “Awaiting Reply,” “Delegated,” and “Scheduled” (for arranged meetings, flights, event tickets, scheduled calls, and anything else he might need to reference quickly).

Scroll to the bottom and click “Save Changes.”

Step 5: Set up filters to pull emails with your special stars into the right panes.

In “Settings,” go to the “Multiple Inboxes” tab. Each panel represents one of your multiple inboxes (up to 5), and you can name and arrange them any way you choose.

Here’s what I did:

multiple inbox names

Notice how I used “OR” so different stars could go into the same pane: yellow bang for important action items and red bang for urgent action items.

Here’s a list of all the possible search queries:

  • has:yellow-staryellow-star.png
  • has:red-starred-star.png
  • has:orange-starorange-star.png
  • has:green-stargreen-star.png
  • has:blue-starblue-star.png
  • has:purple-starpurple-star.png
  • has:yellow-bangyellow-bang.png
  • has:red-bangred-bang.png
  • has:purple-questionpurple-question.png
  • has:orange-guillemetorange-guillemet.png
  • has:green-checkgreen-check.png
  • has:blue-infoblue-info.png

Pro Tip: If you use the Gmail mobile app frequently, Klinger suggests using the default yellow star for important action items because it’s the only special star supported by the mobile app.

While you’re still in the “Multiple Inboxes” tab, make the maximum page size whatever you’d like (I do 20 conversations per page), and position panels on the right side of the inbox.

other panel options

Click “Save Changes,” and you’ll be taken back to your inbox.

Now for the fun part.

The Road to Inbox Zero

Everything you’ve done to this point is to set yourself up for getting to an empty inbox. Right now, you’re probably looking at hundreds, maybe thousands of emails in your inbox.

Don’t be overwhelmed.

You will get to zero, but you need to take care of it right now. It’s actually not that hard. And trust me, it feels good. Here are Klinger’s helpful instructions:

Go through the first two or three pages of your inbox.

Do one of three things with each email:

  1. Mark it with a special star, and then archive it. This will send it to the appropriate pane while removing it from your general inbox.
  2. Archive it without using a special star. This will keep the email saved, but it’ll clear it from the home page.
  3. Delete it.

One of the best parts about special stars (as opposed to labels) is that you don’t need to click into an email or follow multiple steps to mark it with a special star.

Instead, simply click the blank star to the right of the sender name — and keep clicking to scroll through all your special stars until you land on the one you want.

It’ll take a few seconds, but that email will then show up in the appropriate pane. Remember to archive the email once you’ve marked it with a special star so it clears from your general inbox.

Once you’ve gone through the first few pages of your inbox and you feel like you don’t have any more important emails, it’s time for what Klinger calls “the daring move.”

Archive everything else.

Select all of your emails by clicking the check box on the top left. Confirm that you really did mean all those thousands of emails, not just the current page.

Then, click “Archive.”

POOF.

Fin

Tadaa! You’re finished. I’ve been able to maintain an empty inbox pretty easily ever since. Emails aren’t slipping through the cracks like they sometimes used to. I’m also able to keep better track of all the emails I’ve sent that need a reply or that I have to follow up on in some way. Use this method to declutter your inbox and better organize your workflow.

Editor’s note: This article was originally published in June 2015 and has been updated for comprehensiveness.

New Call-to-action