Categories B2B

How to Post to Instagram From Your Computer [7 Easy Steps]

Instagram is a popular social media network for sharing photos, commonly accessed through a mobile app. Unlike other social networks, however, it does not have a desktop version.

This poses a problem for a lot of users who want to access features from their desktop computer. For example, let’s say you’re a social media manager for a prominent brand. The last thing you want to do is have an absentminded mishap where you accidentally post brand content to your personal Instagram account (or, worse, vice versa) simply because you’re logged into both on your phone.

Access Now: 22 Free Business Instagram Templates

Alternatively, it might be easier to upload company posts and videos via your desktop, rather than having your smartphone open at work.

Plus, your company’s files might be more easily accessible via desktop than mobile. For instance, if you use Photoshop to edit company photos, it’s likely easier to click “Upload” from your desktop when you’re done editing, rather than sending that same photo or video to your personal phone.

Perhaps you simply prefer the larger screen of desktop. Or, maybe you don’t have access to a smartphone so you can’t download the app on your phone.

For all of these reasons, you might be wondering, “Can I post to Instagram from my computer?” We have some good news — there’s a solution for you. Let’s dive into that, next.

In other words — Yes, you can post to Instagram from your PC or Mac desktop instead of on your mobile device’s app or browser. In this post, we’ll explore how you can post images and videos from your desktop computer.

How do I post to Instagram from my computer? [PC and Mac]

Whether you’re on a Mac or a PC, you can use workarounds to post from your desktop computer. Depending on the browser you use, the instructions will vary. Below, we’ll discuss how to do it on:

Once we discuss these workarounds for posting photos, we’ll also discuss how to upload a video to Instagram from your desktop.

1. Navigate to Instagram’s website in your Chrome browser.

The first thing you’ll want to do is open up Google Chrome and navigate to https://www.instagram.com/ by typing it into the navigation bar. 

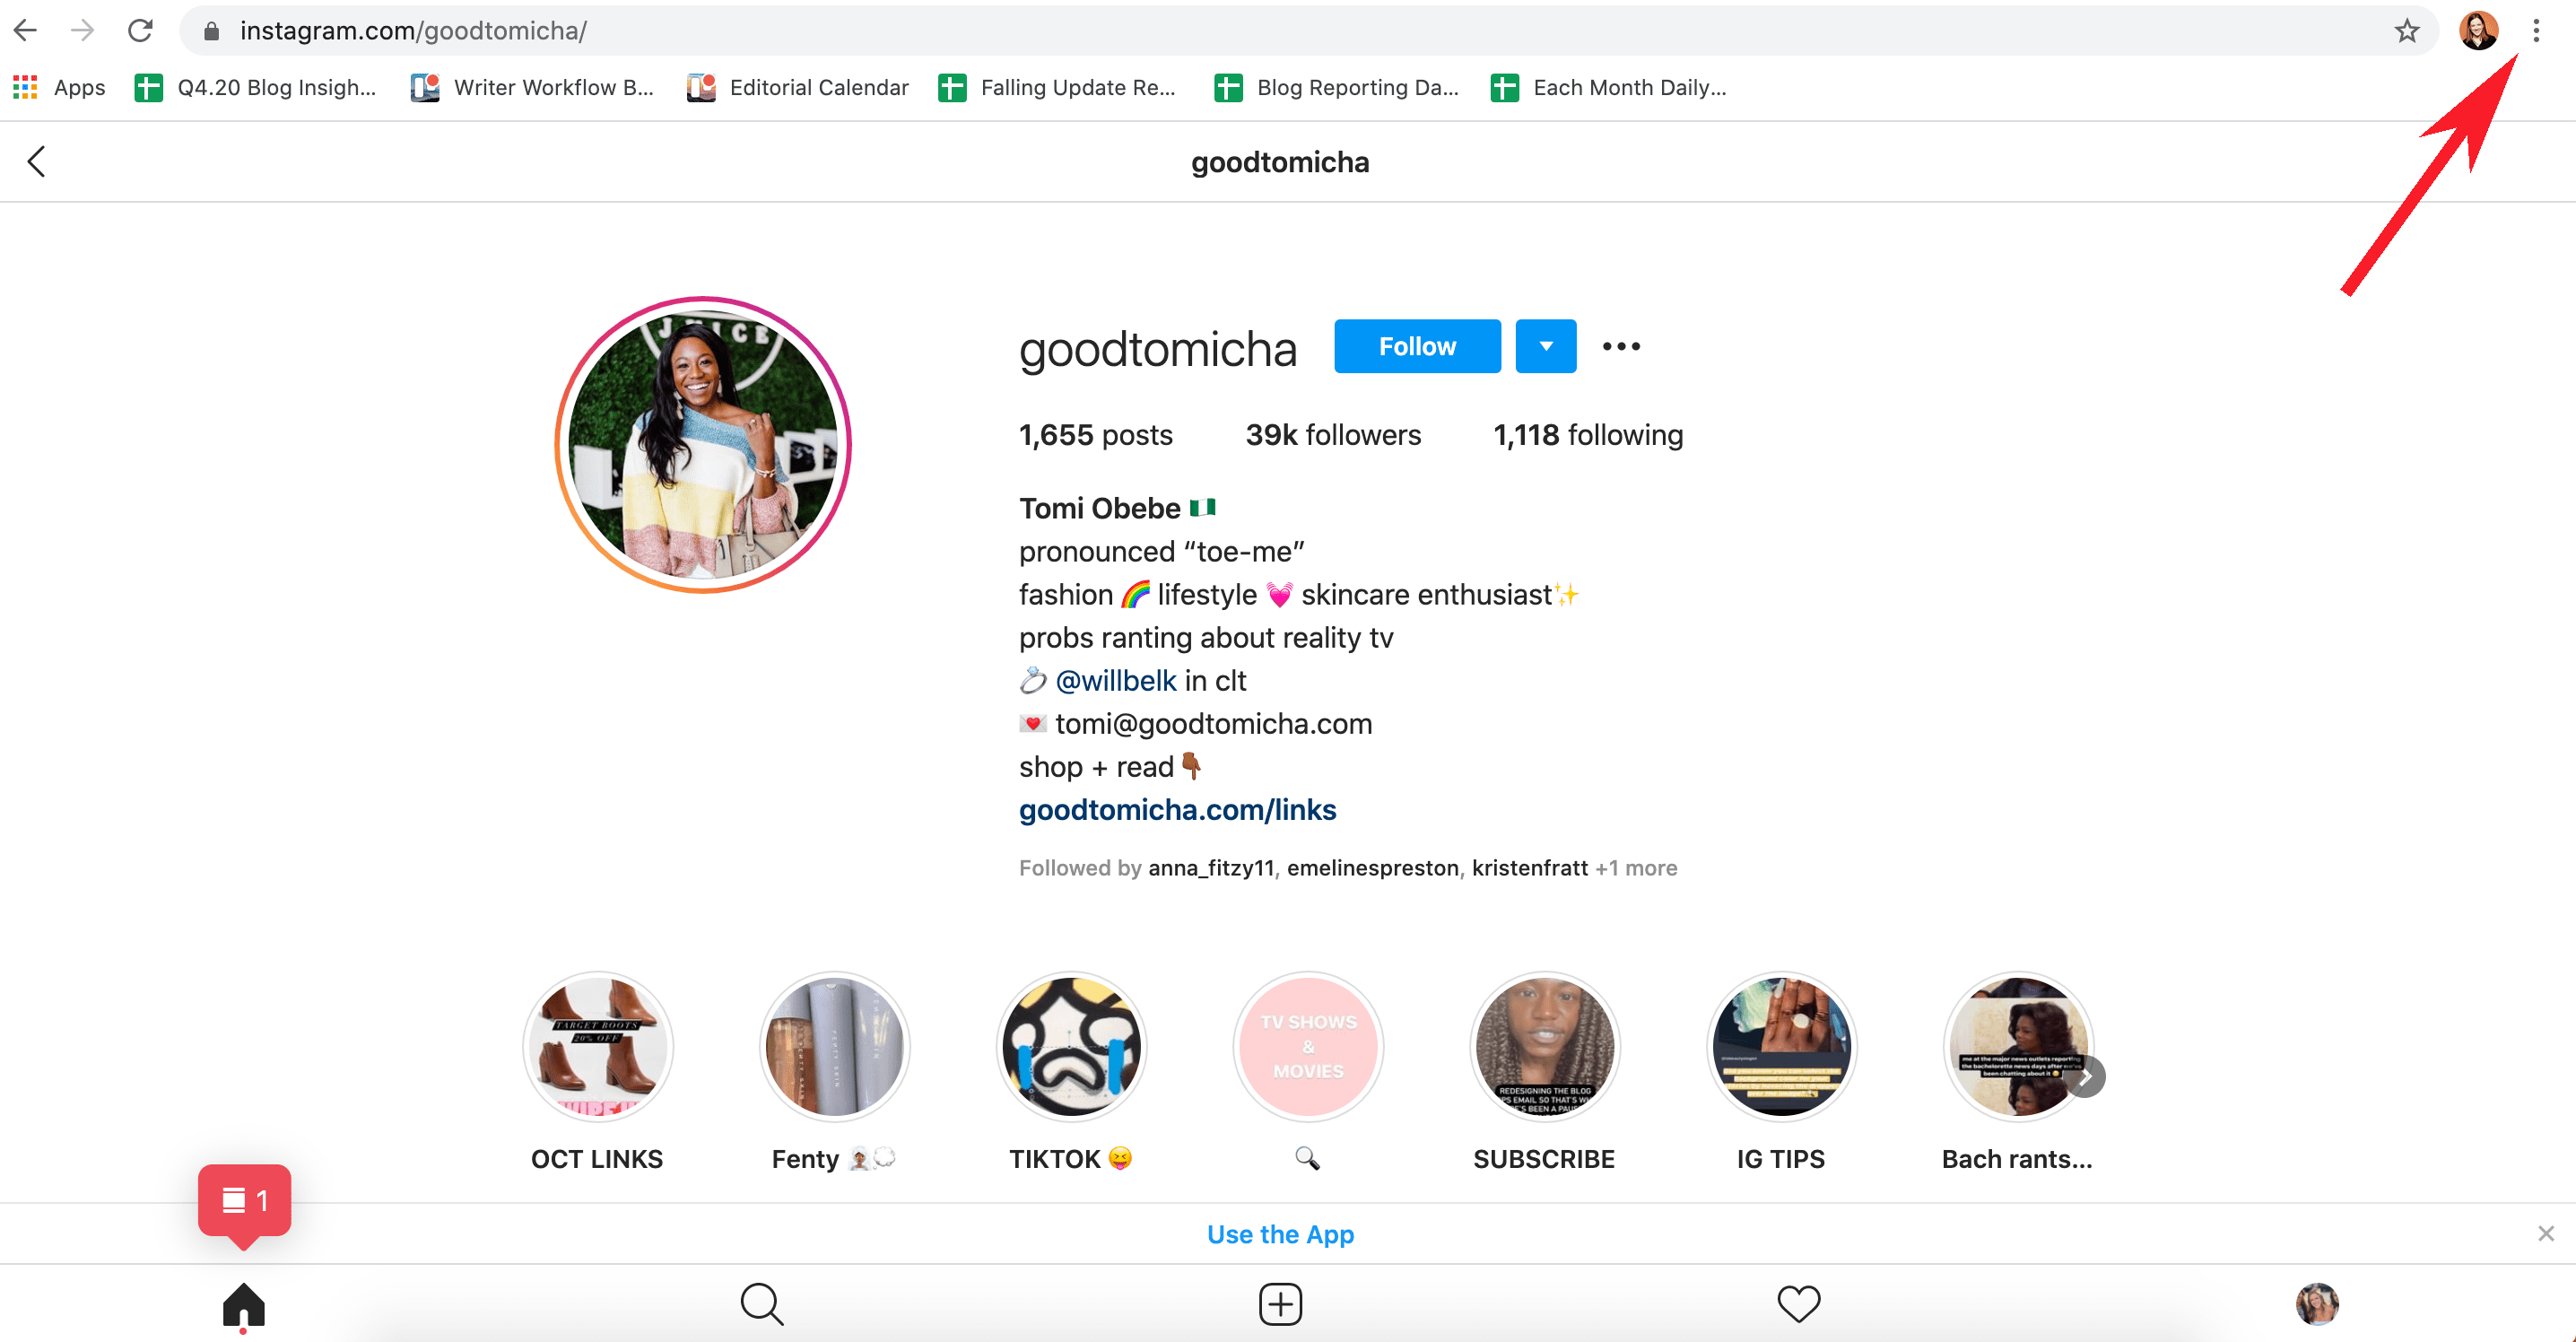
2. Open the “Settings” menu by clicking the three dots in the top right corner of the browser.
click on settings in chrome browser

Instagram Account Credit: @Goodtomicha

Up in the top menu on the far right side, you’ll find three verticle dots. Once you click these, a drop-down menu will open up.

3. Scroll down to “More Tools” in the drop-down menu, and then click “Developer Tools”.

find developer tools on google chrome

Developer Tools gives you access to a menu that opens up in a panel on the right side of your window. This will give you advanced control over how your browser displays content, helping you post to Instagram from desktop using Chrome.

4. Click the “Toggle Device Toolbar” mobile button.
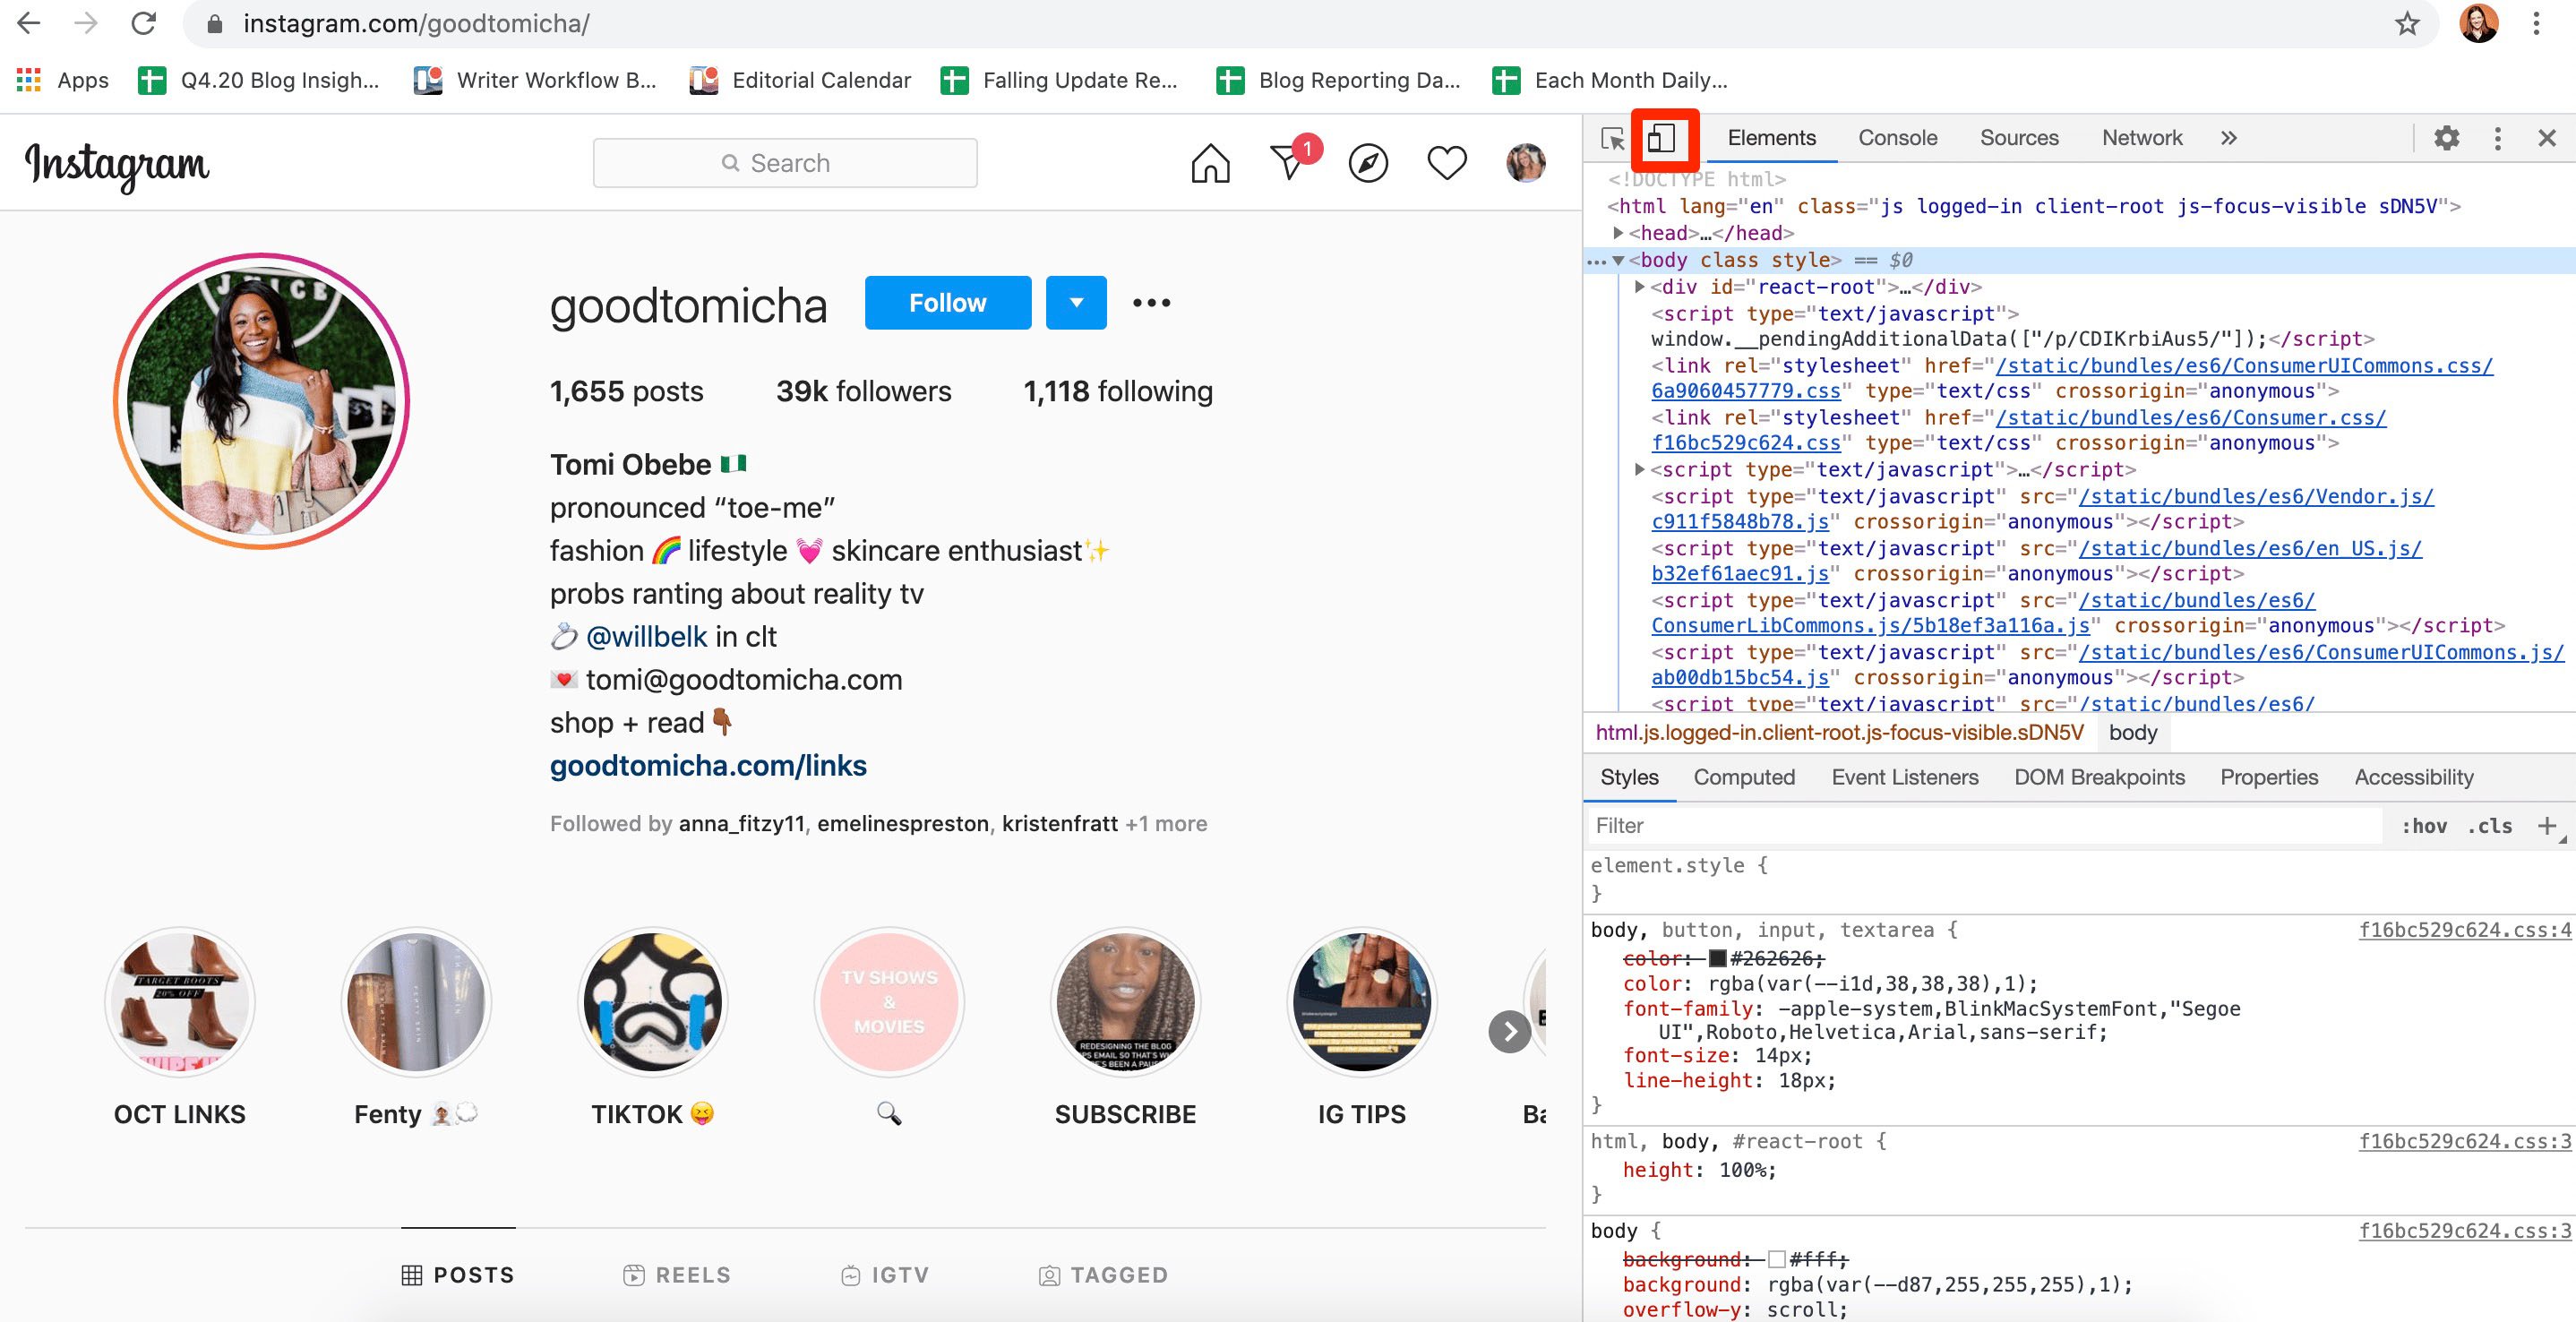
clicking on mobile toggle to change the desktop version to mobile instagram

On the top left corner of the new panel, you’ll see an icon with two squares that represent a tablet and a mobile device. Clicking it will reveal the Device Toolbar that gives you advanced control over your browser.

5. Choose which mobile device you’d like from the drop-down menu.
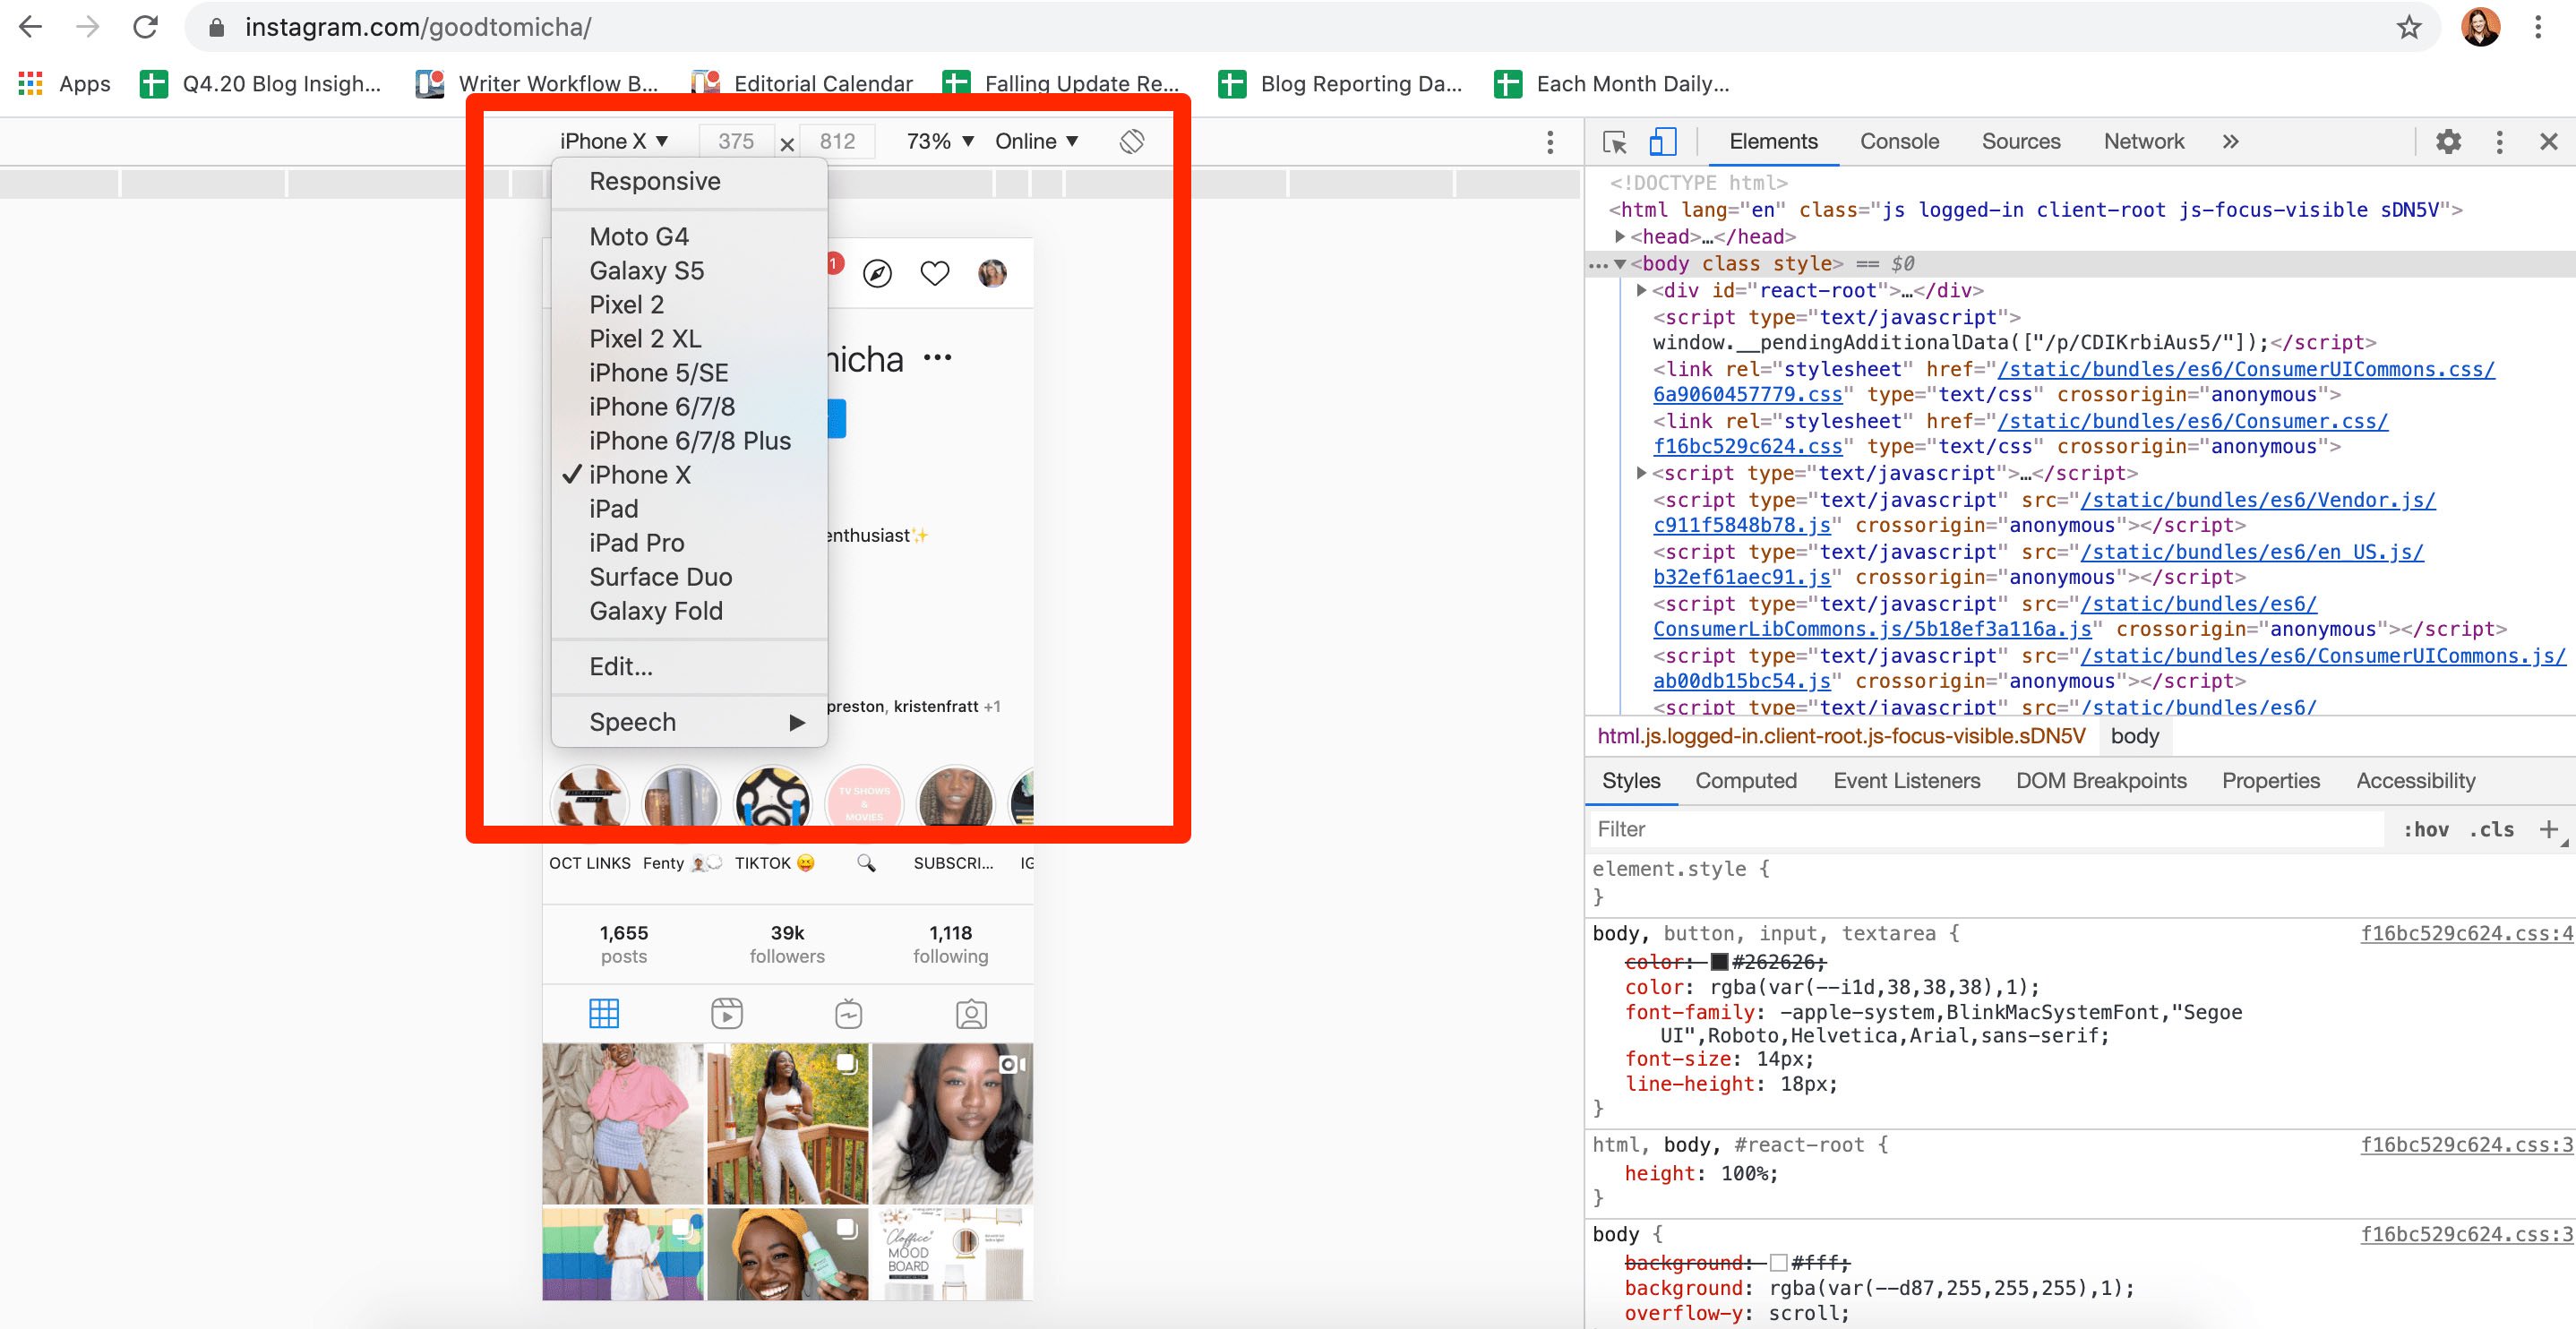
changing responsive design on desktop so it resembles instagram on mobile copy

In the Device Toolbar, you’ll see another drop-down menu with a list of mobile devices. Selecting one will tell the browser to emulate how a website looks on that particular device you selected. 

Choose which mobile device you’d like on the drop-down menu, as well as how zoomed in you want to be.

6. Refresh the page to see the mobile interface of Instagram from your browser.

You should then be able to able to use Instagram straight from the emulation or even close the panel on the right side while retaining this “mobile view.”

7. Upload an Instagram post the same way you would via mobile.

You can upload a Instagram post the same way you would via mobile:

1. Click the “+” button.
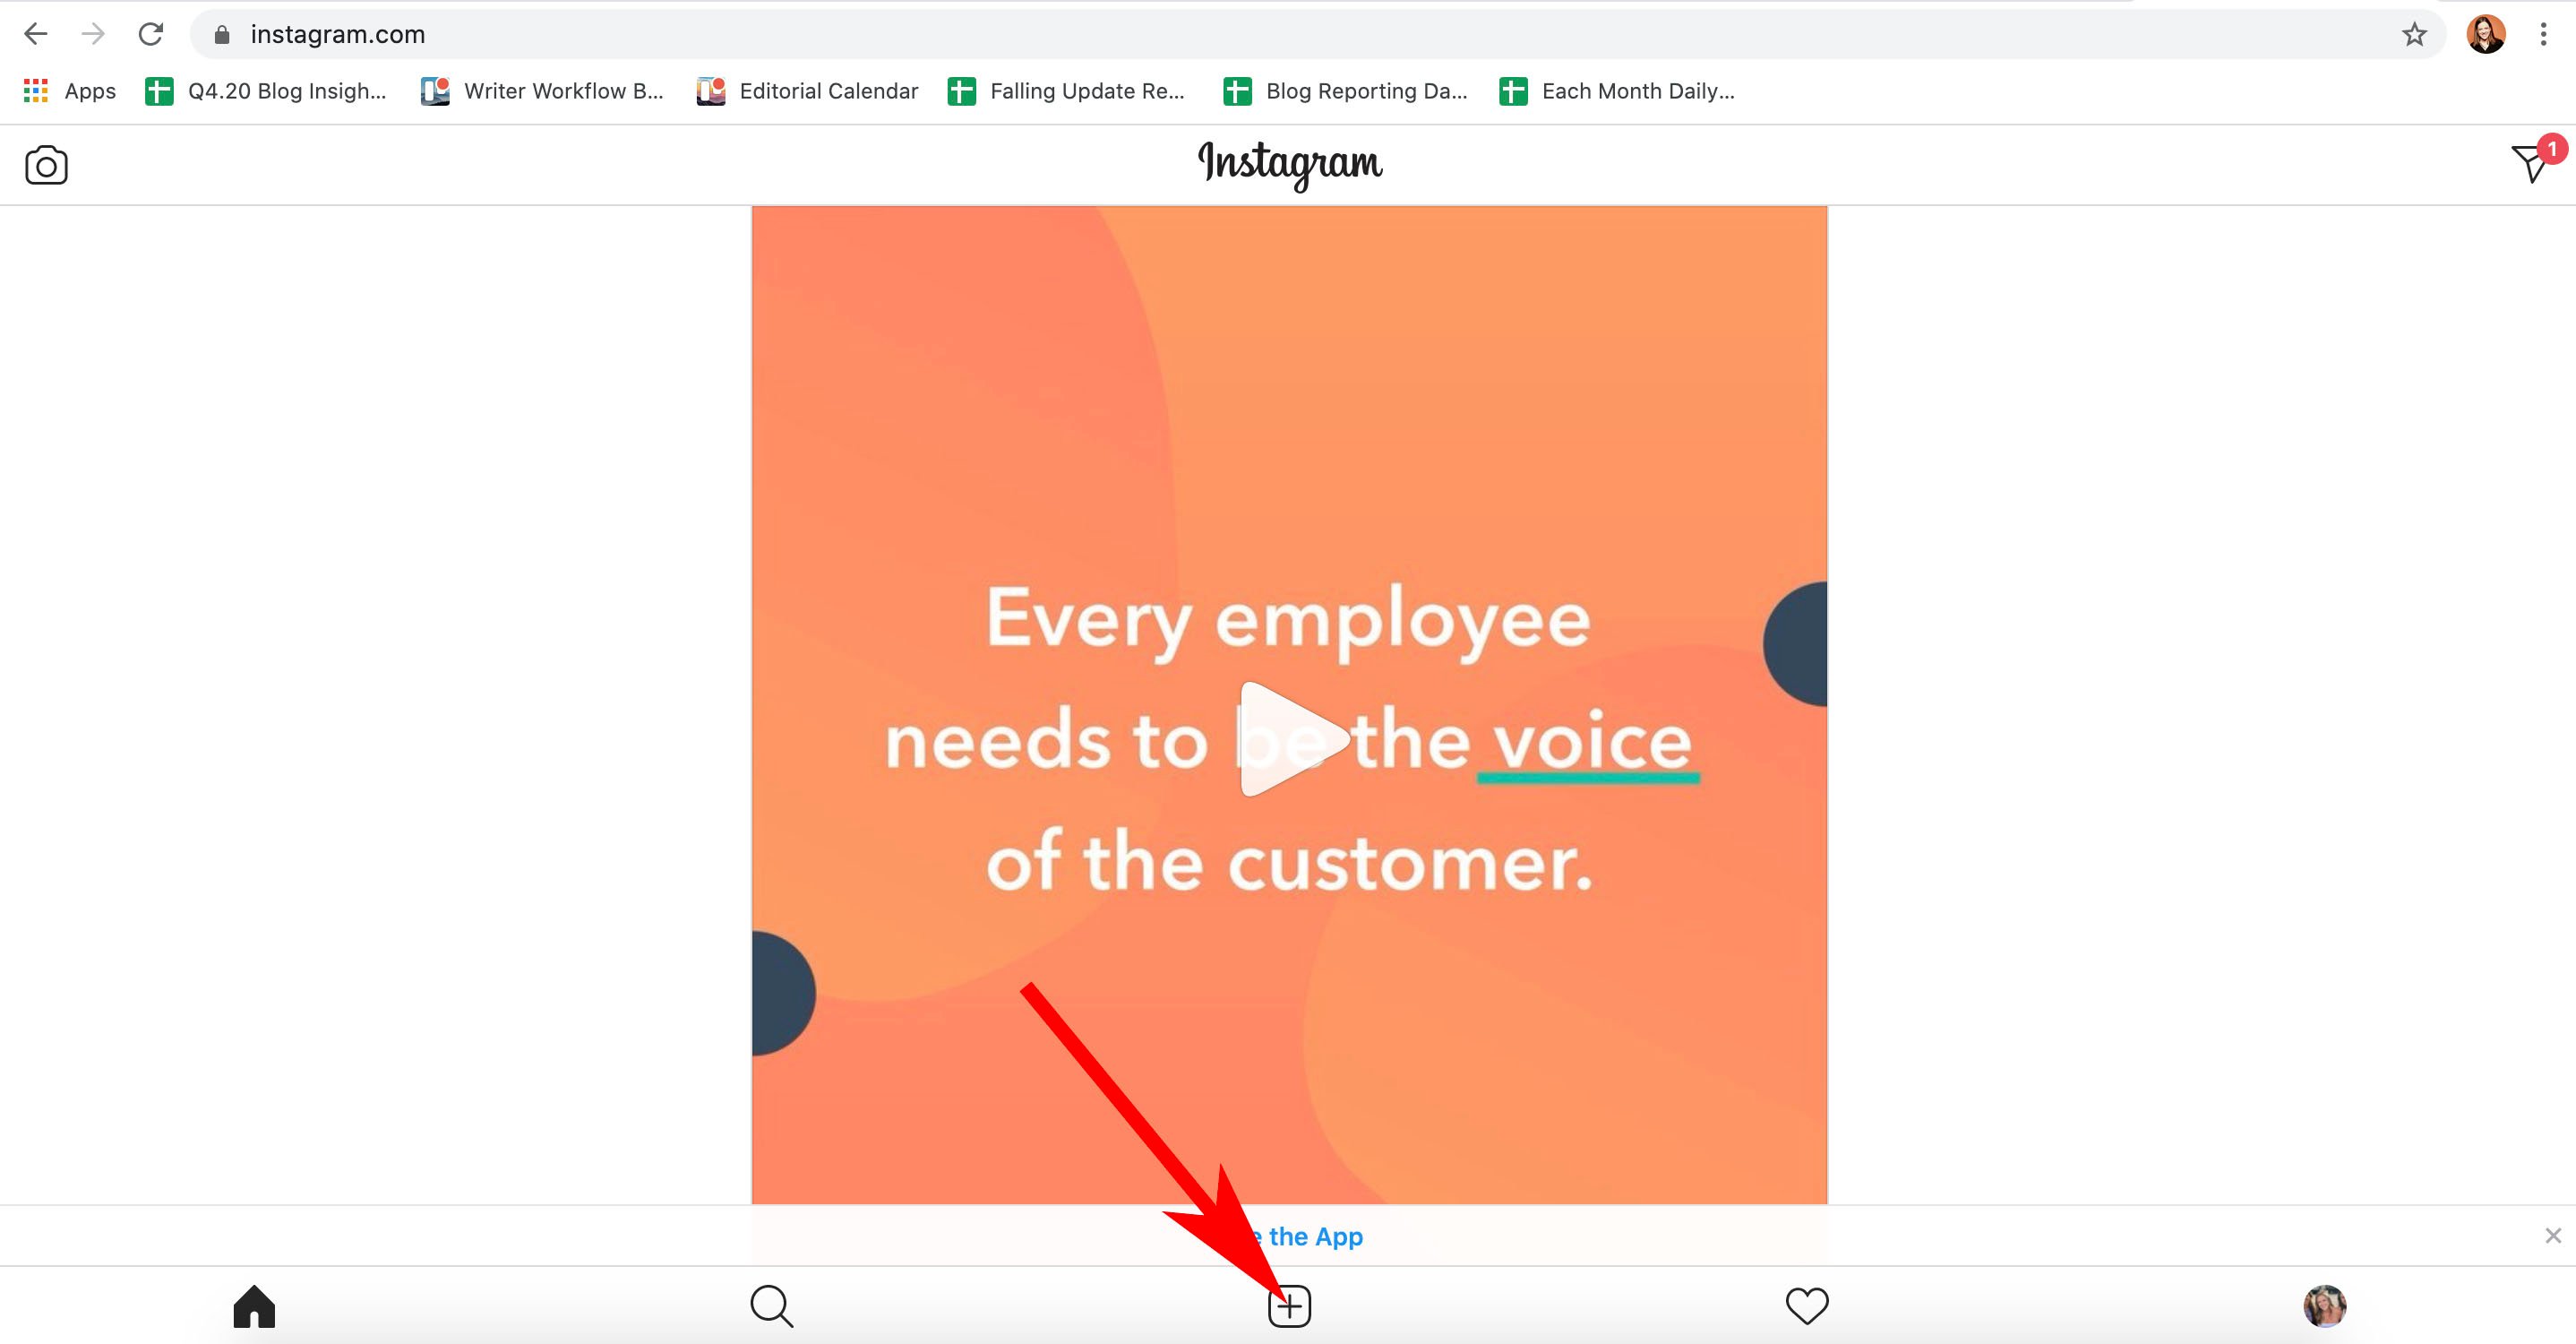
clicking add post on desktop

2. Add filters.

Choose filters or other editing features like you would normally, then click Next in the top right of your screen:

instagram filters on desktop

4. Add captions, locations, and tags.

On the next screen, you’ll be able to add a caption, location, or tag people. When you’re ready, click Share in the top right of your screen.

typing a caption on my instagram post on desktop copy

1. Navigate to Instagram’s website in your Safari browser.

The first thing you’ll want to do is open up Safari and navigate to https://www.instagram.com/ by typing it into the navigation bar. 

2. Click “Safari” and then select “Preferences” in the menu bar.
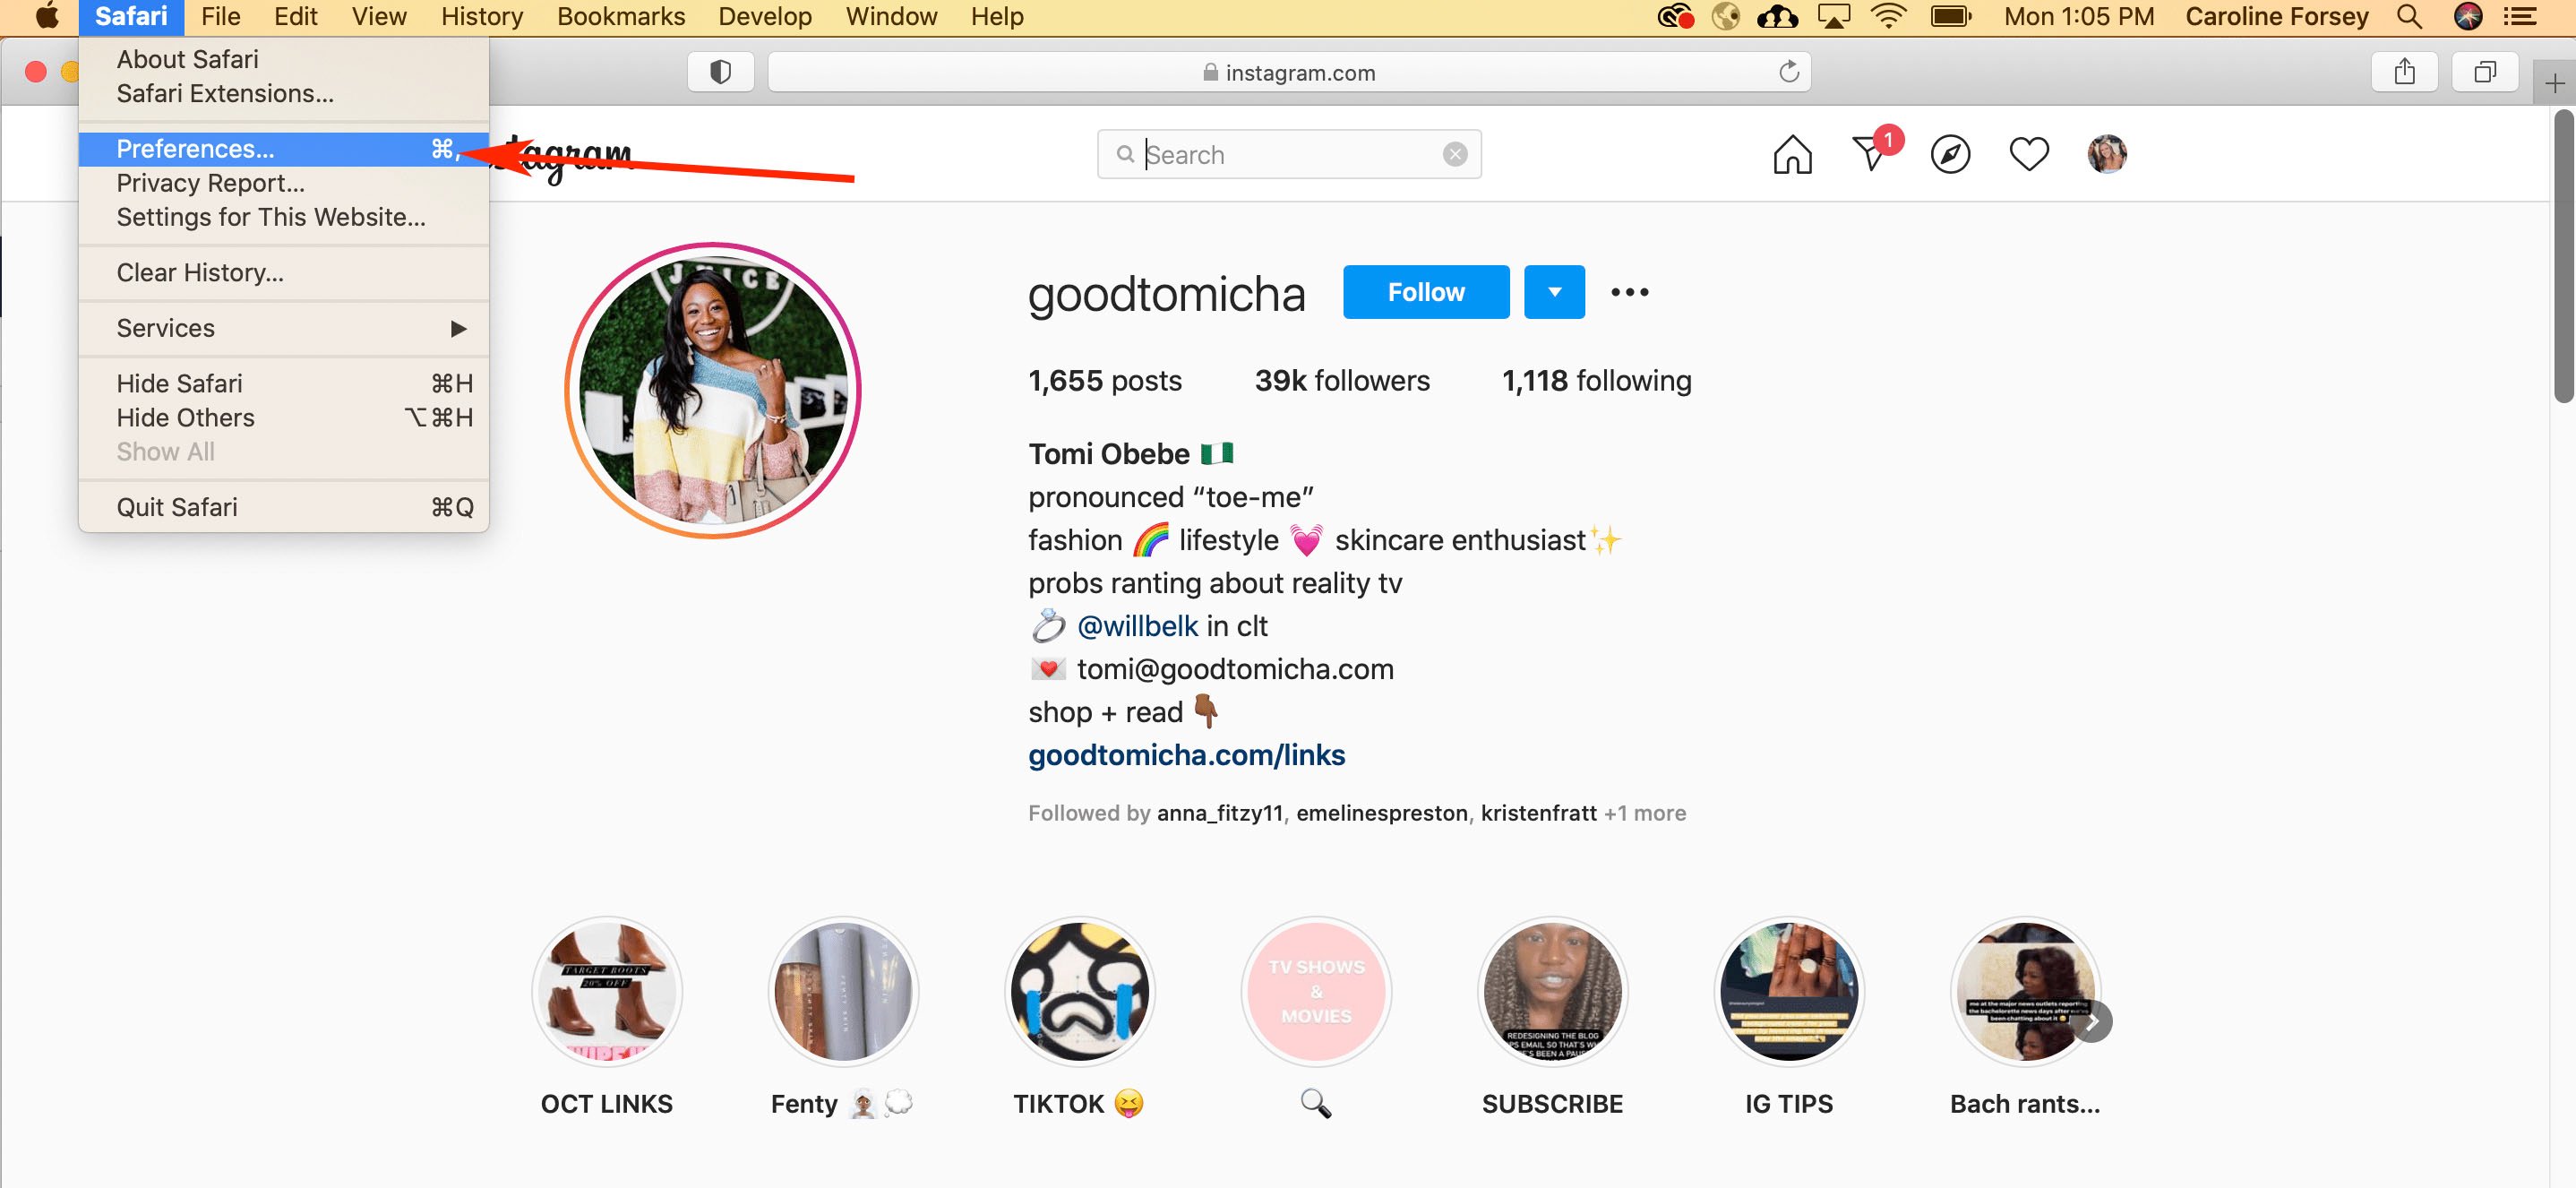
safari prefences drop-down menu

Up in the top menu, click Safari. This is where you’ll find your browser’s “Preferences” settings in the drop-down menu.

3. Click “Advanced” and check the box that reads “Show develop menu in menu bar”.
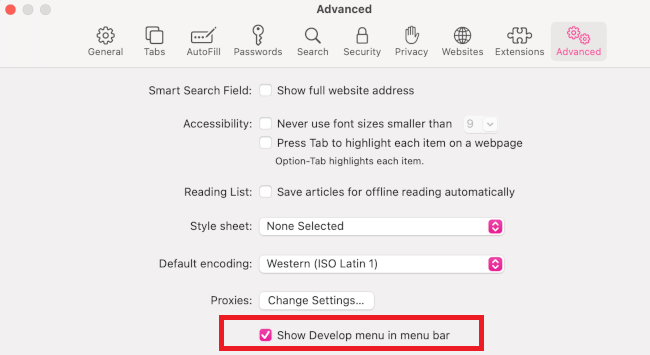
advanced menu in safari

Under “Advanced,” you’ll have the options to show the Develop menu in the menu bar. By checking this box, you’ll get access to a menu that will give you advanced control over how your browser displays content. This will help you post to Instagram from desktop using Safari.

4. Click “Develop” in your menu bar and then scroll to “User Agent”. 
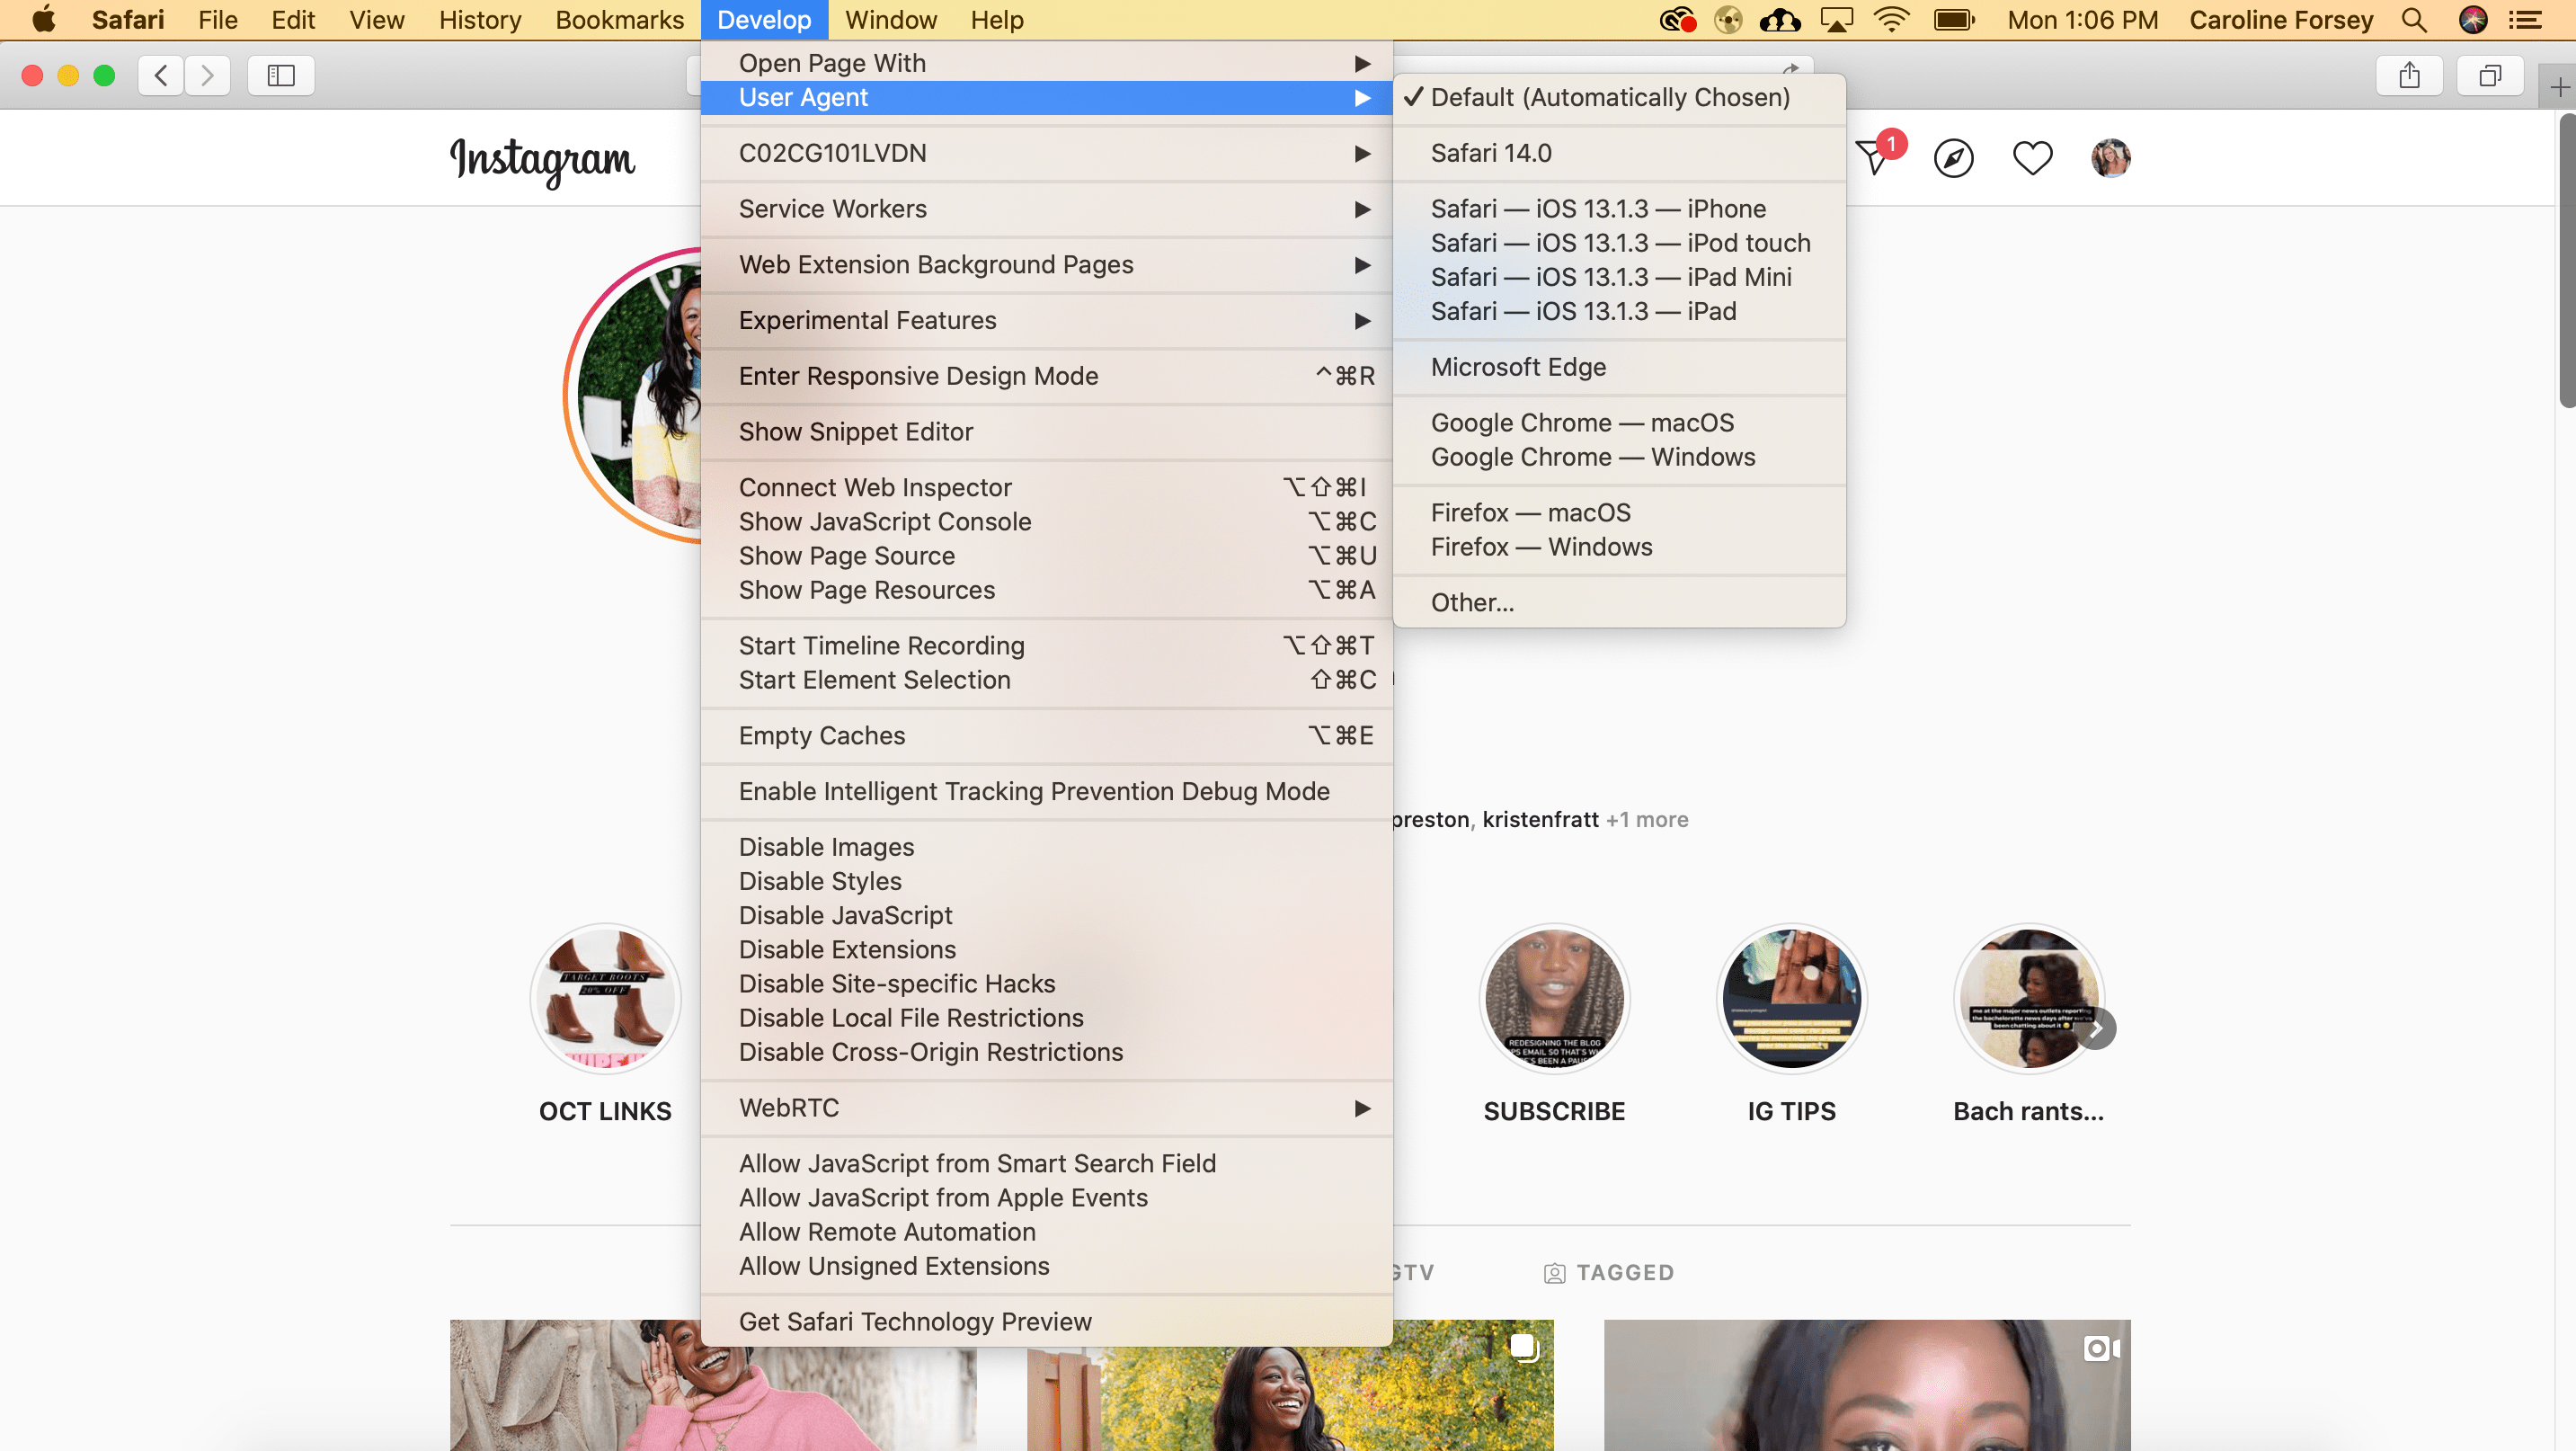
click develop in menu bar, scroll to user agent in safari

Once you click out of the previous screen and return to Safari, you’ll see that new Develop option in the top menu bar. Clicking it will reveal the features that give you advanced control over your browser.

5. Choose which mobile device you’d like on the drop-down menu.

When you select User Agentfrom the Develop menu, you’ll see another drop-down menu with a list of mobile devices. Selecting one will tell the browser to emulate how a website looks on that particular device you selected.

Choose which mobile device you’d like on the drop-down menu.

6. Refresh the page to see the mobile interface of Instagram from your browser.

posting on instagram using safari browser

You should then be able to able to use Instagram straight from the emulation while retaining this “mobile view.”

7. Upload an Instagram post the same way you would via mobile.

Once you are able to view Instagram from your Safari browser, you can upload an Instagram post the same way you would via mobile — by clicking the “+” button, adding a filter or editing the photo, adding a location and caption, and clicking “Share” when you’re ready for your post to go live.

(The instructions for posting an image to Instagram are the same as they are for the Chrome browser instructions, listed above.)

How to Post a Video to Instagram Using a Desktop Computer

To upload a video to Instagram from your desktop, you’ll need to use a third-party service that offers social media scheduling software.

There are a few you might try, including the Flume App for Mac or Lately Social ($14 per user per month for Agency plan).

For our purposes, I used Lately Social’s free personal plan to upload and post a video directly to my Instagram:
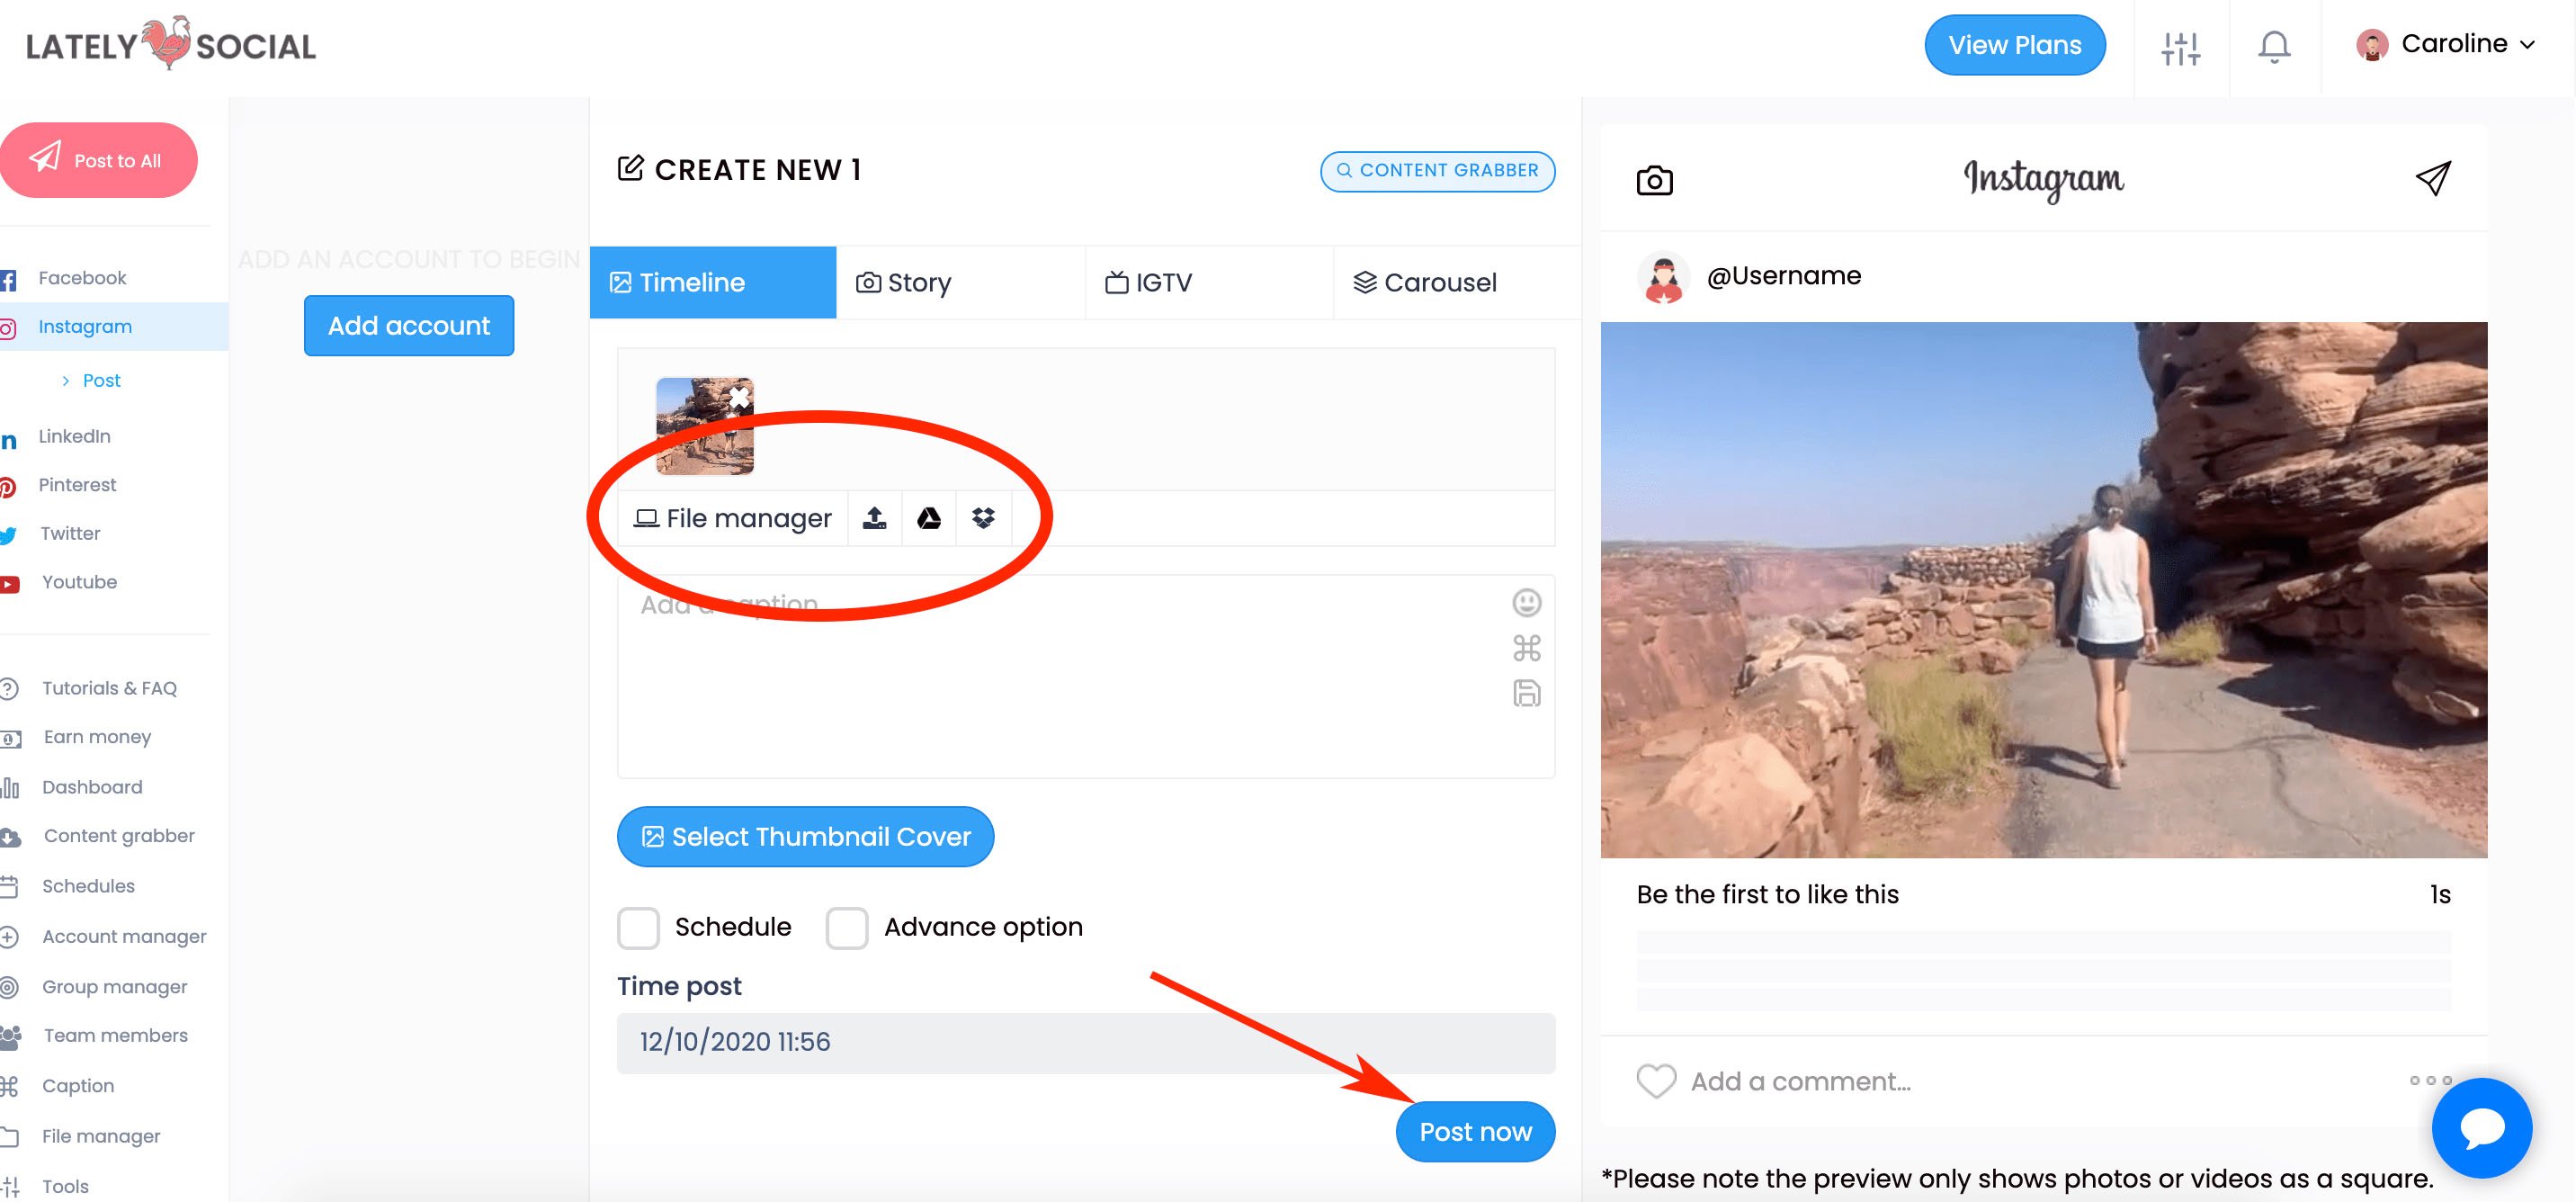
lately social tool dashboard

Of course, if you’re doing this regularly it might be worthwhile to explore all the social media scheduling tools at your disposal to choose the one best-suited for your business’ needs.

Using Instagram Like the Pro You Are

Now that you don’t have to worry about transferring photos to your mobile device or juggling your work’s social media account on your own device, you’ll be able to grow on Instagram efficiently and effectively. From there, the sky is the limit for creating posts and growing your audience in a scalable way.

Editor’s note: This post was originally published in October 2020 and has been updated for comprehensiveness.

New Call-to-action

Categories B2B

The Ultimate List of Instagram Stats [2021]

With more than 1 billion active monthly users, brands are quickly recognizing the need to have a presence on Instagram.

But, as with any social network, the brands that are getting the most out of Instagram are the ones who are smart about what they post, when they post, how often they post, and whom they’re targeting.

But how do they know what’s a “smart” post for their business?

That’s where the Instagram data comes in. There’s a whole lot of research out there about Instagram — everything from the demographics of its users and how often brands are posting, to how negative space affects the performance of your posts (hint, hint: #26).

Read on to uncover more social media stats that’ll help you get ideas and improve your own Instagram posting strategy.

New Data: Instagram Engagement Report [2021 Version]

43 Instagram Stats

Click on a category below to jump to the stats for that category:

  1. Instagram’s Growth
  2. Audience & Demographics
  3. Brand Adoption
  4. Instagram Post Content
  5. Instagram Posting Strategy

Instagram’s Growth

1. As of May 2021, there are over 1 billion Instagram monthly active users worldwide. (Source)

2. As of 2020, there’s an estimated 107 million Instagram users in the U.S. alone — which is predicted to grow to almost 126 million by 2023.(Source)

3. As of February 2021, 40% of U.S. adults say they’ve used Instagram. This is a larger percentage than use Pinterest, LinkedIn, and Twitter. The only two social media apps more popular than Instagram are Facebook and YouTube. (Source)

4. Instagram generated $20 billion in ad revenue in 2019. In 2012, Facebook bought Instagram for one billion. (Source)

instagram is most popular social platform for following brands.

5. Instagram experienced a nearly 14% jump between 2019 and 2020 in its users’ time spent on the app, to an average of 30 minutes per day. This was higher engagement growth than all other social platforms. (Source)

6. Other than Instagram’s own account, the most-followed Instagram account as of February 2021 is run by professional soccer player Cristiano Ronaldo, followed by celebrities Ariana Grande, Dwayne (The Rock) Johnson, and Kylie Jenner. (Source)

Audience & Demographics

7. 71% of U.S. adults between 18-29 use Instagram, compared to 70% on Facebook and 30% on LinkedIn. (Source)

8. 47% of U.S. Instagram users make more than 75,000 per year.(Source)

9. As of October 2020, 510 million Instagram users are female, and 490 million are male. (Source)

10. 72% of teens use Instagram, and 57 million U.S. teenagers say Instagram is their preferred social media platform. (Source)

11. 500 million+ accounts use Instagram Stories every day. (Source)

12. 35% of music listeners in the U.S. who follow artists on Facebook and Instagram do so to connect with other fans or feel like part of a community. (Source)

On instagram, photos showing faces get more likes.

13. The average Instagram user spends 30 minutes a day on the app.(Source)

14. 45% of Instagram users live in urban areas. (Source)

15. As of January 2021, the countries with the most Instagram users are the U.S. (140 million), India (140 million), and Brazil (99 million). (Source)

Brand Adoption

16. 70% of shopping enthusiasts turn to Instagram for product discovery. (Source)

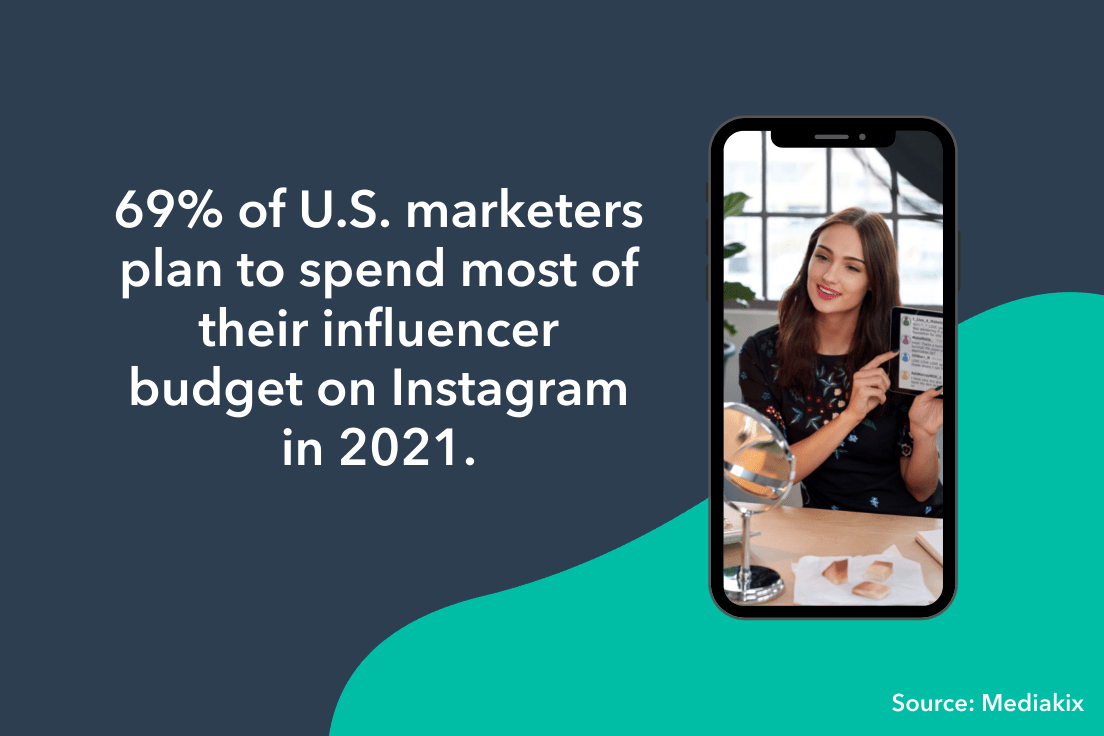
17. 69% of US marketers plan to spend most of their influencer budget on Instagram. (Source)

18. 90% of people on Instagram follow at least one business. (Source)

19. 50% are more interested in a brand when they see ads for it on Instagram. (Source)

130 million instagram accounts tap on shopping posts to buy products.

20. In a 2021 report, the higher education industry currently has the highest engagement rate of any other industry per post on Instagram, at 3.19%. Second was sports teams at 1.79%, and third was influencers at 1.42%. (Source)

21. 67% of users surveyed have ‘swiped up’ on the links of branded Stories. (Source)

22. 130 million Instagram accounts tap on a shopping post to learn more about products every month. (Source)

Instagram Post Content

23. 995 photos are uploaded on Instagram every second. (Source)

24. The median posting cadence across all industries is 4 posts per week. The median posting frequency declined by just 8% this year compared to last. (Source)

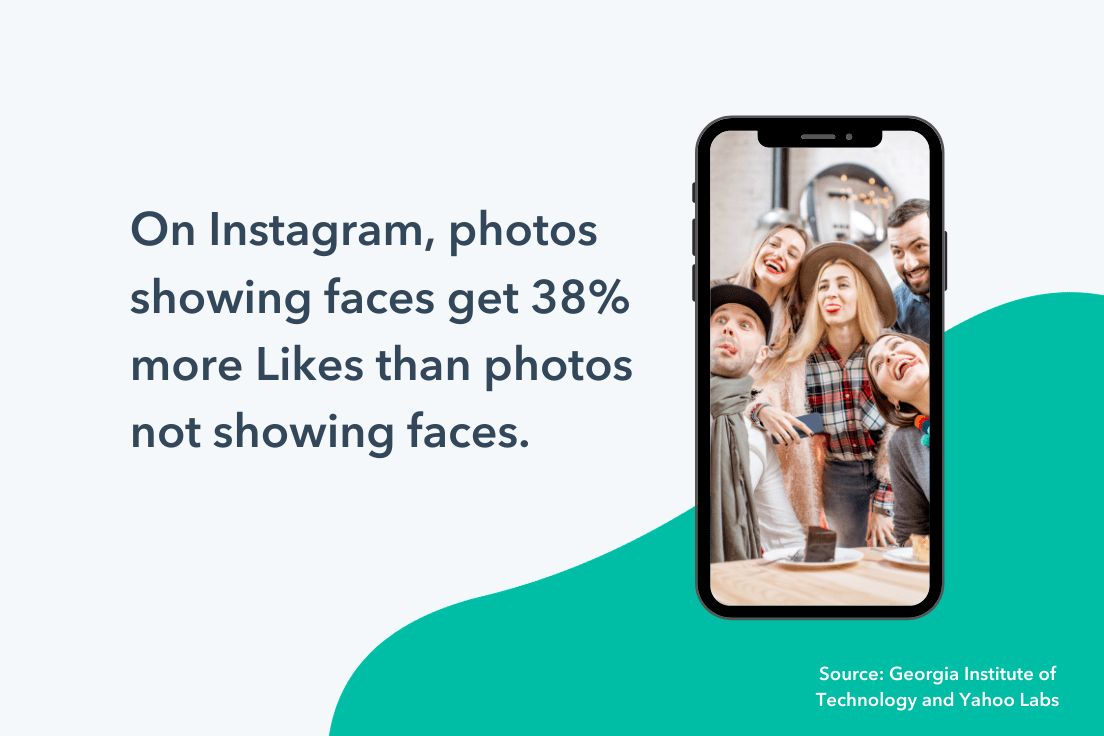
25. On Instagram, photos showing faces get 38% more Likes than photos not showing faces. (Source)

26. On Instagram, images with a high amount of negative space generate 29% more Likes than those with minimal negative space. (Source)

70% of shopping enthusiasts use instagram for product discovery.

27. On Instagram, images featuring blue as the dominant color generate 24% more Likes than images that are predominantly red. (Source)

28. This is so much so that the latest Instagram statistics show that an average Instagram post contains as many as 10.7 hashtags. (Source)

29. Image posts received 27.55% more likes than permanent video posts. (Source)

30. An average image on Instagram gets 23% more engagement than one published on Facebook. (Source)

31. The most geo-tagged city in the world is Los Angeles, California and the tagged location with the highest engagement is Coachella, California. (Source)

Instagram Posting Strategy

32. The best time to post on Instagram is Thursday between 5 a.m. and 11 a.m. in your respective time zone. (Source)

33. Posts with a tagged location result in 79% higher engagement than posts without a tagged location. (Source)

34. 20% of users surveyed post to Instagram Stories on their business account more than once a week. (Source)

35. 44% of users surveyed use Instagram Stories to promote products or services. (Source)

36. One-third of the most viewed Stories come from businesses. (Source)

69% of marketers will spend influencer budget on instagram. 37. More than 25 million businesses now use Instagram to reach and engage with audiences. (Source)
38. 69% of US marketers plan to spend most of their influencer budget on Instagram. (Source)

39. In April 2020, the number of Instagram influencers cooperating with brands who used #ad decreased by 30% compared to April 2019, and it was the lowest total since August 2019. (Source)

40. The industry that had the highest cooperation efficiency with Instagram influencers was Health Care, where influencer posts were 4.2x more efficient than brand posts. (Source)

41. Micro influencers – those with less than 100,000 followers – made up an average of 93% of all brand cooperations in 2020. (Source)

42. 46% of B2B content marketers used Instagram as an organic play in 2020. (Source)

43. Instagram is now the most popular social platform for following brands. (Source)

instagram statistics

Categories B2B

HTTP Error 403 Forbidden Messages: What They Are & How to Fix Them

Imagine this – you’ve recently created a new website to host your content, and you’re excited to see it go live. You can’t wait to dive into SEO and begin ranking for keywords and attracting an audience to your brand.

But then a friend emails you and says, “Hey, is there a reason I see this when I click on your website? http 403 error forbidden example

Image Source

Undoubtedly, a “403 Forbidden” message is cause for immediate concern. How many potential viewers are you losing, as they come across your website to find this message?

Fortunately, there are a few quick-and-easy solutions to a 403 error. Here, we’ll explain the top three, so you can get your site up and running.

→ Download Now: SEO Starter Pack [Free Kit]

What you’ll typically see when you land on a page with a 403 forbidden error is something like this: “You don’t have authorization to view this page – HTTP Error 403.”

It can also have slightly different wording, like the example below.

403 forbidden example

Image Source

Wondering about the difference between a 403 and 404 error? Here it is: A 404 error happens when you access a page that no longer exists or cannot be found. A 403 error, on the other hand, indicates that your access has been denied due to incorrect credentials.

An easy way to remember it: 403 says “access denied” while 404 says “We can’t find what you asked for.”

What causes a 403 error?

There are a few reasons why you may see a 403 forbidden error. Here are the most common:

    • Permission or ownership error – Permissions are represented by codes, which indicate what each type of user can do. If you have the incorrect code associated with a file or directory then your users may run into a 403 error.
  • Wrong file or folder location – When uploading content to your site, you may have added it to the wrong directory, which is not accessible to your end-users.
  • No index page – If your homepage doesn’t have an index page, it will not display correctly on a browser.
  • Misconfigured WordPress plugin – A plugin may be blocking IP addresses to avoid malware, causing the 403 forbidden error.

Now that you know the causes, let’s address how to fix them.

How to Fix 403 Errors

1. Set the correct file permissions.

If you’ve configured your web server, you’ll want to add the server to the www-data group, and set ownership of /var/www to the www-data user and www-data group.

Then, make sure your directories are set to 755, your files are set to 644, and your dynamic content is set to 700. This determines which user types (owner, group, everyone) can read, write, and execute.

2. Make sure you have an index page.

Your website’s home page must be called index.html or index.php – if it’s not, you should rename the homepage to include one of those URL names.

Alternatively, you can upload an index page to your httpdocs directory and then set up a redirect on the index page to your real homepage.

3. Upload your website content to the correct directory on your server.

You might see a 403 forbidden message if you haven’t correctly uploaded your content to the directory on your server.

There are several different FTP clients you might’ve chosen to host your domain — let’s say you chose FileZilla, which is free and available for Windows, Mac, and Linux.

To publish your content online, you’ll need to put your files into the public/htdocs directory.

Note: If you’re using FileZilla, these instructions will vary if you use a different FTP client. Once you’ve dragged and dropped your files into the directory, you should search your website’s URL to double-check they now appear online.

If you’re in your FTP server and don’t see the httpdocs directory, you can create a file within the directory with this title, which could also solve the issue.

4. Deactivate and reactivate your plugins.

If you suspect one of your plugins is responsible for the 403 forbidden error, temporarily deactivate all of your plugins.

You may have noticed the error shortly after installing a plugin. If so, start with that one and work your way down from the most recent installation to the oldest.

Then, one by one, activate each plugin and refresh the page to determine which plugin is causing the error.

As you can see, 403 errors can typically be resolved in just a few easy steps. It’s just about knowing where to look. 

marketing

Categories B2B

Dwell Time is the SEO Metric You Need to Track

This morning, I made a quick Google search.

When the results page loaded, I spent time clicking through the first page of websites to find what I was looking for. When I didn’t find my answer, I clicked back to that results page to look at the next one.

This process took me through to the bottom of the page until I refined my search and started the process again.

I didn’t know it at the time, but I was actually contributing to a powerful metric — dwell time.

Free Guide: How to Run a Technical SEO Audit

When we talk about metrics, we tend to focus on demographics. We ask questions like, Who’s looking at your site, where are they located, and what are their interests?. These interests help marketers make informed decisions about campaigns tailored to their customers’ interests.

Dwell time is the metric that runs through various search engine results pages (SERPs). It’s the time I spent reading those results pages before I went back to Google to take a look at other results.

Let’s explore more about what dwell time means, and its usefulness, below.

What is dwell time?

Remember that dwell time begins and ends with the SERP.

Simply put, dwell time is the amount of time a user takes analyzing a web page before clicking back to search results. If a web page has a low dwell time, it likely means the page didn’t match the user’s search intent.

It’s important to note, dwell time and bounce rate are two different things. Bounce rate is what happens when a user clicks on one page, and then almost immediately leaves the site.

For it to be considered dwell time, on the other hand, the user needs to click on a page from the SERP, stay a while, and then either click back to the SERP or otherwise exit the page.

If you use search engines, you rack up dwell time daily, without even thinking about it. I can already recall two separate instances in which I’ve contributed to dwell time today, all before lunch.

Essentially, dwell time metrics can show marketers if their web pages are capturing the attention and needs of browsers. It has the potential to tell you what to include on web pages, and what to exclude.

For instance, let’s say you write a blog article called “Social Media Tips and Tricks”. You notice the piece has a high click-through rate, but low dwell time.

Upon further inspection, you see the rest of the articles on the SERPs include comprehensive information regarding social media scheduling, how to create posts for social media, and which social media sites have the highest conversion rates.

More than likely, you thought your post was solving for a user’s search intent when it really wasn’t — which is why most readers jump back to the SERP to find an alternative source.

It can also lead to clues about improving UX. For instance, if you have a slow loading time on your web page, you may see that reflected in dwell time metrics, since a user might exit your page if it’s taking too long to load

This metric can lead to important decisions you make for your site, among other metrics.

Next, let’s explore how dwell time is calculated.

How is dwell time calculated?

In Google Analytics, you can determine your dwell time by looking at “Average Session Duration”, which tells you how long visitors are staying on a website on average. It’s measured by the total duration of all sessions, or visits, in seconds, divided by the total number of sessions.

A session begins when a user goes to a website. After 30 minutes of inactivity, or when the user leaves, the session ends. The inactivity cut-off exists so you can get an accurate report of your metrics without untrue inflation.

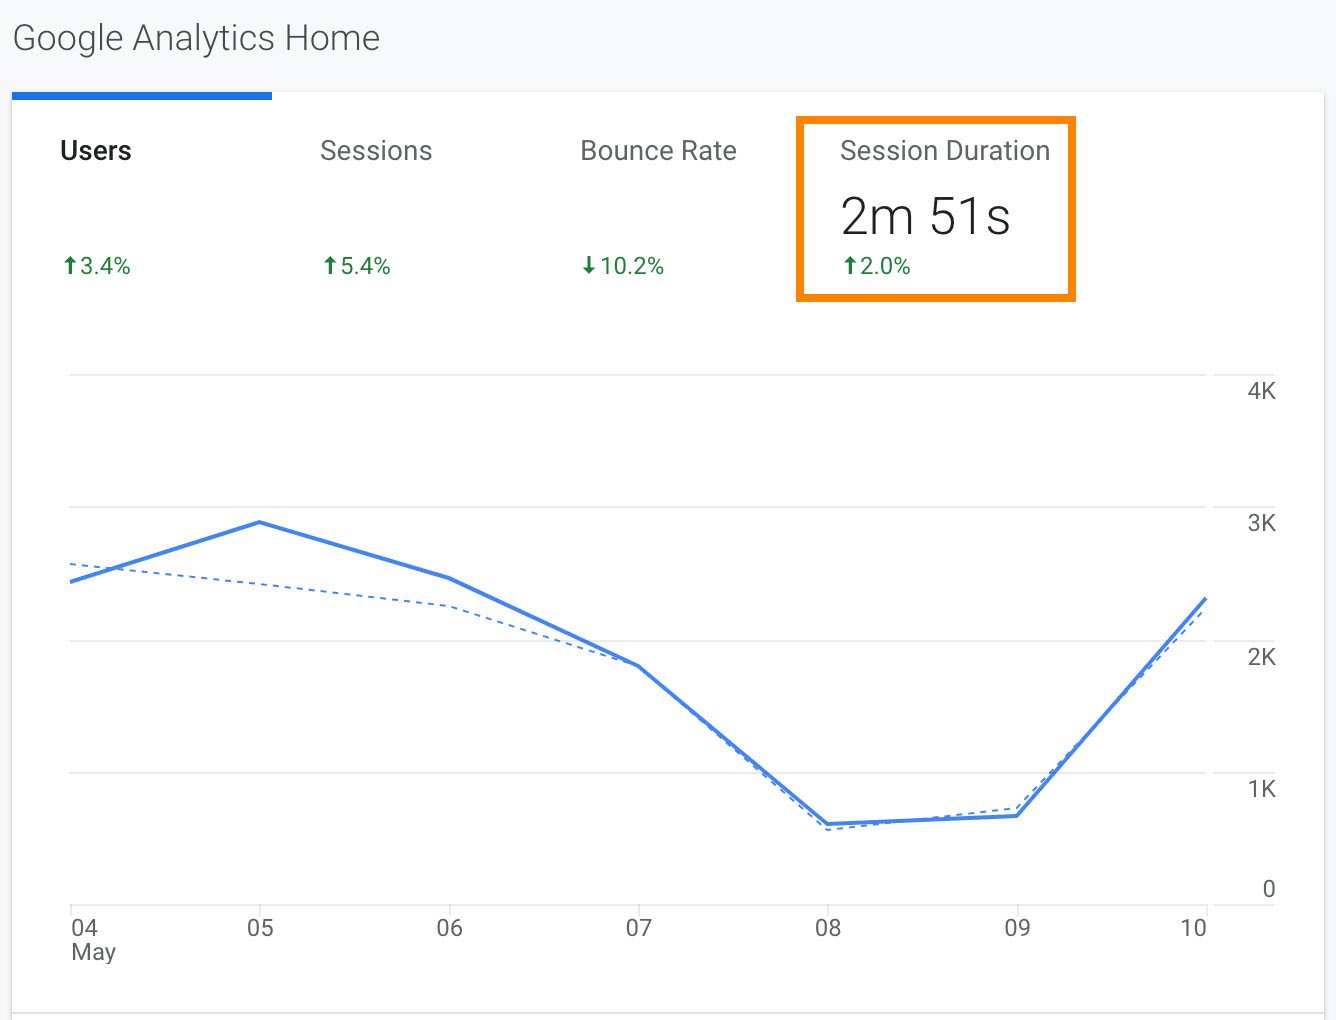
You can find this metric already calculated for you in Google Analytics, displayed in minutes and seconds. You can find it in two places in particular — first, when you log into your Google Analytics home, you’ll see “Average Session Duration” displayed on the homepage, which indicates the average dwell time on any of the accounts you’re tracking in Google Analytics:

session duration on google analytics homepageIf you want to explore “Average Session Duration”, or dwell time, for individual landing pages or blog posts, you’ll want to click “Behavior” on the left side of the screen, and then “Site Content” > “Landing Pages”:
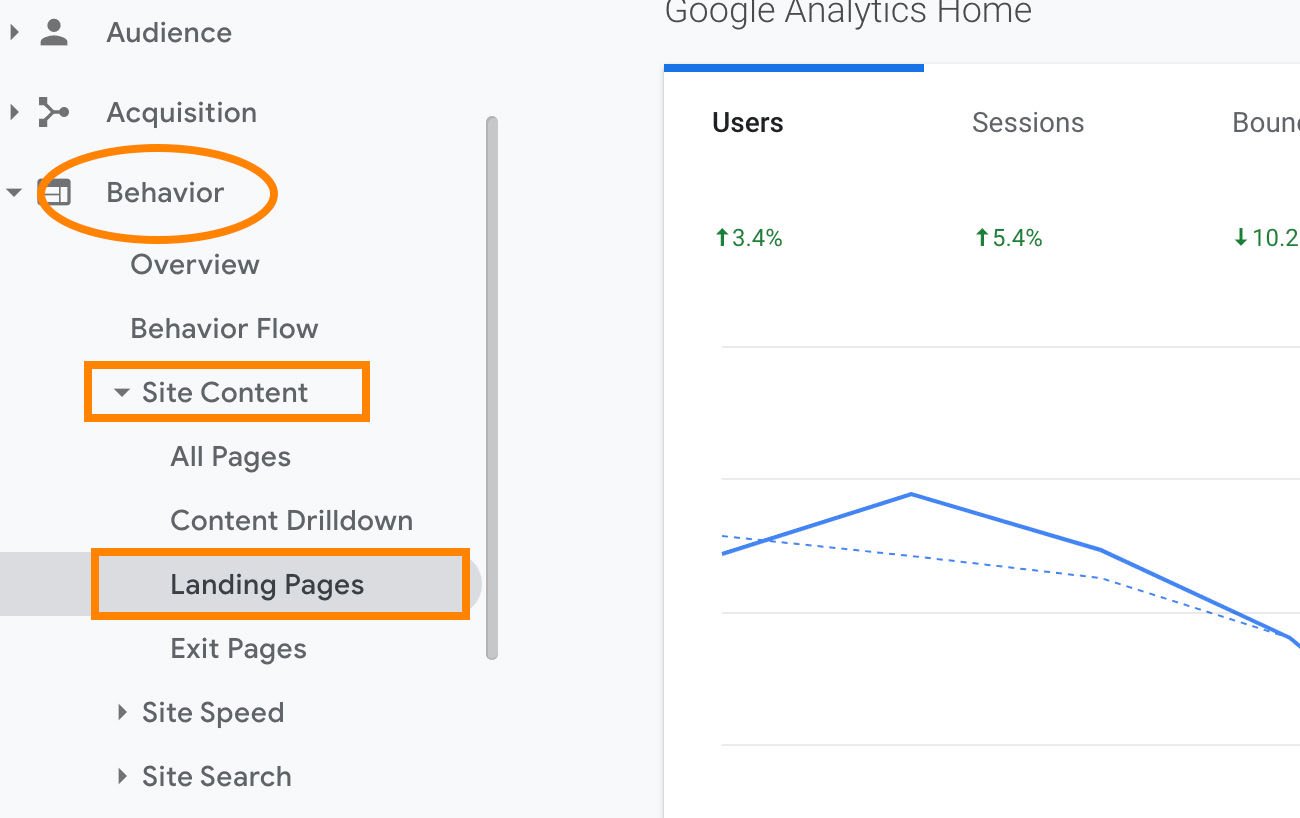
behavior then landing pages for finding session duration

Here, you’ll see the dwell time displayed as “Average Session Duration” in the table.

avg session duration for individual landing pagesIt’s important to note — “Average Session Duration” can depict dwell time, but the two aren’t the same. Dwell time can only come from the SERPs, whereas Average Session Duration might also measure someone’s time on-page after they’ve arrived from another landing page, social media page, or clicked on an email link.
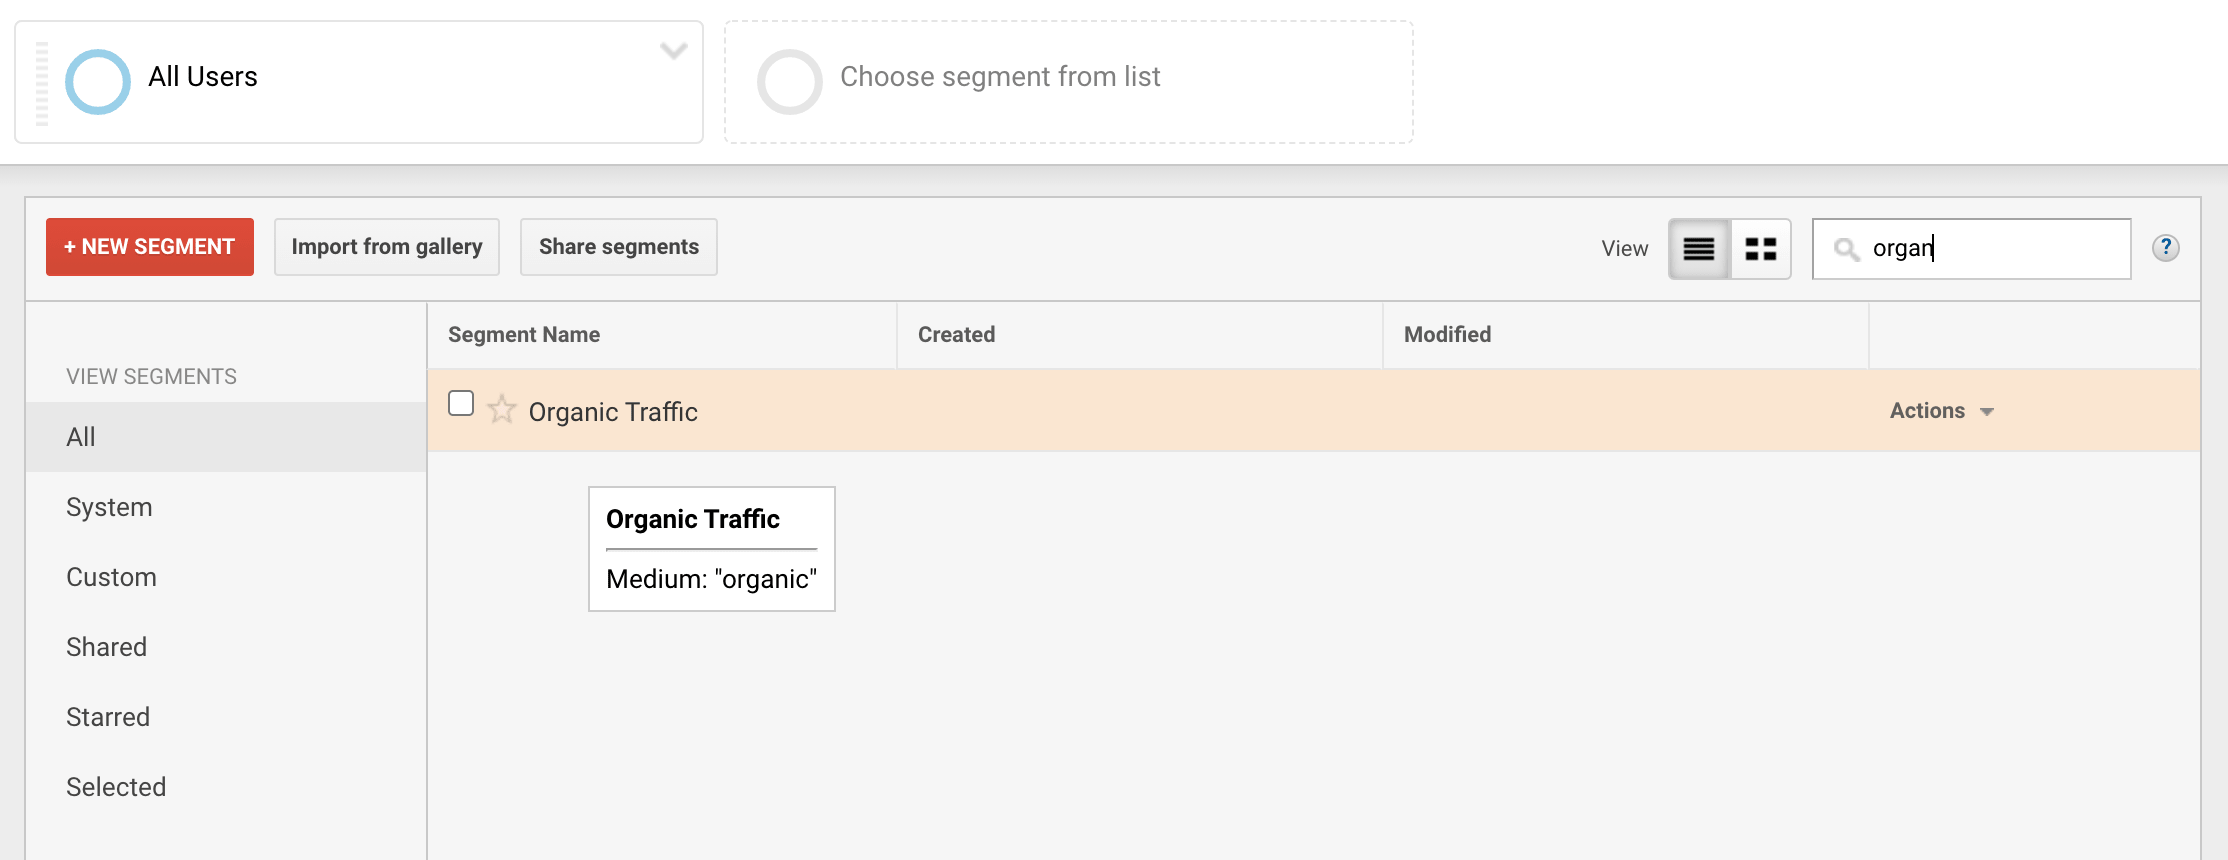
Fortunately, you can account for this difference by simply adding a segment, “Organic Traffic”, to ensure you’re only seeing landing page metrics related to the SERPs.

adding an organic traffic segment in GA

“Average Session Duration” can help you analyze which landing pages are performing well in terms of dwell time, and which could be better.

But what’s a “good” average session? Let’s dive into that, next.

Average Dwell Time on Websites

The industry benchmark for average dwell time is considered somewhere between 2-4 minutes. It usually takes around this time to explore a website and get a feel for the design.

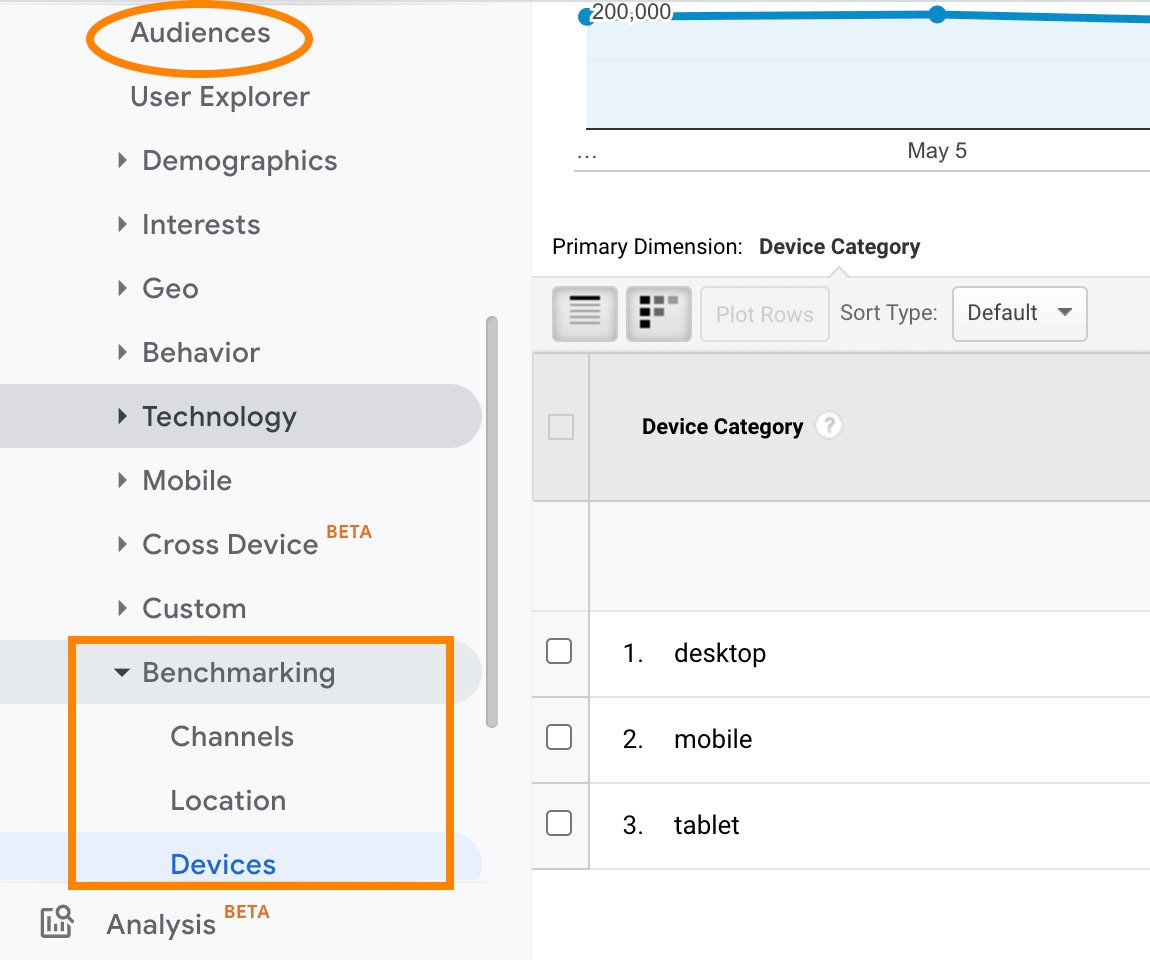
You’ll see this industry standard in Google Analytics when searching for benchmark metrics. To find these metrics, go to “Audiences” and then “Benchmarking” on the left-side of the screen:

finding benchmark data in google analytics

Then, select whether you want to see industry standards across devices, channels, or locations.

For our purposes, let’s take a look at the industry standard for “Business & Industrial” across devices. As shown in the small numbers below the larger percentage, most businesses have an average session between 2-3 minutes (the second number depicted, i.e. 02:43):

benchmark data on average dwell timeMost marketers agree that it’s rare to see average session duration times over 10 minutes or less than one minute, so if you’re looking for a goal, between 2-4 minutes is where the average typically lies.

When you’re looking at metrics, it’s a good idea to look at all of them to get a full scope of how your site is performing. If you’re ranking high on the SERP, that means that your SEO is great, but if your website isn’t providing useful information, your session duration might underperform.

To provide a holistic experience for customers, looking into the meaning behind session durations is important.

How to Improve Dwell Time

A low dwell time tells you that when a user searches a query on Google and then clicks on your site, she’s disappointed with what she finds there — for whatever reason, it didn’t match what she was looking for, or didn’t provide the full answer she needed.

There are plenty of options for combatting this.

1. Make sure your introduction matches the reader’s intent, and follows good UX practices.

First, take a look at your introduction our UX at the top of the page. Is it easy to navigate, and does the text outline what the reader will find on the rest of the page? Best of all, does it help the reader find what she’s looking for quickly — either with a table of contents, or by using short paragraphs and bullet points to make the content more digestible?

User experience could be a major component of a low dwell time, particularly at the top of the page — since readers who aren’t impressed with the above-the-fold UX won’t stick around long.

Content matters, too. You might find you have a low dwell time if your introduction is confusing or doesn’t get to the point quickly enough. Alternatively, perhaps your content isn’t matching the user’s intent.

Take a look at other high-ranking articles on the SERPs to get a better picture of why this reader is searching for this topic. Intent matters.

Consider the following example: You see you have a low dwell time for your article, “How to Delete a Theme in WordPress.” When you click into the article, you find that the introduction focuses on why WordPress might be a good web hosting solution, as well as statistics to support the claim.

Except … readers who’ve just searched “how can I delete my WordPress theme?” likely already have an account and don’t need to be convinced of the strengths of the tool — they just need to delete a theme.

If your article isn’t hitting a good note with readers from the get-go, that could be a major contributor to low dwell time.

2. Ensure the page is fast and clean.

Slow loading time is a major deterrent to high dwell time — if your page takes too long to load, readers likely won’t stick around long.

Additionally, once readers are scrolling your page, if they find the images aren’t loading properly, or it’s an unimpressive experience, they might choose to abandon the page.

This means that having clean code and following SEO best practices for a quick load time (including compressing your images and caching your web pages) is critical to increasing your dwell time.

Ensure the page loads quickly and efficiently across browsers and devices, too. A good mobile-experience is vital here, since a lower dwell time on mobile will contribute to a lower dwell time overall.

3. Have good internal linking.

Dwell time is ultimately the amount of time someone stays on a page before returning to the SERPs — so including links to your other blog posts or landing pages is a good opportunity for keeping them engaged on your site for longer.

Follow good link-building practices to create the right infrastructure for both the SERPs and user experience. The key is ensuring your links are relevant to the topic at-hand. A blog post about social media, for instance, should link to other posts about Instagram or YouTube — not website development.

4. Embed multimedia elements.

Many readers might get tired of reading too much text, so consider breaking up the page by embedding videos, podcasts, images, and other multimedia elements to keep your readers engaged.

Along with improving dwell time, embedding these elements on your page could increase traffic to your brand’s other types of content. For instance, embedding a YouTube video on your blog post (when relevant) could increase views to your YouTube channel. Alternatively, including a link to a podcast episode might increase listeners.

Ultimately, dwell time is a sign that the quality of your content or the page’s UX isn’t good enough to keep readers’ interested. Consider how you might refresh your content to better match the reader’s intent based on what else is on the SERPs, and follow other on-page best practices to increase dwell time and delight your website visitors.

seo audit

Categories B2B

The Beginner’s Guide to Editing YouTube Videos

As a video marketer, editing might be the most important part of post-production. If you can’t seamlessly weave your shots together or get your cut to hit the right frame, your video will seem unpolished and disengage your viewers.

That said, if you’re operating on a shoestring budget, you might not be able to afford video editing software. So what’s a video marketer to do without editing software? Fortunately, YouTube offers a web-based video editor that is entirely free and accessible through its platform.

In this post, learn how to use YouTube’s native video editing tools, as well as best practices to keep in mind when editing your videos to ensure you’re keeping your audience engaged and interested in watching more.

→ Free Templates: How to Use YouTube for Business [Download Now]

How to Use YouTube’s Video Editor

1. Sign in to YouTube Studio

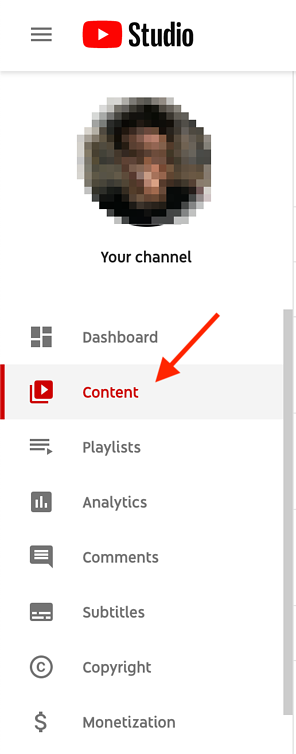
2. On the left sidebar, click Content.

youtube studio editor sidebar dashboard

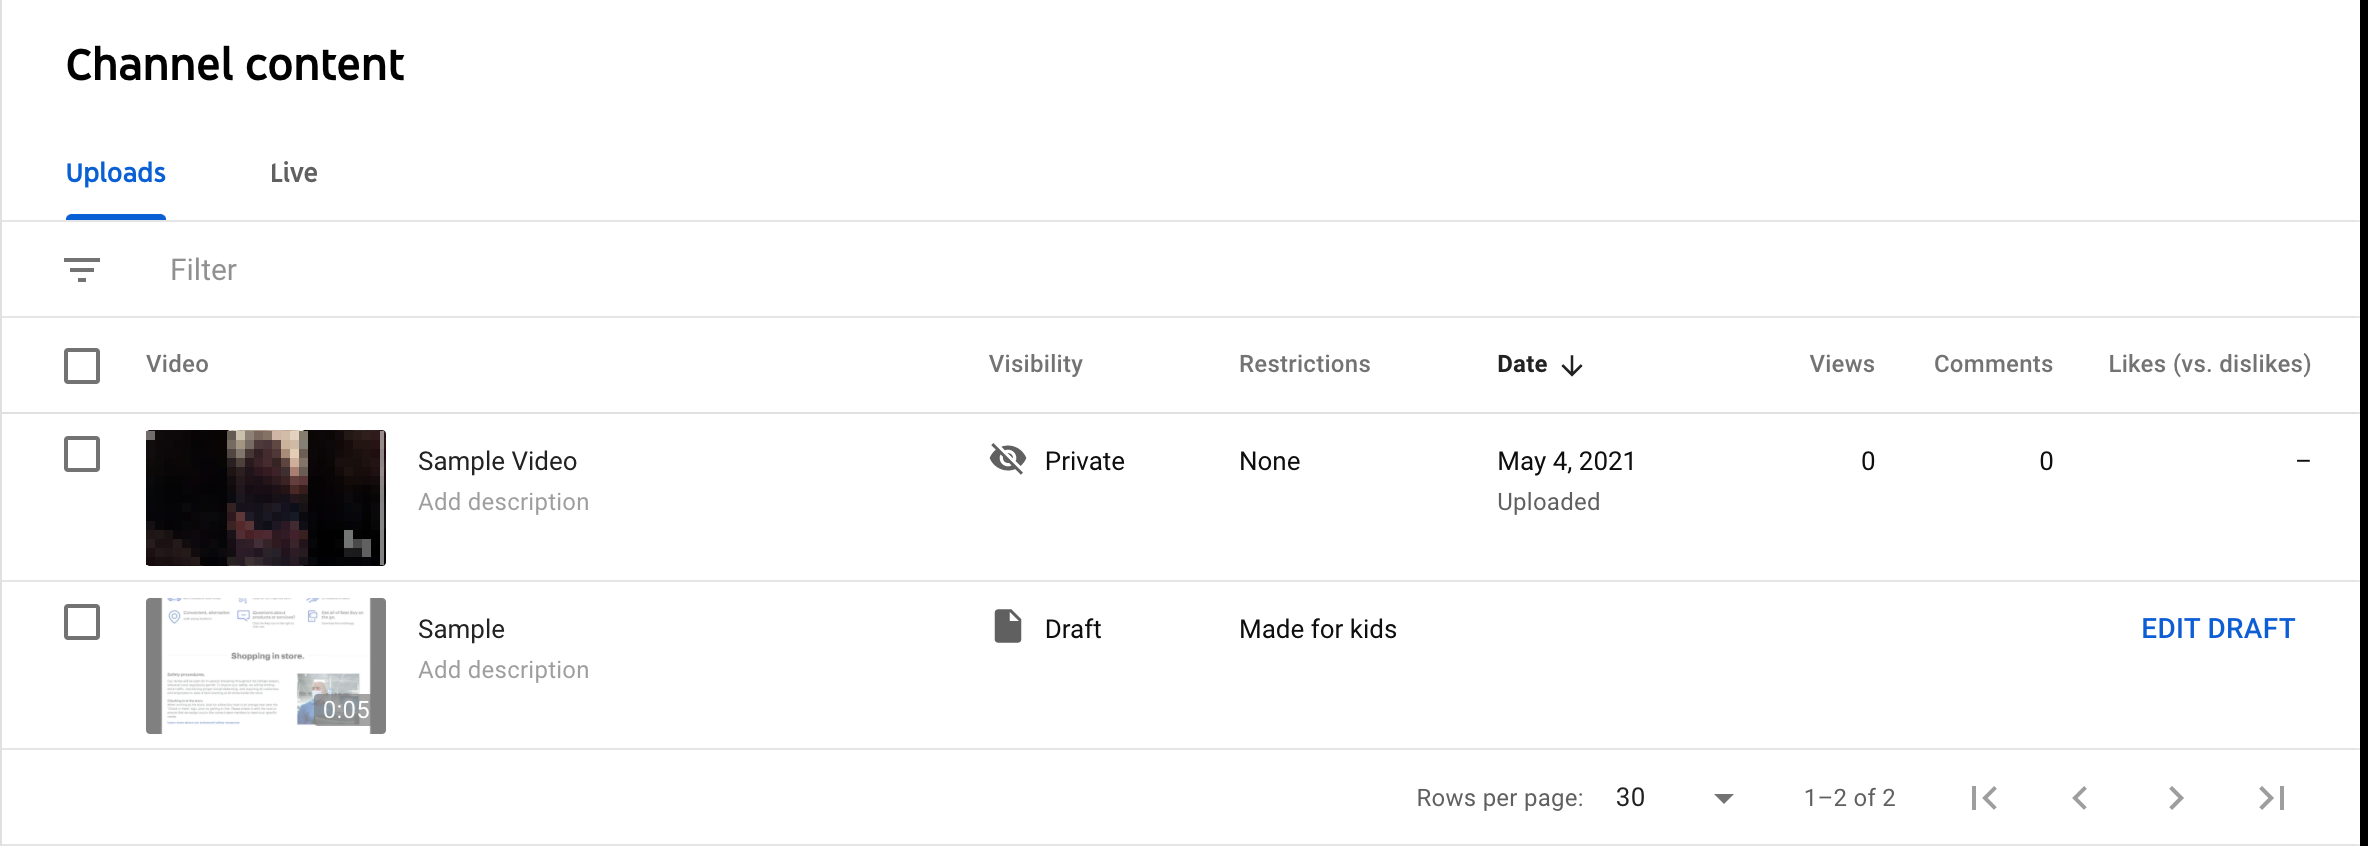
3. In Uploads, click the thumbnail of the video you want to edit.

youtube studio editor channel content dashboard

4. In the left sidebar, click Editor.

5. Trim the beginning or end of your video.

If you want to trim the beginning or end of your video, select Trim, which is next to your video’s timer and right above your timeline panel.

YouTube Studio Trim Video timeline panel

You should see a blue box around the sides of your video timeline panel. Drag them to chop off the parts of the beginning or end of your rough cut that you don’t want to include in your final published version. Click Preview to view the edit, and click Save on the top right-hand corner if you’re satisfied.

YouTube Studio Trim Video

6. Trim clips out of the middle of your video.

If you want to trim a specific clip out of the middle of your video, select Trim. Next, in your timeline panel, click the beginning of the portion of the clip you’d like to remove and press Split.

YouTube Studio Split Video

Next, in your timeline panel, click the end of the clip that you’d like to remove and press Split again.

YouTube Studio Split Video

Finally, click on the blue line at either the beginning or end of your clip and drag it to the other side to trim it out of your video. Click Preview to view your edited video, and click Save if you’re satisfied.

YouTube Studio Split Video

7. Add an end screen to your video.

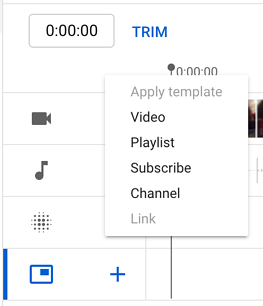
If you want to give your viewers the option to watch one of your related videos, playlists, or subscribe to your channel, click the end screen icon shown at the bottom of your timeline panel. The image below displays the end screen icon outlined in red.

youtube studio video editor timeline panel end screen icon

You can upload your existing end screen template by clicking Apply template in the pop-up menu (this is a helpful guide for creating your own) or choose from the editor’s native options: Video, Playlist, Subscribe, Channel, or Link

youtube studio video editor end screen elements menu

While YouTube’s video editing tool in Creator Studio can be helpful, you may be looking for a more robust editing tool. If this sounds like you, check out our post on
five of the best YouTube video editor alternatives.

How To Edit Videos For YouTube

While understanding how to edit your videos is essential, it’s also important to make sure you’re editing videos into a final product that users are interested in. Let’s discuss best practices to keep in mind when editing your videos during post-production. 

Create engaging thumbnails for each video.

Thumbnails are the first thing your viewers see before watching your video, so they’re your first chance to capture attention and draw in your audience. 

Your thumbnails can be screenshots of specific moments from your videos or even text-based titles, but they should be exciting and leave your audience intrigued and wanting to learn more. 

Here is a helpful guide to creating YouTube thumbnails. 

Tell a story.

Just as we do when we read a book, we want the videos we watch to tell a story. This means that your videos should have a flow and follow the fundamental elements of storytelling: having a beginning, middle, and end. 

You’ll want your story to guide viewers through what you’re sharing with them, and they won’t be left confused and wondering how one clip is related to another. This post is a thorough explanation of the basics of storytelling and how you can apply its principles when editing your videos. 

Use engaging elements in all your videos.

In addition to telling a story, adding engaging elements to your videos during editing is a great way to keep your audience engaged. 

Engaging elements can be things like images, text and shapes, animations, music, and fun transitions. Be sure to choose an element that makes sense and complements your videos, as you don’t want to take the focus away from your high-quality content. 

Create a baseline video editing style.

One of the best ways to streamline your editing process and keep your audience engaged is to develop a baseline editing style that you’ll use and apply to every video. 

This means a consistent way of editing your videos, thumbnail style, music, transitions, and any other added elements that you’ll always use. You’ll spend less time finding new elements every time you sit down to edit, and your audience will come to recognize your consistent style.  

For example, maybe you always give a snippet at the beginning of your videos of the most dramatic or exciting moment that will happen later on to draw in your audience. Keep up this consistent style with all your videos, as it will give you a consistent framework to work from and keep your audience engaged and wanting more. 

Keep it simple.

Although it can be tempting to do as much as you can to draw in your audience, it’s also important to keep it simple and not overwhelm your viewers. Too many unnecessary transitions, loud music, images, and text can distract from your video content and have the opposite effect. 

Aim to find a careful balance of original video content and supplemental elements. 

Take time to step away and come back.

Editing video can be stressful, especially if you sit in front of a computer for hours at a time. It can become easy to second-guess your work, so it can be beneficial to step away for a while so you can come back fresh, energized, and ready to make a final cut.

You can think of it like this: if you’ve been sitting at a desk for six hours editing a video, you’ve been hyperfocused on that and nothing else. You may start to feel stuck or like you’ve hit a wall and that your video is bad. If you step away for a few hours or days, you can come back to it with a fresh pair of eyes to make final edits and realize that your video is good; you just needed to take a break and come back refreshed.

Whether you use YouTube’s native tools or third-party software, editing your videos should be fun. Take the time to understand what works for the content you produce, create a consistent editing strategy, and watch the views roll in

New call-to-action

Categories B2B

The 6 Stages of the Product Life Cycle

When I was 12 years old, I used to look through my older cousin’s CD collection, a little confused.

I didn’t understand the need to have CDs when I could go on iTunes and listen to all my favorite songs. Then, when I was in middle school, I got my first hand-me-down iPod shuffle.

→ Download Now: Free Product Marketing Kit [Free Templates]

This is a great example of the product life cycle (PLC) in action. CDs were in the decline stage while the iPod was in the growth stage. Now, you’ll rarely find a CD in anyone’s music collection unless they’re enthusiasts or want to feel nostalgic for their younger years.

No one wants their product to become “obsolete” and reach the end of its product life cycle. Still, it’s important to understand what stage your product is in so you can make better marketing and business decisions. You can mature and grow in the marketplace by agilely responding to changing customer needs, adding new offerings to your lineup, and adopting new tech that keeps you up-to-date in the marketplace.

Below, we’ll learn what the life cycle is, take a look at the life cycle stages, and go over a few real-life examples.

As marketers, it’s important to understand how your tactics and strategies change depending on the stage your product is in.

For example, a brand new product will be marketed differently than a well-established, mature product. For the first, the marketing campaigns will focus on raising awareness, while for the latter, they’ll focus on maintaining awareness.

Businesses also use to product life cycle to achieve the following:

  • Establish competitive authority. If your product is new and recently introduced to the market, you can market it as a new and improved alternative to an existing product. If the product is established, you can vouch for its long history of use in your branding.
  • Decide on a pricing strategy. Depending on the life cycle stage your product is in, you’ll choose how to price the product. A new product may be priced lower to entice more buyers, while a product in the growth stage can be priced higher.
  • Create a marketing strategy. Your product life cycle stage will determine which strategy to pursue. Maturity and audience knowledgeability plays a big role in the type of content you publish on your site and social media profiles.
  • Respond before the product begins its decline. There’s no worse feeling than watching your product slowly become obsolete or be displaced by a competing product. By keeping the life cycle stages in mind, you can create a strategy that keeps you ahead of the curve as you reach the saturation and decline stages.

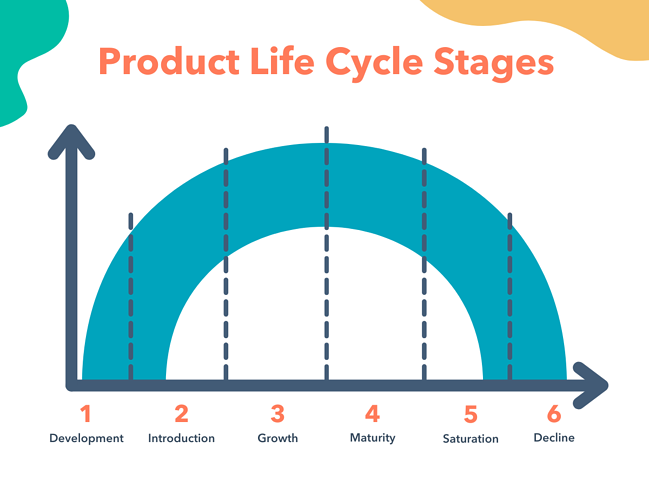
Bell curve showing the product life cycle stages

The product life cycle benefits businesses because they can shift their wording and positioning to best market the product at the stage it is in. If your product has recently been introduced and you try to market it as a long-established solution, consumers will see right through it and trust you less as a result.

Below, I’ll cover the product life cycle stages in more detail.

1. Development

The development stage of the product life cycle is the research phase before a product is introduced to the marketplace. This is when companies bring in investors, develop prototypes, test product effectiveness, and strategize their launch. Due to the nature of this stage, companies spend a lot of money without bringing in any revenue because the product isn’t being sold yet.

This stage can last for a long time, depending on the complexity of the product, how new it is, and the competition. For a completely new product, the development stage is hard because the first pioneer of a product is usually not as successful as later iterations.

Development Stage Marketing Strategy

While marketing typically begins in the introduction stage, you can begin to build “buzz” around your product by securing the endorsement of established voices in the industry. You can also publish early (and favorable) consumer research or testimonials. Your marketing goal during this stage is to build upon your brand awareness and establish yourself as an innovative company.

2. Introduction

The introduction stage is when a product is first launched in the marketplace. This is when marketing teams begin building product awareness and reaching out to potential customers. Typically, when a product is introduced, sales are low and demand builds slowly.

Usually, this phase is focused on advertising and marketing campaigns. Companies work on testing distribution channels and try to educate potential customers about the product.

Introduction Stage Marketing Strategy

This is where the fun begins. Now that the product is launched, you can actually promote the product using inbound marketing and content marketing. Education is highly important in this stage. Your target consumer must know what they’re buying before they buy it. If your marketing strategies are successful, the product goes into the next stage — growth.

3. Growth

During the growth stage, consumers have accepted the product in the market and customers are beginning to truly buy in. That means demand and profits are growing, hopefully at a steadily rapid pace.

The growth stage is when the market for the product is expanding and competition begins developing. Potential competitors will see your success and want in.

Growth Stage Marketing Strategy

During this phase, marketing campaigns often shift from getting customers’ buy-in to establishing a brand presence so consumers choose them over developing competitors. Additionally, as companies grow, they’ll begin to open new distributions channels and add more features and support services. In your strategy, you’ll advertise these as well.

4. Maturity

The maturity stage is when the sales begin to level off from the rapid growth period. At this point, companies begin to reduce their prices so they can stay competitive amongst growing competition.

This is the phase where a company begins to become more efficient and learns from the mistakes made in the introduction and growth stages. Marketing campaigns are typically focused on differentiation rather than awareness. This means that product features might be enhanced, prices might be lowered, and distribution becomes more intensive.

During the maturity stage, products begin to enter the most profitable stage. The cost of production declines while the sales are increasing.

Maturity Stage Marketing Strategy

When your product has become a mature offering, you may feel like you’re “sailing by” because sales are steady and the product has been established. But this is where it’s critical to establish yourself as a leader and differentiate your brand.

Continuously improve upon the product as adoption grows, and let consumers know in your marketing strategy that the product they love is better than it was before. This will protect you during the next stage — saturation.

5. Saturation

During the product saturation stage, competitors have begun to take a portion of the market and products will experience neither growth nor decline in sales.

Typically, this is the point when most consumers are using a product, but there are many competing companies. At this point, you want your product to become the brand preference so you don’t enter the decline stage.

Saturation Stage Marketing Strategy

When the market has become saturated, you’ll need to focus on differentiation in features, brand awareness, price, and customer service. Competition is highest at this stage, so it’s critical to leave no doubt regarding the superiority of your product.

If innovation at the product-level isn’t possible (because the product only needs minor tweaks at this point), then invest in your customer service and use customer testimonials in your marketing.

6. Decline

Unfortunately, if your product doesn’t become the preferred brand in a marketplace, you’ll typically experience a decline. Sales will decrease during the heightened competition, which is hard to overcome.

Additionally, new trends emerge as time goes on, just like the CD example I mentioned earlier. If a company is at this stage, they’ll either discontinue their product, sell their company, or innovate and iterate on their product in some way.

Decline Stage Marketing Strategy

While companies would want to avoid the decline stage, sometimes there’s no helping it — especially if the entire market reached a decline, and not just your product. In your marketing strategy, you can focus on nostalgia or emphasize the superiority of your solution to successfully get out of this stage.

To extend the product life cycle, successful companies can also implement new advertising strategies, reduce their price, add new features to increase their value proposition, explore new markets, or adjust brand packaging.

The best companies will usually have products at several points in the product life cycle at any given time. Some companies look to other countries to begin the cycle anew.

International Product Life Cycle

The international product life cycle (IPL) is the cycle a product goes through in international markets. As products begin to mature and companies want to avoid the decline stage, they’ll typically begin to explore new markets globally. When products reach mass production, manufacturing and production shifts to other countries as well.

The international product life cycle stages are identical to that of a normal product life cycle. The development stage looks differently, however, because local customs and regulations can affect how long it takes to bring the product to a new marketplace.

Beware: once you lay the groundwork in a new marketplace, your competitors will be sure to follow, and the life cycle stages will continue up until saturation and eventually decline. Your option is to either expand into another market or learn from prior mistakes and innovate before the decline stage rolls around.

Next, we’ll look at some examples of product life cycles.

Let’s follow the product life cycle of popular products that have since reached the decline stage.

1. The Typewriter

The typewriter was the first mechanical writing tool — a worthy successor to pen and paper. Ultimately, however, other technologies gained traction and replaced it.

  • Development: Before the first commercial typewriter was introduced to the market, the overall idea had been developed for centuries, beginning in 1575.
  • Introduction: In the late 1800s, the first commercial typewriters were introduced.
  • Growth: The typewriter became a quickly indispensable tool for all forms of writing, becoming widely used in offices, businesses, and private homes.
  • Maturity: Typewriters were in the maturity phase for nearly 80 years, because this was the preferred product for typing communications up until the 1980s.
  • Saturation: During the saturation stage, typewriters began to face fierce competition with computers in the 1990s.
  • Decline: Overall, the typewriter couldn’t withstand the competition of new emerging technologies and eventually the product was discontinued.

2. Vine

Skipping forward to the 21st century, we see the rise and fall of Vine, a short-form video sharing app that was the source for many a meme at its peak but eventually declined due to other platforms.

  • Development: Vine was founded in June 2012 and mainly competed with Instagram.
  • Introduction: The app was introduced to the public in 2013. Its differentiating factor was its short-form video format — users had only seven seconds to film something that was hilarious, absurd, or a mixture of both.
  • Growth: Only two years after its release, Vine had over 200 million active users. Its popularity led to the advent of the phrase “Do it for the Vine.”
  • Maturity: Because it was only in the market for a few years, Vine never reached the maturity stage. While adoption was high, it was still a fairly new app.
  • Saturation: Vine competed in an already saturated market. Instagram, Snapchat, and YouTube were the preeminent names in its category, and Vine soon started to decline in use.
  • Decline: When Musical.ly and, later, TikTok were introduced, Vine lost a large amount of its user base and shut down. It was succeeded by Byte, a similar short-form video sharing platform.

3. Cable TV

Remember the days of switching TV channels to find what to watch? I do — and they feel distinctly like something of the past. While cable TV is still around, it’s safe to say that it’s nearing the decline stage.

  • Development: Cable TV was developed in the first half of the twentieth century. John Walson has been credited with its invention.
  • Introduction: The first commercial television system was introduced in 1950, and by 1962, the technology saw the first hints of growth.
  • Growth: After a decades-long freeze on cable TV’s development (due to regulatory restrictions), the technology began gaining traction, and by 1980, more than 15 million households had cable.
  • Maturity: Cable TV matured at around the 1990s. Around seven in ten households had cable.
  • Saturation: The start of the 21st century saw an oversaturation of this technology, and it also started to compete with other modern developments such as on-demand services and high-definition TV (HDTV). While the internet was still in its nascent stages, it would soon gain on cable TV as well.
  • Decline: From 2015 onwards, cable TV experienced a marked decline. Online video streaming services such as Netflix and Hulu have taken precedence — and this trend is set to continue.

Not all products need to face the decline stage. Companies can extend the product life cycle with new iterations and stay afloat as long as they have several products at various points of the product life cycle.

Keep Your Product’s Life Cycle in Mind

Whether you’re developing a brand new product or working with a mature, well-established brand, you can use the product life cycle stages as a guide for your marketing campaigns. Each stage will dictate how you inform your audience about the product, how you position your brand in the marketplace, and how you decide to move forward after the decline stage. By keeping your product’s life cycle in mind, you can invest in better marketing campaigns that result in a higher ROI.

Editor’s note: This post was originally published in January 2020 and has been updated for comprehensiveness.

Product Marketing Kit

Categories B2B

Google Posts: The Free and Simple Way for SMBs to Leverage Local Search

In 2019, nearly one-third of online consumers in the U.S. used the internet on a daily basis to search for local businesses. And as of 2021, Google had 86.6% of the market share of search engines — meaning, getting noticed on Google is an effective way to boost business volume and find new customers.

To help companies reach prospective consumers, Google introduced a feature called My Business Posts. It allows businesses to share relevant information that appears within Google Search and Maps results themselves, rather than taking users to a new webpage.

→ Download Now: SEO Starter Pack [Free Kit]

Despite their potential benefits, however, Google My Business Posts haven’t seen significant uptake from brands. Do a quick Google search and you’ll find a My Business Help page along with a host of questions like, “Do Google Posts work?” or “Do businesses really use Google Posts?”

In part, this lackluster uptake stems from the ubiquity of Google and our own familiarity with these posts — many businesses assume that Google’s algorithms will pick and place relevant data automatically. In actuality, companies need to create and schedule their own My Business Posts.

Here’s what you need to know about the best-kept secret of local SEO — and how to make My Business Posts work for your brand.

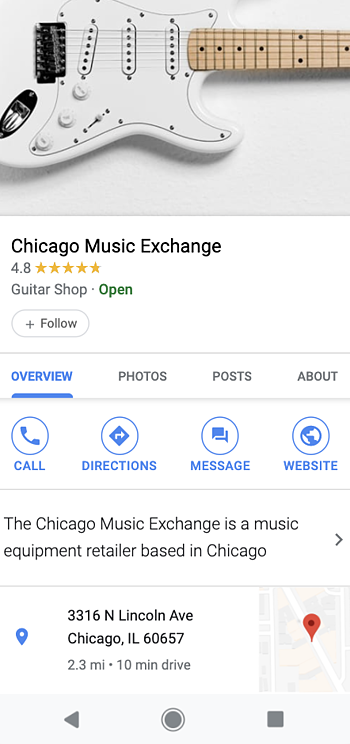
example of a google my business listing

Source

When crafting your Google Posts, you’ll have ample opportunity to grab your audience’s attention. You can describe your offer, product, or event in up to 300 words, upload an image, video, or GIF, and add call-to-actions to prompt product purchases, reservations, and newsletter signups. Your audience can share your Google Posts on social media too.

To make sure your business is constantly publishing fresh content on their search results, Google sets a seven-day life span on each of your Google Posts. The only posts that won’t expire after seven days are ones promoting events, but they’ll disappear once the events end.

Google Posts also has an analytics feature, which shows you how many impressions and clicks your posts get. This might seem like a limited amount of metrics, but they ultimately provide enough information to help you grasp which Google Posts resonated with your audience and which ones did not.

It’s also worth noting that Google My Business listings are free to create, schedule, and post.

While it’s logical to assume that Google would try to monetize the surging popularity of local search by selling ad space on company listings, the search giant decided to do the opposite — they gave every company with a Google My Business account access to a tool that lets them advertise on their business listings for free. Posts created with Google My Business will appear both in Search and Maps results, making it easy for users to find what they’re looking for without being redirected.

How to Use Google My Business Posts to Get Customers

Originally launched as “Candidate Cards” in 2016, Google Posts would only show up in relevant search queries for political candidates who wanted to promote their brand on the search engine.

A few months later, Google decided to roll them out to a select group of small businesses. And by July 2017, the search engine made Google Posts available to every business with a Google My Business account.

Giving every business the opportunity to use Google Posts levels the playing field in the digital marketing space. SMBs without much SEO expertise are now able to leverage the massive reach of local search to grow their business. Consider that for the first six months of 2020, calls to businesses driven by data on My Business Posts rose 61% as customers grappling with pandemic pressures looked to verify if companies were open, closed, or somewhere in between.

Ready to try making a Google My Business Post? Here’s how.

Let’s break down each step in more detail.

1. Log into Google My Business.

Start by signing into your Google My Business account on your desktop or mobile device. If you have more than one location, select the location you’re creating the post for and then select “Posts”.

Worth noting? You can also create a post directly from Google Search. First, make sure you’re logged into your Google My Business account, then search for and select your business profile. Click “Promote” to get started.

how to log into google my business

Source

2. Choose the type of post you want to create.

Next, choose the type of post you want to create — Update, Event, Offer, or Product.

Now, you can add elements including photos, videos, texts or buttons. 2020 also saw the addition of COVID-19 Posts, which can be used to add temporary business hours, operating conditions, or safety and hygiene notices.

how to Choose the type of post you want to create in google my business

Source

3. Craft the post.

If your content isn’t engaging, regardless of the strength of your marketing strategy, it won’t produce results. Crafting captivating content is the only way you’ll attract your audience’s attention and gain their trust. To effectively connect with people and inspire action using Google Posts, here are three copywriting tips you can follow.

1. Create headlines that appeal to people’s self-interest or give news.

With only 58 characters to spare in your title, you must get to the point of your offer. But to get people to click, you also need to clearly communicate your offer’s value, benefits, and relevance. How do you grab someone’s attention with such little room to work with?

  • Headlines that appeal to the audiences’ self-interest
  • Headlines that provide news
  • Headlines with attention-grabbing words and phrases
  • Headlines that are clear, easy-to-read, and fluff-free

2. Publish Google Posts that are clear, concise, and compelling.

Even though you technically have up to 1,500 characters to describe your offer, only the first 100 characters show up in Google’s knowledge panel.

To immediately hook people and persuade them to click on your offer or read the rest of your description, try sticking to one message per Google Post. Spotlighting your offer’s main benefit or feature, especially in the first 100 characters, will make it easy for your customers to understand its value and increase the likelihood of their click-through.

Another way to boost your Google Post click-through rate is by leveraging scarcity. People value objects and experiences that are rare — having something that most people want but can’t have, boosts our self-worth and sense of power.

And since each Google Post has a seven-day lifespan, you can also align your offer’s deadline with your post’s expiration date and use words and phrases that evoke a sense of urgency, like “Exclusive offer” or “Limited availability”. These psychology-backed tactics will skyrocket your offer’s perceived scarcity and, in turn, its consumer demand.

3. Use a large, high-quality visual to make your Google Post stand out.

On a website that’s dominated by text, vivid visuals are refreshing and eye-catching. But supplementing your copy with a standard stock photo or amateur iPhone picture won’t grab anyone’s attention. Vibrant photos will make your Google Post stand out and grab the attention of your audience. So, make sure you take photos or record videos with good framing, lighting, and a decent camera.

You also want your visual to take up most of the space on your post, so make sure your photos have the minimum image resolution of 720 pixels by 520 pixels.

4. Publish your post.

When you’re ready to go live, click Publish. If you’d prefer to see what your post will look like before publishing, select Preview. Don’t like it? Click Back, then Edit to refine your My Business Post. Once live, your post will be visible on both Google Search and Maps results.

5. Check your post status.

If your post isn’t coming up on search results, head back to your My Business account to check the status. “Live” means it should be visible on both Search and Maps results, while “Pending” means it may be in the uploading stage, the processing stage, or is being verified by Google.

If the post status says “Not Approved”, it won’t show up on Maps or Search, but the question mark icon next to the post will show which content policies the post currently violates.

Google My Business Post Examples

Let’s take a look at a few engaging My Business Post Examples

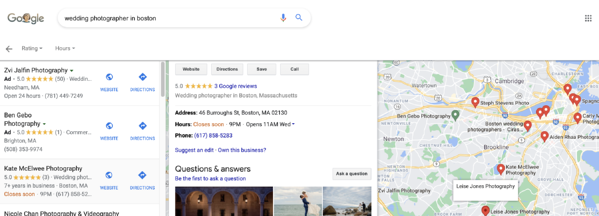
1. Kate McElwee Photography

When you search “Boston wedding photographers, you’re shown a list of photographers in a list on the left-hand side of the page and their locations on the right-hand side of the page on a Google Map.

Screen Shot 2021-05-04 at 8.07.59 PM

Source

2. Boston Yoga Union

When you Google “Boston Yoga Studio”, a number of options appear in a list on Google. You’ll see the results on the Google Map.

boston yoga union example of how google my business works

Source

If you click on one of the photographers in the list, you’re shown their contact information, hours, rating, and samples of their photography, all without ever having to leave the Google Search results page.

boston yoga union example of google my business

Source

3. Bostonia Public House

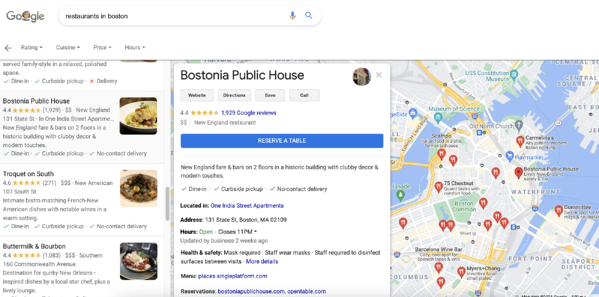
If you search “restaurants in Boston” on Google, you’ll be shown a long list of restaurants paired with a Google Map showing you where each restaurant is located.

If you click on a restaurant in the list, as I did with Bostonia Public House in the screenshot below, you’ll be able to “Reserve” your table without ever leaving Google. You also have access to the menu, reviews, images of the restaurant, and more all on this page.

Screen Shot 2021-05-04 at 8.05.54 PM

Source

Use Google My Business Posts to Maximize Local SEO Marketing

As a free and easy tool for connecting with customers, Google My Business Posts offers massive potential for local SEO marketing. The caveat? While your posts will appear on both Maps and Search results, generic content won’t get noticed in an increasingly competitive marketing landscape.

In effect, Google provides the tools you need to get the job done — but it’s up to your business to create compelling, context-aware content that captures consumer attention.

Editor’s note: This post was originally published in September 2018 and has been updated for comprehensiveness.

marketing

 
Click here to get everything you need to get your website ranking in search.

Categories B2B

The 3 Things Your B2B Content Needs to Succeed in a Post-COVID World

This blog features research from NetLine’s annual State of B2B Content Consumption and Demand Report for Marketers. To learn more about the buying behaviors of B2B professionals, download the 2021 Content Consumption Report.


When we encounter the unknown, we usually do so very cautiously.

In March 2020, when “The Pause” came upon us, the expectation was that things would, “return to normal” within a few weeks, maybe a month or two at max. I don’t need to tell you how wrong we all were.

Putting all of the unknown COVID presented to us as a species aside, perhaps what impacted us the most was the sense of limbo we all felt in the early days of lockdown. For many, this period of purgatory extended into every aspect of their lives, allowing everything they experienced to be called into question.  

In the course of all this questioning, we realize how little trust we have in so much of what’s before us.

“In a post-Covid world…trust is everything.”

In her 85th edition of her brilliant fortnightly newsletter, Total Annarchy, my Instagram BFF Ann Handley wrote those words. While the context was different, the statement remains correct. 

Regardless of whether your company is based on in-person foot traffic or a cloud-based service, everyone felt COVID’s impact. The behaviors of consumers and how they evolved during 2020 forced businesses back to the drawing board. As Jay Baer said last Summer, it was important for everyone to disclose the state of their operations. Questions as benign as, “Are you open?” became incredibly relevant to customers who genuinely didn’t know.

Research from McKinsey highlighted how consumer shopping behaviors changed during the height of The Pause. I wouldn’t be burying the lede to say that trust influenced quite a bit of these decisions.

While there was a considerable push to drive local economies during the Spring and early Summer of 2020, consumers eventually returned to big brands they knew and trusted in a big way. According to the article, “large consumer-goods manufacturers represented ~50% of sales in 2018, they accounted for only 16 percent of the growth in 2015–18, that share of growth rose to 39 percent in 2018–19 and reached 55 percent in the first three weeks of April 2020.”

McKinsey’s analysis projects that the scale of a brand will once matter again. “Big brands are again winning consumers’ trust.” The reason that big brands seem to be winning greater market share now is because what they deliver is often (or has a larger chance of being) more predictable. 

While this research only talks about B2C businesses, the same lessons can be applied to B2B organizations, too. 

Why Successful B2B Content Marketing Requires These 3 Elements 

In analyzing more than 40 Petabytes of B2B content information, our research surfaced three key elements that, when used correctly, give B2B Marketers the best opportunity to build tangible success through content. Naturally, there is connective tissue that binds all of these elements together: Trust.

While trust has always been a pillar of every business relationship, COVID revealed just how crucial it truly is. To achieve success moving forward, your Content Marketing must convey to prospects and clients that your business is not only a trustworthy partner but also reliable enough to depend on you. 

Security

COVID took everyone by surprise and impacted revenues across the board. Moving forward, businesses are going to do everything they can not be caught off guard again.

To do this, organizations will do their best to build strongholds, not only for themselves—like the increased interest seen in database management content—but as a means to identify and align with allies who can accommodate seamlessly without introducing any kind of doubt or volatility, within their own ecosystem. 

Predictability

While safety offers a degree of expectation, predictability raises these expectations. Sure predictable might sound boring, but in reality, after a year plus of, “who know what’s next,” certainty is sexy. 

To confirm this, we need look no further than the surge in consumption from professionals in the Legal, Insurance, and HR fields. Their desire to better protect and predict the hurdles their employees and employers/clients/businesses will encounter lead them to consume as much content associated with COVID, remote work, and every human resource implication imaginable as they could. These pros knew that they would be the ones expected to answer questions regarding these topics while simultaneously acting as a calming and reassuring presence. (No pressure, guys.)

Simplicity

Hundreds of thousands of businesses claim to cover ABC. Unfortunately, most of the time they can only handle R, K, and sometimes C. How on earth can prospects figure out what you do well if you’re not even sure?

The Pause gave companies a chance to reinforce what you offer customers starting from the ground up. Things like your FAQs, About section, and the homepage of your website (the cornerstones of your messaging) were easy candidates for pieces that needed a good hard look. Take a look at them now; is what you do to help businesses understood and expressed clearly and simply? If not, you’d be well-served to revisit this and try to boil it down into the simplest terms possible.

The basics are the basics for a reason. Businesses are looking for content that gives them a foundational path forward: “What do I need? What do I do?” Sweat the small stuff—because your potential customers are, too. This is especially true when their backs are against the wall.

Root Your Content in Trust

We all know that without trust, we have nothing. 

As we’ve highlighted through this blog, trust means way more today than it did just 15 months ago. If you’re able to convey why your business is an expert worthy of being trusted in your industry, you stand to outperform your competition.

By focusing on Simplicity, Predictability, and Security, you’ll better anticipate the needs of your clients and prospects and in turn have the opportunity to win something just as prized as their business: Their trust.

The full 2021 State of B2B Content Consumption and Demand Report for Marketers is now available.

Categories B2B

How to Get to Know Your Email Subscribers, According to Research

One of the first things I do every day is check my email. And I’m not the only one.

Did you know that roughly 80% of marketers have reported an increase in email engagement in 2020?

And that the number of global email users is set to grow to 4.48 billion users by 2024?

Additionally, email marketing has the highest return on investment for small businesses and is the second most effective medium for building brand awareness.

Wow. Those stats alone serve as a reminder that email marketing is not a thing of the past. It’s continuing to grow and is a major way that brands learn about and engage with their customers.

As the adage goes, email marketing is about sending the right message to the right people at the right time.

But, how do you do that?

In this post, let’s review the top strategies you can use to get to know your email subscribers according to research.

→ Download Now: The Beginner's Guide to Email Marketing [Free Ebook]

1. Use analytics.

A great way to learn about your current email subscribers is to dive into your analytics. Find out what emails perform best. Is there a pattern? What topics is your audience most interested in?

What emails do they engage with the most? What day/time are your open rates higher?

Analytics can help you figure all of this out so you can be in touch with and provide content that your audience wants.

Cynthia Price at Litmus says, “If emails could talk, you could learn a lot about your subscribers. Oh, wait. They do. Open rates, click-through rates, and other standard email metrics all give you signals. They’re interested. They’re not. They’re done.”

But how do you optimize other things like templates? Or apply what you learn in your email program to other channels?

Price explains, “With analytics that go beyond opens and clicks. When you know which email clients your subscribers use, you can optimize the experience for them. For example, what if the majority of your subscribers are on mobile and using Dark Mode? You’ll want to incorporate that into your design strategy and QA & testing process. Or let’s say you know an email has a high forward or print rate. You might have a possible viral piece of content on your hands. Don’t miss out on insights like these—see what your subscribers are telling you.”

Ultimately, monitoring your metrics will help you identify what your audience is interested in.

2. Participate in social media listening.

Did you know that 37% of consumers find purchase inspiration from their social media channels?

Paying attention to what your audience is doing on social media will help you learn more about your consumers so you can understand the content that they want to see.

Think, “What are they interacting with on social media? What type of information are they looking for?”

With this information, you can learn what content your audience really enjoys.

3. Send polls.

This might seem a little too straightforward, but honestly, the best way to learn about someone is to ask them questions.

Send out polls in your emails and learn about your audience.

For HubSpot’s Service Blog, the daily email newsletter includes a question of the day. This helps us learn more about our audience on a regular basis.

4. Conduct A/B testing.

A/B testing is one of the most reliable ways to learn what type of email content your email subscribers react well to.

In fact, companies that A/B test every email see email marketing returns that are 37% higher than those of brands that never include A/B tests.

You can use A/B testing to see what types of subject lines work best, what type of email copy, and more.

Price says, “You can optimize content by A/B testing like 90% of marketers. Or personalize to deepen engagement. Birthday emails are said to get 3.42 times the revenue of a standard promotional email.”

5. Segment your lists.

Segmenting your email list when you learn more information about your audience will help you send better, personalized emails.

Emails that have personalized subject lines are 26% more likely to be opened and marketers have found a 760% increase in email revenue from segmented campaigns.

Essentially, email segmentation can help you increase open rates and improve click-through rates.

When you go to segment your list, segment by how people found your page. What were they signing up for? For instance, someone who purchased a product and someone who downloaded a specific lead magnet will be interested in different email newsletters.

You might segment your list by people who want to learn about blog posts and those who are interested in sales information.

Additionally, you can segment by location. Or maybe even open rate — send emails to your most engaged subscribers.

This will help you send the right emails to the right people.

6. Do buyer persona research.

If you don’t have a buyer persona, you might consider creating one. This will help you understand your subscriber’s problems, goals, challenges, values, demographic information, and more.

Conducting buyer persona research will mean that you’ll interview customers and learn about their preferences. Then, create a fictionalized version of your customers based on real data. This is another reason why it’s so important to use your analytics to learn more about your subscribers.

7. Try new things.

Getting to know your email subscribers can be a fun way to experiment with email marketing. Try new things and see what your audience responds to. You can try different types of content, different rich media, or different subject lines.

With email marketing on the rise, it’s important to optimize your strategies. You need to really know your email subscribers to reap the benefits of email marketing.

New Call-to-action

Categories B2B

3 Easy Steps to Build Your Brand Promise [+10 examples]

If you’re a decent human being, you always honor a pinky promise.

For the uninitiated, a pinky promise is usually between two people and it holds more weight than a spit shake, legal contract, verbal agreement, and “I swear on my [insert family member]” statements combined. It’s part of our social contract – once it’s been agreed upon, it cannot be broken.

Download Now: Free Brand Building Guide

A brand promise is the scaled, commercial version of the pinky promise, with the brand holding up one finger and its target audience holding up the other.

Except, in this case, breaking it won’t just ruin your reputation, it can impact your revenue.

Let’s talk about how to create a brand promise and see examples from popular brands.

What is a brand promise?

A brand promise reveals what consumers can expect from a brand across all touchpoints. It serves as a company’s foundational value and informs every aspect of the company, from its messaging to its customer service.

Your brand promise should be central to your company, something that remains constant as it grows and evolves.

Not every brand promise is explicit. In many cases, it’s more of an internal mantra that’s shared with employees, investors, and partners. However, when you have built a strong brand identity and clear messaging, your brand promise can be assumed by your target audience.

There’s often some confusion between a brand promise and a tagline, so let’s break it down.

difference between brand promise and tagline

While it can be just as short as a tagline, a brand promise tells consumers, “Hey, this is what you’ll find every time you interact with our brand.”

So, why have one? Well, a brand promise:

  • Helps internal and external stakeholders know what to expect from you.
  • Gains consumer trust.
  • Serves as the foundation from which you build out how your company operates from a consumer interaction perspective.

One thing to note about a brand promise, it is a promise after all. So when you break it, it can affect your reputation and your revenue.

For instance, let’s say your brand promise is something like “Innovation at every turn,” and your company hasn’t come out with something new and fresh in the last five years, that can deter potential consumers.

Here are the most common types of brand promises:

  • Emotional: A promise appealing to emotion.
  • Action-based: A promise tied to a specific action.
  • Social: A promise based on ethical or social responsibility.

How to Build a Brand Promise

1. Focus on your audience.

Your brand promise outlines your commitment to your audience. So, to figure out what your promise should be, your first step is determining what your audience wants from you.

It goes beyond a specific product or service, it’s more specific to the experience you’re providing.

For instance, Planet Fitness‘s brand promise is based on people’s reluctance to join the gym for fear of judgment and embarrassment. The brand, in response, promises to create an environment that encourages people at all fitness levels to go to the gym and feel comfortable working out.

Another goal of your brand promise is to set you apart from your competitors. What makes you unique, is it your customer service, your product, your mission, your values? Use that to offer a promise that’s distinctive.

In Planet Fitness’ case, the brand did something no one else had done: Address the problem with the gym environment, not its users.

2. Think about your customer touchpoints.

With your brand promise, you’re guaranteeing something to your customers.

As such, place yourself in the shoes of your consumers and envision how you want those interactions to go. Is there a specific feeling involved? What do they have to gain?

Once you put those into words, you’ll be able to craft a brand promise that reflects the experience you want to promote.

3. Keep it simple, unique, and inspiring.

Your brand promise should be clear and to the point, something you can say in one sentence. It won’t necessarily be as fun as a tagline, but it should definitely inspire trust and confidence.

If you can’t articulate your promise in this way, perhaps you haven’t fully fleshed out your brand’s purpose. If that’s the case, start by asking yourself these questions:

  • What should my customers expect from me?
  • What does my company stand for?
  • What makes us unique?

Brand Promise Examples

Keep in mind that some of these examples of brand promises are assumed and some have been shared by the companies. Use them as inspiration when crafting your own.

  • HubSpot – Help millions of companies grow better.
  • Nike – Inspire every athlete in the world.
  • Apple – Think differently.
  • Starbucks – To inspire and nurture the human spirit – one person, one cup, one neighborhood at a time.
  • Coca-Cola – Refresh the world in mind, body, and spirit, and inspire moments of optimism.
  • Anima Iris – Feel empowered and emboldened.
  • Telfar – Redefine luxury as accessible and inclusive.
  • Tru Colour – Celebrate our differences.
  • Noirbnb – Create a safe space for POC to travel and discover new adventures.
  • Pur Home Clean – Change the way you think about cleaning.

What’s common across all of these promises is that they never refer to a particular offering or numerical goal. Instead, they are statements that encompass the brand’s broader purpose.

Brand Promise Template

There isn’t an exact formula to create your brand promise. However, we have mentioned that it is a blend of a few things that make up your company. So here’s a formula you can use to create your promise:

Positioning + Vision + Value Proposition = Your Brand Promise

Write your answers down and start blending these concepts together into one succinct idea.

Crafting your brand promise should be a top priority when developing your identity. Without this core message, you will likely struggle to develop your brand identity and strong messaging to connect with your target audience.

As with everything, expect to have a few iterations. You won’t always have the answer right away.

It may take a few sessions to flesh it out and that’s OK. Because once you have it, it will become ingrained both internally and externally as your company grows.

New Call-to-action