Categories B2B

Instagram Reels vs. TikTok vs. Snapchat: Which Should Businesses Use? [Marketing Professional Data]

Remember Vine? Despite its huge initial growth, the six-second looping video app was discontinued by Twitter in 2016 — only four years after its launch.

Since then, we’ve seen apps like Snapchat, Instagram’s Reels feature, and TikTok fill its void. They allow users to express their creativity with short mobile videos while attracting Gen Z and millennial audiences. They also feel more niche and non-traditional than older platforms, like Facebook or Twitter.

Download Now: Social Media Trends in 2022 [Free Report]

Snapchat, which launched in 2011, allows users to create video-based stories about their lives and send video or image-based messages to their friends. Unlike most other apps, Snapchat content expires either immediately or after 24 hours. This platform leads to users creating content that is more lighthearted on uncensored than other more public-facing platforms.

Meanwhile, TikTok, which launched in just 2017, is similar to Vine in that it allows users to create 10 to 60-second looping videos that can be seen on their profiles or can be algorithmically placed on feeds of users with similar interests or demographics.

Instagram Reels, launched in late 2020, is the platform’s answer to TikTok. The similarities between the two are many — they both allow users to quickly create short-form videos and add filters, effects, and music. However, the most noticeable difference between the two is the length of videos. A Reel is capped at 60 seconds, whereas a TikTok video can reach 3 minutes.

At the moment, all three apps continue to grow. Instagram has 500 million daily users globally, closely followed by Snapchat with 306 million. Not to be outshined, TikTok hit a big milestone towards the end of 2021 — 1 billion daily users.

Despite each platform’s growth, marketers in the social media realm are wondering, “Are any of these worth the hype? Or will they just become another Vine?”

It’s no secret that short-form videos are dominating the social media landscape, and it doesn’t appear to be slowing down. 31% of marketers currently leverage short-form video and 29% plan to leverage it for the first time in 2022. But where, exactly, do they plan to invest?

To learn more about the strength of these three apps, the HubSpot Blog surveyed 1,000+ marketers to find out where they’re investing their time and money.

When asked which platforms marketers plan to increase their investment in this year, TikTok came out on top (62%), with Instagram following closely behind (54%).

But how do these apps fair for ROI? When asked which platform resulted in the biggest ROI in 2021, 18% of marketers responded with Instagram, earning a second place spot. Meanwhile, TikTok landed in fourth place at 12%. As for Snapchat, it didn’t make the top five — but you shouldn’t cross it off your list just yet (more on that later).

Below, I’ll walk you through the ins and outs of TikTok, Reels, and Snapchat, their distinct differences, and the marketing opportunities that each app could provide you now and in the future.

Snapchat vs. TikTok: A Head-to-Head Comparison

User Base

Instagram, Snapchat, and TikTok claim to have predominantly Gen-Z and millennial audiences. In fact, a recent study found that Snapchat, Instagram, and TikTok were the platforms of choice for Gen Zer’s.

According to 2019 data from Snapchat, 90% of 13 to 24-year-olds use Snapchat. Similarly, more than half of TikTok’s global audience is under 34. Meanwhile, Instagram holds nearly equal sway with both Gen-Z and millennial audiences.

The three platforms also have incredibly global audiences. While Snapchat has a large number of users from India, TikTok has such a large user base in China that it has a Chinese version of its app called Douyin. As for Instagram, India and the United States hold the top spots as the countries with the highest number of Instagram users.

Platform and Features

Snapchat’s format includes three main pages: a Friends page, the camera, and Discover. The Friends page shows a list of the user’s friends where it allows them to open Snaps or see each user’s Story. The other two pages are its camera and Snapchat Discover.

While the camera is pretty straightforward to visualize, here are screenshots of the Friends Page, Camera, and Discover:

Image Source

Discover is specifically for brands and publishers to post Stories. While the Friends page allows you to access Stories that have been filmed or created by friends natively in the app, Stories published by brands on the Discover page are often high quality and include graphic designs, edited imagery, animation, or production quality video. Here’s a detailed post about how brands are leveraging Snapchat Discover.

TikTok also has a few central pages. One is a feed that allows people to see videos from their followers or that TikTok algorithms will think a user is interested in.

Image Source

Aside from the feed, users can click on the Search page to see both a search box and highlights of all the trending topics on TikTok. The other two major pages are the app’s camera and the user’s profile page.

Here’s where Instagram Reels is different — while TikTok and Snapchat are standalone platforms, Instagram Reels is just one feature within the app.

Image Source

Instagram Reels has a few central pages — the camera, the feed, and the Explore page. When users record a Reel, they can share it with their friends on their private feed or, if they have a public account, make it available to the broader Instagram community through the Explore page.

Regardless, your Reels will live in a designated tab under your profile. You can also share your reel to your Story, close friends, or in a direct message.

Want to learn more about how to navigate and create posts on each app? Check out our guides on how to use Snapchat, TikTok, and Instagram Reels.

Content on Each Platform

Snapchat is primarily an app for friend-to-friend content which includes text and video-based messages that people post to their daily Stories or send specifically to friends.

However, on the Discover area of the platform, marketers can create advertisements and Story editions with videos and graphics to promote their own products or services. Here’s an example of a Story from Snapchat Discover that highlights a Los Angeles-based manicurist:

Since TikTok allows you to instantly publish public videos, the platform is great for both branded and non-branded content. Much of the content you see on TikTok is short, looping skits, mini-music videos, or vlog-styled clips.

Like Snapchat, Instagram Reels can be shared amongst friends or made public to the larger community. But in order for your Reel to go viral, you need to be picked for the Explore page. When this happens, you’ll receive a notification letting you know that your video has been selected. This can happen anywhere from immediately after posting to a few days after publishing.

Plus, with the integration of Shopping and Branded Content features, we’re seeing businesses use Reels as a tool to promote products and partner with influencers to create branded content.

Which platform is better for content marketing?

Each platform has its pros and cons for content marketers. Here’s what you should keep in mind about each.

TikTok

If you’re aiming to target Gen-Z and on an incredibly limited budget, TikTok’s app might be worth experimenting on. Because of the way the app is formatted, users can more easily find your company page, follow you, or search for your content than they can on Snapchat. You can also further optimize videos with hashtags and keywords.

However, if you’re looking for website traffic, or don’t have time to experiment with TikTok, you’ll want to hold off for now. The platform is still highly experimental and only allows certain brands to link their videos to web content.

Snapchat

On Snapchat, marketers will mainly thrive on the Discover page. While partnering with Snapchat to become an official Discover publisher might be inaccessible at the moment, you can still purchase ads on the platform that similarly allow you to tell users a visual Story about your product. These ads can even get high placement within Discover feeds.

One thing to note is that Snapchat Discover-based ads are much shorter than the Stories of Discover publishers. This means that if you want to create long-form Story content to highlight a product, service, or brand, you might want to try Instagram Reels or consider TikTok experimentation.

Aside from Discover, creating an individual account has not proven to be hugely beneficial for brands because users still have to friend them to see their content. Brands also can’t add links to this content like they do with ads.

However, if you’re looking to create short, bite-sized content for web traffic, conversions, or high placement on a social app that’s popular with Gen Z or millennials, Snapchat’s ad program still might be right for you because although the Stories you’re allotted are shorter, you can still flex your creative muscles to quickly promote a product.

Instagram Reels

We like where Instagram Reels is going when it comes to branded content. With Branded Content Tags, influencers can disclose when they’re creating branded content which increases transparency and makes it easier to create and share branded content.

Further, as Reels continue to earn its place on the app, we expect to see more video editing tools and insights.

User Behavior

Each of these apps have one primary goal: to keep users entertained on their respective platforms as long as possible. And, based on stats below, these applications do successfully keep users engaged.

Snapchat users spend an average of 26 minutes daily on the app and users create an average of 2.1 million Snaps per minute. Meanwhile, TikTok users spend an average of 52 minutes on the app daily as 90% of its user base logs in more than once a day. On average, Instagram users spend 53 minutes per day on the app — although we don’t know how much of this time is spent on Reels specifically.

Although Snapchat is an app that encourages connecting with friends, more and more users are beginning to use it as a part of their shopping process. According to a 2019 Snapchat report, Snapchat users involve Snapchat in their buyer’s journey 35% more than Twitter and 58% more than Facebook.

Instagram Reels is also involved in the buyer’s journey. By integrating Shopping features, businesses and creators can tag products when they create a Reel, making them fully shoppable. When a viewer taps the “View Products” button, they can either buy, save, or learn more about the products.

Instagram Reels also integrates with Instagram Checkout — a feature that allows users to purchase products without leaving the app.

Image Source

When it comes to TikTok, there aren’t many public stats related to advertising engagement just yet. However, brands have gone viral on the app, especially when creating hashtag challenges related to new product offerings. One example of this was Guess’ #InMyDemin challenge. During the challenge, people posted videos of themselves in Guess’ new denim clothing line. These TikTok videos then reportedly racked up a total of 3.8 million views.

As TikTok aims to gain more advertisers, you can probably expect to see more information coming soon about how users interact with advertisers.

Which user base is better for marketers?

While Gen Z is flocking to TikTok, there’s a broader age group of both Gen Z and millennials on Snapchat and Instagram Reels.

Although users spend more time on TikTok and Instagram, they also use Snapchat as a utility app to connect with friends and log into it multiple times per day. This might mean that people see value in the app, other than entertainment, which is the pure mission of TikTok’s platform.

Marketing Opportunities

Instagram Reels, Snapchat, and TikTok are trying to make their applications more enticing to advertisers. Here’s a breakdown of each.

Snapchat

At this very moment, there are only two marketing options for brands on Snapchat and they’re both more accessible to mid-sized or large companies than smaller businesses. The first, and seemingly most profitable, is advertising. Snapchat advertising has been seen to provide ROI related to both in-store and online store purchases.

Snapchat ads also allow you to present your ads in Snapchat’s Discover, similarly to branded publishers. However, unlike Snapchat Discover publishers, you can link ads or paid mini-Stories to your website, which could be beneficial to your traffic or online conversions.

Posting Stories as a publisher on Snapchat Discover is the other option. However, to become a publisher, you need to have a specific contract with Snapchat rather than simply signing up online. You also need to create Story-styled, original content that really engages with users. Discover publishing is also meant to keep users in the app, meaning that you won’t be able to place links into this type of content.

To learn more about how brands are leveraging both ads and Stories on Snapchat Discover, check out this blog post for a detailed list of examples and takeaways.

TikTok

TikTok only launched in 2017, but it’s already expanding its advertising options. It’s become a viable option for brands willing to get creative with their digital marketing. So much so, it launched TikTok for Business in 2021, allowing marketers to create and manage ad campaigns on the platform.

That said, TikTok ads come at a premium cost compared to other platforms. Reports from AdAge in late 2019 show that TikTok’s cost of advertising can be between $50,000 to $120,000 depending on the ad format and duration.

Although these costs are steep for small businesses, the good news is that there are many different ways to advertise on the platform besides its native paid advertising program.

Instagram Reels

Instagram Reels earns a gold star when it comes to marketing opportunities. Despite being criticized as a “TikTok copycat,” its rolled out numerous Shopping features that separate it from the pack.

Further, it may be more cost effective than TikTok. Creatopy, an ad design platform, published a case study comparing the performance between TikTok and Instagram Reels. It ran identical campaigns on both platforms — both had a total spend of $1,000 on each, the same video, ad copy, and landing page. They also targeted similar audiences.

The results were staggering — reach on Instagram Reels was almost double than on TikTok and impressions were almost triple. It cost them $2.60 to reach 1,000 people on Reels, compared to $5.03 on TikTok.

Of course, there are a lot of factors to consider when comparing two platforms, even when you use the same ad. It’s also important to remember these apps are continuously updating their algorithms and features. This study could have very different results a few months from now.

Weighing Snapchat, TikTok, and Instagram Reels

Although Snapchat is more mature, TikTok’s newness makes it a great place for side experiments — especially when targeting Gen Z. Not only is content creation free on the app, but the platform is so new that nearly everything is experimental.

If your goal is to increase conversions and work with influencers, Instagram Reels is your best bet. Instagram is the platform of choice for influencer marketing, and its shopping and branded content features enable visitors to engage and convert without leaving the app.

That said, if you’re more interested in marketing to professionals or those in B2B industries, table these platforms and focus on the more traditional social media networks.

New call-to-action

Categories B2B

How to Share an Instagram Story in Under 5 Steps

Have you ever watched an Instagram story and thought, “[Insert name of friend] needs to see this?”

Download Now: Free Instagram for Business Kit + Templates

One of my favorite aspects of Instagram — and social media in general — is its shareability. For businesses, it’s also a great way to engage your audience, share relevant content, and tell a bigger brand story.

However, when it comes to reposting content on Instagram, the steps aren’t always straightforward. Here, we’ll cover how to share content to your Instagram story.

Table of Contents

How to Share an Instagram Story

How to Share an Instagram Post to My Story

Why Brands Share Instagram Stories and Posts

As I mentioned above, businesses can repost content on Instagram to engage their followers and share on-brand content.

But what, exactly, should you share? It’s a good idea to share content that meets at least one of the following criteria:

  • The content is directly related to my brand
  • The content reflects my brand’s aesthetic
  • A customer has tagged or mentioned my brand
  • My followers will find the content valuable

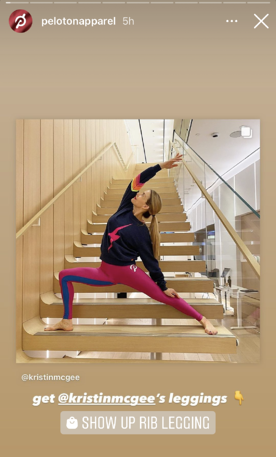
Here’s an example — Peloton’s apparel brand, @PeletonApparel, regularly shares posts from customers wearing its clothing – and they typically add a call to action, such as a link to its shop. It’s an excellent way to leverage user generated content to engage a community and build brand advocates.

peleton

A word of caution here — when it comes to reposting user-generated content, brands should always ask for permission from users before reposting content. Certain users value their privacy over others — and you never want to overstep those boundaries.

Now, let’s cover how to repost content on your Instagram Story.

How to Share an Instagram Story to My Story

Your ability to repost someone’s Story depends on whether the original creator tagged you.

If the user hasn’t tagged you, you’re limited in what you can do. Currently, there’s no feature that allows you to repost stories without a tag. However, you can share it via direct messages to another follower.

If you were tagged in a story, you can easily reshare it to your story by following the steps below:

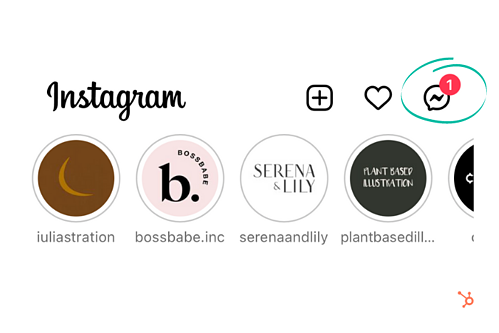
  1. Tap the direct messages icon in the upper right-hand corner.

InstagramStep4

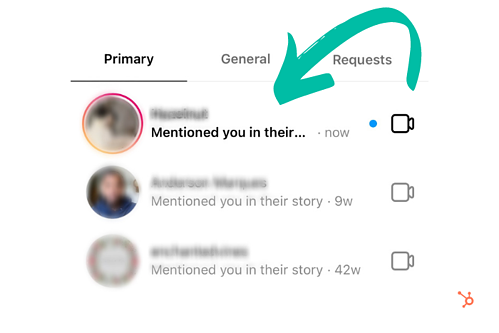
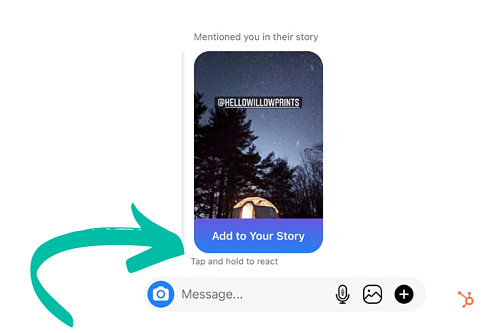
2. Locate and open the tagging notification.

InstagramStep5

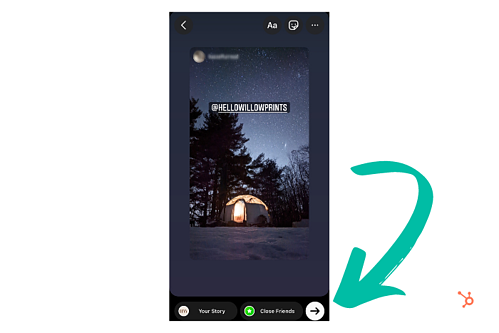
3. Tap “Add to Your Story.” From here, you can add your own text, filters, and stickers to the post — or continue to the next step.

InstagramStep6

4. Lastly, tap “Send.”

InstagramStep7Once your post is live, viewers can see the original story, along with any comments or stickers you may have added.

How to Share an Instagram Post to My Story

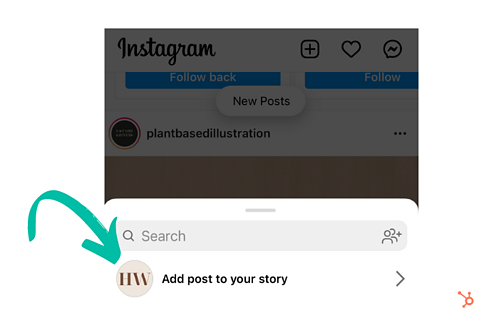
You can share another user’s in-feed post to your story in four quick steps:

1. Tap that airplane icon below the photo or video in your feed.
InstagramStep12. From the pop-up menu, tap “Add post/video to your story.”

InstagramStep2

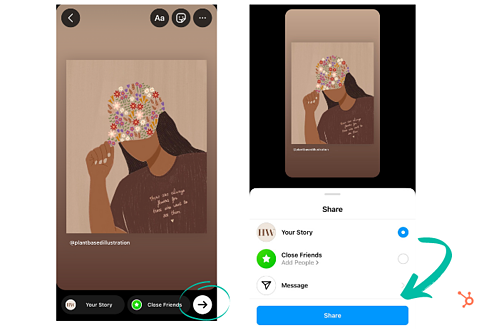
3. Next, you can add text, filters, or stickers to the story — or move to the next step.

4. Tap “Send To” then “Share.”

InstagramStep3Why Can’t I Share Someone’s Instagram Story?
Keep in mind that many users enable story sharing by default, but others may opt to disable this feature. Similarly, users may put their profile on private mode. If they haven’t accepted your follow request, you won’t be able to view their stories.

Of course, you can screenshot or screen record a story before it expires. However, when it comes to sharing and reposting content, it’s important to remember that certain users value their privacy more than others. To avoid crossing any lines, it’s a good habit to ask for permission before sharing any content to your page.

New Call-to-action

Categories B2B

Resume Tips to Get You The Job You Want, Straight from Recruiters

I can’t think of many tasks people dread more than writing a resume. There are so many little things you need to add, rephrase, check, double-check, triple-check.

Post-pandemic, the job search is a whole different ball game, with new considerations you haven’t faced before.

→ Download Now: 12 Resume Templates [Free Download]

A checklist makes everything seem less daunting so that’s what much of this article will be, and the best part is it’s recruiter-approved. Let’s dive in.

1. Include your contact information.

This seems like a given, right? Not exactly.

“You would be surprised to know how many really good resumes I’ve come across with no contact information,” says Ira Hughley, senior technical recruiter at HubSpot.

Make sure your full name, email address, and location are included. Don’t write out your full home address though, only a city and state.

While your location may not be too relevant to the job itself, as more roles are remote than ever before, employers still want to know your general location for tax and law purposes.

This also means that you should probably remove references that are too local, as your resume will likely reach a broader audience than before.

Lastly, make sure your email address is professional. While the time of MSN and AIM usernames are long gone, many of us still use old addresses we created long before we were in the workforce.

With this in mind, create a simple email with your first and last name. If it’s already taken, consider adding your industry to your email. E.g.: [email protected]

2. Tailor your resume to the role.

One of the biggest mistakes job seekers make is using the same resume for every role they apply for.

Hughley recommends having multiple resume versions for each role category you’re interested in.

“Don’t try to cram all of your experience into the resume,” he says. “Sometimes you can talk to them during the interview.”

The same goes for keeping old roles that are no longer relevant.

“Be 110% sure that your work experience and interests match the job opportunity you are looking to get,” says Hughley. “Too often, I see resumes with tons of experience in areas other than the one being applied for.”

Instead, note roles that highlight your experience and show why you are a good fit for the role.

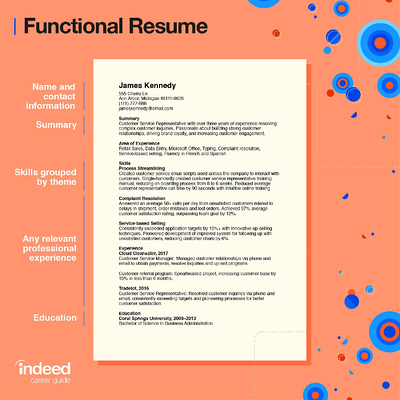
What if I’m transitioning to a new industry and don’t have much experience, what should I do? ” In this case, build a functional resume that frames your past experience to match the job you’re seeking.​​how to write a good resume

Image Source

For instance, say you’re transitioning to a developer role but only have experience in writing. Well, developer roles require problem-solving, critical thinking, time management, and a willingness to learn.

In this case, you can highlight the same skills in your writing role, like:

  • Meeting deadlines – time management
  • Brainstorming new article ideas – critical thinking
  • Analyzing article performance and suggesting optimization strategies – problem-solving

While you may not have the experience, you probably have transferable skills that will help you excel in your new role.

3. Describe your experience in detail.

When it comes to the experience section, there are the basics we all know to input: Previous companies, job titles, and responsibilities. There are two additional details you shouldn’t forget to add: The results you achieved and the awards you received.

One issue Hughley often sees with resumes is that they’re too vague.

“Highlight yourself! Sometimes, I see just a title and no highlights or takeaways from that role,” he says. “This is the time to brag about what you have accomplished, even if it’s just a couple of bullet points.”

HubSpot Recruiter Timothy Dixon-Traylor says we often leave out important details that could help us stand out.

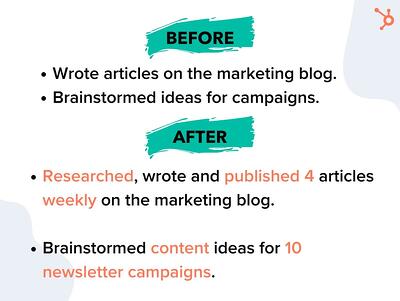
“I believe the most important part of the resume is to show how you’ve made an impact in your current and previous roles,” he said. “This can be done by quantifying your results and impacts, as best you can.”

Dixon-Traylor continues, “Most recruiters and hiring managers will be asking themselves, ‘How can this person help elevate the team and the organization?’Quantifying your contributions will be your first step showcasing how,” he said. 

Resume tips example before and after

Did your work lead to higher revenue, conversions, traffic, etc? Make sure to mention that and add figures.

Next, use action verbs. Instead of “worked on,” write “led,” “managed,” “brainstormed.” This adds specificity to your responsibilities and helps employers better understand your previous roles.

“Avoid short phrases such as “assist customers” or “make cold calls to prospects,” Dixon-Traylor says. “What are you assisting these customers to do? How many customers are you working with a day? Do you have any KPIs or metrics that align with those activities? It goes back to my previous point of quantifying your impact to show how valuable you are.”

Another thing to avoid? Fluff.

Dixon-Traylor suggests asking yourself if your content is showcasing your abilities and the value you bring. If not, go back to the drawing board. 

4. Summarize your experience in a “Key Skills” section.

Your skills section is one of the most important in your resume. Hiring managers and automated resume scanners look at this section to assess if you have the relevant skills.

As such, do not put your skills section all the way at the bottom. Instead, put it toward the top of the resume above your experience section or to the side. Ideally, the hiring manager gets a sense of your skills and your experience shows how you gained them.

5. Design your resume using a template that fits the tone of your industry.

Every industry has an unofficial way of doing things when it comes to hiring.

For instance, traditionally creative industries tend to allow (and in some cases promote) showing some personality in resumes. This can range from adding your picture to your resume to using bright colors and illustrations.

Be sure to follow the tone that’s most appropriate for your industry – no need to reinvent the wheel when the guide is already there.

In addition, Dixton-Traylor suggests using a good balance of white space without crowding the page.

“Use as much white space as possible, on one to two pages that showcase the value you bring,” he says. “Add the technologies, skills, systems, or programs that you have hands-on experience working with. This can range from technical tools, such as Tableau and HubSpot down to simple tools like POS systems, Microsoft Office, or Google Suite.”

Want more design tips? Jump to this section

6. Incorporate keywords from the job description.

There are two reasons you want your resume to have the keywords from the job description:

  • It will show hiring managers that your skills and experience closely align with the job req.
  • You will ensure that your resume successfully passes through automated resume scanners, which look for keyword matches.

7. Proofread for grammar, brevity, and specific action verbs.

One thing you don’t want is an error in your resume. It can affect your credibility and make you look unprofessional.

So, the first step is proofreading your resume. Once you complete it, leave it for a few hours or days then give it another look.

Then, run it through grammar editing software to make sure everything is correct. Here are some good options:

8. Convert your resume to a PDF file.

Imagine you spend hours formatting your resume just for it all to get lost once someone else opens it. That’s what happens when you submit your resume using Word.

Instead, convert your final resume into a PDF file to preserve your formatting. This also ensures easy uploading on most hiring forms.

How The Pandemic Impacted The Hiring Process

When COVID-19 surfaced in early March of 2020, it created a lot of uncertainty in the market. Unemployment rates skyrocketed to 14.7%, as companies struggled with

Now, two years later, the outlook is more positive.

“The talent pool has drastically expanded because most companies are remote, which means that talent is no longer limited by location,” Hughley says.

This is great news for job seekers who were once constrained to the job opportunities in their local areas. A job market that was advantageous for employers has now switched to being favorable to job seekers.

Employers have to offer better benefits with more flexibility to be competitive, everything from remote stipends to unlimited vacation days.

“There is a shift now as well because many recruitment platforms have moved to online or virtual strategy,” Hughley adds. “We have to find more creative ways to connect to candidates to make for the best candidate experience.”

Lastly, Hughley says that the pandemic has made hiring managers more empathetic toward candidates.

“When I think of […] all that applicants have had to endure, I make a conscious effort to lead all hiring and conversations with empathy,” he says.

Dixon-Traylor adds the pandemic has brought more humanity into the hiring process. 

“Pre-pandemic, I loved advocating for candidates who don’t have ‘ideal’ backgrounds – from job hoppers and folks who have gaps to folks who don’t have direct experience, but have impeccable transferable skills,” he said. “Since the pandemic, I advocate even more those communities in the entire hiring process.”

He continues to say that he looks at hiring as a long-term strategy, guiding hiring managers through their unconscious biases and helping them understand what should be required versus what can be coached.

The Ultimate Checklist of Resume Tips

Contact Information Tips

  • Include your basic contact information – including your name, email address, and phone number – at the top?
  • Is your email address professional? (e.g. [email protected] vs. [email protected])
  • Is your email address associated with a familiar domain, like Gmail? Outdated domains can be a red flag for tech-savvy companies.
  • Do your resume details align with your LinkedIn profile? Hiring managers will likely review both.
  • Have you included links to social media profiles, portfolios, and a personal website if relevant?
  • Have you audited your social profiles to ensure no unprofessional content is available to the public?
  • Have you customized any communication within your resume that addresses the company or hiring manager by name?
  • Have you granted the recipient the proper permissions to view it (or opened up permissions to everyone)? If you’re sending your resume as a Google Doc.

Featured Resource: 12 Free Resume Templates

resume templates

Download 12 free designed, formatted, and customizable resume templates here.

Writing for Your Industry Tips

  • Are you writing in a tone that matches that of the company to which you’re applying? For instance, while still writing professionally, you might use a different tone when applying to work at a new tech startup versus an established accounting firm.
  • Have you customized your resume for the specific job to which you’re applying? Highlight work experience and skills that are relevant to the position – don’t just write down every job you’ve ever held.
  • Do you have a clear objective at the top of your resume that is company-focused, rather than you-focused? You don’t need one, but you do need a “Key Skills” section that summarizes who you are and what you can offer the company.
  • Have you included both accomplishments and responsibilities under each job? Both should be easy to ascertain when scanning your resume.
  • Have you used numbers and metrics where possible to better convey your success? For example: “Generated 150 marketing-qualified leads,” “Increased Instagram followers by 25%,” “Oversaw a $250K budget.”
  • Do you illustrate career progression? It should be clear if you were promoted, gained additional responsibility, or switched jobs laterally to acquire more skills.
  • What company details have you added? List not only the names of companies but a short description of what each company does.
  • Have you included your tenure at each company?
  • Have you included relevant information about your education?
  • Does your unique value proposition shine through? E.g., something that makes you stand out from other applicants, or highlights that you’re uniquely qualified for the position.
  • If relevant for the position, have you included links to a portfolio or samples of your work?

Formatting and Design Tips

  • Have you used a resume template so the layout of your resume is visually appealing and easy to read? Get 10 free templates here.
  • Is your resume too creative? (For instance, if you’re applying for a creative position and have formatted your resume as an infographic … is it really simple enough to read, or is it best to save that creativity for your portfolio?
  • Have you selected a clear, easy-to-read font? Is your name clearly stated at the top? It’s a good idea to make your name slightly larger than all other text – employers read many resumes every week, and you need to be memorable.
  • Have you made use of common formatting conventions that make content easier to read, such as bullet points and header text?
  • Has your formatting remained consistent across all positions? For example, if you’ve bolded job titles, are all job titles indeed bolded?
  • Are your margins even?
  • Are all items properly aligned? For example, if you’ve right-aligned dates, are they all lining up in tandem with one another?
  • Are all links you’ve included clickable?
  • Have you converted your resume to a format that allows all recipients to read it as intended, without downloading specific fonts or needing special software? A PDF format is recommended.

Editing Tips

  • Have you included keywords in your resume? If you’re submitting to an automated system, it might be critical to get past filters. Be sure your resume directly reflects some of the software and skills mentioned in the job description.
  • Have you edited it for brevity? Try to keep your resume to about one page per 10 years of job experience, if possible.
  • Have you removed irrelevant job experiences?
  • Is each section of your resume ranked in a way that highlights your skills and what you have to offer the employer? For instance, if you’re a recent graduate with internships in different fields, you might list your most relevant experience at the top, instead of ordering everything by date.
  • Have you edited out generic action verbs in favor of more specific ones? For instance, “managed” instead of simply “worked.”
  • Have you made use of a thesaurus to prevent monotony?
  • Have you found more professional alternatives to unprofessional-sounding terms? “Tasked with,” for example, can make you seem less proactive than someone who “coordinated” various projects regardless of who told them to.
  • Are your special skills truly special? While speaking a foreign language is indeed noteworthy, these days, it might be redundant to mention that you’re proficient in Microsoft Word or capable of using email.
  • Have you done a sweep for annoying jargon or business babble? Everything should be clearly articulated, so it’s easy for the hiring manager to quickly understand what you do.
  • Is everything 100% true? If you write that you’re fluent in a foreign language on your resume, you should be prepared to speak that language during your interview.
  • Have you conducted spelling grammar checks?
  • Finally, have you asked a friend who hasn’t read your resume before to provide a final glance for errors, inconsistencies, or confusing phrasing?

If you’ve checked the boxes of all the resume tips that apply to you, you should be ready to submit your application.

Editor’s Note: This post was originally published in March 2018 and has been updated for comprehensiveness.

New Call-to-action

Categories B2B

8 Valentine’s Day Marketing Campaigns We Love

Love, flowers, chocolate, blah blah blah …

Where are the marketing results?!

Okay, probably not what your Valentine’s date cares about. But if you’re a marketer, you might be interested in merging the most lovey-dovey of days with your marketing. But how?

Download Now: Free Ad Campaign Planning Kit

Well, these companies have figured out some creative ways to leverage the warm and fuzzies (or unadulterated rage and crushing loneliness … whatever) that Valentine’s Day instills in people.

If you don’t have a marketing campaign planned for the 14th, maybe some of these will inspire you to get in on some last-minute Valentine’s Day action.

8 Effective Valentine’s Day Marketing Campaigns

1. Ranch Dressing’s Customized Bottle

Nothing says Valentine’s Day like giving someone a bottle of — Ranch Dressing?

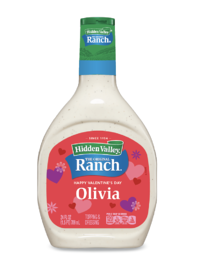
In 2021, while flower companies and B2C brands were highlighting the romantic gifts partners could give to each other, Hidden Valley took a funny approach to this strategy by offering audiences customized Valentine’s Day-themed bottles of Ranch salad dressing.

Ranch Dressing Customized Valentine's Day bottle

While this seems like an odd gift to some, Hidden Valley knows that they have fans out there that just love to cover everything they eat with Ranch dressing. To those audiences, this gift is funny, personalized, and potentially useful.

2. Pandora’s Little Acts of Love

A common pushback people give for Valentine’s Day is that appreciation for loved ones should be shared all year round. Jewelry company Pandora emphasized that small acts of love are suitable anytime with their “Little Acts of Love” placement in 2022. 

The ad shows couples displaying acts of kindness towards one another that would be appreciated any day of the year. This ad reminds us all that thoughtful gestures can go a long way.

3. 1-800-Flowers’ Galentine’s Day

Valentine’s Day isn’t just for significant others, and 1-800-Flowers wants friendships to be celebrated as well.

This ad depicts two friends talking about how they established their friendship, reminding the viewer that platonic love also deserves to be celebrated. The two friends in the ad ask each other thoughtful questions about their friendship and how much they mean to each other. 

It’s an emotional ad that will inspire you to call your best friend, and maybe send them some flowers.

4. Hallmark’s Tell Them They Matter This Valentine’s Day

A Valentine’s Day ad with an important message — everyone deserves to feel like they matter. This ad depicts a young woman who is inundated with negative messages from peers on social media. The messages are pretty bleak and would be hard to hear for anyone. 

At the end, she finds a Valentine’s Day card in her locker from her best friend reminding her she matters and is loved, which helps drown out the negativity of the messages at the top of the ad. Though more series in nature, this heartwarming ad shows how powerful our words really are, and inspires us to show more kindness to one another.

5. Target Valentine’s Day Haul Instagram Post

Many people have experienced walking into Target without a list, relying on Target to tell them what they need. This user-generated post on Target’s Instagram account captures the spirit of what we all love about Target — how easy it is to load up on fun items (though our bank accounts may not share the love). 

In the video, the original poster fills their cart with festive Valentine’s Day merchandise at their local Target. Though it isn’t a traditionally produced ad, it’s a relatable post for Target shoppers who may have been inspired to visit their local store and pick up some of the items they saw featured in the post to celebrate.

6. MeUndies Match Me Valentine’s Day

This relatable MeUndies ad from 2021 captures the spirit of communicating via Zoom that many people have become familiar with since early 2020. 

In the ad, couples talk about some of their pre-pandemic plans including travel, and weddings. Though many of those events didn’t go as planned, the couples talked about ways they’ve grown closer despite the challenges and uncertainty brought on by the pandemic all while wearing matching merch from MeUndies.

7. Winc’s Be Wine Instagram Post

Wine is a popular Valentine’s Day gift that is up there with roses and chocolate. Wine subscription company Winc typically devotes real estate on their social channels for Valentine’s Day-themed posts in the weeks leading up to the holiday. 

In 2021, the Winc Instagram account had a series of posts consisting of unique and user-generated content related to Valentine’s Day. The “Be Wine?” post was among the most popular. We loved the punny caption and heart-themed visuals.

8. OpenTable’s Millennial Experiences

If you’ve ever marketed to millennials, you may know that millennials value experiential gifts. Or, as OpenTable says in this 2020 ad, dates. 

In 2020 OpenTable released 14 ads as part of a two-week countdown to Valentine’s Day, encouraging customers to make reservations early to avoid the holiday rush.

Each of the ads targeted a different audience that could benefit from using OpenTable to make Valentine’s Day reservations, with a clear call-to-action and messaging that appeals to the ideal viewer. 

Honorable Mention: Match.com’s “Match Made in Hell” campaign.

Technically, this campaign wasn’t created for Valentine’s Day specifically. But, many of our marketers thought it had all the perfect elements of a great Valentine’s Day campaign. Because of this, we wouldn’t be surprised if it sees a lot of circulation in February.

In the commercial, directed by actor Ryan Reynolds, Satan sits in Hell using Match’s app when he sees he’s matched with a woman named 2020. When he meets up with her on Earth, he nervously says “Hi 2-0-2-0.” She replies, “Please, call me 2020” — pronouncing it like the year. 

As the commercial continues, 2020’s character appears to be the epitome of everything that happened in 2020.

For example, which launched in December, shows Satan and 2020 causing mischief, stealing toilet paper from store shelves, having a picnic inn empty stadiums, and ultimately posing for a selfie in front of a dumpster fire.

The couple frolics to the familiar sounds of Taylor Swift’s hit song, “Love Story.” which also sparks a sense of rom-com nostalgia for millennials. 

On the same day of this ad’s release, Match and Reynolds also shared another commercial showing the pair explaining how they met in couple’s counseling.

In this video, Satan explains how he found 2020 on Match:

“I started by using the Match custom search filter. I filtered out joy, happiness, toilet paper, and reason,” Satan says in the video below:

Although this didn’t launch in February, it was a very clever newsjacking example that many of our marketers say they enjoyed when they were asked to share their favorite Valentine’s campaigns.

While 2020 was a difficult year for many, Match and Reynolds identified a tasteful way to create content that audiences could relate to. At the same time, they still told an epic, hilarious love story with a pleasant, entertaining tone. Although they discussed a truly terrible year, they did so in a way that felt like escapism for the viewer.

Valentine’s Day Campaign Takeaways

As you create and launch Valentine’s Day campaigns, take note of these strategies many of the brands above used:

  • Grab your audience’s attention: Like with any holiday, marketers around the globe are churning out content around it. To compete with this overly saturated Valentine’s Day ad landscape, you’ll need to grab and keep your viewer’s attention with entertaining elements or valuable information.
  • Be relatable: Around this time of year, many people are inundated with high-budget Valentine’s Day ads that offer them no useful information or value. Even if you want to tell a mushy romance-fueled love story with your content, make sure it still feels relatable or authentic. To do this, you can leverage tactics like telling a story your audience will relate to, or leveraging user-generated content from your followers — like Twitter has.
  • Test out different platforms: While some companies on this list took to Instagram, others embraced physical campaign strategies like special products or billboard use. 

Editor’s Note: This blog post was originally published in Feb. 2013, but was updated for comprehensiveness.

Improve your website with effective technical SEO. Start by conducting this  audit.  

Categories B2B

The Beginner’s Guide to Share of Voice

If you’ve ever been in charge of gathering reports for your marketing team, then you know there are a plethora of metrics you can measure.

One metric that gets overlooked is share of voice. However, this is a versatile metric that you can use in a competitive analysis for social media, organic traffic, or even paid advertising.

As a marketer, share of voice is important because it helps you understand how well your brand is performing against the competition. Below, we’ll review everything you need to know about share of voice.

→ Download Now: Market Research Templates [Free Kit]

This metric was mainly used as a way to measure success in paid advertising, however it’s much more than that now. You can calculate share of voice for organic traffic and social media, in addition to paid advertising.

By calculating your share of voice, you’ll have a better understanding of many people know about your brand, and you can identify areas to work on. For example, if you have a high share of voice in social media, but not as much in organic traffic, then you know you need to improve your organic traffic strategies.

While share of voice isn’t the same thing as market share (more on that below), share of voice tends to correlate with market share and revenue. For instance, the more you’re dominating in the conversation online, the more market share you’ll have and the more authority you’ll have among users.

Share of Voice Formula

To calculate share of voice, divide your brand’s measures by the total market measures. This could be your social mentions, paid advertising clicks, or website traffic.

To find these numbers, you’ll need to use some of your marketing tools. You can look at your social media automation tool, for instance, to count how many mentions your brand has. Then, you can calculate how many mentions your competitors have. After you add all those together, you can divide your mentions by the total to find the share of voice percentage.

Calculating share of voice should help you learn which channels need your attention the most and how you stack up against competitors. Now, let’s see which channels you should calculate share of voice for.

Share of Voice Metrics by Channel

Advertising

When it comes to advertising, it’s important to find your share of voice to see how much ad space you’re taking up compared to the competition.

To find this, you’ll divide how well you did in a paid advertising metric (such as impression shares), by the total number in the industry.

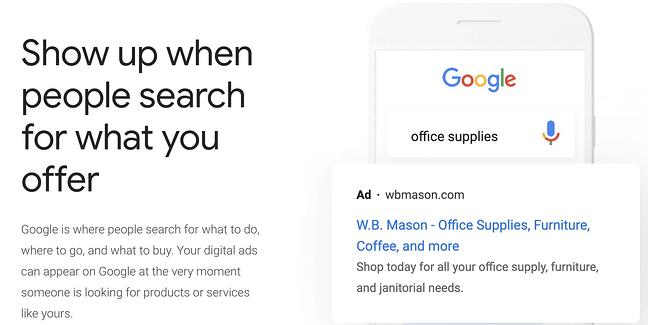
For PPC ads, you can look at impression shares, which represent the amount of times your ads were shown to users compared to the number of times your ads could have been shown, based on your keyword and campaign settings. If you’re using Google Ads, you can find “Impression Share” into your account, going to campaigns, clicking the column icon, selecting “modify.” From there click “competitor metrics” and then add impression share columns by checking the boxes next to their names. Then click “apply” and the impressions data should show up in your table.

Share of voice is important in advertising because it will help you budget, measure campaign effectiveness, and give you a competitive advantage.

News Outlets and Blogs

Measuring your share of voice across news and media tracks how often your brand is mentioned across these platforms. Find out which publications are talking about you and the context of these mentions.

Use this information to help you identify writers or outlets that would be interested in covering your brand or related topics, find out industry related trends, and compare how competitors are doing. Harnessing this information can simplify research for your PR team and give you helpful industry insight.

You can get notifications of mentions using Google News alerts, but for more in depth feedback, you’ll want to use a listening tool.

SEO and Organic Search

To measure your brand’s share of voice in organic search, you’ll need to look at your brand occurrence in search results pages (SERPS). Typically the number of impressions is the metric used to measure this, but you could also use clicks. There are several tools you can utilize to pull this information (more on those in the next section).

Performing an SEO share of voice analysis will help you figure out which websites rank most for a set of keywords of your choice.

Once you’ve decided on a list of keywords or topics you’d like to focus on, pop them into a keyword research tool. Pull the 1st page (SERP) rankings from the results for each topic. From there you can export this data into a table or chart to get a better visual of the data.

Social Media

Social media is one of the main channels where you can use share of voice as a measure of success since social media is where consumers go to be heard. Statista reports that in 2021 there were 295 million social media users in the U.S. alone. With even more users around the globe, you’ll want to tap into the conversations people are having and use that data to improve your marketing strategy.

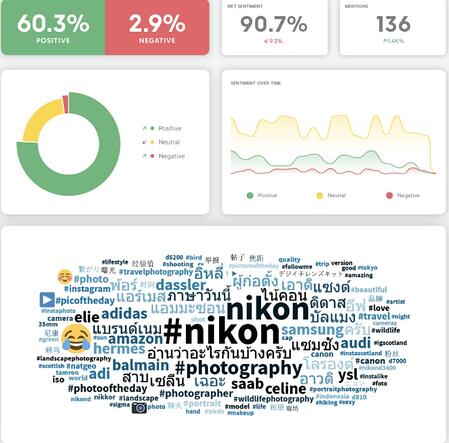
With social media, you can measure brand mentions, hashtags, reach, impressions, or even sentiment.

To calculate, use a social media tool to measure brand mentions. Calculate yours, your competitors, then add those numbers together and divide your mentions by the total.

Share of voice is important in social media because it will help you determine which competitors are getting mentioned more, so you can analyze what you do versus what they do. This will help you identify gaps in your strategy. Ask yourself, what platforms are working for your competitors, which influencers talk about them, and where they’re the most popular.

While calculating share of voice may seem daunting at first, the good news is there are plenty of software and tools available that will help you gather the information you need. Here are some of our favorites.

1. HubSpot Social Media Management Software

share of voice tools HubSpotBest for: Social Media Share of Voice
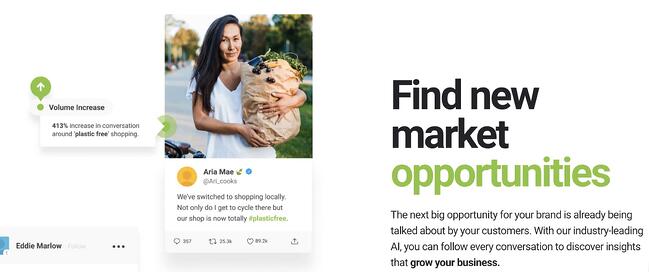
This all-in-one tool will help you build and track marketing campaigns, but it is also an effective social listening tool. With HubSpot, you can create keyword monitoring streams, track social media interactions and trigger email alerts when prospects mention your brand. Save time as this tool allows you to track multiple social platforms in one spot, automate monitoring, and focus on the interactions that matter most.

Why we like it:HubSpot let’s you link all of your interactions back to your CRM and makes it easy to evaluate campaign results with their ready-made reports.

2. Hootsuite

share of voice tools HootsuiteImage Source

Best for:Social Media Share of Voice

Hootsuite lets you keep an eye on conversations mentioning your brand, monitor relevant keywords, and hashtags. Similar to HubSpot, Hootsuite allows users to access this information from an easy to use dashboard without having to toggle back and forth from various social media accounts.

Why we like it: Hootsuite is a great entry level option for those new to social monitoring tools.

3. Talkwalker

share of voice tools TalkwalkerImage Source

Best for: News, Blog, and Social Media Share of Voice
Talkwalker monitors brand mentions across news, social media platforms, blogs and the web. This tool also dives deep to help you get insight on not only share of voice, but user sentiment. Talkwalker will give you sentiment analysis for up to 25 languages, a great option for those who do business internationally.

Why we like it: Their AI visual listening feature lets you track brand logos on the web and across social media to help you gain a more comprehensive picture of how your brand is doing.

4. Google Ads

share of voice tools Google Ads

Image Source

Best for: PPC and Advertising Share of Voice

When you need to measure PPC share of voice, it’s hard to beat Google Ads as a tool. To find your PPC share of voice, use their impression share metric. Conveniently, Google’s tools work together, so if you already have Search Console, you could link it to your Google Ads account.

Why we like it: Google Ads is so widely used, it’s often already a component of marketing campaigns. Having the Impressions share metric built in makes pulling this data a simple task.

5. Ahrefs

Best for: SEO Share of Voice

When measuring SEO share of voice, Ahrefs is a reliable tool. You can easily get a snapshot of your organic traffic compared to your competitors using their batch analysis feature. Alternatively, you could use hrefs to track competitors’ share of voice by comparing them against the keywords you want to rank for. It’s a great overall tool for most SEO needs.

Why we like it: Ahrefs is an all-in-one SEO tool that can help you tackle a myriad of SEO tasks from topic research to website audits.

6. SEMrush

share of voice tools SEMrush Position TrackingImage Source

Best for: SEO Share of Voice

Like Ahrefs, SEMrush is another great all-in-one SEO tool that can also help you measure share of voice. This can be done through SEMrush’s position tracking tool. You’ll need a business subscription to access it, but it’s worth it for large enterprises. In addition to the position tracking tool, you can measure share of voice by location or topic, as well as discover new competitors.

Why we like it: in addition to share of voice metrics, SEMrush can be utilized for content marketing needs and technical SEO. Their keyword gap feature can help you identify areas for organic search improvement.

7. Brandwatch

share of voice tools BrandwatchImage Source

Best for: Web and Social Media Share of Voice

Brandwatch is another tool that can help you track your brand’s share of voice across social media, web, and news mentions. You can compare share of voice by brand or opt to compare customer sentiment, location, and other demographics. This tool is great if you’re looking to dig into customer insights of your competitors.

Why we like it: Brandwatch’s customer sentiment analysis will help you identify any roadblocks or risks, plus add helpful context to the data in your reports.

Now, you might be wondering, “How can I generate these reports?”

Share of Voice Reports

To create a share of voice report, you should be able to use your marketing automation tool to gather the numbers. Most of the tools listed above, like HubSpot, will generate reports for you, or have the option to export the data.

If exporting you can put the data in whatever format you like as long as it makes sense to you and your team. You can simply create an excel sheet and begin calculating the share of voice for several channels including social media, news, advertising, or organic traffic.

Calculating share of voice is a great way to learn how well you perform against your competitors. Use the insights you gain to better serve your audience, stay on top of trends, and outperform the competition. The best part is that you can use this metric for several marketing channels, from advertising to social media.

This article was originally published March 10, 2021 and has been updated for comprehensiveness.

New Call-to-action

Categories B2B

The Plain English Guide to Demand-Side Platforms (DSP)

As a marketer, you might be focused on creating organic content most of the time. But you should keep in mind that paid advertising is just as important.

When you manage the paid ads for your business, you can go through individual ad managers such as Google Ads or Facebook Ads. However, that’s not the only option. You can also use demand-side platforms (DSP), which are automated, as a way to purchase and manage your online ads.

Access Now: Free Media Planning Template

According to a 2021 study published by Statista, the US was the largest programmatic advertising market worldwide, spending an estimated $70 billion in 2020. Marketers are increasingly using DSPs as a way of purchasing, managing, and tracking online advertising. Below, let’s review all the basics about DSP advertising.

With a DSP, you can purchase mobile ads on apps, banner ads on search engines, and video ads on Facebook, Instagram, Google, and even more platforms. Instead of using both Google Ads and Facebook Ads, for instance, you can purchase those ads in one place on a DSP.

The purpose of this is to make ad buying faster, cheaper, and more efficient. Now, let’s dive into how DSP platforms work and why you should use one.

How do DSPs work?

DSPs work by using programmatic advertising, which is the buying and selling of ads in real-time through an automated system. With real-time bidding, ad placements are auctioned off in milliseconds.

When you get started with DSP advertising, you’ll need to begin strategizing how much you want to spend. Think about what an effective cost per click and cost per action might be. This will help you set up your online ads so the platform knows how much to spend in any given auction.

The best DSP platforms will allow you to include multiple rich media ads, including video, images, and animation.

Why use a DSP?

The main reason for using a DSP is that it makes your digital ad experience easier and more cost-effective. You can control, track, and maximize all your digital ads in one place. This means you can manage an entire ad campaign across sites on one dashboard. For example, you can show someone an ad on Google, then show them ads on Facebook, and then across other sites they visit — all in one campaign. Before DSPs, those would be separate campaigns on Google and Facebook Ads.

This means you can advertise on many networks, including all the major publishers, in addition to more. With the number of networks, you’ll have a more global reach.

Additionally, DSPs often partner with third-party data providers, giving you better tracking and reporting capabilities than a single network usually provides. And in the planning process, the targeting options are more personalized, meaning you can get better conversion rates.

When you’re choosing a platform to work with, you’ll want to look at how many ad exchanges the DSP has access to because that affects how many people you can reach. Plus, you’ll want to consider cost, training (full service or self-service), support, and ease of use.

Now that you know more about DSP advertising and how it works, let’s discuss the platforms that can help you do it.

1. Basis Technologies

DSP example Basis Technologies

Image Source

Best for: Large or enterprise level companies

Basis Technologies is an omnichannel DSP built to generate better outcomes for your ad campaigns. One of the best features is that it uses AI machine learning to automatically analyze data from numerous campaign parameters to optimize your ads.

With this DSP, you’ll be able to target hyper-local audiences across devices and multiple touchpoints. You’ll also get access to the industry’s leading exchanges, along with 25,000+ audience segments across over 30 different data providers.

Why we like it: Basis Technologies harnesses the power of machine learning to analyze data and automate processes.

2. Google Marketing Platform

DSP example Google Marketing Platform

Image Source

Best for: Small to large businesses or agencies

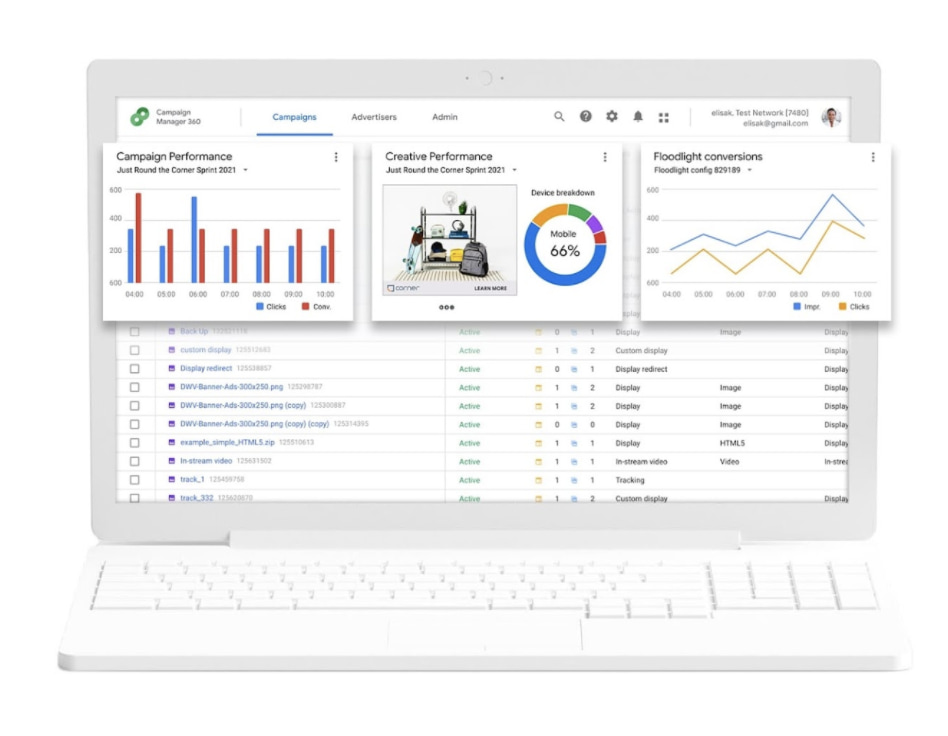
Google Marketing Platform is Google’s unified advertising and analytics platform for smarter marketing and better results. This DSP has several products for both small businesses and enterprise companies, including Campaign Manager 360 and Display & Video 360 (formerly DoubleClick).

With this product, you can save time with cross-channel ad management to maximize insights and optimize media and creative performance across all your digital campaigns. The flexibility is the standout feature of this DSP. You can use third-party features and integrations so you can choose the capabilities that best help you manage and measure your campaigns.

Why we like it: Google’s products are designed to work together, but also give the flexibility to use third-party features and server to server integrations.

3. Knorex

DSP examples Knorex

Image Source

Best for: Mid-sized to large advertising agencies

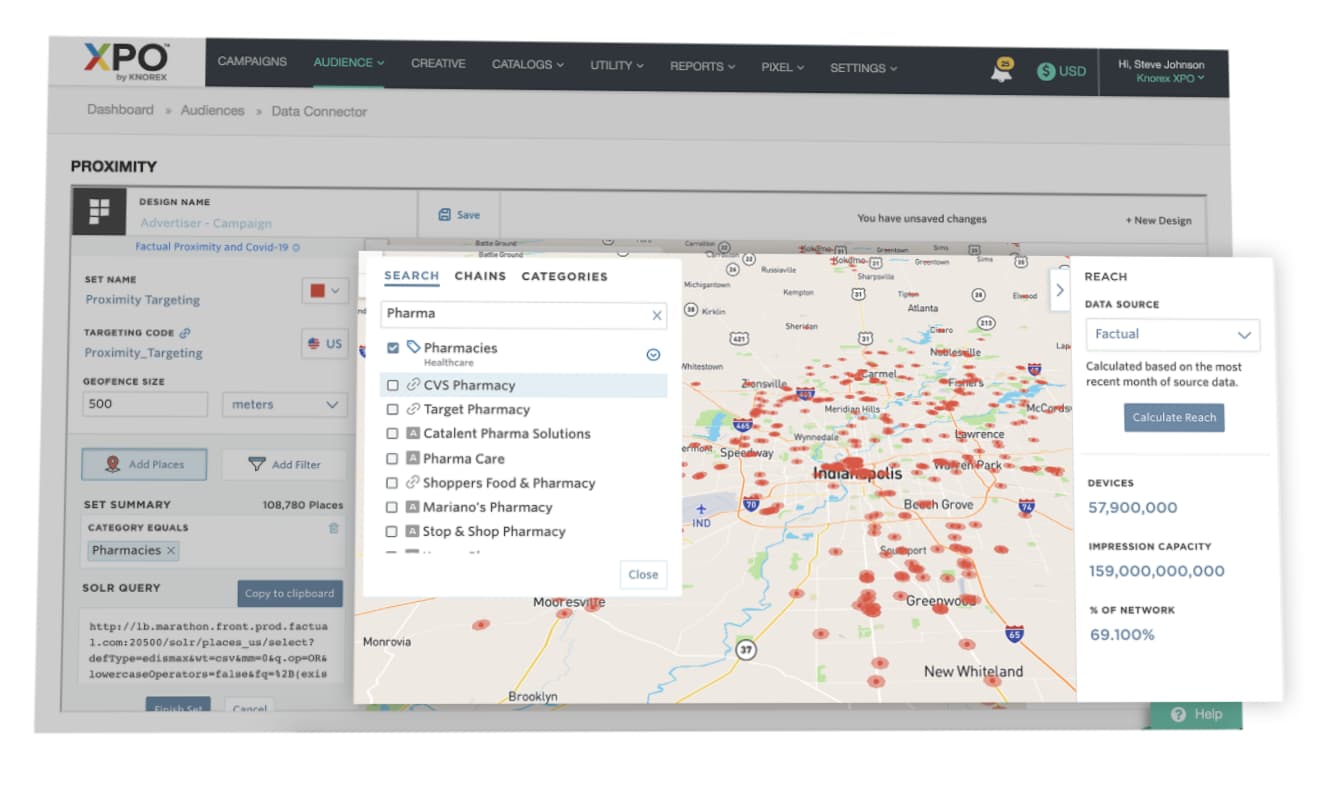
Knorex is a universal advertising platform that automates personalized marketing across channels, devices, and ad formats. You can market on Google Search, Facebook, Instagram, and LinkedIn all in one place.

This DSP also uses AI to learn from past data to predict and adjust ad budgets dynamically in real-time to drive higher efficiency.

Why we like it: Knorex values security, offering a variety of brand privacy and security tools out of the box.

4. Jampp

DSP example Jampp

Image Source

Best for: Gaming apps and companies looking for a mobile DSP solution

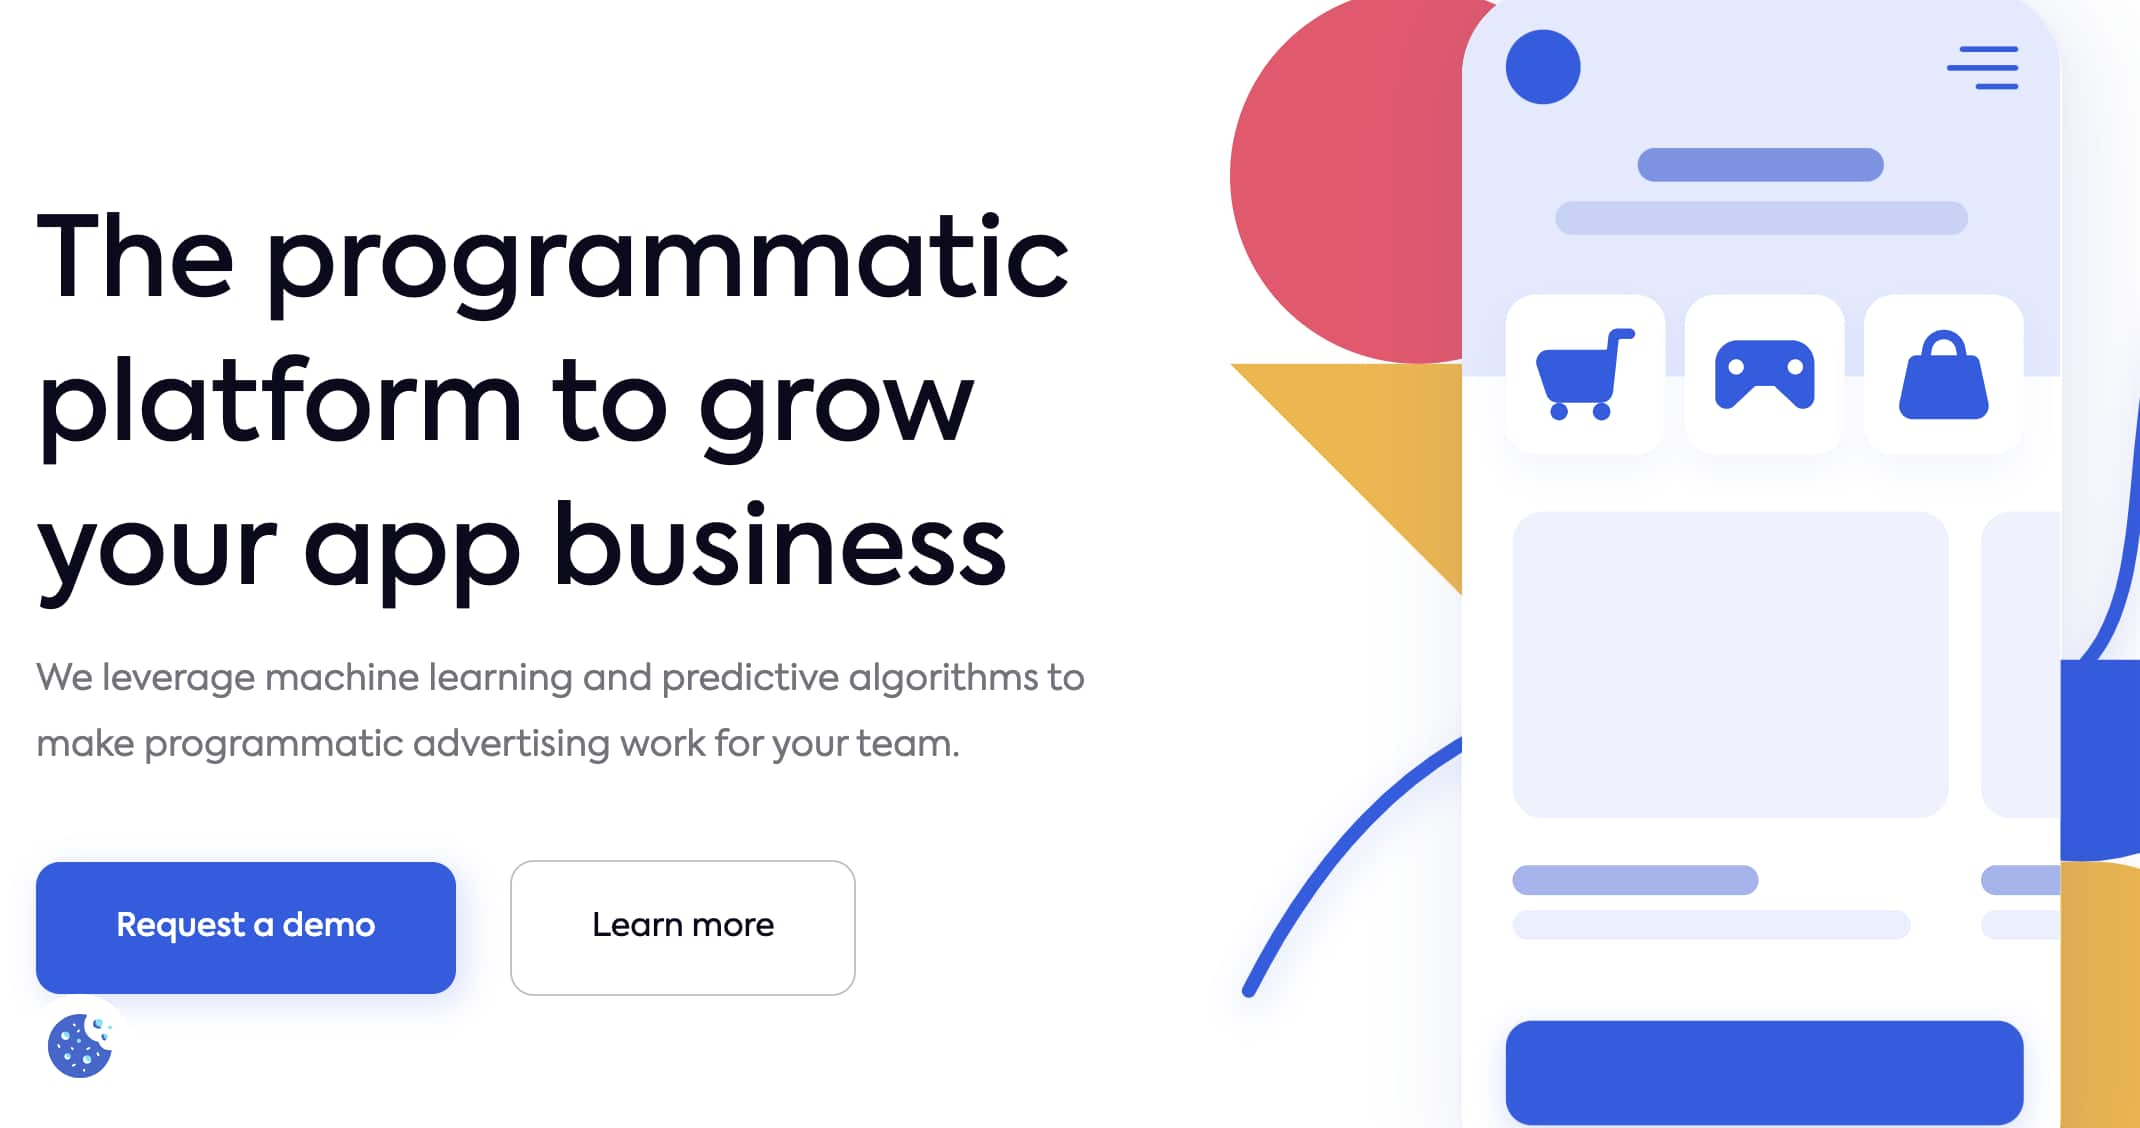
Jampp is a DSP that leverages unique contextual and behavioral signals to deliver customers and in-app purchases through programmatic advertising.

The key features of this platform are user acquisition, app retargeting, geolocated ads, dynamic ads, and predictive bidding. This is mainly a mobile user acquisition and app retargeting DSP where you can focus on mobile-first ads.

Why we like it: Jampp’s app retargeting helps re-engage existing customers and uses their previous behavior to predict whether or not they will convert.

5. Smadex

DSP example Smadex

Image Source

Best for: Companies needing a mobile-first DSP solution

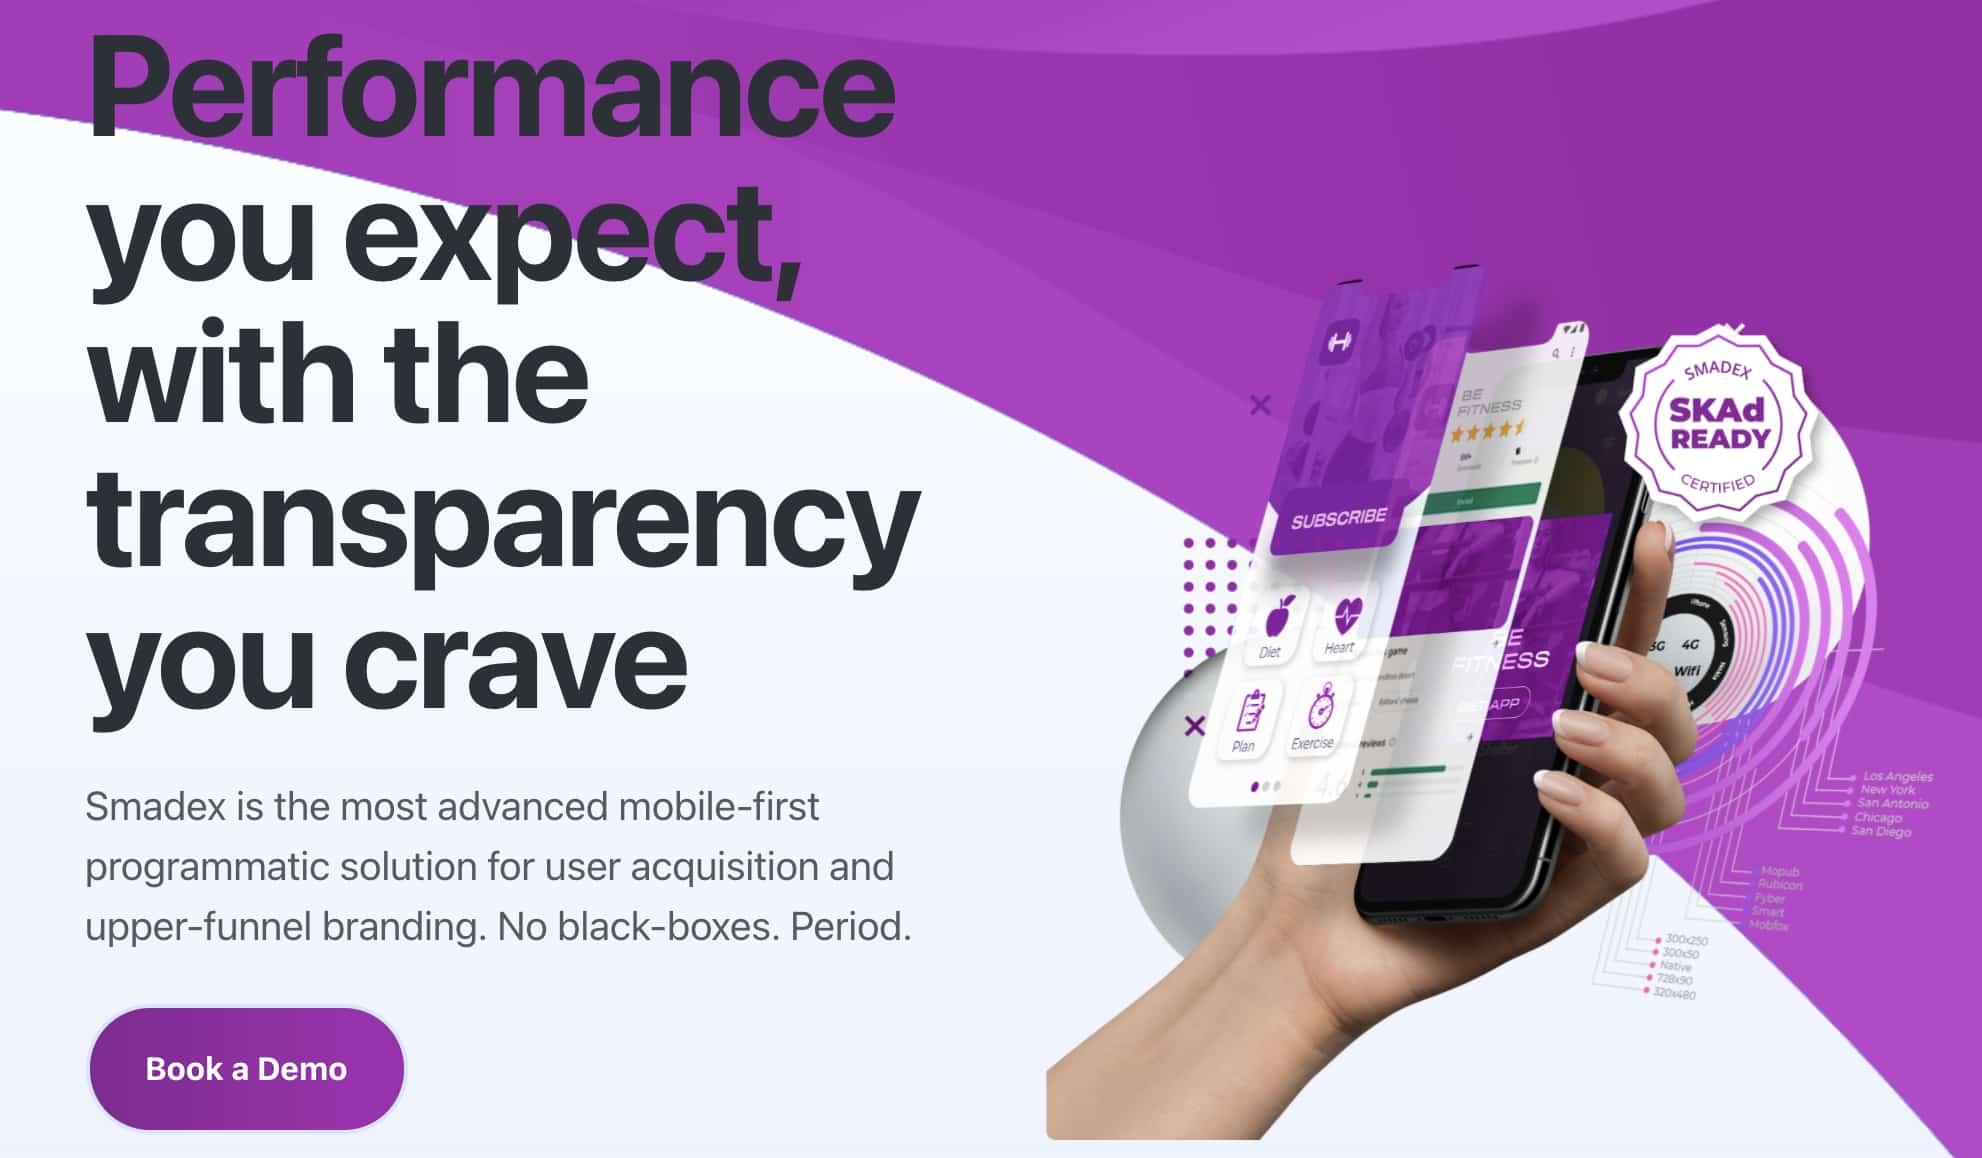
Smadex is a mobile DSP engineered for growth. The platform uses a combination of its own programmatic advertising technology, machine learning, and first-party data.

With this platform, you can reach global audiences at scale and re-engage audiences with its retargeting capabilities.

Why we like it: Smadex values security just as much as helping your brand scale. It ranked #1 for fraudless DSP installations by Kochava Traffic Index and holds an IAB (Internet Advertising Bureau) Gold Standard certification.

6. MediaMath

DSP examples MediaMath

Image Source

Best for: Mid-sized to large agencies that want a custom solution

MediaMath is a customizable DSP that provides brands with a myriad of options for managing their campaigns. Opt to use their built-in creative tools to run ads on their server or choose one of your own. You can even use APIs to run on top of your core foundation.

Why we like it: MediaMath’s product is not a one-size-fits-all DSP. Brands can tailor their components to build an advertising solution that suits their needs.

7. Amazon DSP

Amazon DSP

Image Source

Best for: Ecommerce brands that want to advertise on Amazon (and Amazon-owned sites)

Amazon is one of the world’s largest online retailers, so it’s no surprise that brands would want to tap into their advertising audience. Both advertisers who sell products on Amazon and those who don’t can use Amazon DSP. They offer two options: self-service and managed service. With self-service, brands are in full control of their ad campaigns. Those who are new to programmatic advertising or need guidance are advised to use the managed option, however that comes with a $35,000 minimum spend.

Why we like it: Amazon DSP can greatly increase brand awareness for sellers on and off Amazon.

DSPs Still Require Research

When you choose a DSP, make sure you understand how many inventory sources it accesses, which third-party data integrations it offers, and what targeting criteria are available. To successfully run programmatic ads on a DSP, you’ll need to reach global audiences with personalized ads. While using a DSP simplifies paid ad management, it won’t replace customer research and having a clear idea of who your target audience is.

This article was originally published March 5, 2021, and has been updated for comprehensiveness.

paid media template

Categories B2B

How to Decline a Job Offer

Before you decline a job offer, ask yourself some key questions:

  • Why are you no longer interested in the job?
  • Are your reasons for losing interest short-term, or longer-term reasons that you can’t change?
  • If you don’t accept the offer, will you regret turning it down?

If you’ve answered all of these questions and still feel like you want to decline, read on to discover the different ways to decline a job offer.

Free Kit: Everything You Need for Your Job Search

Know exactly what you need? Jump to one of the following sections:

How to Politely Decline a Job Offer

Politely declining a job offer focuses on three key things: being prompt, showing appreciation, and giving a brief reason. We’ll discuss each further below.

1. Be prompt.

Let the hiring manager, recruiter, or relevant individual know as soon as you know you won’t accept a job offer. Putting it off can cause inconvenience, and they may have other candidates that they want to notify of their acceptance to fill the position as soon as possible.

2. Show your appreciation.

It’s essential to show your appreciation to the hiring manager or team responsible for interviewing you and the time they’ve spent communicating with you throughout the process. Showing this gratitude goes a long way in terms of expressing appreciation, and doing this can leave a positive impression if your paths ever cross in the future.

3. Give a reason, but keep it brief.

There’s no need to go into incredible detail about why you’re declining an offer, but it can be valuable to give a brief reason as to why you’re moving on. So, for example, you can say something like:

“At this time, I don’t think I should leave my current position,” or, “After some thought, I don’t think this position matches my current career goals.”

It’s also not necessary to give a reason all the time, especially if it’s due to something like red flags you noticed in the boss or if you didn’t like the company. If you have a reason like this, it’s best to simply express thanks and say you won’t accept the offer.

How to Decline a Job Offer Due to Salary

Sometimes you’ll decline a job offer because the salary offered is lower than your expectations, which is a valid reason for looking elsewhere.

Follow the tips mentioned above about politely declining a job offer and, when giving your reason, you can specify that it is about salary. Without going too in-depth, you can be short and to the point and say that the salary does not meet your desired expectations. Here’s an example of how you can note salary as a reason when declining a job offer:

“While this position excites me, I, unfortunately, must decline the job offer as the salary doesn’t meet my desired expectations. I appreciate the opportunity, and thank you for taking the time to consider me for the position.”

How to Decline a Job Offer Over the Phone

There is debate about the best medium for declining a job offer. While some may prefer one medium over the other, the most important thing is that you’re expressing appreciation. Below we’ll go over declining a job offer over the phone.

  1. First, call at an appropriate time where you can reach the correct person, like when they’re less busy, like right when a workday would begin or after a lunch break.
  2. Try to speak to an actual person versus leaving a voicemail, but if you can’t get through, you can leave a voicemail asking them to call you back.

It may seem nerve-wracking to decline a job offer over the phone as you have to speak to the direct individual, but it shouldn’t bring too much trouble if you follow this template. Also, it’s likely the hiring manager or responsible interviewer won’t want to spend a significant amount of time on the phone, especially if you clearly state your reason.

“Hi, this is [Your name]. I was hoping to speak with [Name of the hiring manager or DRI].

I’m calling today because I wanted to let you know that I won’t be accepting the job offer due to [Reason]. I appreciate the time you took to interview and consider me for the position and extend an offer. Thank you!”

The hiring manager or responsible person may ask questions, so be prepared for the possibility of more conversation.

If you choose to leave a voicemail, here’s a sample template:

“Hi, this is [Your name], hoping to reach [name of responsible individual]. I’m calling regarding the job offer and wanted to let you know that I can’t accept the offer at this time due to [Reason]. I appreciate the time you took to interview and consider me for the position and extend an offer. Thank you!”

Please note that you don’t have to give a reason; you can simply say you can’t accept the offer.

How to Decline a Job Offer Over Email

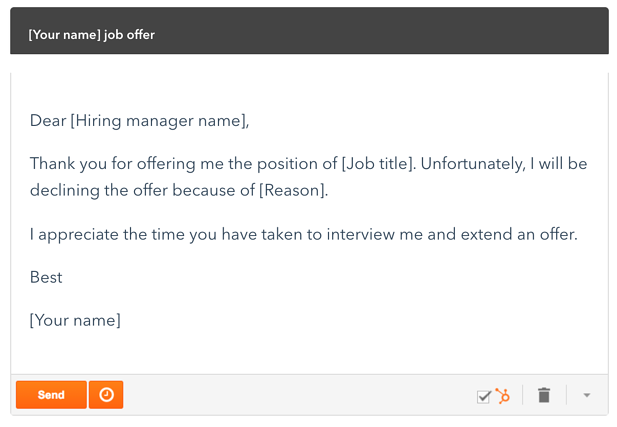
Declining a job offer over email follows the same practices: be prompt, express appreciation, and give a brief reason. Also, if you’re using email because you made a phone call but couldn’t get through, mention that and say something along the lines of “I hoped to get in touch with you over the phone, but wasn’t able to get through.”

Here’s a sample template:

how to decline a job offer sample emailDepending on your reason for leaving, you can input your information. For example, if you accepted a job somewhere else, or you’re simply just not ready to leave your company.
How to Decline a Job Offer You Already Accepted

Declining a job offer you’ve already accepted can be a bit tricky, so here are some tips.

The most important thing to do is read the contract you signed to see if there is a clause or statement that dictates how you should decline the offer. For example, some contracts state that you need to make people aware of this within a specific time frame.

The best way to decline the offer is over the phone, so you can speak to someone and clearly explain yourself. State the reason you’re going back on your acceptance, express appreciation, and say thank you.

Be aware that you may put the business in a challenging situation so that the conversation may be extremely brief.

Here’s a sample template that you can use over the phone or via email:

“Hi [Hiring manager or DRI], this is [Your name]. Unfortunately, after giving it a bit more thought, I will have to decline this offer. I’ve realized that [Reason], and I’m sorry for any inconvenience this may cause your business. I’m thankful for the time you spent interviewing me and extending my offer.”

Over to You

Whatever your reasoning is, declining a job offer can be nerve-wracking. If you use our templates and can be prompt and appreciative, you may find that it’s not so bad, and you may even end up developing relationships that can help you with your career further down the line.

Apply for a job, keep track of important information, and prepare for an  interview with the help of this free job seekers kit.

Categories B2B

What’s an Instagram Handle? (+4 Ideas to Help Create Your Own)

Did you know Instagram has over 1 billion active users? With so many on the platform, it can be challenging to find one particular person or business. Enter the Instagram handle.

Download Now: Free Instagram for Business Kit + Templates

You can think of a handle as the address to your Instagram page. It’s also what people search to find you. An effective handle quickly identifies you while being memorable.

Here, we’ll discuss how to find and change a handle, ideas for creating your own, and whether it deserves a spot on your business card.

It’s easy to confuse an Instagram handle with your Instagram name. However, they both serve different functions. The biggest difference is that an Instagram handle is unique — once you choose it, no one else can claim it. An Instagram name, however, can be the same amongst multiple users.

An Instagram handle has several purposes — first, it’s what people use to tag you in photos, videos, and stories. For example, HubSpot’s handle on Instagram is @HubSpot, which users can type to mention the user in posts.

Second, it creates a link to your profile. If you change your handle, the URL to your profile also changes. Keep in mind that when you pick a new handle, you can’t switch back to your old one until 14 days have passed.

How to Find an Instagram Handle

When you sign up for an Instagram account, you will be prompted to create a handle. While you can let your creativity take the wheel, there are some rules you need to follow:

  • Your handle can’t exceed 30 characters
  • It can only contain letters, numbers, and periods
  • It can’t contain symbols or punctuation marks
  • It needs to be unique

The hardest task is the last one — and may take some trial-and-error. To help, we’ve included four Instagram handle ideas to get you started.

Instagram Handle Ideas (+ Examples)

1. Keep it simple.

For businesses, a good rule is to keep it simple — usually by picking a handle with the name of your business. But if your business name is unavailable, you may need to do some finessing.

For instance, suppose you run a print shop, Mint Prints. The handle @MintPrints is the ideal option — but if it’s already claimed, you can alter it without changing its meaning. For example, you could add your location (@MintPrintsBrooklyn) or a word that describes your business (@MintPrintsDesign).

Later, we’ll discuss more variations to try if your first-choice handle is unavailable.

2. Relate the handle to your niche.

Whether you’re into fitness, photography, travel, dance, or art, a great tip for creating a handle is to include words that relate to your niche. This also adds personality and interest to an otherwise static profile.

Check out the example below from food author Lizi Heaps:

3. Avoid using extra characters and symbols.

When a user performs an Instagram search, it pulls up a list of profiles with the most relevant handles. Therefore, adding extra characters or symbols to your username could make it harder for others to find your profile.

Although handles have a 30-character limit, keeping it short and concise is better. Long handles are difficult to remember and harder to discover via search. For instance, which handle below is easier to remember?

Option 1: @SophiasFoodBlog

Option 2: @SophiasFoodBlogNYC5746

4. Add “The” or “I’m” in front of your handle.

As we discussed above, sometimes your ideal Instagram handle has already been taken. Luckily there are different variations you can try to craft another one.

One variation is to add “The” in front of your handle. For example, Faire Plaisir, a vintage homeware company, uses the handle @TheFairePlaisir on Instagram. This minor modification allows the brand to still use its company name, which helps with discoverability.

Another variation is to add “Im” in the front of your handle. For example, actor Angela Bassett has the handle @im.angelabassett. This modification is better suited for individual or personal accounts than businesses ones.

How to Change an Instagram Handle

Before you pick a new Instagram handle, it’s important to understand what does and doesn’t change once you make the switch.

For one, your handle is a key part of your profile’s URL. If someone bookmarks or saves a link to your profile with your old username, they will be redirected to a page that reads, “Sorry, this page isn’t available.” The same goes for every tagged post, comment, and “like” from your old username,

Also, if you link your Instagram handle in an email signature, blog post, website, or business card, it’s essential to update this information — which can be a hassle.

If you’re starting to get cold feet about changing your handle, fear not — Instagram gives you 14 days to change it back. That said, there are valid reasons for changing your handle, such as rebranding.

Here are four steps to change your handle:

  1. Navigate to your profile and click “Edit Profile.”
  2. Click on your username.
  3. Delete your old handle and type a new one.
  4. Click “Done.”

After you complete these steps, Instagram will automatically update your profile with your new handle.

Should I include my Instagram handle on my business card?

Image source

While social media was once a way to connect with friends and family, it now doubles as a networking tool. So much so, a number of professionals reserve a spot on their business card for their social media accounts.

But is this the best option for you or your brand? Let’s consider the benefits:

  • It builds and expands your network. Building your brand often goes hand-in-hand with building your network. Putting your Instagram handle on your business card encourages prospects to find and engage with you.
  • It puts a face to the name. Providing your Instagram handle gives prospects a chance to know you beyond the surface-level details. Having an online presence is also important to gaining trust and credibility.
  • It provides an additional communication channel. Having social media info on your business card lets prospects know that you’re open to communicating in different ways and contexts.

Of course, you also run the risk of crowding your business card with too much information — which is why I recommend linking Instagram only if it’s a platform that you actively engage with.

Final Thoughts

Although picking an Instagram handle may feel like a minor detail, it’s a key component of your digital brand. And with millions of users on Instagram, it’s essential to pick one that’s searchable, memorable, and relevant to you.

New Call-to-action

Categories B2B

20 Ways to Effectively Increase Your Conversion Rate

Have you ever heard the term “analysis paralysis”? It’s the concept that too many choices can inhibit a person’s ability to make a decision. Visitors to your website can experience this too if there are too many places to look or if there’s a confusing design.

When this happens, visitors won’t convert. Therefore, increasing your conversion rate is beneficial to lowering your cost per acquisition.

Download Now: Free 8-Week Conversion Rate Optimization Planner

Below, let’s review how to increase your conversion rate for both your desktop website and mobile site.

How to Increase Conversion Rate on Your Website

1. Use a CRO planner.

Getting started with conversion rate optimization can seem like a daunting task.

The first step to improving your conversion rate? Use a CRO planner.

With a CRO planner, you’ll be able to analyze and develop a strategy for increasing your conversion rate.

For example, with HubSpot CRO planner, you’ll find instructions on how to conduct a site audit, identify areas to improve your conversion funnel, understand users on your site, and go through the process of A/B testing and experimentation.

CRO planners can be helpful because they take through the entire process from A to Z.

HubSpot's conversion rate optimization planner.

2. Shorten your forms.

One reason that users don’t convert is because there’s friction in the process. For example, if you have a long-form, visitors might be hesitant to fill it out.

It’s your job to eliminate hesitation, not create it. By shortening your forms, you’ll create trust among your audience. Plus, it takes less time to fill out so users are more likely to complete it.

3. Include social proof.

Did you know that 89% of consumers check online reviews before making a purchase? The Canvas8 study commissioned by Trustpilot also found 49% of consumers consider positive reviews one of their top three purchase influences. Without a doubt, your reputation and online presence impact your conversion rate. That’s why you should include social proof on your site.

You can link to your Yelp or any other directory page where customers have left reviews.

Additionally, you should also add testimonials and reviews right on your site so visitors don’t have to go to a third-party site.

It should be apparent that your customers have enjoyed using your product or service. If it isn’t, your conversion rate will suffer.

4. Track how people interact with your site.

It’ll be hard to improve your conversion rate if you don’t understand how users are interacting with your site.

But how can you see where visitors are getting tripped up? With website analysis tools, you can see screen recordings of users on your site. You’ll see what they click on, if they skip over an offer, or if they stop filling out a form in the middle.

Additionally, these tools should include heat maps of your site, so you can see what elements stand out and what draws the eye.

A tool like Crazy Egg or HubSpot’s website grader can help you see what you’re doing well and diagnose what areas of your site you need to improve. You should also calculate your conversion rate and analyze why visitors aren’t converting on your site.

5. Add live chat.

When a web visitor doesn’t convert, they might have a question or concern about your product or service.

Live chat to increase conversions

To avoid losing potential customers, you should consider adding live chat to your site.

With live chat, your customer service or sales employees can alleviate concerns of prospects who are on the fence.

6. Test your offers.

Sometimes it can feel like you’ve checked everything — you’ve written a strong copy, included social proof, and have optimized your forms … but you still aren’t converting.

When this happens, it’s time to check your content offers. Do they align with your audience? Are they creative and compelling? Do the offers make sense for the page they’re on?

Think about your current offers and answer those questions.

For example, offering a free trial or consultation is fairly generic. Instead, you could offer something like HubSpot’s Website Grader. With this offer, the customer is getting a lot out of it. They’re getting actionable advice, for free, and they don’t need to clear out time on their calendar to get it.

Tangible and compelling offers always perform better than a generic offer. To improve conversions, you need to analyze and test your content offers.

7. Conduct A/B testing.

It’s not always easy to know what’s working and what isn’t. When that happens, you should conduct A/B tests.

See what types of headlines, colors, copy, layout, and CTAs work for your audience. Get creative with your experiments.

For example, you can try testing an entirely new type of CTA or completely changing the format of your copy.

8. Increase trust and remove friction.

Users don’t convert if they don’t trust your brand or experience friction in the process.

So, how can you increase trust?

You can use several tactics, including money-back guarantees, updating your site content regularly, avoiding spammy links, and making the site easy to use.

If it looks like you haven’t posted a blog in two years or there are a lot of broken links — that’s friction and it creates distrust.

Additionally, you can include team bios so your audience knows who they’re getting information from.

9. Create abandoned cart email campaigns.

Have you ever been on a site, added something to your cart, but decided not to check out? We all do it and that means it’s probably happening on your site too.

You shouldn’t forget about those potential customers. If someone abandons their cart, they should receive an abandoned cart email campaign.

increase conversions using abandoned cart emails

With this type of email campaign, you’ll email users a reminder about the products in their cart, send a follow-up, and then perhaps include a discount or offer.

If you don’t send this email, you’re losing out on conversions.

How to Increase Landing Page Conversion Rate

10. Communicate your value proposition.

On any landing page, your value proposition should be clearly communicated. To do this, you need to have a solid understanding of who your audience is and your buyer persona.

Write your copy specifically for your target audience. For example, you can address their goals, motivations, and pain points.

Additionally, you should discuss the benefits of your product or service over the features. Benefits will help your potential customers imagine their life with your product, while features are easy to skim and ignore.

Your copy should communicate how your product or service can solve your audience’s problem. If you aren’t converting, you should check and see how well your copy is written.

11. Incorporate multimedia elements into your landing pages.

Have you ever ordered something at a restaurant and when it came out, it looked completely different than what you imagined?

You don’t want this to happen when people download your content offers. To avoid this, include images and videos of your product or service on your landing pages.

Multimedia elements make your site feel more trustworthy. Plus, it’s the preferred way of consuming content.

To improve your conversion rate, try adding images of graphs and charts, or video testimonials to your site.

12. Write strong CTAs.

A huge component of conversion is your call-to-action (CTA). Your CTA could be to download an offer, share a post on social media, or subscribe to your email newsletter.

Whatever it is, you need to include CTAs throughout your website and landing pages. Usually, this means that they’re clear and easily accessible.

“Marketers need to take a Goldilocks approach when it comes to placing CTAs since sometimes, one placement isn’t enough,” explains AJ Beltis, HubSpot’s Senior Marketing Manager. “But it’s very easy to have a CTA appear so often as to appear spammy to website visitors.”

Typically, each landing page will only have one call to action but be incorporated several times on a page. For example, this blog post has three CTAs that lead to one offer. One at the bottom of the page, one in the text in the introduction, and one that pops up after scrolling down the page.

Typically, the sooner a CTA can appear on a page, the better, Beltis says. Otherwise, you run the risk of visitors who don’t scroll down far enough missing the conversion point entirely.

The important thing to note is that you can access the CTA no matter where you are on the page. Removing risk for the visitor (like offering a guarantee) and communicating that message clearly in your CTA will encourage them to take action.

13. Eliminate unnecessary distractions.

Speaking of CTAs … it’s important to remove anything on your landing page that would detract from visitors taking a preferred action. Get rid of any unnecessary links, pop-ups or navigation options that could potentially divert a visitor’s attention away.

A busy or cluttered page is less likely to convert visitors. You only have a few seconds to win them over, and a page that’s hard to navigate will discourage them from sticking around.

Design a page that encourages visitors to click your CTA using visual hierarchy to your advantage.

14. Meet your audience’s expectations.

When someone clicks on your site after reading your meta description on Google or seeing your search engine ad, your landing page needs to follow through.

You have to deliver on the promises that were made in that copy. For example, if a user sees this post in Google, they’re going to expect to find strategies to improve their conversion rate. If they clicked through and this page only had pictures of puppies, they’d be confused.

If a landing page doesn’t deliver on what a user thought they were getting, they won’t convert. That’s why you need to think about the entire process from seeing an ad, going to your landing page, and downloading an offer.

If a landing page isn’t converting, review your social media posts and search engine descriptions to see if you follow through on the promises you made.

How to Increase Mobile Conversion Rate

15. Improve your page speed.

When it comes to mobile conversion, a huge obstacle is page speed. This is the time it takes for your content to appear on the screen.

Did you know that 40% of people abandon sites that take more than 3 seconds to load? On mobile specifically, a one-second delay in page response can result in a 7% reduction in conversions.

If your mobile page isn’t converting as well, analyze your page speed with Google’s PageSpeed tools. This will test your mobile page speed.

To improve your page speed, images need to be smaller and compressed. Additionally, your site should be responsive and optimized for mobile.

16. Optimize for mobile.

Since Google switched to mobile-first indexing, mobile optimization has been more important than ever. If you don’t optimize for mobile, your Google rankings might be impacted, which could reduce conversions.

You might be wondering, “How do I optimize my site for mobile?”

Before you begin, it’s important to remember that mobile and desktop experiences are different.

You can use Google’s mobile testing tool to see if your site is mobile-friendly. With this tool, you’ll get recommendations for how to improve your site’s mobile performance.

For example, you might need to increase your font on mobile, compress your images, or improve page speed.

17. Enhance the purchasing process.

Making a purchase on your phone should be a simple process.

That means you shouldn’t have too many steps in your checkout process and your payment buttons should be easy to see and click.

Additionally, try to remove restrictions on online forms where you gather payment information. Personally, I’m always stopped on mobile forms because the name of my city is too long (22 characters).

Users should be able to check out as a guest and use whatever payment method they want, whether that’s Google Pay, Apple Pay, or PayPal.

Ultimately, this process should be easy and pain-free. A complicated checkout process will reduce mobile conversions.

18. Be creative with your mobile marketing.

When you want to increase your mobile conversion rate, that doesn’t just mean you need to adapt your site to the mobile experience.

You can also start to get creative and run mobile-only marketing campaigns.

For example, maybe you can start an SMS text message campaign, or you can use push notifications on your app.

These creative, out-of-the-box techniques can help increase your mobile conversion rate.

19. Make adjustments to your mobile site.

Since the mobile and desktop experiences are different, your mobile and desktop sites should be different.

For example, your email subscriber form might be smaller or nonexistent on your mobile site.

Additionally, you’ll probably use different CTAs on your mobile site. For instance, when you read this blog, the website and mobile have different types of CTAs. While the offer is the same, the button and the way to access the CTA aren’t.

On mobile, less is more. Your mobile site should be simple and eliminate distractions. This can mean you have simplified navigation and use a hamburger menu so it’s easy to get around your site.

20. Localize your content.

Mobile users are usually on your site because they’re looking for contact information, want to know your location, find directions, or look up reviews.

That’s why you should optimize for local marketing. This means adding location pages to your website, managing your online directory listings, and creating local content.

To improve your mobile conversion rates, consider localizing your content so you perform better in local searches.

Before I sign off, I want to remind you that many of the tactics for improving your website’s conversion rate can be applied to mobile CRO.

Empathize With Customers

At the end of the day, we’ve all been consumers before. Take a step back, look at the bigger picture, put yourself in your customer’s shoes, and think about whether you would make a purchase off your site.

This article was originally published May 25, 2020, and has been updated for comprehensiveness.

Get the 8-Week CRO Planner

Categories B2B

The 20 Best Video Editing Apps for 2022

Using a video editing app is critical for creating a winning video marketing strategy. And if you’re reading this blog post, chances are you already know you should incorporate more video content into your marketing, especially after the rise of remote work.But like most new strategies, you’ll need to prove its ROI before you get a budget. And that can be tricky because to make a great video, you need a few things — like a camera and editing software. You might already have a high-quality camera built into your smartphone, but editing your raw footage and preparing it for publication requires a third-party mobile app. You might even need to hop on the computer for the more extensive post-production projects.

→ Access Now: Video Marketing Starter Pack [Free Kit]

The good news: There are several free and inexpensive video editing apps you can download that run the gamut from super simple to Hollywood-level powerful. In this post we will delve into the best video apps for every device and click one of the links below to jump to a specific type of app, or keep reading to learn about them all.

Editing Apps for Videos: Standard Features

Every editing app will be different, but there are a few features you’ll want to look for. Because most apps will have a free and paid version, it’s important to know what’s essential and what might be worth an upgrade.

For every video app whether paid or free, it will include:

  • Scrubbing through video as you edit.
  • Choosing an aspect ratio that fits with your target platform (Instagram, Youtube, Facebook, TikTok, etc.).
  • Adding text and shapes along with professional transitions throughout the shots.
  • Exporting video with at least 480p quality with high definition exports up to 4k.
  • Adding music to the video via stock music or your library.

The following solutions can help you make video magic — whether your video is meant for Instagram, YouTube, or a similar channel where your audience is hungry for content.

Instagram Video Editing Apps

The following apps allow you to edit and quickly upload beautiful videos to Instagram. None of these apps are limited to Instagram but are known for their support of this social network.

1. Magisto

Price: Starts at free | Platforms: iOS, Android, Online

Best Video Editing Apps for Instagram: Magisto

Image Source

Video automation is here — in the form of the Magisto video editor.

Owned by Vimeo, Magisto allows you to make incredible videos without ever leaving your smartphone in three easy steps: First, you’ll choose your video editing style (the type of story you’re telling), then you’ll choose the photos and video clips you’d like included, and lastly, you’ll pick your music from Magisto’s built-in music library.

Using artificial intelligence (AI), this intuitive app helps organize your footage in a video that best delivers the message you have in mind. Why not stop at the free version? Upgrade to Premium or Professional for a small monthly fee and make longer movies with more of your own content.

Pros

  • Easy-to-use templates for hassle-free creation
  • Intuitive, beginner-friendly interface
  • Online version available for creating both on Windows and macOS laptops
  • Professional and Business plans come with a free Vimeo Pro subscription

Cons

  • The “Created with Magisto” watermark will be visible unless you upgrade to premium
  • No multi-track editing or 4K exporting
  • Ideal for very short social media videos (< 3 minutes long)
  • Stock videos are only accessible with a Professional plan

2. Hyperlapse

Price: Free | Platforms: iOS

Hyperlapse is an app created by Instagram itself that condenses videos into brief, hyper-speed videos that you can upload to Instagram or Facebook.

You can choose among a few different speeds, and the app will show you how long the hyperlapse video will be for every speed in comparison to the length of the video in real-time. (So a 40-second video in real-time will become roughly a 7-second video in Hyperlapse at 6X speed.) It’s a cool way to capture something that usually lasts a while — like a sunset or an event setup.

See what happened when I used Hyperlapse to film daybreak at 12X in the video above.

Pros

  • It’s an easy way to speed up process videos.
  • Use a minimal layout that’s nearly identical to the iPhone camera.
  • You can capture videos straight from the app.
  • No sign-in is required to get started.

Cons

  • It only has one capability: speeding up videos
  • You can’t import already-filmed videos into the app
  • The video saves to your camera roll, taking up storage space
  • No multi-track editing, 4K exporting, or other features typically associated with apps for video editing

3. Wondershare Filmora

Price: Starts at free on mobile | Platforms: iOS, Android, macOS, Windows

Best Video Editing Apps for Instagram: Wondershare FilmoraImage Source

Wondershare Filmora (formerly Wondershare Video Editor) is the perfect option if you want to start with basic video editing functionality with the opportunity to get more advanced as you go. The app is perfect for Instagram but can create audience-ready videos for numerous platforms.

Filmora is available for Windows and Mac computers, whereas the company’s FilmoraGo mobile app is free to download for both iOS and Android devices.

Filmora’s “Easy Mode” strips away the complexity so you can drag and drop video clips, add some music, and produce a finished video in a matter of minutes. The FilmoraGo app has many of these features, plus an Effect Store where you can incorporate preset intros, themes, and transitions into your video creation.

Sounds too good to be true? Well, you’re right: The free version of Wondershare Filmora adds a watermark to your videos that you can only remove through upgrading to their paid service.

Pros

  • This app is a powerful option for both beginner and advanced video editors.
  • The desktop version offers multi-track editing and more traditional video editing capabilities.
  • The mobile version includes easy-to-use effects, stickers, and filters.
  • You can layer music and different sounds in the mobile app.
  • Relatively affordable (starting at less than $50 per year for Filmora X, and free for the mobile app) compared to competitors such as Adobe.

Cons

  • The desktop apps are not free, but a trial is available.
  • Videos are watermarked with the Wondershare branding unless you upgrade to a premium plan.

4. InShot

Price: Starts at free | Platforms: iOS, Android

There are times when you just want to edit a video — no fancy collages and no splicing. For that, there’s InShot, a handy app that lets you trim, speed up, or add music and filters to video. It’s pretty fundamental, but with that comes a high ease of use. You can also add a background if you like, though we think it’s pretty cool to have an overlap of images — like we did with the video above.

I took a simple video of a tranquil beach scene, but enhanced it with InShot’s “warm filter” and added a fitting musical track to it — a song called “Pikake Stream,” by Kalani. (I recommend viewing the video in its entirety with headphones, especially if you’re having a stressful day.)

Pros

  • It’s a great app for beginners and marketers who don’t have a lot of time for intensive video editing.
  • Built-in music library with royalty-free options.
  • You can add voice-overs and your music.
  • The app has a 4.8-star rating on the Apple Store and over 1M ratings.

Cons

  • There’s no desktop app available.
  • Filters and stickers are only available with a paid subscription.
  • Your video will be watermarked unless you upgrade to the paid version.

Video-Marketing-Starter-Pack-Interactive-Banner.png

Top Free Video Editing Software

The following tools are the most versatile mobile apps of all the free software listed in this article.

1. WeVideo

Price: Starts at free | Platforms: iOS, Android, Chrome OS

Top Free Video Editing Software: WeVideo

Image Source

Cloud-based video editing software (i.e., software that you access via a browser instead of downloading directly to your hard drive) is growing more and more popular. One of the programs leading the charge is WeVideo.

WeVideo offers some advanced features and functionality, including audio editing capabilities, a library of commercially licensed music, and the ability to share videos in 4K resolution. However, the free version of WeVideo isn’t without its limitations.

One major downside is that you’re only given 10GB of cloud storage. If you’re making a one-off video, this is fine. But if you’re planning to edit multiple videos, you’ll need more space. The free version also puts a WeVideo watermark on your videos, which isn’t ideal.

WeVideo is also available as a desktop computer product and comes with free and paid plans. For a complete breakdown of the differences between these plans, check out WeVideo’s pricing page.

Pros

  • You can access your videos from any device
  • Paid versions are relatively cheap (starting at $4.99 for the Power version)
  • 4K exporting available

Cons

  • Only 10GB of storage and 5 minutes of published video are available on the free version
  • The maximum resolution is 480p on the free subscription
  • Your video will be watermarked with WeVideo’s branding unless you upgrade

2. Splice

Price: Free | Platforms: iOS

Splice allows you — as the name suggests — to splice together different video clips on your phone to create a moving collage.

We had a lot of fun playing with this one, especially since Splice even contains a library of musical tracks that can be used as a background for your finished product. You can also use the app to trim and edit the different pieces of video and customize transition lengths from one scene to the next.

My colleague, Amanda Zantal-Wiener, experimented with Splice by compiling the above 15-second video of her dog — using only an iPhone 6.

Pros

  • Easy and intuitive to use
  • Familiar user-friendly interface
  • Multi-track and timeline editing with layers and masks
  • No sign-in required
  • No watermark, even for free subscribers

Cons

  • Subscription starts at $2.99/week, or $12.97/month, which is pricier than other alternatives
  • Effects and music are only available for paid subscribers

3. Adobe Premiere Rush

Price: Free | Platforms: iOS, Android

Top Free Video Editing Software: Adobe Premiere Rush

Image Source

Adobe’s popular video editor, Premiere, isn’t just available on your mobile device — it’s free.

Melissa Stoneburner of Examiner.com calls this app a “gateway” into the full Adobe Premiere Pro video editor for desktop, and we can see this for ourselves. Similar to Magisto (the first video editor on our list), Adobe Rush automatically sets your video to the music of your choice (using Premiere Rush’s library or your own), and offers a Freeform editor that allows you to customize your edits further after this initial audio sync.

Premiere Rush’s equally robust video editing features help you trim, drag, and drop multiple video and image clips — right from your mobile device’s photo and video album — in the order you’d like.

Then, just add proper lighting, manipulate the speed of the video, and share your final product directly on Facebook, Twitter, or YouTube.

Pros

  • It’s a natural choice for current Adobe users.
  • Premiere rush offers a familiar video editing interface for those with experience and an easier learning curve for beginners.
  • The paid version supports 4K exports.

Cons

  • Some users report exporting and crashing issues on the Android version.
  • Limited storage capabilities (<100GB) for free users

4. PicPlayPost

Price: Free | Platforms: iOS, Android

We’ve already covered the coolness of photo collages. But what if you could make a video collage? PicPlayPost is a simple app that lets you do exactly that. Just remember that the sound from both videos will play at the same time, so be sure they won’t clash with one another.

There are many uses for a video collage app, but my colleague, Lindsay Kolowich, particularly likes the way fitness professional Melissa Made uses it on her Instagram account. She posts video collages with her performing a workout on one side, while she explains the workout out loud on the other.

Pros

  • You can create alternative formats such as gifs and live photos
  • 4K exporting available

Cons

  • Most valuable features are available on the paid version only
  • You can’t paste text from another app
  • Video will be watermarked with the PicPlayPost branding unless you upgrade

Best Video Editing Apps for YouTube

Although the video editing services below do not offer mobile versions, they do offer easy-to-learn functionality at minimal cost. These apps are the best for sitting down at your computer and editing amazing video content for your YouTube channel.

1. Blender

Price: Free | Platforms: Windows, macOS, Linux

Best Video Editing Apps for YouTube: Blender

Image Source

The open-source program Blender is more than just a video editor: It’s a full-blown 3D animation suite, which allows for modeling, rendering, motion tracking, and more.

On the video editing side, there are a ton of features, including transitions, speed control, filters, adjustment layers, and more. There are also 32 slots available for adding video clips, audio clips, images, and effects, which means you can produce some incredibly complex video.

For the amateur video editor, all the options can be a bit overwhelming. But if you’re looking to produce truly professional-quality video — without having to deal with watermarks — Blender is a solid option. The best part: “You are free to use Blender for any purpose, including commercially or for education,” according to its website. For the fine print, check out its licensing info.

Pros

  • Blender has a long history of use across multiple platforms.
  • You can render, model, sculpt, and animate using this app.

Cons

  • There’s a steep learning curve for beginners.

2. Lightworks

Price: Free | Platforms: Windows, Mac, Linux

Best Video Editing Apps for YouTube: Lighthouse

Image Source

Like Blender, Lightworks is definitely on the more advanced (and powerful) end of the video editing software spectrum. In fact, it’s a program that’s been used to edit some well-known and award-winning films, including Pulp Fiction, The Wolf of Wall Street, and The King’s Speech.

There are two different licenses you can choose from with Lightworks: “Free” and “Pro.” (The latter of which, as you might have guessed, requires that you cough up some cash.) The main difference between the two licenses is that the Pro version offers more features, including stereoscopic output and advanced project sharing. But the free version is still quite powerful, providing 100+ effects and supporting multicam editing.

Pros

  • Like Blender, Lightworks has a long history of use across multiple platforms.
  • You can access royalty-free videos and audio from the desktop app.
  • You can export up to 4K.
  • Multi-track editing and timelines, even in the free version.
  • You can buy a lifetime license for $437.99 and never worry about renewing a subscription.

Cons

  • There’s an extremely steep learning curve for beginners.
  • Limited options for creating titles and subtitles.
  • Users have reported formatting issues when importing video clips.

3. Shotcut

Price: Free | Platforms: Windows, macOS, Linux

Best Video Editing Apps for YouTube: Shotcut

Image Source

Shotcut is another open-source video software — and it’s completely free. It’s possible to use Shotcut to create professional-looking videos, but the interface is tricky to use. Perhaps that’s because it was originally developed for the Linux platform, which looks and feels a lot different from the typical Windows or Mac UX.

With dedication — and time spent in the Shotcut frequently asked questions and how-to guide sections — it’s possible to use this software to create and export high-quality videos, completely for free.

Pros

  • It’s completely free—you never have to upgrade, ever.
  • The diverse list of features rivals those of paid apps.

Cons

  • Shotcut could be difficult to get the hang of at first.
  • Some users find the UI difficult to navigate.
  • It’s less intuitive compared to other apps such as Premiere Pro and FinalCut, even for experienced editors.

4. VSDC Free Video Editor

Price: Free | Platforms: Windows Only

Best Video Editing Apps for YouTube: VSDC Free Video Editor

Image Source

In experienced hands, the VSDC Free Video Editor can produce professional-looking videos. In addition to supporting nearly every major video format, the program offers advanced video effects, including object transformation and color correction, as well as advanced audio effects like volume correction and sound normalization. And unlike WeVideo, the VSDC Free Video Editor is truly free. You can use the program’s full feature set without having to deal with pesky watermarks.

Unfortunately, there is one catch. If you want technical support, you need to pay. (And because there is a bit of a learning curve, there’s a good chance you’ll need assistance.) Support for the VSDC Free Video Editor costs $9.99 for one month and $14.99 for one year.

Pros

  • The free version is packed with typically premium features such as masking, blending modes, and 4K exports.
  • You can share your video directly from the app to YouTube, Vimeo, and other platforms.

Cons

  • You have to pay for support if you’re using the free version.
  • Not as user-friendly as other alternatives.
  • Users have reported a steep learning curve.

5. Machete Video Editor Lite

Price: Free | Platforms: Windows Only

Best Video Editing Apps for YouTube: Machete Video Editor Lite

Image Source

At the simple end of the spectrum is Machete Video Editor Lite, a free program allowing you to cut, copy, and paste different sections of video. As the Machete website puts it, Video Editor Lite was “designed for quick and simple ‘slicing’ of your video files.”

The program’s intuitive interface means you won’t have to waste time shuffling through technical support documents. And because Video Editor Lite doesn’t re-encode your video files when you slice them, you don’t have to worry about losing video quality.

The main downsides to the program? It only supports the AVI and WMV video formats, and it doesn’t allow for audio editing. Still, if you have zero video editing experience and only need to make simple edits, it’s a great option.

Pros

  • This app offers simple but powerful slicing and editing capabilities.
  • It’s an incredibly simple and user-friendly interface; simply download and go.

Cons

  • You can only export AVI and WMV files.
  • You can’t edit or replace the audio.
  • The website is outdated with limited support documents.

6. Avidemux

Price: Free | Platforms: Windows, macOS, Linux

Best Video Editing Apps for YouTube: Avidemux

Image Source

Like Machete Video Editor Lite, Avidemux allows you to do basic video editing (no audio editing) without having to worry about losing video quality. But Avidemux also has a few more tricks up its sleeve.

For starters, the program supports multiple video formats, including AVI, DVD, MPEG, QuickTime, and MP4. What’s more, Avidemux comes with several filters that allow you to perform a host of different functions, from flipping and rotating clips, to adding subtitles, to adjusting colors and brightness levels.

And while the learning curve for Avidemux is slightly steeper compared to Machete Video Editor Lite, the upside is that there’s an extensive Avidemux wiki that covers everything you need to know.

Pros

  • Supports multiple file formats such as AVI, MPEG, MP4, and Microsoft’s proprietary ASF
  • Simple interface that’s best for tasks such as cutting and splicing footage
  • Easy learning curve; simply download and start using

Cons

  • Limited capabilities compared to other apps (especially mobile apps)

7. HitFilm

Price: Starts at free | Platforms: Windows, macOS

Best Video Editing Apps for YouTube: HitFilm

Image Source

HitFilm Express is a free video editing and visual effects software — which means you can use it to add more than 180 special effects to your videos, including 3D editing.

Possibly the coolest HitFilm feature is its wealth of tutorial videos — users can practice applying special visual effects in movie tutorials based on Star Wars, Westworld, and more.

Of course, upgrading to HitFilm Pro grants access to more visual effects, better high resolution and 3D rendering, and better audio syncing between audio and video files. It costs $300, but if you’re not ready to fully invest, HitFilm Express users can purchase lower-cost expansions to use more tools in their software.

To see the complete list of differences between HitFilm Free and Pro, check out their “Compare Versions” page.

Pros

  • Powerful capabilities such as mask rendering, export queues, and unlimited tracks and transitions
  • Built-in voice recorder for easy voice-overs
  • Has been described as a mix between Adobe After Effects and Adobe Premiere Pro

Cons

  • Beginners may experience a learning curve.
  • Some users have reported crashing issues.

Video Editing Apps for Android

These video editing apps are particularly appealing for Android mobile users, though some of them are compatible with more than just the Android operating system.

1. VideoShow

Price: Free | Platforms: Android, iOS

Video Editing Apps for Android: VideoShow

Image Source

VideoShow allows you to edit video content in many creative ways beyond cutting and pasting scenes together. The award-winning app, which has more than 400 million users, allows you to include text overlays, stickers, music, filters, and sound effects in your footage. Because of these features, it lends itself to video producers who want to add a bit more creativity to a vlog series, where the video is primarily of one person speaking directly to the camera.

Pros

  • Easy-to-use yet powerful, with HD exports available for free users
  • Expansive music library

Cons

  • Your video will be watermarked with VideoShow branding if you’re not on the paid version
  • You can’t export the video without upgrading to the paid version

2. PowerDirector

Price: Free | Platforms: Android, Windows, macOS

Video Editing Apps for Android PowerDirector

Image Source

This robust video editor has a suite of creative design tools just for Android and desktop users. Developed by CyberLink, the app can help you create 4K-quality videos from footage taken with numerous devices. Special features include motion tracking, which helps you focus on specific subjects in each frame; video collages, which help you piece together numerous photos into a motion video; and video stabilization, allowing you to remove moments of “shaky camera” in your footage. PowerDirector can also help you add voiceovers and creative sound effects using chroma key.

Many of PowerDirector’s features are completely free in the Android app. For a more advanced suite of editing tools, you can invest in one of CyberLink’s paid products starting at $99.

Pros

  • Powerful features such as green screen editing, motion graphics, and keyframe controls
  • Incredibly low price compared to competitors such as Adobe
  • Multi-track editing and timelines
  • The company constantly adds new graphics and templates for users to choose from

Cons

  • Some users have reported that it can be buggy

3. Quik

Price: Free | Platforms: Android, iOS, macOS, Windows

Video Editing Apps for Android: Quik

Image Source

Quik is a video editing tool developed by GoPro, making it the software of choice for people who are editing footage from their GoPro camera. But yes, it can edit content from any source.

The app can manage up to 75 photos and video clips in one project, and can even comb through this content to help you make smart editing decisions based on what the app detects in the footage. From time-lapses to panoramic pieces, Quik can manipulate your media in lots of creative ways. The app has more than 20 preset themes to choose from and supports eight common file types.

Pros

  • Easy-to-use and intuitive app
  • Automatically imports photos from your camera

Cons

  • This software no longer receives updates from its manufacturer
  • You only have access to the cloud when you upgrade to GoPro PLUS

4. KineMaster

Price: Free | Platforms: iOS, Android, ChromeOS

Video Editing Apps for Android: Kine Master

Image Source

KineMaster is a super-versatile video editing tool that allows you to edit videos on “multiple layers.” What does that mean? Content creators can add an unlimited amount of text overlays, images, audio, and even free handwriting onto their footage for the artistic detail they or their brand needs. You can also blend multiple pieces of footage and use double-exposures to customize the background in a load of creative ways.

For simpler editing tasks, of course, this app offers intuitive trimming and splitting features to make your video progress just the way you want it to.

Pros

  • Powerful features such as multi-track editing, layers, and blending modes
  • Over 3M reviews on Google Play and an average rating of 4.5 stars
  • You can share on YouTube, Instagram, and Facebook straight from the app
  • 4K exports available

Cons

  • Your video will be watermarked with the KineMaster branding if you don’t upgrade to Premium
  • Limited access to assets on the free version

5. VivaVideo

Price: Free | Platforms: iOS, Android

Video Editing Apps for Android: VivaVideo

Image Source

VivaVideo makes professional-level edits easy for content creators. Free for all mobile devices, the app allows you to trim, merge, speed up, slow down, and reverse clips and images in a short amount of time. The app also comes with a simple collage- and slideshow-maker and offers a variety of camera lenses to capture new, edit-ready footage directly in the app.

Pros

  • Fun on-trend filters, templates, and effects
  • Expansive music library with hundreds of clips to choose from
  • Multi-track editing allows you to layer voice clips and music

Cons

  • The five-minute time limit for videos

With most people working from home, the importance of video can’t be overstated. But unless you get the right app for video editing, you’ll run the risk of publishing videos that look unprofessional and unpolished.

With these apps, you’ll be sure to create a video that attracts, converts, and delights your audience. The sooner you download one, the sooner you can sharpen your audio/video creation skills and attract more people to your brand.

Create Better Videos for a Higher ROI

Online video content isn’t just watched more — it’s expected more. Luckily, you have the video editing tools to help you delight your audience and improve conversion rates across your social media accounts. Grab the guide below to make the video learning curve easier and to jumpstart your video marketing efforts.

Editor’s note: This post was originally published in March 2019 and has been updated for comprehensiveness.

Discover videos, templates, tips, and other resources dedicated to helping you  launch an effective video marketing strategy.