Categories B2B

Facebook is Redesigning its News Feed: What Marketers Need to Know

Back in July, Mark Zuckerberg announced a change to Facebook’s news feed — it’s been split in two! Facebook now has a Home tab and a Feeds tab. The Home tab includes content recommended to users based on their actions on the app. The Feeds tab shows content from people, pages, and groups the user is following.

Zuckerburg said the goal is to make it easier for Facebook users to see their favorite content and make new discoveries. It’s also meant to keep Facebook competitive with TikTok. TikTok’s For You page also shows recommended content from across its platform based on what algorithms think a user wants to see. The Following page only shows content from pages the user already follows.

But what does it mean for marketers who relied on Facebook’s news feed to find and maintain an audience? Here’s what marketers need to know about the new tabs.

Download Now: Social Media Trends in 2022 [Free Report]

Facebook’s Home Tab

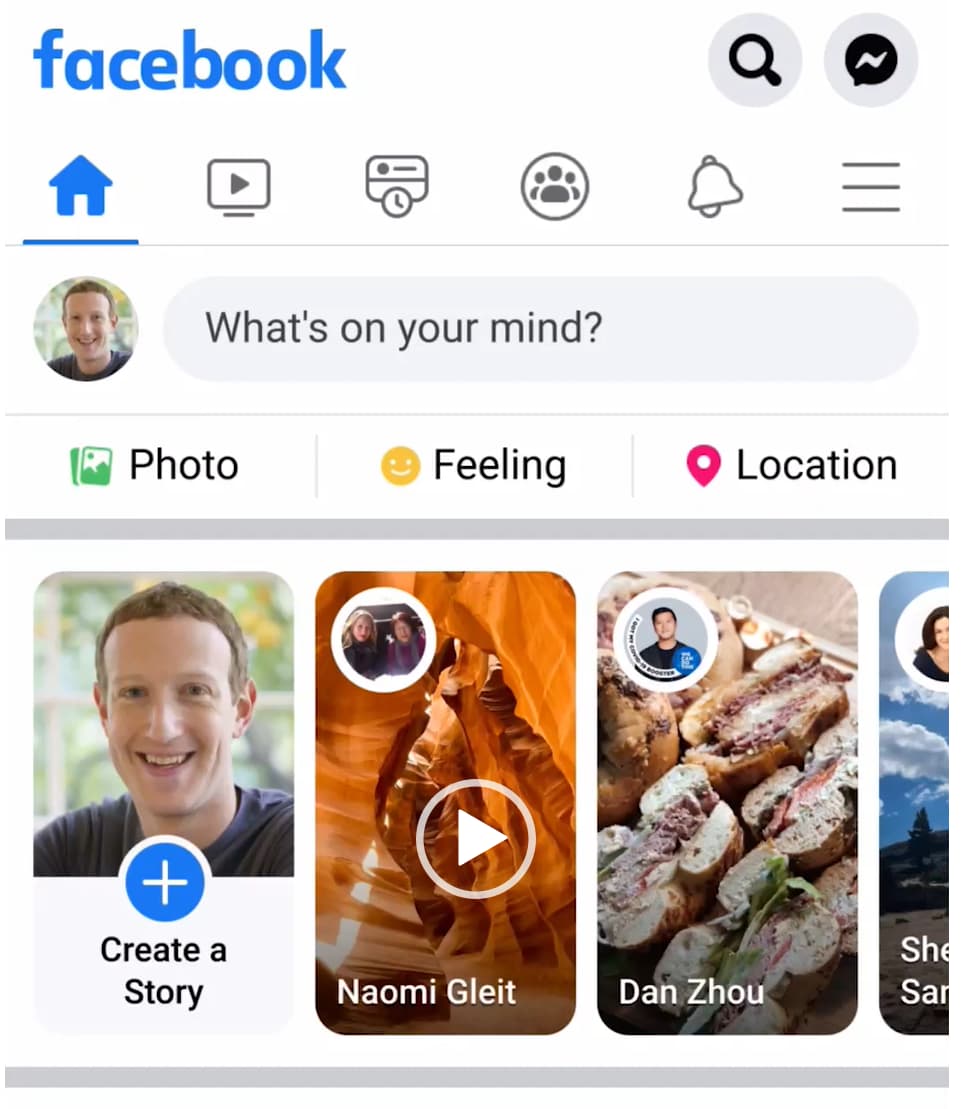
The Home tab is the first feed users see when they open the app. Like the Feeds tab, Home will have content the user is already following (posts from friends and family, for example), but the feed will prioritize recommended content from the app’s discovery feature.

“This system takes into account thousands of signals to help cut through the clutter and rank content in the order we think you will find most valuable,” Meta said in a press release. “We’re investing in AI to best serve recommended content in this ranked experience.”

Facebook HomeImage source

Content prioritized in the Home tab will include Reels and Stories. To get your marketing content on the home page so your brand can reach new consumers, you should leverage short-form video content like Reels.

During our own social media marketing survey, 85% of the 310 marketers surveyed said short-form videos were among the most effective tactics in their social media campaigns. So next time you post a Reel to Instagram and the app asks if you’d like to automatically share it on Facebook, the answer should be yes.

Another way to end up on the Home tab is to leverage livestreams. In that same survey, 69% of marketers mentioned livestream videos as one of the most effective methods in their campaigns, and 72% of respondents said livestreams are effective overall. Livestream opportunities can include live Q&As, webinars, and workshops.

Facebook’s Feeds Tab

As I mentioned, the Feeds tab shows content from pages, groups, and communities the user is already following. There is no content from the app’s discovery feature — however, ads will still be shown on Feeds. Therefore, investing in Facebook Ads can help your brand’s content get on the Feeds tab and expand your brand’s reach there as well.

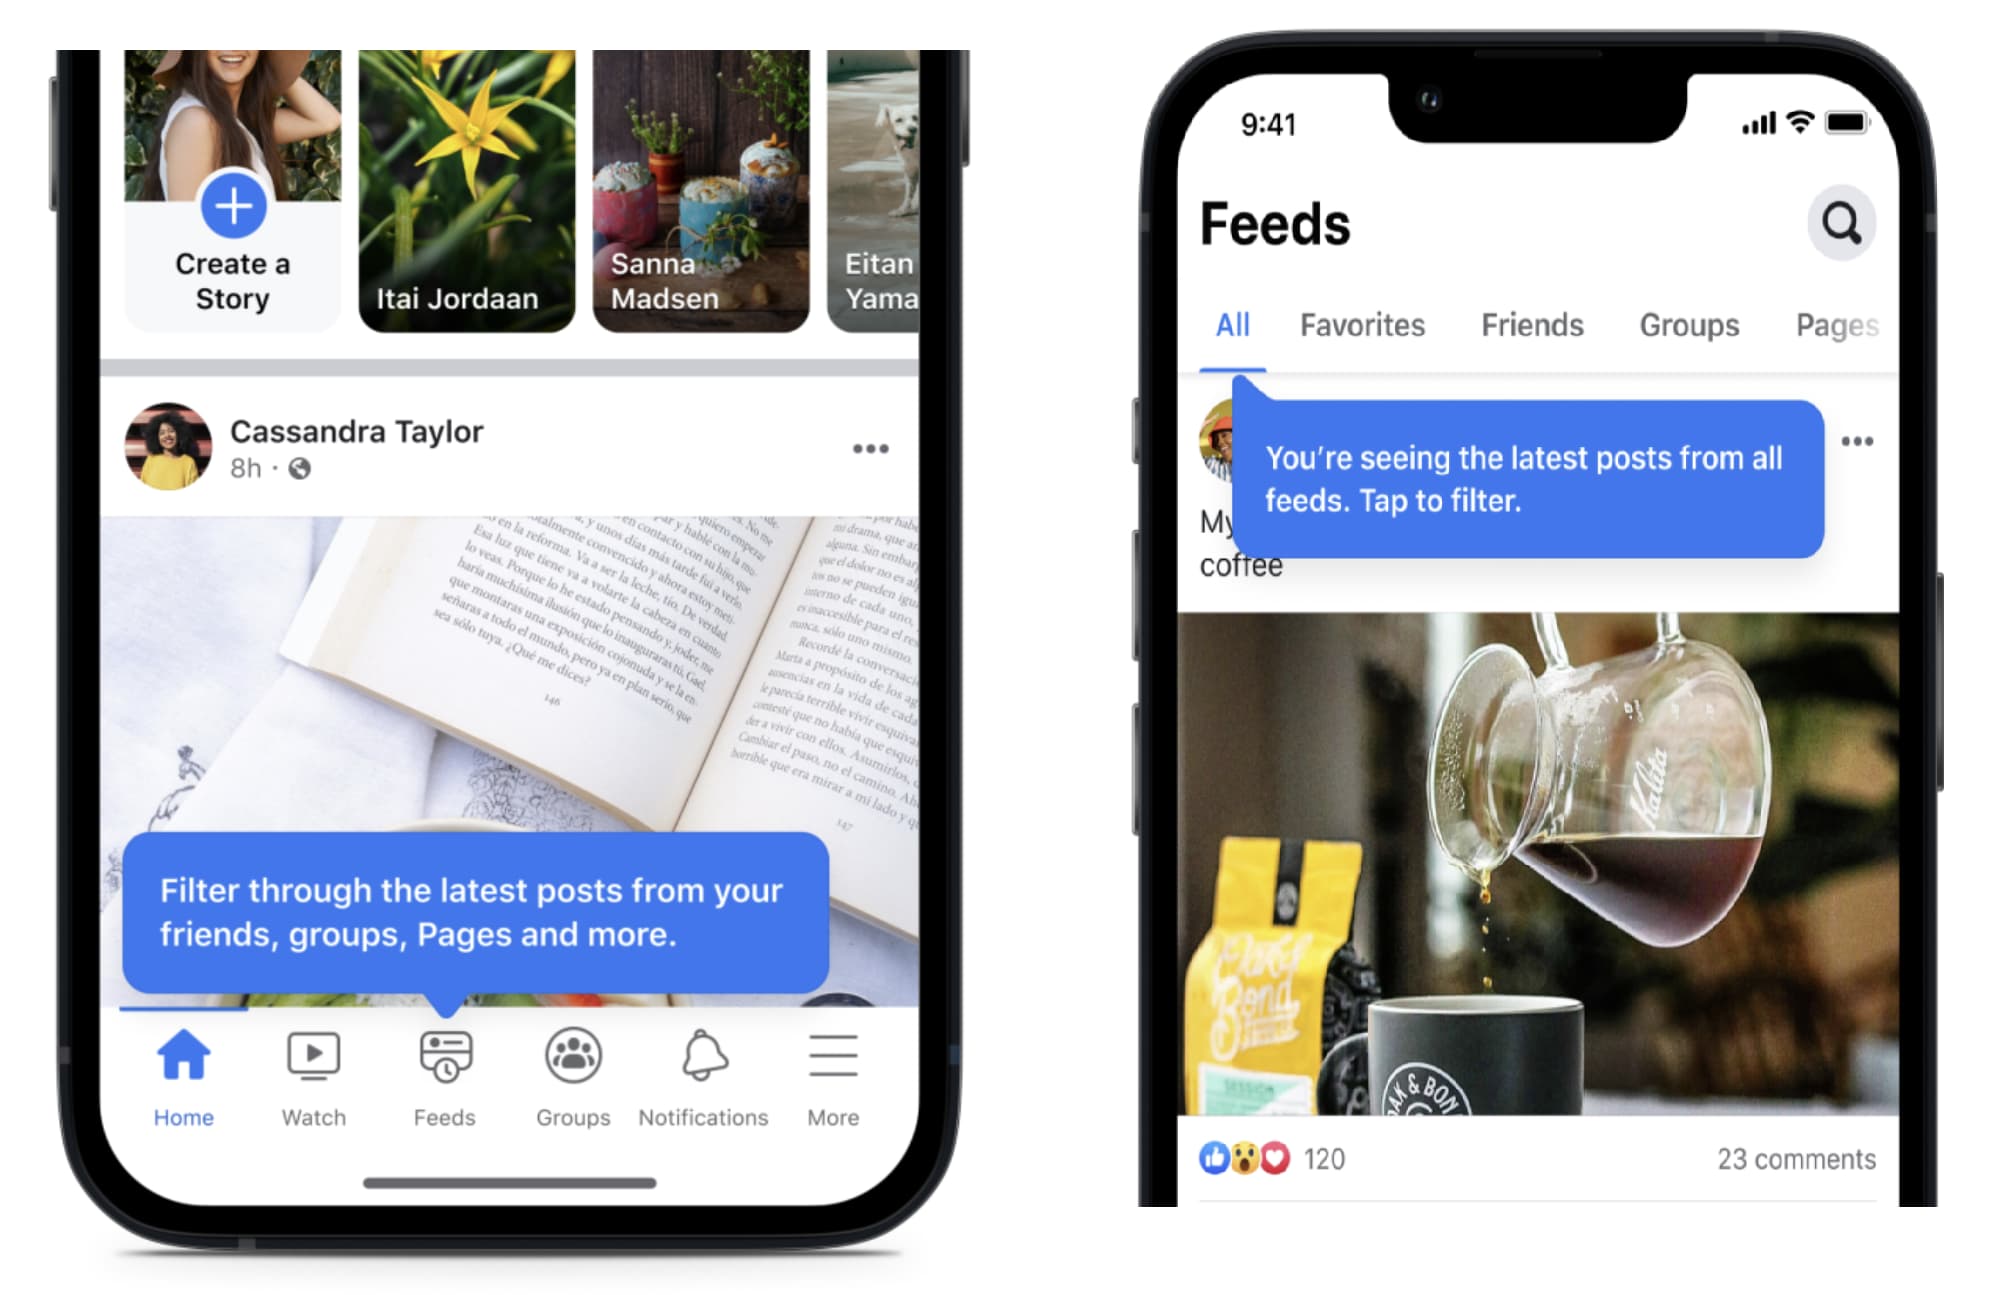
However, delighting the audience you already have should be your focus when it comes to Feeds. Notice that Feeds is separated into different sections — All, Favorites, Friends, Groups, and Pages. To stay top of mind for your audience, your company should have content in as many sections as possible, particularly All, Favorites, and Groups.

Facebook Feeds 3Image source

Marketers should create Facebook groups that appeal to their audience’s interests. A great example of a Facebook group is Instant Pot Community. The group was started by the multicooker brand Instant Pot and is a space for Instant Pot users to share recipes, ask questions, and discuss their products. The group has over 3 million users.

9 of The Best Facebook Groups We’ve Ever Seen-5-1

To get your content to the All and Favorites sections, regularly post engaging content like short-form videos, livestreams, polls, and statuses. By keeping a consistent stream of quality content, your brand will appear in the All section regularly. If your content is compelling and includes CTAs telling users to add your brand’s page to their Favorites, you’ll have content in that section as well.

Meta’s change to Facebook’s feed means marketers will have to adjust their social media campaigns on the app, but the adjustment doesn’t have to be difficult. Leverage short-form videos like Reels, find livestream opportunities, invest in ads, and work to foster community — and that will keep your audience engaged whether they’re on the Home tab or Feeds tab.

New call-to-action

Categories B2B

Offline Marketing: Should You Leverage It in a Post-Pandemic World?

Since the start of the pandemic, marketing strategies have relied heavily on online tactics —leveraging tools like social media, email, and digital ads. But what about marketing outside of the digital space, otherwise known as offline marketing?

Is there still value in marketing via billboards, print ads, and broadcast commercials? In a post-pandemic world, whenever that may be, there’s a chance offline marketing could make a comeback.

Here’s what marketers need to know about offline marketing and how it can be leveraged.

→ Download Now: Free Marketing Plan Template

What is offline marketing?

5 Offline Marketing Strategies You Should Use

Business Cards

Community Engagement

Event Hosting

Press Releases

Free Workshops


So why should your company still incorporate offline marketing into its strategy, especially in the digital age?

One reason is that it’s tangible and allows marketers to physically reach their target audience in a way that online marketing can’t. You can hand out flyers, put up posters, and send direct mail to people’s homes. Sometimes, physical items relating to your brand can leave a more lasting impression.

For example, the local Papa John’s in my neighborhood has a deal with my apartment complex. Whenever a new tenant moves in, they get a Papa John’s magnet and menu inside their welcome gift bag. Both the magnet and menu have the local restaurant’s number and hours.

I didn’t know of any other pizza places in the area, so I pinned the items to my fridge, and every time I was craving pizza I would call that particular Papa John’s location.

Offline marketing can also create a personal connection with your audience. For example, you can sponsor and host fun, engaging local and in-store events that let you connect with your consumers in person.

But most importantly, the best marketing strategies combine both online and offline marketing to reach an audience through as many channels as possible. For example, let’s say your company hosts an in-store event to connect with customers offline. That offline marketing strategy can also be used to create online content via video highlights of the event.

Another factor to consider is that online channels may not be available to everyone in your market, such as older consumers who are less likely to be tech-savvy — so offline marketing with business cards or pamphlets will make your brand more accessible to that demographic.

5 Offline Marketing Strategies You Should Use

Here are a few offline marketing strategies you can use to reach your target market:

Business Cards

Business cards are a tried and true offline marketing method. A business card with a distinct design can set your business apart from competitors and reflect your brand’s values and mission. Make sure everyone in your company has their own business cards to give away at any time —you never know when they might run into a prospective client.

You may be tempted to try online business card generators to save a little money. While those can save money, you’re better off opting for local designers or print shops to create cards that are truly unique to your business. That way, you can customize the layout, color, texture, font, and more.

Pro Tip: Use a color other than the usual white for your business cards, and make sure every card has the same logo, font style, and colors for a unique but uniform look as well as brand consistency.

Community Engagement

Offline marketing lets you create a more personal connection with your audience — especially if you incorporate community engagement in your strategy. Using your platform and resources to help others within your community can increase brand awareness and solidify your brand’s reputation for being responsible.

An excellent example is the annual Stuff the Bus event hosted by First Coast News, a TV news station in Jacksonville, Florida. Every summer right before back-to-school season, First Coast News partners with United Way of Northeast Florida to raise money and school supplies to be donated to local schools. The event helps the station establish itself as an integral part of the community it broadcasts to.

Pro Tip: Carefully consider the organization or service you involve in this strategy to ensure it aligns with your company’s values and image.

Event Hosting

Event hosting is a great way to market your brand offline because events can promote outreach as well as opportunities to network. You’ll have the chance to engage with potential clients in person and connect with potential business partners or collaborators.

One example is RDC World’s annual DreamCon anime convention in Arlington, Texas. RDC World is a group of content creators who gained a huge following on YouTube making viral skits geared toward Black anime and comic book fans. To meet its fans in person and to provide other content creators a chance to network, RDC World started DreamCon.

The con attracts more guests each year and has grown to include appearances from celebrities, voice actors, and other viral content creators. The convention, as well as RDCWorld, is now a staple among Black anime fans.

Pro Tip: To get the most out of your event, incorporate digital marketing tactics like live streams and short-form videos for platforms like TikTok and Instagram.

Press Releases

A simple but effective way to boost brand awareness is to send press releases to local journalists in your community. Make a point to build relationships with them and get them interested in your brand. Once you find the contact information for your local journalists and publishers, start sending press releases that advertise your brand and any upcoming events you are hosting such as conventions, workshops, or fundraisers.

Pro Tip: Invite the press to special meet-and-greets and tours of your business to build an offline connection.

Free Workshops

You want consumers to know your brand is made up of experts in its field — one way to do that is by offering free workshops. A workshop can be in the form of a TV or radio appearance where you present valuable information while expanding your reach. You can also write regular columns for your local newspaper or magazine that give tips and advice pertaining to your market.

This marketing tactic builds trust with your audience. If they know you’re an expert in your space, then they’ll trust that your products or services are top-notch as well.

Pro Tip: When handing out flyers or other offline marketing materials, make sure to include a section with useful tips regarding your industry.

Digital marketing isn’t going anywhere anytime soon, but offline marketing should still be a part of your strategy to meet your audience wherever they are. In a post-pandemic world where more people will drive past billboards or look for workshops to improve their craft, you’ll want to be the brand that catches their eye.

New Call-to-action

Categories B2B

What Are Agile Metrics?

Agile marketing focuses on creating high-value deliverables by working in short bursts to achieve goals. An agile marketing process is also constantly iterated to ensure productivity and efficiency.

Measuring the success of an agile marketing process is critical as it helps monitor processes and ensures everything is on track — this is where agile metrics come in.

In this post, we’ll discuss:

→ Free Download: Free Marketing Reporting Templates [Access Now]

What are agile metrics?

Agile metrics is a tool that helps marketing teams measure the progress and productivity of marketing activities, stay on track, and address roadblocks. Agile metrics are most effective when tailored to the specific needs of individual projects.

You can use agile metrics at both the team level and individual level. At the team level, they help assess the overall health of marketing activities and identify potential bottlenecks. At the individual level, they can help identify areas of improvement for each team member based on their progress.

Importance of Agile Metrics

Agile metrics are important because they help track progress and identify areas for improvement.

Agile metrics also:

  • Increase productivity by providing visuals of project timelines so stakeholders can understand what comes next.
  • Build accountability and transparency between stakeholders because everyone knows what’s expected of them and their teams.
  • Improve communication between team members because agile metrics give specific insight into project progress so people can begin conversations based on metrics and data.
  • Help managers and leaders identify risks and potential problems early on from historical agile metrics data, helping them correct processes and save time.

Types of Agile Metrics

There are three main types of agile metrics, and we’ll outline them below.

  1. Scrum Metrics: A Scrum is a process where work is done in sprints to quickly deliver small projects that make up larger projects over time. Scrum metrics analyze sprint effectiveness and show how much work was completed during a given sprint.
  2. Kanban Metrics: Kanban processes use visual cues to track progress over time. It usually is based on a project board that is divided into columns that represent stages in a workflow. Kanban metrics help you understand workflow effectiveness, organize and prioritize work, and the amount of time invested to obtain results.
  3. Lean Metrics: Lean processes help decrease the amount of time it takes from when a task or project is requested to when teams complete it. Lean metrics measure productivity and quality of work output, helping get rid of activities that don’t benefit outcomes or getting work done quickly.

Key Agile Metrics

Below we’ll go over some of the most common agile metrics.

1. Sprint Burndown Chart

Type of Agile Metric: Scrum

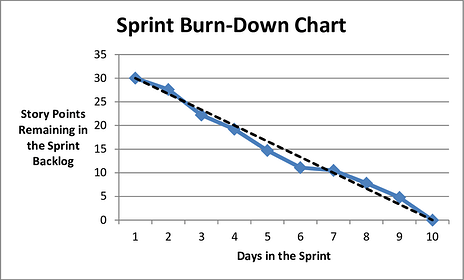
A sprint burndown chart shows the work that remains and has already been completed in a designated sprint. It also shows the amount of work that has been completed over time.

Sprint burndown charts provide a visual for this data and can predict a team’s likelihood to complete their work in the time available.

types of agile metrics: sprint burndown chart

Image Source 

2. Cumulative Flow Diagram

Type of Agile Metric: Kanban

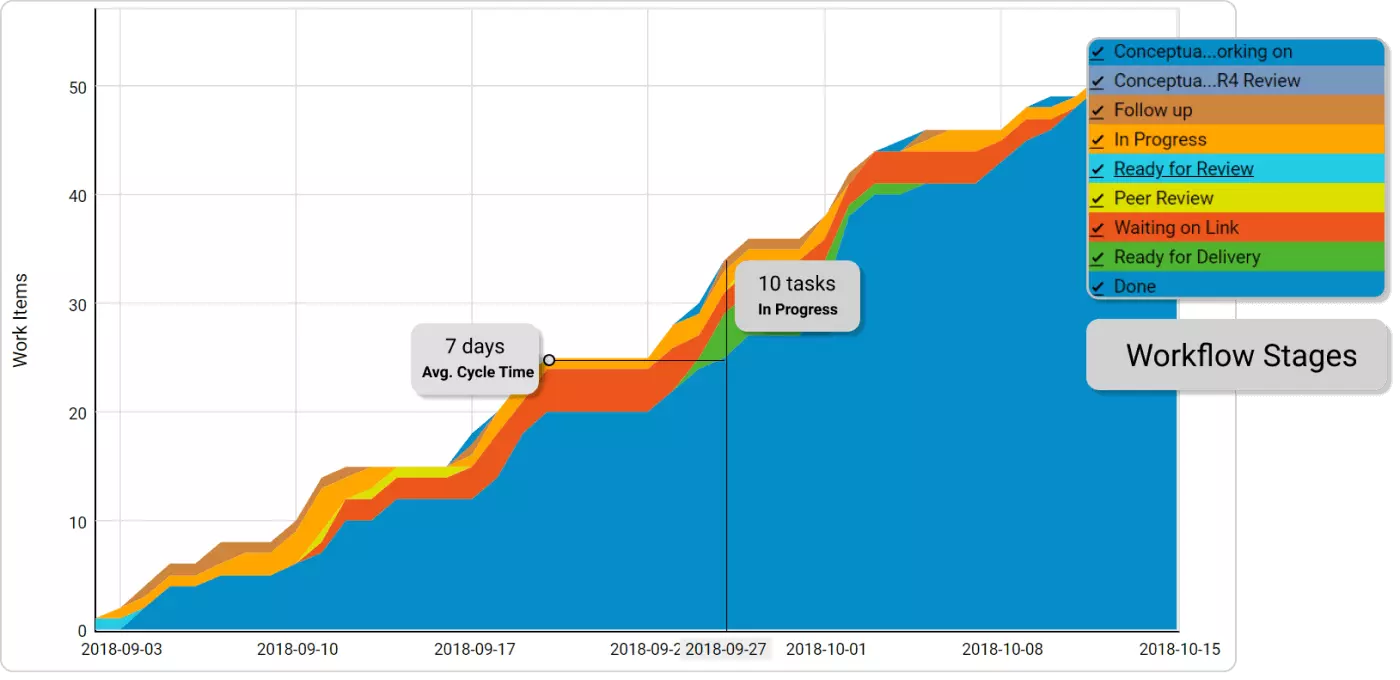
The cumulative flow diagram is a graphical representation of work in progress. Specifically, it displays the work already completed, the work currently in progress, and tasks that have yet to begin. The diagram helps you visualize how stable your process is and helps you identify problem areas to address.

types of agile metrics: cumulative flow diagram

Image Source

3. Cycle Time Diagram

Type of Agile Metric: Kanban

A cycle time diagram displays the amount of time it takes to complete a task. It helps you identify areas where your process can be updated and streamlined for future productivity and understand the effects of the strategies you implement.

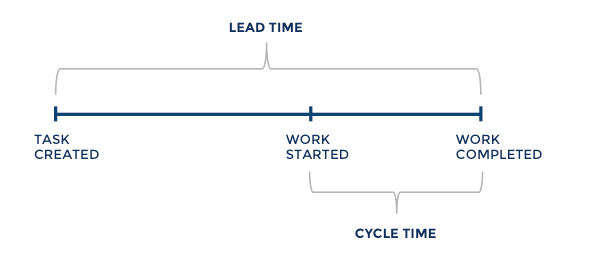
As your overall goal is likely to have a shorter cycle time across all projects, the diagram will help you understand the length and identify areas for improvement. Cycle time is a smaller section of the lead time metric, which we’ll discuss below.

4. Lead Time

Type of Agile Metrics: Kanban

Lead time is the time it takes for a task to be completed from start to finish. It builds off of the cycle time metric but adds on the amount of time between when a task or project was requested to when it was started.

types of agile metrics: lead time

Image Source

For example, you could use the lead time metric to analyze how much time it takes from when a new marketing copy is requested to when it is delivered.

5. Velocity Chart

Type of Agile Metric: Scrum

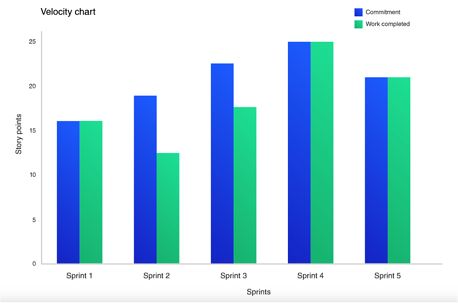
Velocity is the rate at which a team can deliver work during a sprint. It measures how fast teams complete a task and identifies whether they are on track to meet deadlines. It can also predict a team’s future abilities, helping ensure you don’t commit to a timeline you can’t achieve.

types of agile metrics: velocity chart

Image Source

A lower velocity means it takes teams more time to complete a task, so it could be worthwhile to identify areas you can streamline to speed up the process.

6. Burn Up Chart

Type of Agile Metric: Scrum

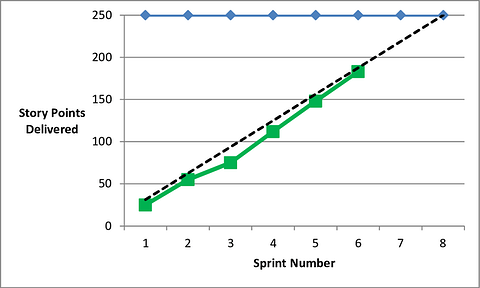
A burn-up chart tracks progress over time. The graph features two lines, one that displays the projected amount of work and another that shows actual work completed.

types of agile metrics: burn up chat

Image Source

This metric helps you compare expectations to how much work is delivered, which can help you understand team efficiencies and identify areas for improvement.

The right agile metric helps you and your teams stay productive and focused.

Choosing an agile metric depends on the specific needs of your marketing activities. Once you choose one, you’ll get a bigger picture of your team’s productivity and marketing processes, helping you identify roadblocks, optimize your strategies, and meet your business goals.

 marketing reporting templates

Categories B2B

How to Create an HTML Form That Sends You an Email

Have you ever set up a form on your site, only to forget to check the entries that were submitted? Creating an HTML form that sends an email after submission is one of the simplest and most effective ways of resolving this issue.

Here, we’re going to walk you through how to create a form that sends an email to you, as well as the customer, to ensure the form was received.

Convert anonymous visitors into leads. Try HubSpot Forms free.

Ideally, browsers would allow you to route form submissions directly to an email address. However, the reason they don’t is that emailing directly from an HTML web form would reveal the visitor’s email address, making the user vulnerable to malicious activities, such as phishing.

Adding a mailto: address to the form can be a potential way to circumvent this challenge. This option activates the default mail client on the user’s computer, prompting them to send the form over email. The web browser sends a request to the email service provider, not to the specified address.

There are a few problems with the mailto: option. For example, it isn’t 100% compatible with all browsers, it isn’t very user-friendly, and it’s impossible to control the formatting of the data when the form is sent by the browser.

Beyond that, a warning message will pop up when the user goes to submit the form, letting them know that the information they’re about to send will not be encrypted for privacy.

Below, we go over a few options for creating an HTML form that emails you when a new entry is submitted.

The option you choose depends on how you work and what platform you’re using. This is to say that things are a little different if the plan is to use a mix of HTML and different scripts. Below, we go over the different options available.

Method 1: Create an Email Send Form Using HTML (Not Recommended)

Using just HTML? From starting fresh, here is a sample code for use:

See the Pen How to Create an HTML Form That Sends You an Email by HubSpot (@hubspot) on CodePen.

This code will create a form that asks for the contact’s name, message, and includes a submit button (not visible in CodePen). Note that this code is basic — it won’t look super snazzy. For a more beautiful one, you’ll have to add some more lines of code specific to your needs.

While you can use just basic HTML, this isn’t the ideal option. This form doesn’t directly send to email addresses, but rather opens an email client or tool window to submit the form. This can spook the user out of submitting the form at all.

So, what HTML code allows you to send form submissions directly to an email address?

To make the form work with your email server and send it to a mailbox, PHP is the answer — let’s explore that option now.

Method 2: Create an Email Send Form Using PHP (Advanced)

To create a form subscribers can contact you with, the PHP script is going to be your best friend. I know, another acronym. This one stands for Hypertext Preprocessor, and this language collaborates with HTML to process the form.

Before jumping into the process, let’s break down a few form basics.

A webform has two sides: The front-end, seen in the browser by visitors, and a backend script running on the server.

The visitor’s web browser uses HTML code to display the form. When the form is submitted, the browser sends the information to the backend using the link mentioned in the “action” attribute of the form tag, sending the form data to that URL.

For example: <form action=https://yourwebsite.com/myform-processor.php>.

The server then passes the data to the script specified in the action URL — myform-processor.php in this case. Using this data, the backend script can create a database of form submissions, direct the user to another page (e.g. payment), and send an email.

There are other scripting languages you can use in the backend programming, like Ruby, Perl, or ASP for Windows. However, PHP is the most popular and is used by almost all web hosting service providers.

If you’re creating a form from scratch, here are the steps you can take.

Step 1: Use PHP to create a page.

For this step, you’ll need to have access to your website’s cPanel on your hosting platform.

When you’re creating a webpage, instead of using the “.html” extension, type “.php” instead. This is similar to what happens when you save an image as “jpg” versus “png”.

By doing this, the server will know to host the PHP you write. Instead of saving the empty HTML page as such, save it as something like this: “subscriberform.php”. After your page is created and saved, you’ll then be able to create the form.

Step 2: Make the form using code.

In this step, you’ll write the code to create the form.

If you’re not sure how to create forms in HTML, check out HTML Dog’s resource for a primer on the basics.

The following code is what’s needed for a basic form:

Because this is similar to the HTML-only write-up, these lines will also create a name for the form and an area for subscribers to type a custom message and send it to you.

An important difference is the action=”subscriberform.php” part. This portion of code is what will make the page send the form when submitted. Recall that in the first example, that wasn’t an option.

Step 3: Make the form send an email.

After you create the form and add all the proper fixings depending on your design preferences, it’s time to create the email portion.

For this, you’re going to scroll to the beginning of the page (the very beginning, even before defining the HTML Doctype). To enable sending data in the email, we have to add code that will process the data. Copy this code or create something similar:

Everything inside the first and last lines will tell the webpage to make these functions perform as PHP. This code also checks to see if a subscriber uses the form. From there, it checks to see if the form was sent.

Further breaking it down, “mail” sends the completed form as an email to “[email protected],” and the subject line is what follows. In the next line, you can write a copy of the email message inside the quotes, to be sent from whichever email address you choose.

Once the form is submitted, the page sends the data to itself. If the data has been successfully sent, the page sends it as an email. The browser then loads the page’s HTML — the form included.

With that, you have the basic code you need to create the form.

Note that this is just one way to do this — alternatively, you can also create a form using a builder, and then embed it onto your website.

Method 3: Create an Email Send Form Using a Form Builder

If you’re not using WordPress to build your website and are not coding-savvy, you may be at a loss as to how you can create a form, especially if your CMS doesn’t offer a drag-and-drop page editor.

(Hot tip: A drag-and-drop editor can make it much easier and simpler to create an email-sending form. Try CMS Hub — it’s 100% free.)

Each of the below tools allows you to build a form that sends an email without any coding needed from you. The best part is that you don’t need to change content management systems if you don’t want to. Instead, you can embed the form onto your website using each tool’s embed code.

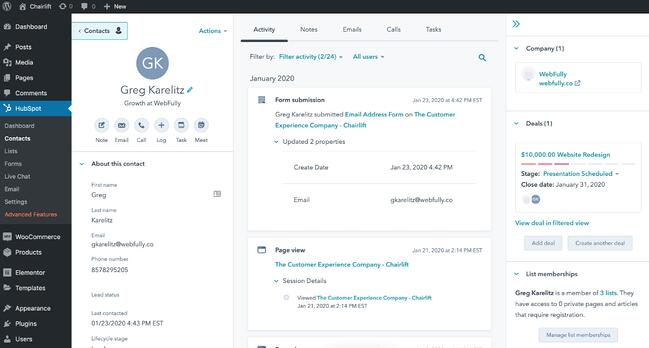
1. HubSpot: Best Email Form Builder Overall

email send form builder: hubspot

HubSpot includes a form builder in the free tier of all of its products. Because HubSpot already has your email, it will automatically send you a message when a new entry is submitted.

HubSpot’s form builder is linked with other tools in the platform, including Marketing Hub and CMS Hub, and doesn’t require any previous technical knowledge. If you want to extend the form to include marketing capabilities, you can do so as well.

For example, you can build custom forms that connect to your contacts list. You can also customize those forms and trigger automatic emails based on the completion of your forms. Note that the latter requires a premium upgrade.

If you want to learn how to receive an email after a form submission, take a look at our Knowledge Base article.

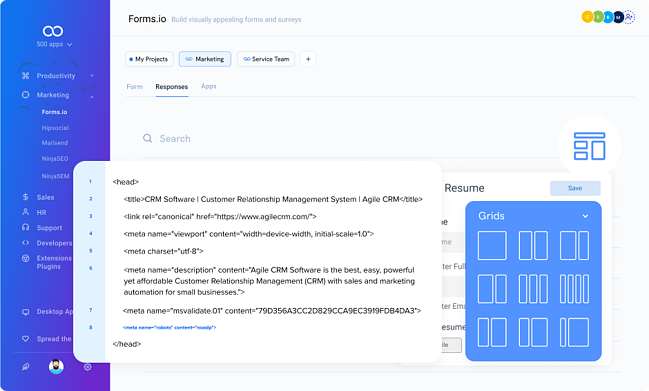
2. Forms.io: Best Quick Email Form Builder

email send form builder: forms.io

Forms.io allows you to quickly create a form in its drag-and-drop interface, then embed it on your site using HTML embed code. You’ll receive an alert or notification, and you can then manage responses in the tool’s backend. It’s free for 10 users, but if your company will need more seats, you can have access for $14.99/month.

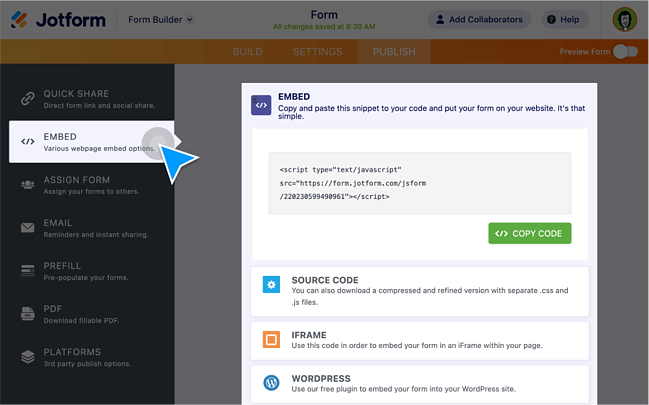
3. Jotform: Best Email for Builder for Multiple Forms

email send form builder: jotform

If you expect that you’ll need more than one form, Jotform is a great choice. It gives you several options for embedding forms on your website: JavaScript, iFrame, or the entire source code of the form. You also have the option of creating a lightbox or popup form.

Jotform is free with its branding. Pricing starts at $24/month.

Check out more form builder tools here.

Method 4: Create an Email Send Form Using a Plugin

If you’re running a WordPress website, we have good news: You have a plethora of form builder plugins available to you, most of which come at the excellent cost of free. These tools will all send an email upon receiving a submission.

1. HubSpot Form Plugin: Best for Lead Generation

email send form builder plugin: hubspotIf you’re planning to use your form as a lead generation tool, then we highly recommend using the HubSpot form plugin. It links directly to your HubSpot account, allowing you to use it in conjunction with HubSpot CRM, Marketing Hub, Sales Hub, and more.

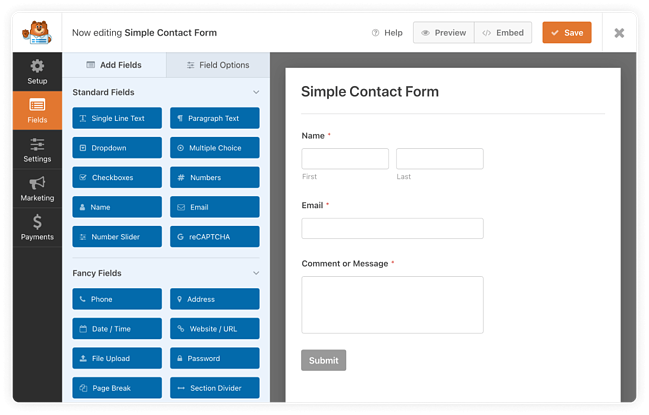
2. WPForms: Best for Embedding Anywhere

email send form builder plugin: wpforms

WPForms is a drag-and-drop form builder that allows you to configure it to email you upon receiving a submission. You can also embed the form anywhere on your site, including the sidebar and footer.

3. ARForms

email send form builder plugin: arforms

ARForms allows you to receive email notifications based on conditions you’ve set, but you can also get email notifications for all submissions. You can also integrate it with other tools in your tech stack, including HubSpot, PayPal, and Google Sheets.

The Perks of HTML Forms that Send Emails

Whether you want to convert more visitors to leads, collect information for your sales team, or create more loyal brand advocates, forms are imperative to an inbound strategy. If you don’t have a form on your website, you could be missing out on more leads, higher conversions, and happier long-term customers.

The problem is that it’s easy to forget checking the responses, and even easier to get submissions but have no searchable record of them. Forms that send an email back to you keeps information in your inbox for reference and ease.

Editor’s note: This post was originally published in December 2019 and has been updated for comprehensiveness.

New Call-to-action

Categories B2B

How to Write a Video Script [Template + Video]

Videos tell a story. Whether you’re writing an original video script or using a video script template, your script is essential to that story.

And videos are powerful selling tools. 92% of marketers say that video is central to their marketing strategy.

→ Access Now: Video Marketing Starter Pack [Free Kit]

But creating videos can be intimidating. It’s complicated whether you’re a writer, marketer, or movie producer. There are many steps to planning, editing, and producing videos and each step is important.

Writing an effective video script can mean the difference between video success and failure. This post will show you how to write an effective script for your videos. Are you ready to get started?

Even the most basic video will be better with a video script. Creating a video is complex. Most video projects include:

  • Lighting
  • Sound
  • Sets
  • Cast and crew
  • Equipment

Each of these elements can be tricky to execute, and when they combine, it’s easy for mistakes to happen.

But your script will include details that make the process run smoothly. A video script is vital to help your team prepare for and organize the video-making process.

Plus you and your team will be more confident and produce a better video with a comprehensive script.

1. Choose your target audience.

Any marketing project is better with the right buyer persona. This is especially true with video.

Because videos often take more time and investment than an online ad or blog, it’s important that your video speaks to a specific audience.

So, before you start developing characters or a brief for your video, you need to figure out who your video is for. Your target audience for your video script can impact:

  • The length and format of your video
  • Where you post your video
  • Setting, costume, and lighting

If your video is for brand awareness, you may be broadcasting to a large and diverse audience. But what if you’re introducing a product or feature? In that case, you’ll want to focus your audience on the buyers that are most likely to feel the pain point your product solves.

If your video is for employee or customer retention, you might want a different approach. You’ll want to review data, reviews, and testimonials before you begin your script brief. This will help you create the story and dialogue that your audience will respond to.

2. Set a goal for your video script.

Videos are usually team projects. Without a single focus, every person could come to the video with their own idea of what it’s about. As the project continues, this can turn a simple video into a convoluted mess.

That’s why it’s important to start your video script by just thinking about your goal. So, before you jump into a storyline, character, or setting, figure out the why.

Why are you making this video?

Do you want to teach people about your product? Are you introducing a new pricing structure? Are you trying to expand into a new niche?

If you’re not sure about your goal, think about the problem you’re hoping this video will solve.

For example, say you’re struggling with conversions for a new product.

  • Is it because you’re breaking into a new niche? A product video on the right social media platform for this niche might be right.
  • Do users need better instructions? You might want to add a product tour or instructional video to your website.
  • Are you getting good reviews? You may want to partner with influencers to build a reputation for this product.

Don’t jump into your video script without deciding on a single goal.

Then, use your goal to set the metrics you’ll use to measure the video’s performance once it goes live.

3. Choose the main character for your video.

Video marketing helps you show your viewers what your product can do instead of telling them. And characters are essential to storytelling.

Choosing the main character for your video before you begin your script will help you focus on telling a story, not just selling an idea. This will help your audience connect and engage with your video.

You may already know that your main character is your ideal customer or your CEO. They could be a celebrity, a cartoon of your product, or a narrator who speaks in your brand voice.

But if not, before you start writing your video script, decide who will be the focus of your video.

If you don’t know who your main character is, go back to your goal and target audience. Think about who your buyer persona wants to hear from as they reach that stage of their journey.

Next, outline your main character. You can use the habits, quirks, and voice of your main character to paint a picture for your audience that helps them remember and relate to your video.

Once you’ve figured out your main character you can decide how they relate to your product. Do you want to talk about their back story? Are you going to talk about a specific experience they had and how your product helped?

4. Create a brief.

Creating a brief allows you and your team to document the answers to the most important project questions. This helps everyone involved understand the who, what, when, where, and why of your video.

Say you’re three-quarters of the way through the editing process. If your boss or colleague wants to completely redo half of your video, that’s a huge problem.

Challenges like this can impact your budget, timing, and campaigns. But with a brief, you can refer to the goals and project plan your team mapped out together, and say, “Actually, that’s not what we agreed to.”

Then, you can move forward.

Focus on your goals, topic, and takeaways in your brief.

A brief doesn’t have to be fancy, nor does it have to follow a specific formula. But there are several key questions it should include to craft an effective video script.

  • What’s the video topic? (The more specific, the better. For example, if you’re in the house painting business, you might choose a topic like, “buying the right paint brush”).
  • What are the key takeaways of the video? What should viewers learn from watching it?
  • What’s our call-to-action? What do we want viewers to do after they’ve finished watching the video?

You can easily create a brief in Google Docs to serve as a living, breathing template that you revise over time – and that your team can collaborate on.

5. Use your brief to write an outline.

Once you’ve picked a topic and written a brief, it’s time to start constructing your video script. We recommend starting with an outline to give structure to your video script. This way, you can break your video into subtopics and decide how your dialogue (or monologue) will progress.

Are you basing your video script on a blog?

You can’t just rewrite a blog post and call it a day – there’s a specific way to write a blog-based script so that it shapes an effective video. Alicia Collins can teach you a bit more in the video below (and yes, we wrote a script for it).

Like Alicia says in the video above, a video script shouldn’t simply regurgitate the blog post word-for-word. Blog posts are ideally written to be conversational. But there are pauses and verbal explanations you’ll need to add to your speech patterns that you wouldn’t have without your script.

But, using the blog post’s subsections is a helpful starting point when figuring out how your script will progress from one section to the next.

Are you writing an original video script?

Start with a well-structured outline. Many video scripts follow a three-part structure that includes:

  • An introduction and hook to draw viewers into your video
  • A problem, pain point, or question comes up
  • A conclusion and resolution of the problem, including a call-to-action

This is a basic video script structure, but there are many ways you can go as you outline your story. This structure will help you write a script that covers the details that make your video believable and useful to your audience.

As you create your outline, think about where natural transitions happen.

For example, say you’re writing a video script about the life of a new product. You might outline your script with the steps a business might take to launch a product, including:

  • Coming up with the idea
  • Doing market research
  • Designing the new product
  • Producing a test product
  • Editing the product for mass production
  • Audience testing
  • Marketing and sales strategies
  • Product launch

Your primary goal is to engage your target audience with a situation they can connect with. This can help them understand how the challenges you share in your video relate to the problems they want to solve in their own lives.

6. Start writing your script, section by section.

Your video script doesn’t have to be fancy. You’re not trying to submit this script for any awards – its purpose is strictly functional. A good script makes it easy for the people on camera to get their messages across while sounding and acting naturally.

Write conversationally.

Writing a script isn’t the same as writing a college paper or marketing research report. You want to write the script how you want the video subject to speak.

Saying, “I’m gonna create a video after reading this blog post” on camera will read much better than, “I am going to create a video after reading this blog post.” Keep sentences short and crisp and try to avoid compound sentences.

Make it thorough.

A script doesn’t just include dialogue. If your video will require multiple shots, characters, or scenes, include these details. Be sure to include any necessary information about the set or stage actions, such as a wardrobe change.

Basically, you want the script to be thorough enough that you could hand it off to someone else to shoot, and they’d understand it.

Write for the audience and the platform.

Make sure you’re keeping your script conversational for the people you’re trying to connect with – and infuse humor, tone, and inflection accordingly.

For example, if you’re writing a short-form video for Facebook, you might want to consider keeping your script choppier with sentence fragments. But if you’re producing a long-form explainer video for your website, make sure you’re as thorough as possible.

Script every single word.

It’s understandable to think you can just jot down the main bullet points for a script, and then just wing it on camera, especially if you know your subject matter.

This approach makes it tough to communicate a message as clearly and concisely as possible and it usually results in a lot of redos.

So, we suggest scripting every last word. Doing this will keep you organized during filming and save you loads of time later.

7. Edit your video script.

Writing is tough, and it’s easy to get stuck if you expect your video script to be perfect on your first draft. It’s worth doing two to three rounds of edits to cut any unnecessary words in your writing.

These are a few more tips for editing your script so that the video script can make your final video shine.

Give yourself a break.

Step away from your script after you write it, and don’t go back until you can look at it from a fresh perspective.

Check for transitions.

Dialogue and actions will move your story forward. So, look for moments in your script that feel abrupt or awkward. Then, add details that will help your viewers understand what is happening.

Cut the extras.

Great writing and interesting dialogue will be bad for your video if they don’t advance your story. Edit out these parts and save them for a later project if you think they can be useful.

8. Do a verbal run-through off-camera.

Now that you know how to write a script, it’s time for a table read. This is the part where you practice bringing your script to life on camera.

Why practice? Because some words look great on paper, but once you read them aloud, they just don’t sound right. Reading your video script out loud can help you make the language more conversational and your sentences shorter.

You can read your script aloud while editing, but the table read is where you really get to fine-tune the tone. It’s when you can nix anything that sounds too proper, improper, robotic, or otherwise inappropriate for the message you want to convey.

Check out this video for a fun example of a table read:

Video Script Template

Writing a script from scratch is way harder than starting with an example.

This video marketing starter pack includes a free video script template. Take a look at this HubSpot video below.

Next, check out how we’ve used HubSpot’s video script template below to include the elements described throughout this blog post.
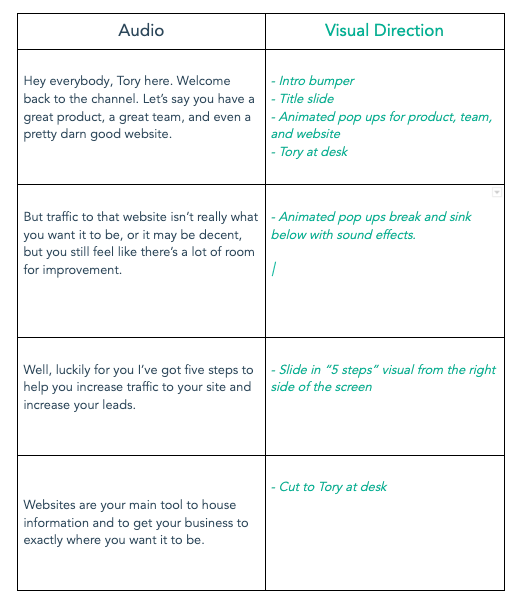
Video script template example: HubSpot video script template

Download the template and get started today.

Video Script Example

There are many different ways to write a video script. Usually, the format you use will depend on the length and complexity of your video. Adding columns can help you organize crucial information like:

  • Dialogue by scene
  • Run time
  • Effect and audio cues

Besides the video script template above, the examples below are other ways you can approach your video script.

Single column script:
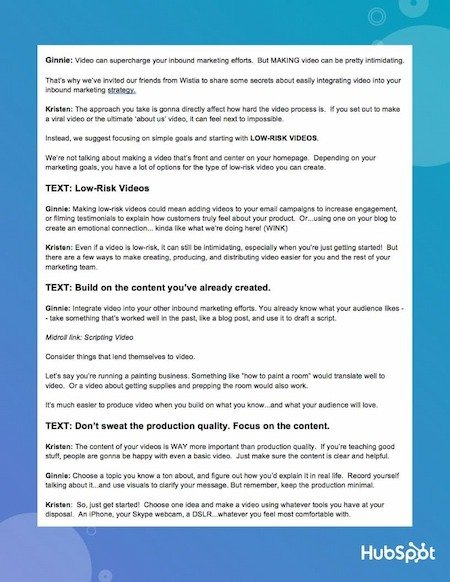
Video script template example: Single column script

Two-column video script

Video script template example: Two-column script

Four-column script:

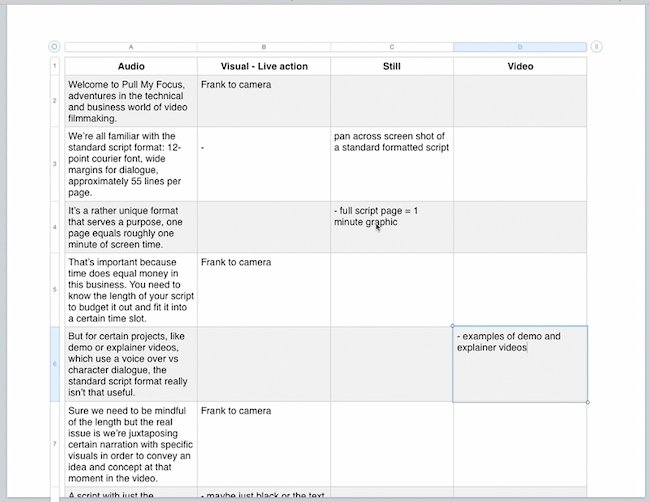
Video script template example: Four-column script

Image Source

1. Create a powerful beginning.

You have more viewers during the first 10% of your video than at any other time. So, your top goal when writing a video script is to hook viewers at the beginning so that they keep watching until the end.

Use the first few lines to introduce the main character or narrator and what the audience is going to learn by the end of the video. You can offer in-depth details later in your video.

For example, if you’re teaching viewers how to optimize their blog for SEO, your introduction might be:

“Hi there! I’m [narrator’s name] from [company], and in the next [length of video] minutes, I’m gonna teach you how to get your blog ranking on Google.”

And don’t forget that some viewers will be watching your video without sound. Viewers who are silently scanning your social media or website will still need to quickly understand what your video is about.

2. Be concise.

When it comes to marketing, shorter videos tend to be more compelling than longer videos. In fact, 68% of people said they’d rather learn about new products and services through a “short video,” according to a survey by Wyzowl.

To make short videos, you need a short script. Don’t write a script any longer than two pages. If you can keep it to one page, even better.

The result is a video that’s succinct, engaging, and allows for a simple editing process.

3. Write in short paragraphs.

Time is important when you’re writing a script. If you’re reading at an average pace, you’ll cover about two words per second.

Short paragraphs make it easier to understand the timing of your script as you write and edit it. They also make it easier to use a teleprompter.

So, try to keep your paragraphs to 3-4 sentences at most.

4. Support any B-roll with the proper callouts in your main narrative.

If your video will transition from a person speaking in front of a camera to a close-up shot of your product or a demonstration, write these cues into your script.

This way, anyone who reads it knows to introduce these things to the viewer.

What is B-roll?

These secondary shots are often referred to as B-roll, which take place while the person continues to speak off-screen. B-roll is one of the main differences between a blog post and a video script.

For example, if a blog post reads, “take a look at the graph below,” it’s clearly referring to a graph embedded below that sentence. This phrasing won’t work on camera.

Instead, your video script might read, “in the graph you see here” – while you show the graph on-screen.

Give cues to your characters or narrator.

These written exceptions help cue your talent to take certain unspoken actions while reciting the script. It’s also a good idea to add open loops so that your audience has an idea of what is coming next. This will make them more willing to wait through a section that they mind not find engaging.

5. Use graphics to make your video stand out.

Visual cues are important to add to your script. Graphics help you make your dialogue easier for viewers to understand and remember.

Options for graphics you can add to your videos include:

  • Photos
  • Animations
  • Infographics
  • Moving text

It can be tempting to add visuals just for the cool factor. But every image you add should offer value to your viewers. And if you think about these visuals as you write your script they will feel more natural in your final video.

6. Add some variety to your script.

Writing video scripts is fun, so make sure that the fun shows. As you write and edit your script, try new things to spice up your dialogue, visuals, and structure.

These are a few ideas that can help you add something new to your script writing.

Create backstories for your characters.

For example, say your main character is talking about finding a better toothbrush. If her back story is that she was a cookie-loving pastry chef who’s prone to cavities, sharing her back story lets your audience know what inspired her when she was first starting out.

Use opposites.

Opposites are a popular concept in improv acting, and they can help when you’re adding variety to your script.

For example, say your script features two ambitious characters. One could be ambitious because they got poor grades in high school and they want to prove themself. The other is ambitious because they have always performed well in school and they want that to continue. These different motivations will help make their conversations more interesting.

Get inspired.

Films, videos, books, and pictures can all help you create a more vivid world for your video script. You can apply your inspiration directly to the scenes you write or use it for motivation when you’re feeling stuck.

Think visually.

Another way to add variety is to step back and look at the big picture. Writing an outline of your script on notecards, or using a card for each scene can help you get a sense of where your script may need some work.

7. Plan to repurpose your video content.

While a great final video is your ultimate goal, you’ll also want to plan for the future as you write your script.

Most marketing videos won’t just post to a single platform – your team will share clips on social media, in email, and during presentations.

So, it’s smart to plan for repurposing. As you write, think about moments in your script that could be engaging on their own.

Even if you’re writing a script for a short video, try to write with quick clips in mind. For example, if you’re creating a two-minute video, plan to pull out a few five-second clips.

Use your video script to create incredible videos.

A video script can be a quick outline or a carefully written work of genius. Either way, it will form the foundation of your video and have a major impact on your results.

When you’re scripting you can let your creativity run wild, test new ideas, and push boundaries. Use these steps, tips, and templates to invent and experiment. Get to work and help your business soar.

Editor’s note: This post was originally published in May 2019 and has been updated for comprehensiveness.
Discover videos, templates, tips, and other resources dedicated to helping you  launch an effective video marketing strategy. 

Categories B2B

How to Use the Goal Seek Excel Function (With Pictures)

Goal-seeking helps you calculate backwards from an end goal. It’s a powerful way to understand how you should best allocate resources. If you use Excel to evaluate data, here’s how to plan ahead with the Goal Seek Excel function.

Download 10 Excel Templates for Marketers [Free Kit]

To use the Goal Seek function in Excel:

Let’s run through that with a simple example.

I want to bring in 130 new customers. But I don’t know how many visits I’ll need to reach my goal.

Before doing the Goal Seek analysis, I organize my data to find the average MoM visit-to-customer percentage.

How To Use Goal Seek In Excel

Step 1: Select the cell with the output you want to change

In this case, I’ll select the customer goal.

How To Use Goal Seek In Excel: Step 1 select the cell with the output you want to change

Step 2: Navigate to the “Data” tab

How To Use Goal Seek In Excel: Step 2 navigate to the data tab

Step 3: Select “What-if Analysis”

How To Use Goal Seek In Excel: step 3 select what if analysis

Step 4: Click “Goal Seek”

How To Use Goal Seek In Excel: step 4 click goal seek

Pro Tip: You can also get here with the Goal Seek Excel shortcut. Press Alt + A on your keyboard, followed by key W, then G.

Step 5: Type the number you want to hit into the “To value” field

My goal is 130 customers, so I’ll type in that number.

How To Use Goal Seek In Excel:  step 5add a number to the to value fie/d

Step 6: Select the variable you want to change in the “By changing cell” box

I’m changing Projected Visits so I’ll place the cursor in the “By changing cell” box, then scroll down to select the corresponding cell.

How To Use Goal Seek In Excel:  step 6select the variable to change

Step 7: Click “OK” to see the Goal Seek analysis

How To Use Goal Seek In Excel: step 7click ok to perform the goal seek analysis

Voila! I find that to get 130 customers, I need to attract 5000 visits.

a complete goal seek analysis in excel

Use the Goal Seek Function In Excel for Smarter Marketing Insights

Take control of the variables that seem out of your control with the Goal Seek function. You’ll gain respect within your company for predicting your needs and hitting your goals.

You’ll also be ready if the unexpected happens. And you’ll know how to make informed decisions or tweak your strategy with your new what-if analysis skills.

Editor’s note: This post was originally published in [Month Year] and has been updated for comprehensiveness.

excel marketing templates

Categories B2B

UX vs. UI: What’s the Difference?

UX and UI are two terms that are often mentioned in the same sentence, but that doesn’t mean they are interchangeable. UX and UI are so often conflated that you could come across a job posting for a UX Designer where the job description mistakenly outlines the responsibilities of a UI Designer and vice versa.
 
Although UX and UI are distinct practices, they overlap and complement each other. For this reason, it can be confusing to understand what makes them different and how they work together to create a great product.

Download Our Free UX Research & Testing Kit

UX and UI are two disciplines that work hand in hand to create a product, service, or website that is delightful and intuitive for customers to use.
User Interface (UI) relates to the aesthetic properties of a digital product, including the look, feel, and design of all the elements a user can interface with. Meanwhile,
User Experience (UX) is more big-picture and conceptual. UX considers a user’s journey in engaging with your product, how it solves their problem, and how it makes them feel. UX without UI is like an engine without the car surrounding it. You need both to get where you want to go.
 
To further understand the difference between UX and UI, let’s start with an example: YouTube.

UX and UI example using the Youtube homepage

Take a look at the YouTube home page. All the visual elements on the page are the work of a UI designer. That includes the search bar at the top, the choice of fonts and colors, the spacing between videos, the branding, the “Subscriptions” bar to the left, and anything else you can see or interact with on the page. The aesthetic choices that make up the look and feel of the page and the way in which information is presented are encompassed by UI. However, when we consider what information to display in the first place and how the product works when you interact with the UI, we begin to enter the realm of UX.
 
Imagine every YouTube video you click loads slowly. Imagine you search “cats” and nothing comes up. Imagine you can’t search by username, so it’s hard for you to find that girl who sang an acoustic rendition of your favorite Lizzo song.
The above outcomes result in a poor user experience (UX). If the product doesn’t offer the solution you are expecting, then there is a UX designer somewhere with her work cut out for her.
 
Cognitive scientist Don Norman, who first
coined the term UX in the 1990s, and Jakob Nielsen, co-founder of the
Nielsen Norman Group, explains the
difference between UX versus UI this way:
 
“Consider a website with movie reviews. Even if the UI for finding a film is perfect, the UX will be poor for a user who wants information about a small independent release if the underlying database only contains movies from the major studios.”
 
In this example (and in all good products), UX and UI come together to create a hollisictally enjoyable experience. Even the most beautiful UI imaginable can’t be appreciated if the product doesn’t function the way the user wants.
Let’s define UX and UI in more detail now, to further clarify the difference between the two.
 
 
While UI is visual, UX is conceptual and is focused on developing and improving a user’s journey to solve a problem.
A UX designer is responsible for all aspects of a user’s interaction — this means a UX designer is not solely responsible for the technology behind a product. They’re responsible for how a user interacts with a company both on and offline, including customer service and other facets.
 
Essentially, a UX designer must answer the question: “How can my company’s product best meet our user’s needs?”
 
Now, what’s left for a UI designer to do?
 
 
Have you ever visited a website and thought, “Wow, this company is cool and has a great product, but what sold me was their website’s intuitive and sleek layout?”
That’s largely due to their UI designer. 
 
Now that we’ve explored UX and UI separately, let’s see how they function collaboratively.

How do UX and UI work together?

Let’s say your company wants to develop a running app, so your CEO hires a UX designer. The UX designer is first going to conduct research into competitors’ apps and your user’s pain points.
 
With this information, she will decide on the core features of the app (“must monitor heart rate and mileage”) and explore
user personas in-depth to create a site map and initial prototype.
 
From there, a UX designer will create wireframes, which they will test, refine, and convert into mockups. Then, the UX designer will conduct research and refine the product for the market. Throughout all stages, the UX designer is focused on the structure and value of the product and how that product is or isn’t meeting the user’s needs.
 
Towards the end of development, a UI designer will then take control over the app’s appearance, including on-screen forms, images, buttons, links, and icons.
The primary difference between UX and UI is their goals: a UX designer is focused on the users’ entire journey in using a product to solve their problem or meet their needs. This includes anything that might motivate or frustrate them, why they would or wouldn’t enjoy the product, and what the product needs to include to make for a pleasant experience.
 
A UI designer is given those constraints — she’s told what the app must include and exclude, and how it’s going to work. Using those constraints as a guideline, she designs an interface that is intuitive to use and materializes all of the users’ needs on the screen.
 
You can’t create an exceptional product without both UX and UI. Without a UX designer, YouTube would appear beautiful and appealing but completely unusable. And, without a UI designer, YouTube would be a great idea in theory but would be difficult and confusing to navigate on the screen.
 
Editor’s note: This post was originally published in June 2018 and has been updated for comprehensiveness.
ux templates
{{slideInCta(‘4bf6af99-b34d-4c32-bac3-5950cf96059d’)}

Categories B2B

Decision Trees: A Simple Tool to Make Radically Better Decisions

Have you ever made a high-stakes decision? If yes, did you contemplate for some time before landing on the “right” decision — and even then, still felt unsure about the best course of action?

In cases like those, you might need a decision tree. It’s more formal than a chat with a friend or a pros-and-cons list.

Here, we’ll show you how to create a decision tree and analyze risk versus reward. We’ll also look at a few examples so you can see how other marketers have used decision trees to become better decision makers.

→ Access Now: 8 Business Flowchart Templates [Free Tool]

Table of Contents

What is a decision tree?

Decision Tree Analysis

How to Create a Decision Tree

How to Create a Decision Tree in Excel

Decision Tree Examples

When it comes to marketing, decision-making can feel particularly risky. What is my colleague is so attached to a new product, she doesn’t want to mention any of its shortcomings? What if my marketing team doesn’t mind office growth, but they haven’t considered how it will affect our strategy long-term?

The visual element of a decision tree helps you include more potential actions and outcomes than you might’ve if you just talked about it, mitigating risks of unforeseen consequences.

Plus, the diagram allows you to include smaller details and create a step-by-step plan, so once you choose your path, it’s already laid out for you to follow.

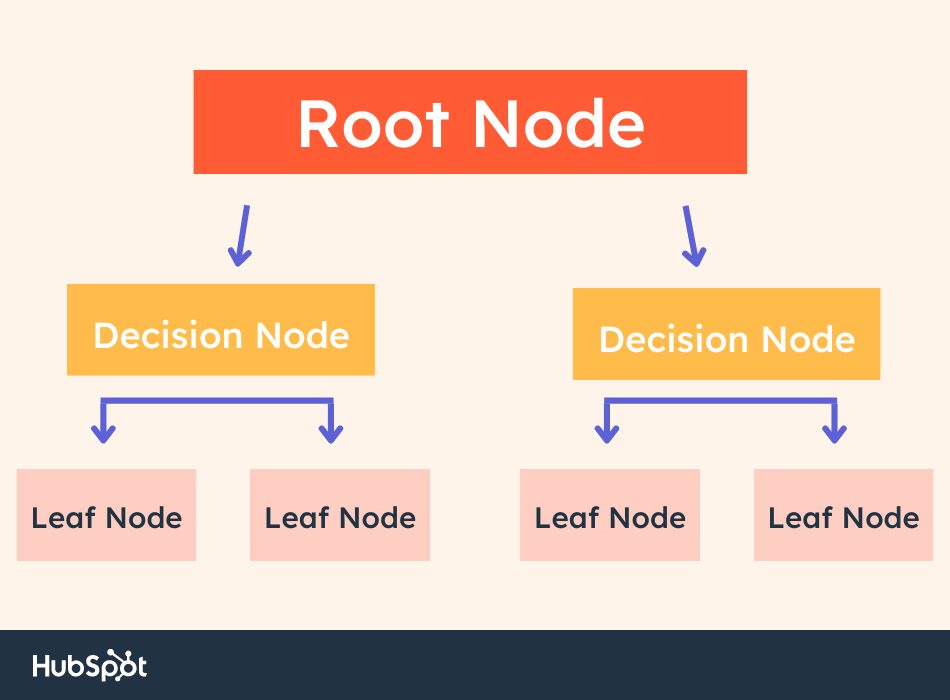
Decision TreeA decision tree contains four elements: the root node, decision nodes, leaf nodes, and branches that connect them together.

  • The root node is where the tree starts. It’s the big issue or decision you are addressing.
  • As the name suggests, the decision nodes represent a decision in your tree. They are possible avenues to “solve” your main problem.
  • The lead nodes represent possible outcomes of a decision. For instance, if you’re deciding where to eat for lunch, a potential decision node is eat a hamburger at McDonald’s. A corresponding leaf node could be: Save money by spending less than $5.
  • Branches are the arrows that connect each element in a decision tree. Follow the branches to understand the risks and rewards of each decision.

Now let’s explore how to read and analyze the decisions in the tree.

Decision Tree Analysis [Example]

Let’s say you’re deciding where to advertise your new campaign:

  1. On Facebook, using paid ads, or
  2. On Instagram, using influencer sponsorships.

For the sake of simplicity, we’ll assume both options appeal to your ideal demographic and make sense for your brand.

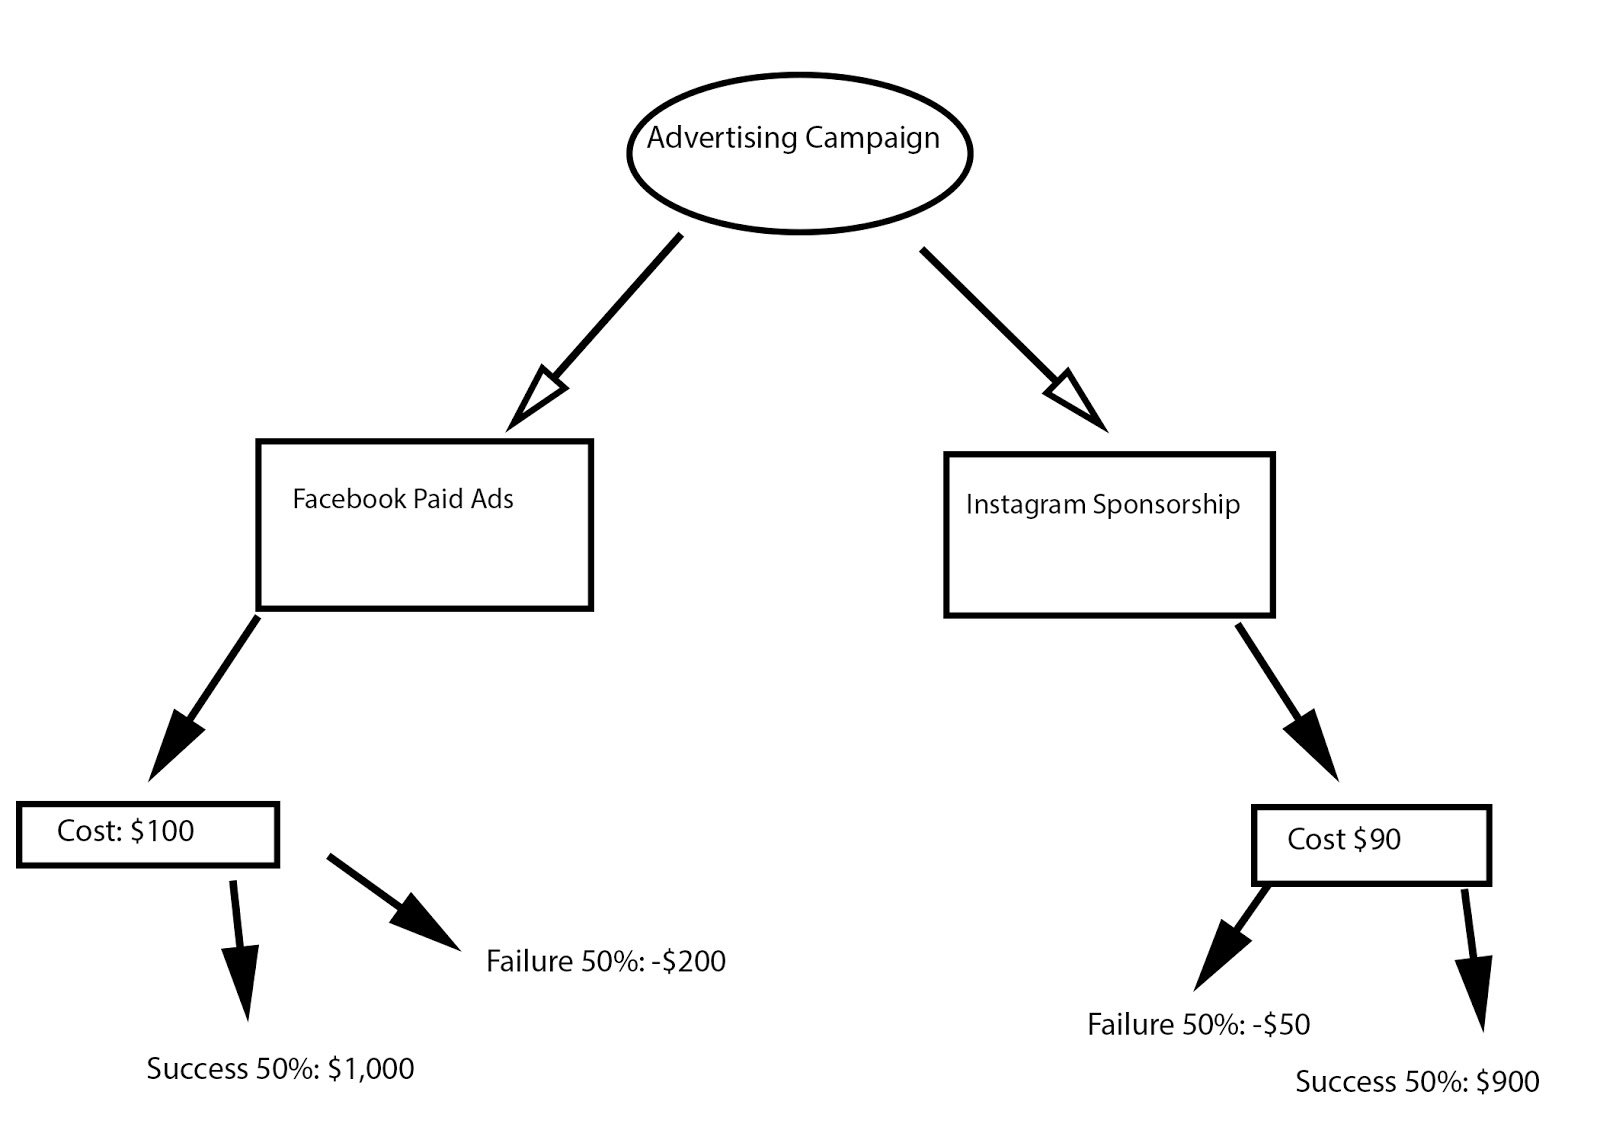
Here’s a preliminary decision tree you’d draw for your advertising campaign:

As you can see, you want to put your ultimate objective at the top — in this case, Advertising Campaign is the decision you need to make.

Next, you’ll need to draw arrows (your branches) to each potential action you could take (your leaves).

For our example, you only have two initial actions to take: Facebook Paid Ads, or Instagram Sponsorships. However, your tree might include multiple alternative options depending on the objective.

Now, you’ll want to draw branches and leaves to compare costs. If this were the final step, the decision would be obvious: Instagram costs $10 less, so you’d likely choose that.

However, that isn’t the final step. You need to figure out the odds for success versus failure. Depending on the complexity of your objective, you might examine existing data in the industry or from prior projects at your company, your team’s capabilities, budget, time-requirements, and predicted outcomes. You might also consider external circumstances that could affect success.

Evaluating Risk Versus Reward

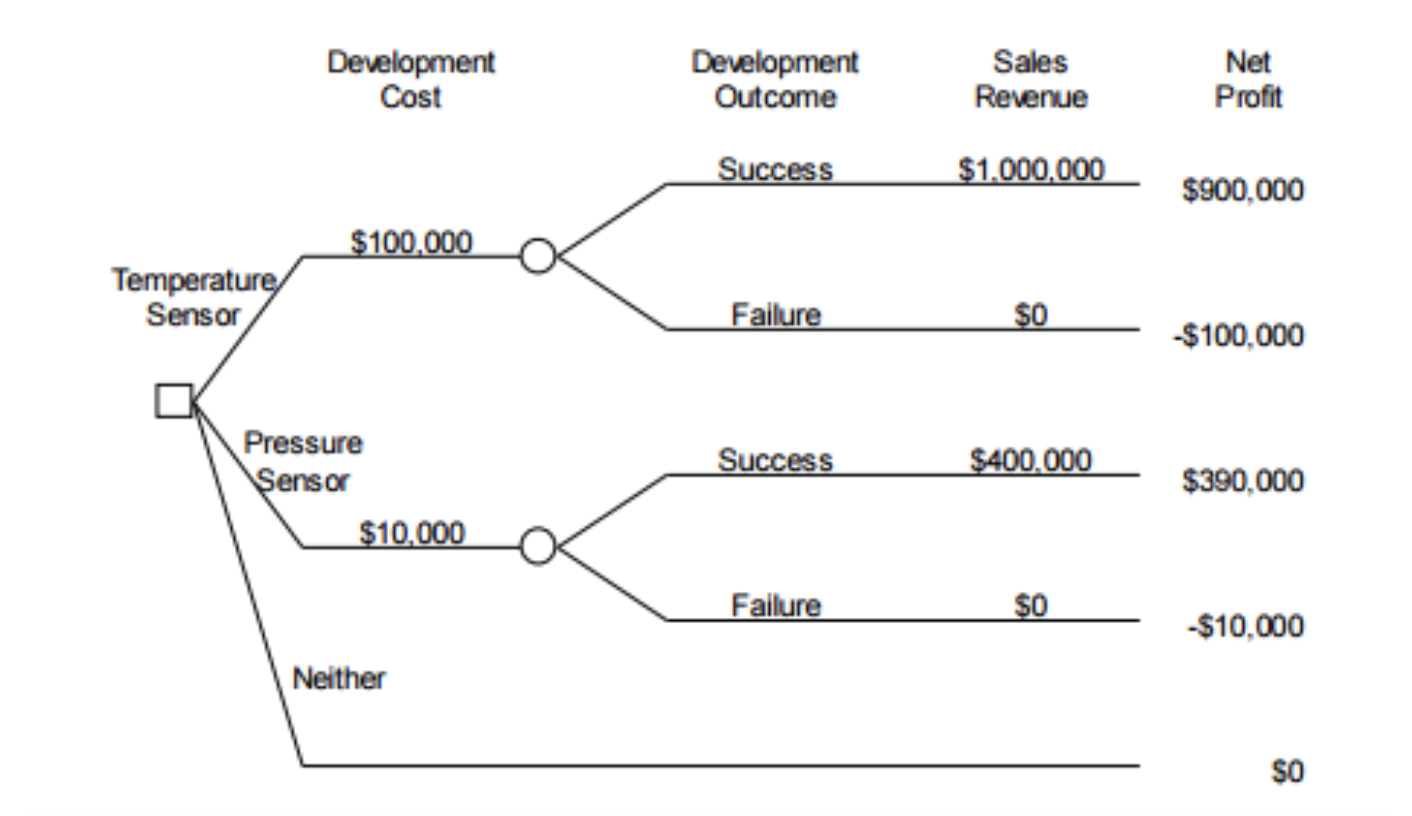
In the Advertising Campaign example, there’s a 50% chance of success or failure for both Facebook and Instagram. If you succeed with Facebook, your ROI is around $1,000. If you fail, you risk losing $200.

Instagram, on the other hand, has an ROI of $900. If you fail, you risk losing $50.

To evaluate risk versus reward, you need to find out Expected Value for both avenues. Here’s how you’d figure out your Expected Value:

  • Take your predicted success (50%) and multiply it by the potential amount of money earned ($1000 for Facebook). That’s 500.
  • Then, take your predicted chance of failure (50%) and multiply it by the amount of money lost (-$200 for Facebook). That’s -100.
  • Add those two numbers together. Using this formula, you’ll see Facebook’s Expected Value is 400, while Instagram’s Expected Value is 425.

Expected Value

With this predictive information, you should be able to make a better, more confident decision — in this case, it looks like Instagram is a better option. Even though Facebook has a higher ROI, Instagram has a higher Expected Value, and you risk losing less money.

How to Create a Decision Tree

You can create a decision tree using the following steps. Remember: once you complete your tree, you can begin analyzing each decision to find the best course of action. 

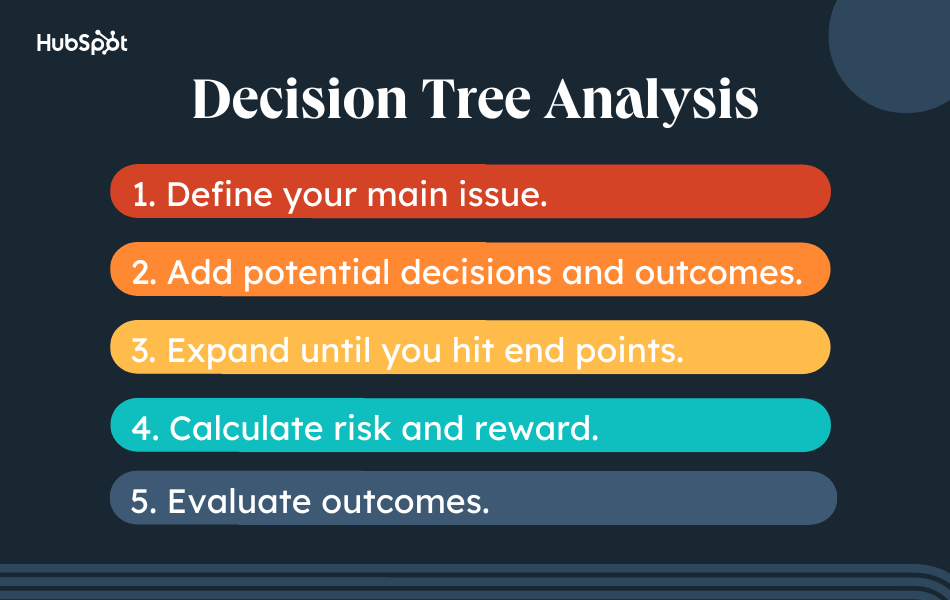
DEcision Tree Analysis

1. Define your main idea or question.

The first step is identifying your root node. This is the main issue, question, or idea you want to explore. Write your root node at the top of your flowchart.

2. Add potential decisions and outcomes.

Next, expand your tree by adding potential decisions. Connect these decisions to the root node with branches. From here, write the obvious and potential outcomes of each decision.

3. Expand until you hit end points.

Remember to flesh out each decision in your tree. Each decision should eventually hit an end point, ensuring all outcomes rise to the surface. In other words, there’s no room for surprises.

4. Calculate risk and reward.

Now it’s time to crunch the numbers.

The most effective decision trees incorporate quantitative data. This allows you to calculate the expected value of each decision. The most common data is monetary. 

5. Evaluate outcomes.

The last step is evaluating outcomes. In this step, you are determining which decision is most ideal based on the amount of risk you’re willing to take. Remember, the highest-value decision may not be the best course of action. Why? Although it comes with a high reward, it may also bring a high level of risk.

It’s up to you — and your team — to determine the best outcome based on your budget, timeline, and other factors.

While the Advertising Campaign example had qualitative numbers to use as indicators of risk versus reward, your decision tree might be more subjective.

For instance, perhaps you’re deciding whether your small startup should merge with a bigger company. In this case, there could be math involved, but your decision tree might also include more quantitative questions, like: Does this company represent our brand values? Yes/No. Do our customers benefit from the merge? Yes/No.

To clarify this point, let’s take a look at some diverse decision tree examples.

Decision Tree Examples

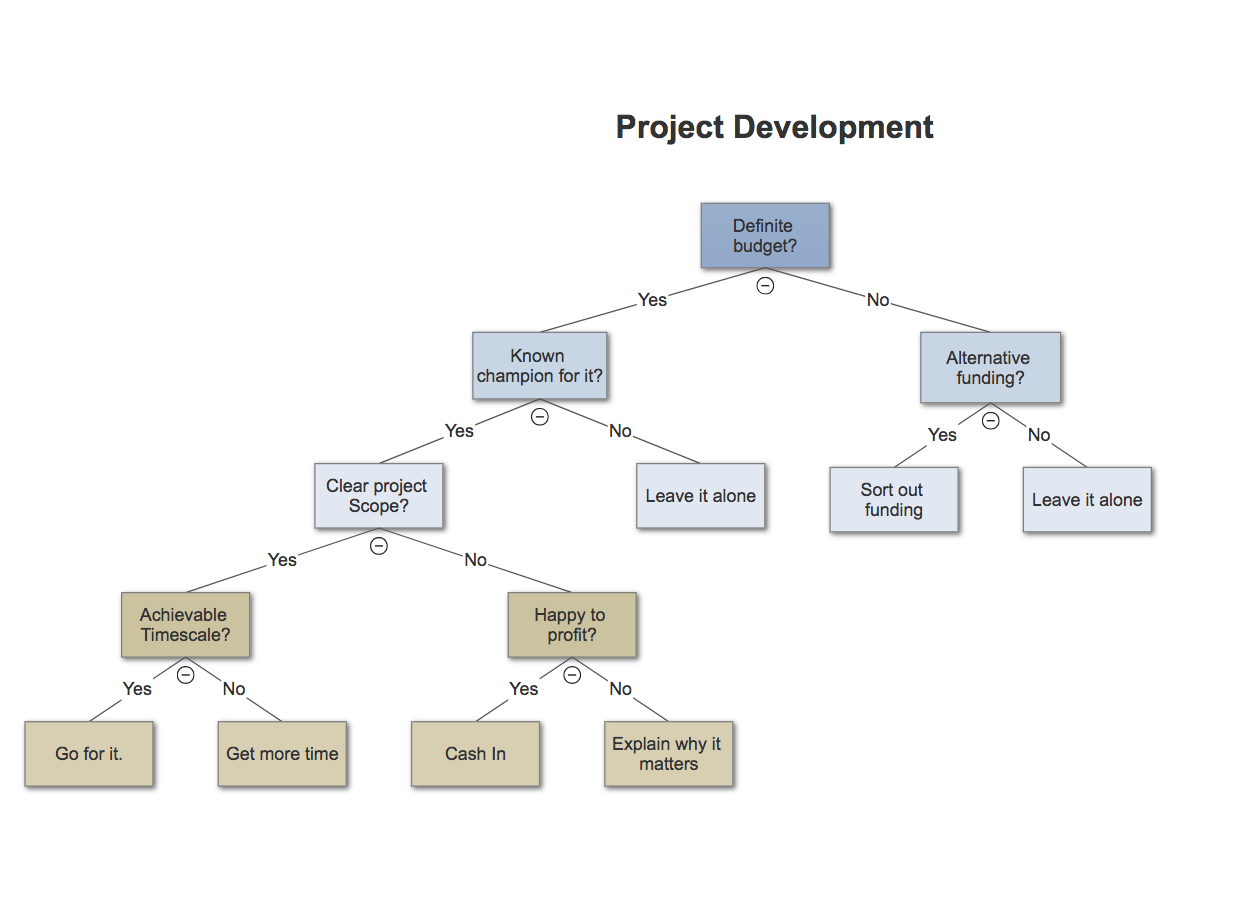
The following example is from SmartDraw, a free flowchart maker:

Example One: Project Development

Here’s another example from Become a Certified Project Manager blog:

Example 2: Office Growth

Here’s an example from Statistics How To:

Example 3: Develop a New Product

To see more examples or use software to build your own decision tree, check out some of these resources:

Back to You

Remember, one of the best perks of a decision tree is its flexibility. By visualizing different paths you might take, you might find a course of action you hadn’t considered before, or decide to merge paths to optimize your results.

New Call-to-action

Categories B2B

How to Start a Podcast on Spotify for Free

If you’re reading this, you’ve likely found a topic you could talk about for hours — and now you’re ready to launch a podcast.

The good news: Spotify is becoming a go-to destination for podcasts. In 2021, Spotify listeners spent 78% more time listening to podcasts than the year before.

Even better news: it’s relatively easy to start a podcast on Spotify — no fancy equipment or advanced skills required.

➝ Free Guide: How to Start a Podcast

Here, we’ll cover everything you need to know about podcasting on Spotify, and how to upload your next episode to the platform.

How to Meet Spotify’s Podcast Requirements

The first step to starting a podcast on Spotify is making sure you meet its podcast requirements. Here’s a quick rundown.

Your podcast should have:

  • A title along with relevant details (i.e., category and primary language).
  • Cover art in a 1:1 ratio and PNG, JPEG, or TIFF format. The higher the resolution, the better.
  • A high bitrate MP3 format (128 kbps+) or MP4 with AAC-LC.
  • Episodes that do not exceed 12 hours.

Once you meet the conditions in this checklist, you’re officially ready to upload your podcast to Spotify. Check out the steps below.

1. Create a Spotify account.

Unsurprisingly, you’ll need a Spotify account to upload your podcast to the platform. If you’re new to Spotify, use this form to sign up.

2. Choose a podcast hosting platform.

Despite being a hot spot for podcasts, you can’t actually host your podcast on Spotify. That’s right: Spotify only provides access to podcasts that are hosted elsewhere.

That said, Spotify has its own hosting platform — Anchor.fm — that enables you to record, edit, and share a podcast to Spotify in one location. It also offers plenty of analytics to better understand your audience.

Of course, there are plenty of other hosting platforms — both free and premium — to choose from, most notably Buzzsprout, Podbean, and Castos. Remember not all hosting sites are created equal, so pay close attention to the amount of storage and analytics each one provides.

3. Copy your RSS feed link.

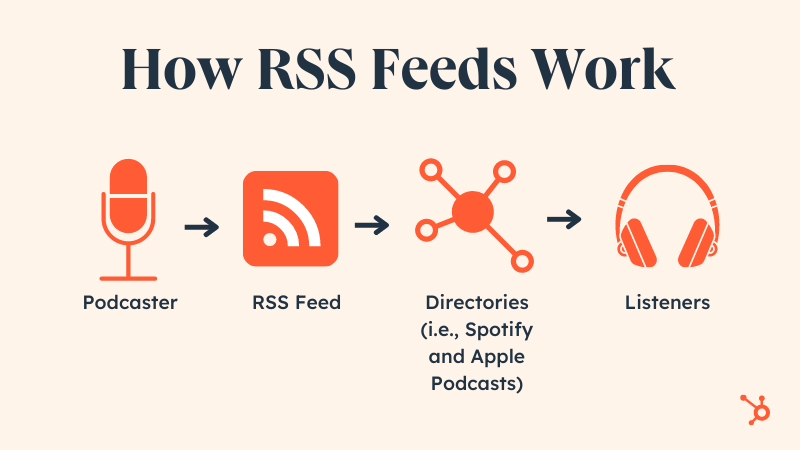
After uploading your podcast to a hosting platform, the next step is to copy the RSS feed link. You can think of your RSS feed as the address for your podcast. And, like an address, there is only one RSS feed per podcast.

RSS Feeds Podcasts

4. Open Spotify for Podcasters.

Next, open Spotify for Podcasters and log in with your Spotify account. Then, hit “Get Started.”

Spotify for PodcastersThen, paste your RSS feed link into the text box. Hit “Next.”
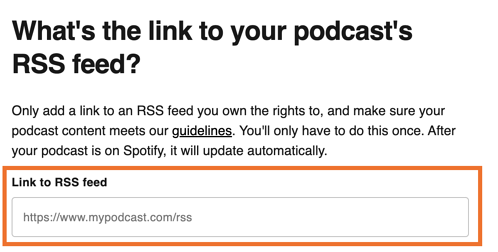
how to start a podcast on spotify: Link RSS Feed

Once you submit the RSS link, Spotify will verify that you own the podcast. What does this look like? Typically, Spotify will send you a code via email to verify. More than likely, this is the same email you use to log into your hosting site.

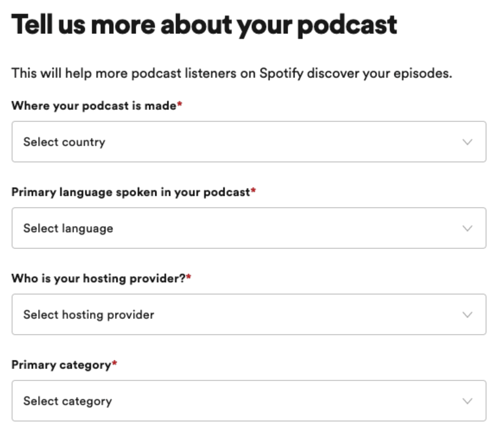
5. Add your podcast info.

Once verified, the next step is to add essential information about your podcast— including where it’s made, its primary language, your hosting provider, and its primary category.

Starting a podcast on spotify: adding podcast detailsOnce you select a primary category, you can select three corresponding sub-categories. This is especially helpful if you’re podcast spans multiple topics or genres.
After filling out the form, hit “Next.”

6. Review and submit your podcast.

The final step is reviewing the information you filled out in the previous step. Once you’re happy, hit “Submit.”

After submitting your podcast, the Spotify team will review your info and then push your podcast live. Expect this process to take a few hours. It’s also worth noting that Spotify does not alert you when it goes live, so keep an eye out for your new episode.

Back to You

In six easy steps, you can share your podcast on one of the biggest podcasting platforms today. Once your podcast goes live, remember to share it far and wide. Make this a regular practice with each episode to boost your listenership.

New Call-to-action

Categories B2B

Best 12 Finance Podcasts To Get Your Money Right in 2022

If you’re looking for some great finance podcasts to listen to in 2022, you’ve come to the right place.

In this article, we will share with you a list of the best finance podcasts available.

Download Now: Business Startup Kit [Free Templates]

Whether you’re just getting started in your financial journey or you’re looking for some new tips and tricks, these podcasts will help you out.

Best for Learning About The Economy: Planet Money

planet money best finance podcastNPR’s Planet Money describes itself as a show where listeners can learn about the economy from a friend – at a bar.
While the economy may seem like a boring topic to many, Planet Money makes it interesting by doing deep dives on who it impacts and how – everything from inflation to fast food delivery to crypto and city building.

What’s more, the show takes a global approach, tackling all countries and the economic issues they face.

Although this isn’t the show to teach you how to manage your 401K, you will learn how a lot about where the economy is and where it’s headed – which is valuable knowledge for long-term investments.

Standout episodes:

  • Buy Now, Pay Dearly
  • No Such Thing as a Free Return
  • Of Oligarchs, Oil, and Rubles

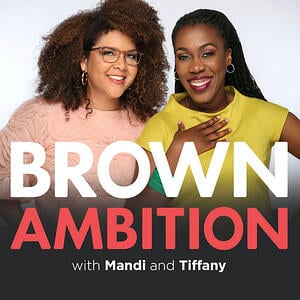
Best for Beginners: Brown Ambition

brown ambition best finance podcastIf you are new to the financial literacy game, you’ve probably heard of The Budgenista. She is a well-known finance educator and author with a large social media following and a frequent daytime TV show guest.

She, along with her co-host Mandi Woodruff, another personal finance expert, started a podcast so you can get their advice every week.

They cover traditional finance topics like retirement accounts, debt management, and loans while also tackling current events, such as rising inflation and the pandemic.

Brown Ambition is perfect for those who don’t know where to start to manage their finances as well as those who have the basics down but still want to do more.

Standout episodes:

  • Why I-Bonds are Suddenly a Sexy Investment
  • Juggling Your Business with a 9-5
  • Can you buy your way to an early retirement?

Best for Seasoned Investors: Invest Like The Best

invest like the best best finance podcastOne of my favorite ways to learn is by listening to experts. This finance podcast leverages this by bringing in investment leaders from all sectors to offer advice and share their journey with listeners.
What’s great about this podcast is that it doesn’t just focus on standard investments like 401Ks, stocks, and bonds – they also discuss artificial intelligence, ecommerce, NFTs, gaming, and more.

This show is for business-driven folks who want to learn how to diversify their income streams and scale their businesses.

Standout episodes:

  • Factories of The Future
  • The Past, Present and Future of Digital Infrastructure
  • The Art of Software Buyouts

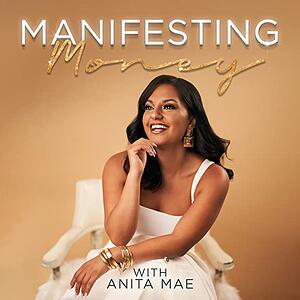
Best for Building a Millionaire Mindset: Manifesting Money

manifesting money best finane podcastManifesting Money is a show that focuses on the psychological, spiritual, and emotional side of making money.

It’s all about attracting and retaining money to build long-term wealth.

The show tackles everything from breaking harmful generational beliefs around money to getting out of financial hardship.

This podcast is ideal for those who not only want to get their money right but also their mind.

Standout episodes:

  • Releasing Your Emotional Attachment to Money
  • Step-by-Step Process of Getting Through Financial Hardship
  • Is Your Family Blocking Your Financial Blessings?

Best For Beginners: Clever Girls Know

clever girls know best finance podcastCreated for women by women, this podcast is an extension of the Clever Girl Finance brand, which is personal finance media and education platform in the U.S.

From personal success stories to pop culture lessons to expert tips, Clever Girls Know has a little bit of everything in its podcast. This is what makes the podcast exciting – every week, you get something fresh and different.

Standout episodes:

  • The Parallels between Your Health/Diet and Your Finances
  • The Good, The Bad, and the Backlash of Saving $100K
  • How Stephanie Increased Her Income, Then Identified & Addressed Her Money Trauma

Best For Side Hustlers: Yo Quiero Dinero

yo quiero dinero best finance podcastsWe can’t talk money without talking about generational disparities stemming from race, gender, and sexual orientation. Yo Quiero Dinero tackles this and more.

Led by a Latina woman, Yo Quiero Dinero helps its listeners tap into their potential by offering the steps needed to succeed in entrepreneurship while navigating real-life challenges.

From the path to investing as a first gen to the mental health impact of pursuing financial independence, this podcast is a well-rounded podcast that teaches about money and beyond.

Standout episodes:

  • How to Manage Wealth Guilt
  • Why Entrepreneurship is Emancipation for Women of Color
  • Taxes and Accounting for Side Hustlers

Best For Parents: Parents Making Profits

parents making profits best finance podcastsAre you a parent struggling to balance family and business? Then, this podcast is for you.

Parents Making Profits is all about ways to earn money while balancing raising a family.

The best part? It’s led by two Dadpreneurs who practice what they preach – so, you know you’re getting advice from those who understand exactly what you’re going through and how to tackle those challenges.

Standout episodes:

  • How to Get PR without a Publicist
  • Who is more helpful when starting your business: Strangers or Friends/Family?
  • 4 Tips for You to be an Effective ParentPreneur

Best for Short-and-Sweet Tips: Nerd Wallet’s Smart Money

smart money best finance podcastsNerd Wallet has already established itself in the blogging space as a reputable. financial education platform. In 2017, they expanded into the audio space by launching “Smart Money.”

Compared to most podcasts which usually range between 45 minutes to an hour, Nerd Wallet is short and sweet, with most episodes around 20 to 30 minutes.

These bite-sized episodes cover everything from leveraging credit card points to vetting mortgage lenders. They also do “nerdy deep dives” into niche industries like child care and weightlifting.

Standout episodes:

  • When Travel Insurance is Worth It and Buying an Electric Car
  • Why File Your Taxes Early and Tapping Your Home’s Equity
  • Small Business Inflation and Sign-Up Bonuses

Best for Beginners: Money Please

money please best finance podcastsMoney conversations can get complicated very quickly. Think of Money Please as your go-to friend for all things finances who can give you the scoop and offer advice without shaming or judging you.

The host, Berna Anat, regularly brings in experts to help listeners go from a fear of money to a love of personal finance.

Standout episodes:

  • How Do I Avoid the Budgeting Guilt Cycle?
  • Is It Too Late to Become Part of the CryptoClub?
  • Financial Feminism

Best for Those Seeking Early Retirement: Choose FI

choose FI best finance podcastsEver watch those “I’m retired at 30” videos and wished that was you? Then, start listening to Choose FI.

This podcast focuses on reaching financial independence (FI) early by exploring tactics used by those who have achieved it. They tackle debt management, tax hacks, passive income streams, real estate, free travel, and more.

Standout episodes:

  • SWOT Analysis for Financial Independence
  • The Art of the Career Pivot
  • $1K 100 Ways

Best For Novice Investors: Coffee and Coin

coffee and coin best finance podcastsSome of the best conversations are had while drinking a cup of coffee.

This podcast aims to do just that: Real, honest conversations about money. From where to invest to how to double your earning potential.

Although the podcast was created with women in mind, anyone can benefit from listening to this podcast.

Standout episodes:

  • Investing Strategies: How Erique Leveraged Automation to Turbo Charge Her Net Worth
  • Why Compound Interest Is Your New Best Friend
  • Bad Pocket Business Plans: What They Are & Why You Need One

Best For Real Estate Investors: On the Market

on the market best finance podcastsWant to keep up with the real estate market but don’t have the time to keep up with the news? That’s where On The Market comes in.
This podcast serves as your one-stop shop to learn and get updates on everything related to the market.

From crash predictors to recession investments to interest rates, real estate enthusiasts are sure to stay ahead of the curve.

Standout episodes:

  • What to Invest in During a Recession
  • The Not-So-Scary Way to Start Buying Real Estate in 2022
  • Host vs. Hotels: Is there still room in the short-term rental market?

Whether you’re new to personal finance or you’re a seasoned investor, there’s a financial podcast in this list for you.

Apply for a job, keep track of important information, and prepare for an  interview with the help of this free job seekers kit.