Categories B2B

16 Effective Ways to Build Your Online Presence

The other day I was trying to find the perfect dress pant yoga pants because I wanted comfortable, professional clothing options.

When I searched for “dress pant yoga pants” on Google, I found the brand Betabrand.

Amazingly, the company dominated the top four search results. The first two results were their website, the third was their Amazon page, and the fourth was a review of their product.

Deciding I wanted to look into it further, I searched for Betabrand on Google and found their social media pages, a Wikipedia page, their website, their Amazon store, and reviews.

They were impossible to ignore online. Ultimately, I ended up making a purchase.

My buyer’s journey is not unique.

In fact, according to Adaptive Marketing, 97% of consumers use the internet to find a business.

That’s why having an online presence is important.

It helps consumers find your brand before they are aware you exist and it helps them learn about your reputation before making a purchase. Eventually, all of this information will play a role in your customer’s purchasing decision.

Below we’ll review what an online presence is, and explore 16 effective ways to build your online presence.

Download Now: Free Brand Building Guide

1. Build an email list.

One of the top ways to build your online presence is to create and grow an email list. An email list will enable you to engage with current and potential customers on a daily, weekly, or monthly basis.

To grow your email list, you can create gated content that users have to sign-up to receive. Additionally, you can use a call-to-action (CTA) on your website and social media pages to promote your email newsletter. With a newsletter, you’re able to collect leads’ emails — additionally, it shows your leads and customers are interested in your content.

You can use tools in your content management system (CMS) to create forms, slide-in CTAs, or popups that are designed to gather email addresses. For example, HubSpot offers free CMS tools, an email marketing tool, free pop-up forms, and a free online form builder to help build an email list. Alternatively, you might consider checking out MailChimp or GetResponse. To find a tool that works for your business, check out The 12 Best Email Newsletter Tools in 2019.

2. Master SEO.

With algorithms changing every day, search engine optimization (SEO) is one of the best tactics to build your online presence.

The first step to showing up online when people are searching is to master SEO.

SEO can be divided into two categories — on-site SEO, and off-site SEO.

On-site SEO is all about the content. You’ll want to use keyword research, include internal and external links, and create educational content that likely matches your target audiences’ search queries.

With off-site SEO, you’ll pay attention to the more technical side of things. For example, you’ll want to make sure your site is set up correctly, has simple URL structuring, and loads quickly. Additionally, off-site SEO also includes building credibility with backlinks. You can also use SEO and website audit tools to optimize both your on-page and off-page SEO

Lastly, if you want to show up on Google, create a Google My Business account, and use Google’s keyword planner.

3. Create value.

Overall, your brand or company’s goal is to make money. But before you can make money, you have to create value and be customer-centric.

One way to create value is to provide educational, free content online. Not only is this helpful for your customers, but it’ll also improve your online presence.

To get started, write out a list of your customer’s pain points and motivations. In other words, take a look at your buyer persona.

Then, brainstorm content that would answer their questions. What information would help your customers? This will be the basis for your content strategy.

Another way to create value online is to give advice. You could do this through guest posting, responding to comments, or appearing on a podcast. Wherever your customers have questions, you should be answering them.

4. Be active online.

In order to show up online, you have to be active online. This includes regularly posting to your owned properties, including your website and social media accounts.

Additionally, you should be active in other areas, as well. For example, you should engage with followers and subscribers on social media. If there’s something that everyone is talking about in your industry, you can engage in the conversation.

5. Analyze your results.

Once you get started with a few tactics to build your online presence, it’s critical you analyze your results. I would suggest testing your strategies so you learn what works and what doesn’t.

In order to test your results, start out by deciding what metrics you’re using. If you’re working on your SEO, you might track your search engine results on Google. On the other hand, if you’re building an email list, you might track the number of subscribers, plus your open and click-through rates.

Keep in mind that these are long-term strategies. Some may take time to produce results. Additionally,, some may be harder to track, like brand awareness. But that’s okay — just because results may be hard to track doesn’t mean it’s not worth doing.

6. Adopt new forums.

When new social media or popular websites emerge, be an early adopter. There are many benefits to being an early adopter.

First, if you’re an early adopter, there’s less competition. Second, most of these websites start out free and have high engagement rates.

To be an early adopter, make sure you’re always in “the know.” Read industry news and research new, up-and-coming sites.

7. Have a social media presence.

Being on social media is a necessity in this day and age. In fact, in 2019 there are now 3.2 billion people on social media globally, so social media is a key tool for reaching your intended audience on whichever platforms they prefer.

Having a presence on social media instills trust in your current customers and prospects. Personally, if I see that a company doesn’t have a presence on social media, I lose trust and feel unsure if they even exist.

Plus, social media is a great way to build your credibility and reputation and showcase your brand. When potential customers are researching your brand, the first place they’ll look is social media to see what you’re putting out there and what people are saying about you.

8. Make a website.

Not to be repetitive, but again, to show up online, you have to have a website online. Besides social media, one of the first places people will go to find out more about your company is your website.

Your website is where you can show off your brand through colors, fonts, text, video, and images. You’ll appeal to your buyer persona’s pain points and present a solution to their problem.

To make a website, there are many CMS sites you can use, including HubSpot, Wix, WordPress, and Squarespace. HubSpot’s free CMS tools contains a host of features to make website creation seamless and customizable.

9. Produce content.

The more content you produce, the more opportunities you have to show up online. Having an online presence is all about showing up in search engines, on social media, and sites like YouTube.

To start producing content, strategize what places you want to show up online. Do you want to be on Facebook, Instagram, YouTube, Twitter, Pinterest, Etsy, Poshmark, Goodreads, or Amazon?

Prioritize the sites your customers are active on (based on customer research) and start brainstorming content that is best-suited for those mediums.

For example, with YouTube, you’ll come up with video ideas — whereas on Instagram, you’ll come up with photo and caption ideas.

10. Personify your brand.

Building an online presence is a lot like building a brand. One tactic many companies use to build a brand is to personify their brand.

For example, The Skimm, a daily newsletter, personified their brand when they were founded in 2012. The founders created a persona called The Skimm Girl. This was the personification of their brand. They knew her likes, dislikes, age, job, financial situation, and sense of humor.

By personifying their brand, the company was able to appeal to their target demographic while staying true to their mission and values.

Having a clear brand helps users relate to your company and makes them want to engage with you, whether through a social media comment or by signing up for your email newsletter.

11. Experiment with online advertising.

A faster solution to building an online presence is through online advertising. If your ad shows up in the top search results, you’ll build brand awareness and increase your visibility online.

You can advertise on search engines like Google, Yahoo, and Bing. Additionally, you can look into social media advertising. Facebook, Instagram, and YouTube are well-known for their advertising options.

Before you begin advertising online, brainstorm what you want to promote. Do you want to promote a certain content offer? Alternatively, perhaps you want to advertise your email newsletter?

Once you choose what it is you want to advertise, you’ll also need to decide on the platform that is best-suited (i.e. has the right audience) to promote that content on.

12. Research influencer marketing.

In order to stay active in your community, it’s important to engage with the most popular figures in your niche.

For instance, if you sell beauty products, you might consider researching beauty influencers on YouTube and Instagram. Many consumers look to influencers for their honest reviews and promotion before purchasing a product.

Additionally, influencer marketing will get the word out about your brand online. The more people are talking about you, the more often you’ll show up online.

13. Be competitive.

When you’re building an online presence, remember to be competitive. Look at what your competitors are doing and discuss whether or not that’s a good strategy for your business, as well.

You can also use your competitors to see what they’re missing. Is there a gap they aren’t filling? What information do customers want that your competitors aren’t providing?

Researching your competitors should give you ideas for content and strategies. You won’t be able to compete with or one-up your competitors if you aren’t sure what they’re doing.

14. Develop relationships.

Developing relationships with those in your industry is an important way to build your online presence.

For instance, if you have a relationship with blog writers or podcasters in your industry, they might feature you in their content. Perhaps they’ll ask you to guest post or appear on their podcast.

Forging relationships with others in your industry will ultimately help you show up online.

15. Show up where your audience is.

To show up online, you have to figure out where your audience is.

If your audience is on Instagram, but they aren’t on Twitter, you shouldn’t be putting all your efforts into Twitter. On the contrary, you should be focusing your content and promotion strategy on Instagram.

If you show up where your audience is, you’ll build a strong online presence that customers can’t ignore.

16. Automate your process.

Lastly, building an online presence includes a lot of tedious tactics.

In order to ensure the system runs smoothly, automate some of your processes. For instance, you can schedule your content to go live on your CMS and social media.

Additionally, you can curate other people’s content, which enables you to provide valuable resources for your audience without constantly creating fresh content.

You can also plan your email marketing newsletters in advance, and set up email sign-up forms on your site that show up automatically.

These marketing strategies can help you build your online presence, create brand awareness, and develop a strong reputation. Building an online presence requires effort, but over time it will pay off with increased sales and better brand awareness in your industry.

brand consistency


Categories B2B

How to Whitelist an Email in Gmail, Outlook, Yahoo, and More

Imagine waiting for an important email, never receiving it then discovering it in your junk folder months later. That’s pretty frustrating.

The same can happen between a brand and its subscribers – wasting a marketing team’s time and resources.

→ Download Now: The Beginner's Guide to Email Marketing [Free Ebook]

In this article, learn how to whitelist an email on all major email providers like Gmail and Outlook. If you’re a marketer, discover ways to encourage your subscribers to do so.

Table of Contents

1. Click the gear icon in Gmail and select “See all settings” from the Quick settings menu.

gmail gear icon and quick settings menu

2. Navigate to “Filters and Blocked Addresses” in the top menu.

gmail filters and blocked addresses page

3. Select “Create a new filter.”

In Gmail, whitelisting an email actually involves creating a filter.

gmail create filter on filters and blocked addresses page

4. Add a specific email or a whole domain in the “From” field.

The “From” field is where you’ll specify what’s getting whitelisted. In Gmail, you can specify either a specific email address (e.g. [email protected]), or you can whitelist a whole domain by omitting everything before the at symbol (e.g. @domain.com).

The former will whitelist one specific email address while the latter whitelists anyone who is sending emails from that domain.

gmail-create-filter-process

5. Click “Create filter.”

From there, you don’t need to input any additional information. Simply click the Create filter button at the bottom of the window (next to the blue Search button).

6. Check “Never send it to Spam” in the checkbox.

Clicking the button brings up a new window. Here’s where you’ll actually specify that what you’re doing is whitelisting. In Gmail, you do this by checking the Never send it to spam box.

Doing so will ensure that emails that meet the criteria you specified never end up in Spam or Trash (unless you do so manually).

gmail never send to spam checkbox

7. Click “Create filter.”

Once this information is specified, you click the “Create filter” button again, and this creates the whitelist within Gmail.

1. Click the gear icon in Outlook and select “View all Outlook settings.”

outlook gear icon

When you select it, a drop-down menu will appear. At the bottom of the drop-down menu, you’ll choose View all Outlook settings.

outlook settings menu with "view all outlook settings" highlighted

2. Select “Mail” from the settings menu.

outlook junk email settings

3. Choose “Junk email” from the submenu.

4. Click “Add” under “Safe senders and domains.”

outlook add safe senders and domains

5. Enter the email address that you want whitelisted.

6. Choose “Save.”

This will save your whitelist preferences and ensure that emails that fit the criteria don’t make it to your junk email folder in Outlook.

How to Whitelist an Email in Yahoo

  1. Open Yahoo Mail and log into your account.
  2. Navigate to “Settings” then click “More Settings.”
  3. Select “Filters” and hit “Add” to enter the email you’d like to whitelist.
  4. Name the filter and add the email address.
  5. Select to send all mail to “Inbox.”
  6. Save your settings.

How to Whitelist an Email in AOL

  1. Log in to your AOL account.
  2. Open “Contacts” from the left navigation pane.
  3. Click the “New Contact” icon and add the email address.
  4. Click the “Add Contact” button and you’re set.

How to Get Subscribers to Whitelist Your Email Address

To get on your email subscribers’ whitelists, consider using simple language that frames the extra step as a benefit to the recipient:

“To be sure our emails always make it to your inbox, please add us to your email whitelist.”

Ideally, you’ll include this message in the first email you send new subscribers to improve email deliverability at the onset of a new relationship.

You might use your own flair and brand voice to craft a compelling email message.

Digital marketing agency Yokel Local does this well in their re-engagement campaign aimed at reconnecting with customers who may not be opening their emails:

whitelist email example from yokel local

While the email above is serving a specific function in an email marketing campaign, you can also include a more general whitelist reminder in the footer of all your communications like so:

whitelist message in footer

Keep in mind that not all of your recipients may know what a whitelist is, so you might also want to incorporate steps they need to take. To make the process simple, you can include links to the instructions for the most common web clients like this:

“To be sure our emails always make it to your inbox, please add us as a contact or put us on your whitelist. If you have a Gmail account, follow these steps. Alternatively, if you use Outlook, find the steps here.

Just be sure that you include instructions for the most popular email providers.

Best Email Practices Beyond Whitelisting

Encouraging your subscribers to whitelist your email is a best practice that can help you improve the deliverability of your email. However, it’s not the only factor that can help you increase deliverability. Here are some additional fail-safes:

  • Use inbound methods to populate your database rather than buying email lists and sending spam emails.
  • Segment your email database.
  • Keep your contact information clean and remove disengaged emails.

All of this is so important in ensuring that your message is heard by your prospects and customers so that you stay top of mind and grow your business.

Editor’s note: This post was originally published in April 2019 and has been updated for comprehensiveness.

New Call-to-action


Categories B2B

The Complete Guide to Stakeholder Management

Successful projects have support from stakeholders across the organization. That’s why stakeholder management is essential for any initiative.

Click Here to Get HubSpot's Project Management Tool

Stakeholder management allows you to identify and meet leaders’ needs while keeping communication open.

In this article, you’ll learn what stakeholder management is, why it’s important, and how to create a stakeholder management plan.

Table of Contents

Why is stakeholder management important?

Projects fail when the interests and needs of stakeholders are ignored. This leads to a lack of buy-in from key stakeholders, which can jeopardize the success of the project.

When stakeholders feel their needs are being met, they’re more likely to support the project. On the other hand, if their needs are not met, they may try to block your initiative. Stakeholder management helps build positive relationships that keep your project running smoothly.

An effective stakeholder management strategy can help you:

  • Avoid or resolve conflicts between stakeholders.
  • Secure buy-in and support from key stakeholders.
  • Communicate effectively with stakeholders.
  • Manage expectations of stakeholders.
  • Monitor stakeholder engagement throughout the project.

Benefits of Stakeholder Management

There are many benefits of an effective stakeholder management strategy, including:

  • Improved communication. By identifying the interests and needs of stakeholders, you can tailor your communications to their specific needs. This ensures that your messages are received and understood.
  • Increased buy-in. According to KPMG, 61% of projects have highly involved sponsors. When stakeholders feel their interests and needs are being considered, they’re more likely to support the project.
  • Reduced risks. By engaging with stakeholders, you can identify potential risks early and take steps to avoid or mitigate them. This can help reduce the overall risk of the project.
  • Improved performance. An effective stakeholder management strategy can help you optimize resources and align project activities with stakeholder interests. This can lead to improved project performance.

Inside the Stakeholder Management Process

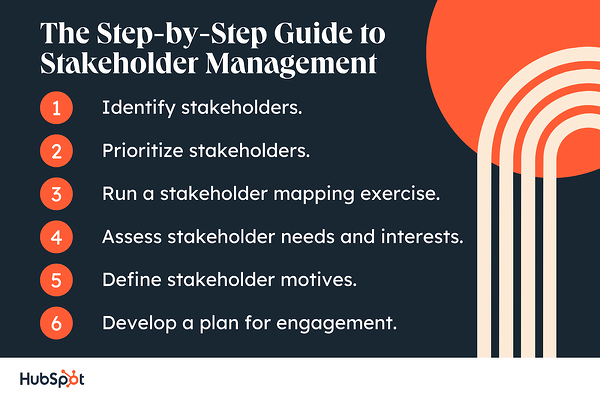
stakeholder management, the step-by-step guide

While stakeholder management may seem intuitive for some, you can start building trust systematically with a more formal roadmap.

The following six steps can help you understand stakeholder priorities and how you can address these needs.

1. Identify stakeholders.

Stary by identifying all the individuals and groups who can impact your project, both positively and negatively. This includes internal stakeholders (such as team members) and external stakeholders (such as customers or suppliers).

To identify your stakeholders, ask yourself the following questions.

  • Who will be impacted by your project?
  • Who has an interest in your project?
  • Who has the power to influence your project?
  • Who wants your project to fail?
  • Who wants your project to be successful?

2. Prioritize stakeholders.

After you’ve identified all your stakeholders, the next step is prioritization. This will help you focus your attention on the stakeholders most important to your project’s success.

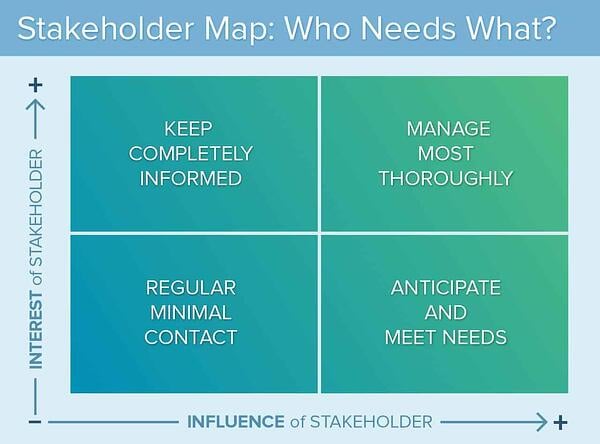
You should identify where their expectations lie, their level of influence, what information they will want from you, and how often they want reporting from your team. You can use stakeholder mapping to help you prioritize key leaders.

Run a Stakeholder Mapping Exercise

stakeholder mapping, stakeholder management process

Image Source

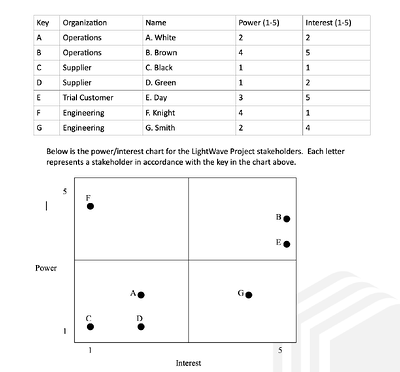
The above stakeholder mapping exercise asks you to plot leaders on a two-by-two grid. One axis is labeled power and the other interest.

On the power axis, you rate each stakeholder on their ability to influence the project. On the interest axis, you rate each stakeholder on their level of interest in the project. This will give you a clear picture of which stakeholders are the most important to engage with and how best to do so.

There are several different ways to map stakeholders, including:

  • RACI matrix. This is a popular stakeholder mapping method that uses the letters R (responsible), A (accountable), C (consulted), and I (informed) to rate stakeholders on their level of involvement in the project.
  • Power/interest grid. This is a simple way to map stakeholders that can be used to prioritize engagement. It is also known as the Salience model.
  • Influence/impact matrix. This is a more detailed stakeholder mapping method that can be used to assess the potential impact of each stakeholder on the project.

3. Assess stakeholder needs and interests.

The key to a successful stakeholder management plan is understanding your stakeholders. This will help you assess what they want from the project and how best to engage with them.

At this stage, ask yourself the following questions.

  • Do you understand their needs, priorities, and issues?
  • Do they have the power to influence the project?
  • What financial or emotional interest do they have in the outcome of the project?
  • What motivates them?

By understanding the answers to these questions, you can better develop a stakeholder management plan that fits each leader.

4. Define stakeholder motives.

Once you’ve identified and assessed your stakeholders, you can begin to define their motives. This will help you understand what they want from the project and how best to engage with them.

There are several ways you can define stakeholder motives, including:

  • Interviews. You can interview stakeholders to get their views on the project. This can be done in person, over the phone, or via email.
  • Surveys. You can send out surveys to stakeholders to get their feedback on the project. This is a quick way to gather data from a large number of stakeholders.
  • Focus groups. You can hold focus groups with stakeholders to get their input on the project. This can be used to generate ideas and identify issues.

By understanding stakeholder motives, you can develop an effective stakeholder management plan that meets their needs and interests.

5. Develop a plan for engagement.

The goal of stakeholder engagement is to manage expectations and build relationships. This can be done through several different methods, including:

  • Frequent communication. This is the most important aspect of stakeholder engagement. You must regularly communicate with stakeholders to update them on the project and get feedback. This can be done through face-to-face meetings, phone calls, emails, or online tools like a project management software. Each stakeholder may need their own communication strategy.
  • Consultation. This involves consulting stakeholders in decision-making. This can be done through meetings, surveys, or focus groups.
  • Collaboration. This involves working with stakeholders to complete tasks or achieve objectives. This can be done through co-creation, joint planning, or shared decision-making.

The best way to engage with various leaders will depend on the stakeholder and the project. You should tailor your engagement plan to each individual.

Stakeholder Management Plan Templates

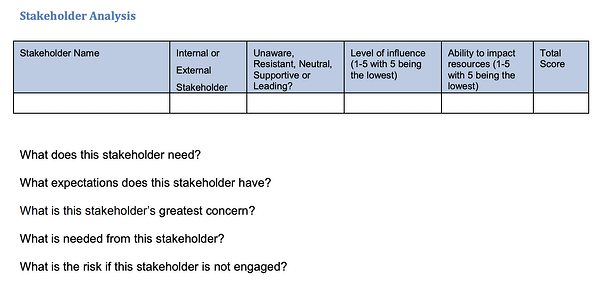
After you’ve identified stakeholders, it’s time to develop management plans for each group.

The below templates can help you create engagement plans and organize your stakeholder communication.

Asana

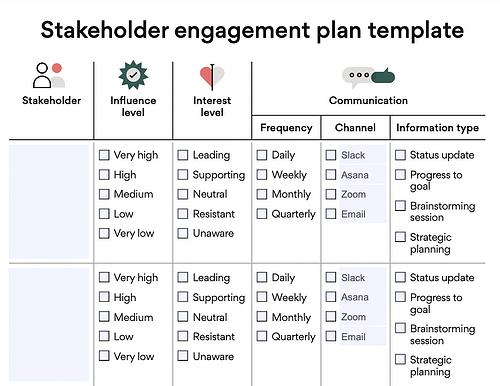
stakeholder management plan template, Asana

If you’re new to stakeholder management, this template from Asana offers a simple way to stay organized. In this plan, you write down each stakeholder, their level of interest in your project, and how influential they are to your work.

Then, you can check a box to identify their communication preferences. That includes how often they want to hear from your team and how they want you to get in touch.

What we love: With this template, you know which of your leaders prefer a quick Slack versus a formal email at a glance.

Project Management Docs

stakeholder management example, project management docs

If you’re looking for a more detailed engagement plan, consider this option from Project Management Docs. With this document, you can fully lay out the vision of your project and which departments your initiative will affect.

What we love: This template includes charts and tables that you can use to determine each stakeholder’s level of importance to your project. You can use this document to brainstorm and outline your final draft.

KnowledgeHut

stakeholder management plan template, Knowledgehut

If you’re looking for a complete guide to writing an engagement plan, KnowledgeHut is here to help. This template includes sections that help you identify stakeholders and create a timeline for each person’s involvement. You can also keep track of costs and human resources involvement.

What we love: This template features charts that you can fill out with stakeholder data. If you get stuck, each section comes with helpful questions for self-reflection to guide you along the way.

PM-Training

stakeholder management example, pm training

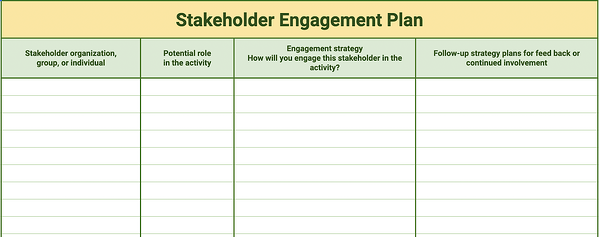
If you’ve been searching for a simple spreadsheet to manage your stakeholders, look no further. This template from PMTraining offers a straightforward approach to managing stakeholders.

What we love: This template lays out who is involved, what they need to do for your project, and how you plan to keep them engaged. If you’re looking for a quick way to develop a one-page stakeholder management guide, this is it. Plus, everything can be edited in Google Docs.

Tips for Stakeholder Management

Formalizing stakeholder management can feel like an overwhelming process. Whether you’re just getting started or have years of experience, the following tips can help you ensure successful stakeholder management.

1. Define the purpose of the project.

According to PMI, 44% of projects fail because of a lack of alignment between business and project objectives.

Before you begin engaging with stakeholders, it is crucial to define the purpose of the project. This will help you identify who you need to engage with and their objectives.

2. Define roles and responsibilities.

At the start of a project, clearly define each stakeholder’s roles and responsibilities. This will help ensure that everyone is clear on their involvement in the project.

3. Communicate regularly.

Regular communication is essential for successful stakeholder management. You should update stakeholders on the project regularly and solicit their feedback.

Your strategic objectives should always be clear in stakeholder communication. This allows your team to manage stakeholder expectations and create positive relationships.

4. Be transparent.

It is important to be transparent with stakeholders about the project. This will help build trust and ensure everyone is on the same page.

5. Seek feedback.

Feedback is essential for successful stakeholder management. You should seek feedback from stakeholders at every stage of the project.

Keep track of their suggestions and implement their insights. You can then report back on how you implemented their solutions to further gain their support.

6. Choose the right software.

Today, only one in four teams uses a project management software. Implementing one of these tools can help you keep organized.

That ranges from project management software, like Basecamp or Asana, to collaboration software, like Google Drive or Trello. Choose a tech stack that best fits the needs of your project.

7. Be flexible.

Stakeholder management is not a one-size-fits-all process. You should be flexible and tailor your approach to each individual you work with.

Create an Effective Stakeholder Management Plan

Stakeholders hold the power to influence your project, so engaging leaders while keeping their needs at the forefront will help keep things running smoothly.

Keep these tips in mind as you develop your stakeholder management strategy to stay on track.

New Call-to-action

Categories B2B

What is a Project Charter? The Complete Guide

Project charters provide a guiding light for any new initiative. So, whether you work as a project manager or operations professional, you’ll need to become a pro at writing these documents.

Click Here to Get HubSpot's Project Management Tool

Besides providing you with the authorization to begin projects, project charters help you sell your project’s viability to stakeholders. This document will also help get your entire team on board with your plans and deadlines.

In this guide, we’ll explore everything you need to know about project charters. We’ll cover:

The Benefits of Creating Project Charters

“The project charter is such an important document that a project cannot be started without one,” says Rita Mulcahy, a renowned project manager, trainer, and author. This document can keep your team on track to achieve your project objectives on deadline.

Here are other benefits of creating a well-written project charter:

  • You’ll decide on a project budget.
  • You can define the project outcome.
  • You’ll avoid scope creep and meet your deadlines.
  • You can get stakeholders’ buy-in for your project.
  • You can set the expected start and end dates of the project.
  • You can clearly explain how your project goals align with organizational objectives.

Next, we’ll explore best practices for writing a project charter.

How to Write a Project Charter

When writing your project management charter, it’s important to get it right from the onset. “You shouldn’t change a project charter after its approval,” says Mary Beth Imbarrato, author of The Project Roadmap. Last-minute changes can make stakeholders question the project’s feasibility.

This step-by-step guide will help you write a great project charter from the get-go.

1. Gather insights from your project team.

Talking to your team members is essential when creating project charters. Your colleagues can help you set realistic project timelines. They can also help you uncover the goals, scope, and risk mitigation plans for the project.

“You should set aside time for your team members to discuss the project, how they want to approach it, and what’s their current bandwidth,” says Will Yang, Head of Growth at Instrumentl. “Doing this ensures your project team is on the same page.”

2. Store the charter in a central location.

To foster collaboration, store your project charter in a central hub so team members can comment on and edit it.

This gives everyone a sense of ownership of the project. Programs like Google Drive and Dropbox offer co-editing capabilities.

3. Keep the project charter brief.

You may be tempted to capture every detail in your project charter. But remember: You should go in-depth in your project planning document, not in the project charter.

“Stakeholders won’t have the time to read a verbose 15 pages charter because they have other priorities,” advises Konstandinos Christofakis, head of marketing at ULTATEL. “That’s why charters should be a high-level overview of projects, remain short enough to be useful, and long enough to be valuable.”

If information is digestible, the chances of project approval rise, according to Christofakis.

4. Add visuals to your charter.

Using images or design elements can help improve the readability of your project charter and keep your document brief.

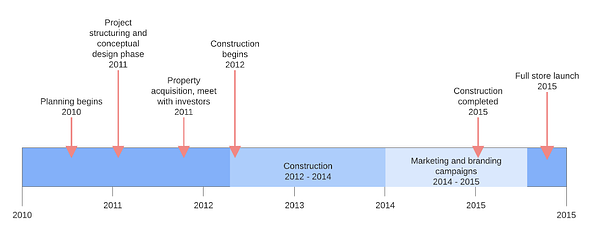
For instance, if you want to outline a lengthy communication plan or milestone in your charter, a Gantt chart can help. These charts also stand out in the project charter, allowing team members to reference them easily.

Project charter timeline example

Image Source

5. Create a project charter template.

Have you written a project charter in the past? Or perhaps the document you just completed is a masterpiece. Turn these documents into templates that you can use in the future.

Having a template for your project management charter helps you save time and maintain consistency in the future. This approach to project charters also ensures you don’t skip important elements in your document.

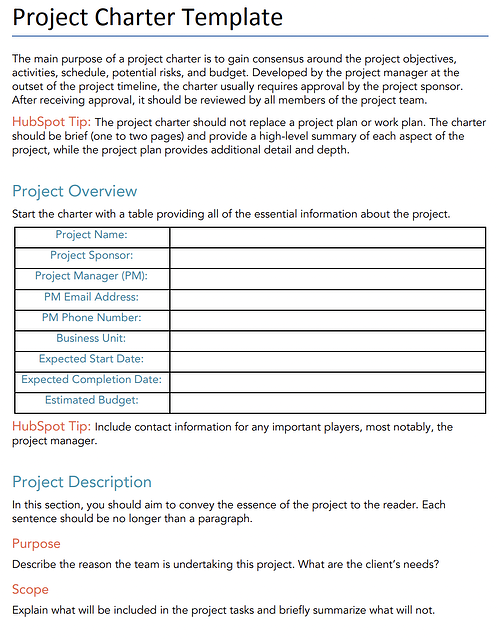
Pro tip: If you don’t already have a template, you can browse options online. HubSpot offers a free project charter template that you can download at any time.

Image Source

Now that you know the basics of creating project management charters, let’s go over the anatomy of a project charter.

The Anatomy of a Project Management Charter

After developing a project charter, project managers send them to the project sponsor to get approval. A sponsor may include the government, individual financier, or top management of the organization executing the project.

Here are the elements your project charter needs to get approval from sponsors.

1. Project Objective

The project objective is the high-level reason for undertaking the project. Tying objectives to your company goals is a brilliant way to pique stakeholders’ interest in your project.

Pro tip: Use the SMART framework to make your goals Specific, Measurable, Achievable, Realistic, and Time-bound.

2. Project Overview

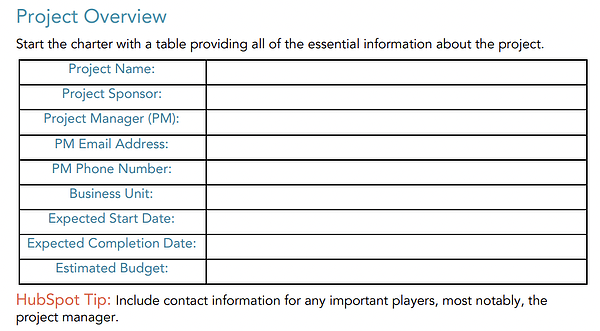
Your project overview goes into greater detail about the timeline and ownership of a project. This section outlines details like the project name, project sponsor, project Manager, expected start and completion dates, and estimated budget.

Pro tip: Add a table to your project overview. This makes information skimmable and easy to find.

Project charter overview template, HubSpot

Image Source

3. Project Deliverables

This is a list of the services or products the project team will provide to stakeholders. Be clear on what your team is delivering to avoid any disagreements that’ll make you extend your deadline.

4. Project Scope

The project scope explains the boundaries of the project. While PMs typically write detailed project scopes, keeping it brief in the project charter is a best practice. Why? You can create a detailed scope statement in the project planning phase.

5. Project Stakeholders

This is a list of the names and responsibilities of the parties involved with a project. Stating who’s responsible for different tasks holds your team members accountable.

6. Project Risks

Outlining the risks to a project will help you identify blockers to the success of your project and their potential impact. Doing this enables you to devise risk mitigation strategies.

Pro tip: Create a table of potential risks. Be sure to explain why the risk poses a threat to your project and the mitigation strategies you plan to enact.

Project charter risk template, HubSpot

Image Source

7. Project Resources

Always create a list of resources your project will need. And that’s not just money. Your resources should include team members, facilities, equipment, and other essential items which are critical to the success of your project. This helps you account for everything you need to take the project to the finish line.

Project charter resources template, HubSpot

Image Source

Project Charter Examples

1. Project Management Charter for Lean Six Sigma

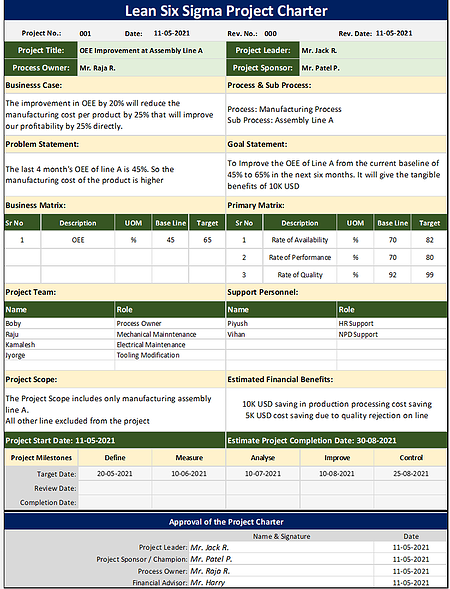
project charter example, lean six sigma

Image Source

This sample project charter follows the Lean Six Sigma format, one methodology for project management. Teams that already use this framework may opt to structure their project charter in this way.

What we like: The Lean Six Sigma project charter offers a clear scope of work. Project goals also follow the SMART framework, making how the project will benefit the company extremely clear.

Project charter limitations: While this charter outlines key information, including the project goal and problem statement, some key information is missing. The process owner didn’t state the project costs or risks. If you emulate this format, be sure to include this information.

2. Project Management Charter for Website Redesign

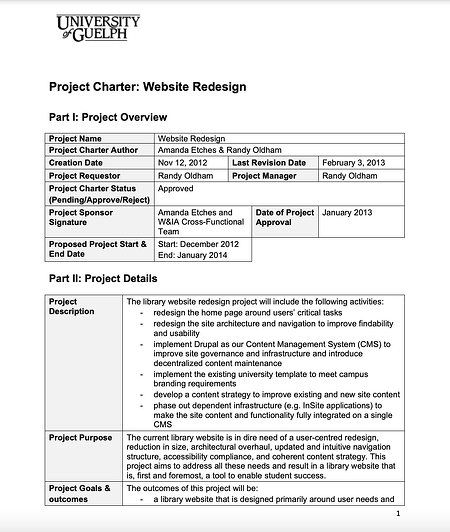
Image Source

In this project charter, the University of Guelph explores exactly what its web team must do to redesign the school’s library website. That includes all of the necessary stakeholders and who’s owning the project.

What we like: This project has a well-defined scope and timeline. Sponsors know exactly who is working on what and when.

Project charter limitations: While this project explores the risks associated with the project, mitigation plans would improve this section of the document.

Mistakes to Avoid When Creating Project Management Charters

1. Missing a Clear Purpose Statement

Every project should have a clear goal and purpose. But sometimes, the primary objective becomes unclear. To combat this, apply the illusory truth effect, which states the use of repeated information increases understanding.

Lauren Carter, principal consultant at Lauren Ashley Consulting, says she uses this strategy to help her team remember the purpose of projects. In Lauren’s words:

“Project members often lose the ‘North Star’ in the thick of the work. One effective way I prevent this is by having a clear purpose statement in the charter, which I repeat in several ways throughout the project’s lifecycle.”

“This can be as a header on project documents, putting it at the top of timelines or charts, or using it as a metric against which you evaluate planned and unplanned activities that arise.”

2. Creating a Charter Mid-project

Project charters should kick off your initiative. Writing this document halfway through can lead to scope creep, ill-defined responsibilities, and confusion.

“Changing the project charter after initiation and planning means you’ll have to review any work you’ve completed and even rework some completed tasks,” says Mary Beth Imbarrato, a 25-year veteran in the project management industry.

She adds, “This can lead to delays, elevated costs, and create more project risks.”

Mary Beth also says changes to the charter may impact how team members view a project. The result? Reduced commitment and engagement.

The bottom line: Creating the charter before starting the project will help you avoid scope creep, prevent wasted time by redoing work, and keep extra risks to your project at bay.

3. Ignoring Your Company’s Project Charter Template

Using existing project charters as templates can save you time and ensure consistency.

Instead of creating new charters from scratch, request a sample of a completed charter document the company liked and use it as your template. This template will help you understand how your organization prefers to present ideas, allowing you to follow suit and begin projects on the right foot.

Start New Project Without Missteps

A well-thought-out charter is a roadmap for achieving your project objectives in record time.

Get started by gathering input from your team and creating a project charter that will get the green light from stakeholders.

New Call-to-action

Categories B2B

How to Repost on Instagram: Ways to Reshare Content From Other Users

Instagram is a powerful social media platform to help increase brand reach and drive new business, but it can be time-consuming and expensive to consistently share content you need to see your engagement grow in the long-term — which is why you should learn how to repost on Instagram.

In this post, we’ll show you different free ways to repost on Instagram in a few simple steps. But before diving in, let’s discuss why reposting on Instagram can benefit your brand.

Access Now: 22 Free Business Instagram Templates

Why should your brand repost on Instagram?

Instagram is one of the largest social media sites on the market. With over one billion monthly active users, brands that incorporate the site into marketing strategy can reach larger audiences and gain visibility faster over other social media channels.

And with an audience like that, you want to consistently post high-quality content — but that can take time, effort, and resources that may not fit your budget just yet. Since most marketers post between 3-4 times per week, you should have a backlog of content to keep up with demand. 

Additionally, user-generated content (UGC) performs exceptionally well. In fact, 90% of consumers say UGC holds more influence over their buying decisions than promotional emails and even search engine results.

For instance, consider the power of Warby Parker reposting this funny image from one of its customers, @cjronson:

Not only does the image likely appeal to Warby Parker customers, but it ultimately made Warby Parker marketers’ jobs easier — they didn’t need to create that content in-house.

Reposting to Instagram can help you highlight brand endorsements from your customers, brand loyalists, and employees. UGC is typically considered more trustworthy since a consumer isn’t gaining anything by promoting your product or service (unless it’s an advertisement) — they’re just doing it to tell their audiences that they like your product. 

How to Repost on Instagram

Instagram allows you to repost other users’ Reels and posts to your own Instagram Story using its native reposting functionality. However, it has its limits: It doesn’t let you repost to any permanent part of your Instagram profile, including your feed, Reels, or videos.

In other words, Instagram only lets you temporarily share someone else’s content for 24 hours max. If you do want to keep it permanently, you can add it to an Instagram Story Highlight.

If you’re looking to add a post to your permanent feed and credit the original creator, read about how to do that in the next sections. For now, let’s learn how you can repost content to your Story and add it to your highlights.

1. Navigate to the post, Reel, or video you want to repost.

First, find the right content to share with your followers. You can do this through several avenues:

Remember that you can only repost content from users and brands with public profiles.

Note: You can also repost other people’s Stories, so long as you’re tagged in them. You can find those who’ve mentioned you in their Story in your Direct Messages.

2. Click the paper airplane symbol on the post or Reel.

On photos and videos, the button will be located next to the Like and Comment buttons.

how to repost on instagram: airplane button on post

On Reels, it will be located between the Comment button and the three dots.

how to repost on instagram: airplane button on reel

3. On the pop-up menu, click “Add post to your story.”

A pop-up will appear with several options. If you’re sharing a post, you have the option to add it to your story, reply to the poster (if they allow replies), or send the post via Direct Message to anyone you’ve messaged recently.

how to repost on instagram: add post to your storySimilar options appear when you try to share a Reel.

how to repost on instagram: add reel to your story

Click Add post to your story or Add reel to your story.

4. Tap to show and hide the post’s caption.

Next, you should see a draft of your story.

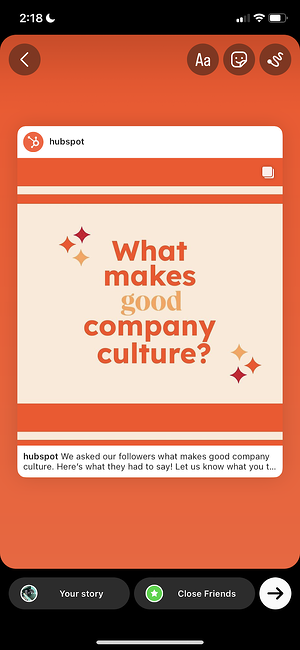
how to repost on instagram: reshare with no caption

You have the option of either showing or hiding the caption. Simply tap the post to toggle between the two.

how to repost on instagram: reshare with caption

5. Add text, stickers, hashtags, and other elements.

To get the most engagement possible and align the repost with your brand, spruce up the story with text and other elements. You can even add a link or a call-to-action. Learn how to customize your Instagram Story here.

how to repost on instagram: add stickers and hashtags

6. To share, click “Your Story.”

It’s time to finish your repost. At the bottom, click the button that says “Your Story” at the bottom. This will automatically share it with no additional action required.

You also have the option to click “Close Friends”, if you only want a select group to view your story. Last, if you click the right-hand arrow, you’ll see additional options to share the post via DM or with your close friends.

how to repost on instagram: access additional options

7. Add the shared post to your Highlights.

While Instagram doesn’t allow you to share posts directly to your permanent feed, you can add it to one of your Highlights, which will remain permanently on your profile. Learn how to create Highlights here.

Here’s one example from a stationer called MARK+FOLD:

how to repost on instagram: add to highlights

With Stories, the same best practices should be followed as for sharing a post. If you don’t know the person and suspect the content you’d like to re-share might be licensed material, ask for permission first. Give credit to the original posters whenever possible.

The screenshot method doesn’t require other websites to repost on Instagram. It’s worth nothing that this method only works for reposting photos, not videos.

Here’s how to do it.

1. Find a photo on Instagram you’d like to repost, and take a screenshot with your phone.

take a screenshot of the image you want to repost

  • For iOS: Press down on the home and lock buttons simultaneously until your screen flashes.
  • For Android: Press down on the sleep/wake and volume down buttons simultaneously until your screen flashes.

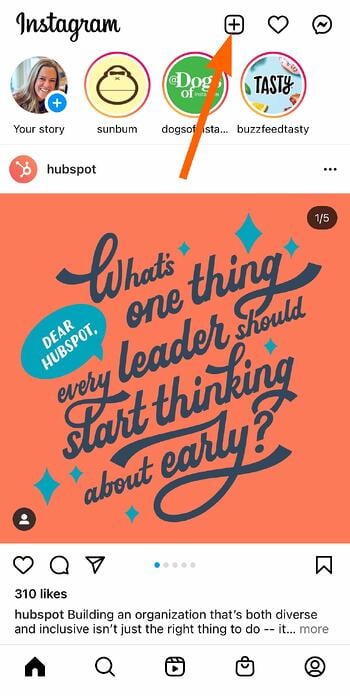
2. Tap the new post button.

Once you’ve got your screenshot, return to your Instagram account. Tap the “new post button” in the top right of your Instagram screen (the plus sign inside a square).

click the plus button on your instagram to repost

Then select “Post” (other options include “Story” “Reels” or “Live”).

choose to repost to your feed, story, reels, or instagram live

3. Resize the photo in the app.

crop your reposted image within the instagram app

Keep in mind that your phone will take a screenshot of everything on your screen, not just the photo you want to repost. So, be prepared to crop the sides of the screenshot to capture just the image you want to share with your followers.

After you’ve cropped or resized the photo to your liking (by pinching the image and then widening your fingers apart), click “Next” in the top-right of your screen.

4. Edit and add filters of your choice.

edit and filter the image you want to repost on instagram

Edit and filter the post like you would any other Instagram post.

5. Add a citation.

The repost won’t include a citation, so we suggest adding one by typing “@ + [username]” to credit the original poster with the photo you’re reposting.

6. Add a caption.

add a caption and give credit to your reposted image on instagram

At the top you’ll see a preview of your post along with space for a caption. You can choose to tag people or organizations, and add a location.

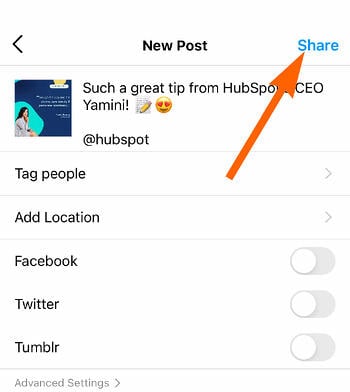
7. Click share.

Once you’ve finished customizing the post with the options above, click share at the top right corner. The post will be live.

click the share button to repost your image on instagram

Here’s how the finished product looks:

an example of an image that has been reposted on instagram

Pro Tip: When reposting content through screenshots, make sure you properly tag or give credit to the original content owner either within your story by linking to their account, or in the description of a post or reel.

Best Apps for Reposting on Instagram

1. Repost: Posts, Stories, Reels

Price: Free with in-app purchases

best apps for reposting on instagram: repost posts stories and reels

Image Source

For Instagram for iOS or Android. The app integrates directly with Instagram so you can share content from other Instagram users from your mobile device.

If your brand’s Instagram profile follows a distinct brand style guide, Repost can help you customize your reposts to adhere to those guidelines. Users can pick from 50+ different text styles and symbol art to create eye-catching captions to capture more attention.

2. Reposta

Price: Free

best apps for reposting on instagram: reposta

Image Source

For Instagram for iOS or Android. Reposta for Instagram is a straightforward way to repost your favorite photos and videos on Instagram while giving credit to the original poster.

When you find something you want to repost in Instagram, simply copy the share URL and open Reposta. Then in Reposta, you can position the attribution mark and send the reposted media back to Instagram.

3. DownloadGram

Price: Free

DownloadGram lets social media users download high-resolution copies of content to repost from their own accounts on channels like Instagram and Twitter. 

There’s no app you need to download to repost using this process, instead you can copy and paste the URL to download video, photos, reels or stories to repost via PC.

Share Your Favorite Instagram Posts

Now that you’ve learned how to repost on Instagram, you can diversify your profile with content sourced from friends, family, and brands. Use the methods above — being sure to cite the source of the original post — to quickly and easily reshare your favorite content.

This article was originally published in November 2020 and has been updated for comprehensiveness.

New Call-to-action

Categories B2B

Big Data for Small Businesses: How To Leverage Big Data for Big Results

Big data for small business may sound like an oxymoron, but big data is just as necessary for small businesses as it is for large corporations. By leveraging big data for your small business, you can discover meaningful insights that put you a step ahead of the competition.

Big data drives revenue because it delivers deep insights into customer behavior. Then, you use those insights to deliver value based on their needs. 

Download Now: Free Growth Strategy Template

Big data can help you make smarter, faster decisions. Read on to learn more about how to leverage it within your small business.

Big data comes in a few types:

  • Structured. Structured data is housed within a traditional database like a spreadsheet or SQL database. An example of structured data is a spreadsheet or log of all your customers’ page visits and dates of recent purchases.

  • Unstructured. Unstructured data is found within non-traditional databases such as email, social media posts, texts, and videos. An example is all the tweets on Twitter that mention your brand name. Unstructured data is by far the most abundant type of big data.

  • Semi-structured. Semi-structured data is not formatted in a traditional relational database format. Instead, it’s organized to an extent with a certain schema that makes it easier to analyze than unstructured data. An example of semi-structured data is HTML code. 

To quote the famous computer programmer, Daniel Keys Moran: “You can have data without information, but you cannot have information without data.”

Big data isn’t perfect, but it’s one of the most powerful weapons in any marketer’s arsenal. Leverage big data in your small business, and you can move more customers through your sales and marketing funnels. It’s as simple as that.
Here are some eye-watering facts about big data:

The Benefits of Big Data For Small Businesses

It’s important to note that big data on its own won’t do much for your organization. However, the right technology systematically extracts large data sets from various sources so you can find patterns, trends, and correlations in this data.

The best analytics tools provide you with deeper insights into your business operations and replace many of the manual methods associated with data analysis.

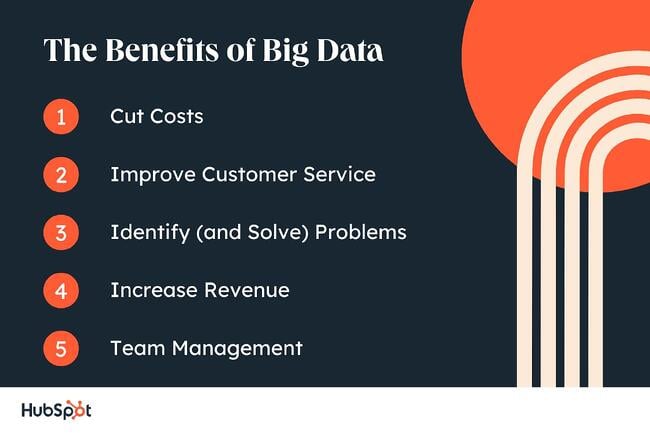
Read on for some of the main benefits of using big data in your small business.

1. Cuts Costs

Big data can have a significant impact on cost-cutting in your organization by identifying expensive processes and redundant workflows.

With the latest data, you can find areas of your business to scale up or down. This can have long-term financial benefits.

2. Improve Customer Service

Big data drives better customer service. With real-time insights into your customer base, you can discover how consumers think and behave. After you have this information, you can make changes to your business as a result.

Personalized customer service derived from big data analytics will help you engage with customers on a deeper level and provide customized service that drives sales.

“Big data is poised to help marketers reach and engage customers and prospects in ways that businesses are only now starting to understand,” says business journalist Allen Bernard, writing for CIO.com. “Enterprises that don’t embrace analytics may soon see embattled customers voting with their wallets.”

Customer service is more important than ever, and more small businesses are using big data to retain consumers. Why? Just a 5% increase in customer retention generates more than 25% of profit increases.

3. Identify (and Solve) Problems

With big data, you can finally answer all those nagging questions: wWhy do customers abandon their carts? When are customers likely to make a purchase?
Data analytics tools can give valuable insights into customer behavior as they move through your funnels.

Although data analysis isn’t an exact science, it provides you with the tools you need to solve a wide range of complex problems.

As well as tracking customers, you can solve issues associated with suppliers, investors, and other clients. With real-time reports, you get a 360-degree overview of your business, and you can make smarter decisions going forward.

4. Increase Revenue

Big data increases revenue in various ways. Analytics provide you with in-depth intelligence into the customer lifecycle, and you can identify new ways to encourage sales.

Good data might give you the confidence you need to launch a new product or diversify your business, and this could prove lucrative.

On average, companies that incorporate big data into their business generate a profit increase of 8%. Do the same, and it could be the best investment you make in your small business this year.

“Most people used to think that big data was only for big business. But, as time goes on, it is clear that this technology is for everyone,” says Entrepreneur.

5. Team Management

Big data also makes it easier to manage the team in your small business. You can identify employees that provide you with the most value, for example, or employees who require additional resources or training.

This is because analytics systems generate insights that help you increase productivity and keep employees happy.

“The value that big data brings to managing employees is in identifying and analyzing the relationship between engagement and retention,” says employee engagement website Hppy. “How and why people are engaging with what they do, how does that translate into the business metrics, and what you can improve to retain them.”

Combined with a great team culture that inspires engagement, the tech stack you use can make all the difference when it comes to managing your team. 

With an Integration Platform as a Service (iPaaS), you can connect your cloud-based apps for enriched data and the broadest range of insights.

big data for small business benefits

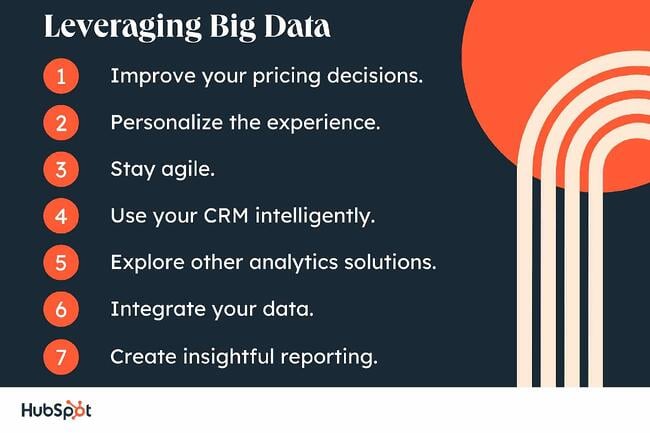
How Small Businesses can Leverage Big Data

Remember: Big data is only one slice of the pie. You need to analyze that data and use the findings to make informed business decisions that move the needle and delight your customers.

So, how can your small business leverage big data for the best results? Here are some examples.

1. Improve your pricing decisions.

You can use big data to make informed decisions on the price of your products and services. If the price of your product is too high, customers will look elsewhere for a better deal, and you’ll get fewer sales.

Using big data, you could compile the prices of a huge amount of items and their prices from competitors. After, you can analyze that data to arrive at an ideal price that is both competitive and lucrative.

Pro tip: Using big data to inform pricing choices can be helpful for most businesses. However, we think the opportunity is greatest for small businesses that sell physical products and have many competitors who sell similar products. 

2. Personalize the experience. 

While streaming platforms are large enterprises, their use of big data acts as a helpful case study. These companies compile data on when their customers watch, how long they watch, what types of content they view, and whether or not they paused. 

Any type of data you can think of related gets collected, analyzed, and used to serve up a highly personalized customer experience.

What we like: Streaming companies have mastered the personalized customer experience. Customers highly value frictionless and positive interactions with businesses. Big data can help your small business personalize communications with customers and delight them.

3. Stay agile.

The advantage small businesses have over the big guys is their ability to be nimble, fail quickly, and iterate on ideas with ease. This applies to big data as well. 

A small business has the opportunity to adopt a data-driven strategy quickly, or even from the very beginning. Consider taking a big data approach within your organization and embracing learning from any growing pains. You can always right the ship later.

4. Use your CRM intelligently.

You probably already use a CRM to manage your customer information, but you’re not necessarily getting the best results from the data inside it.

Before diving into other analytics tools, fully explore the data you already have in your CRM. Here are some valuable questions to ask as you do so.

  • What do we know about the people we serve?

  • How can we leverage this data to deliver the most value?

  • How can we use this data to provide a more personalized experience?

  • What automation and new processes can we power with this data?

5. Explore other analytics solutions.

A CRM can only tell you so much about your prospects and customers. With big data analytics solutions, however, you can analyze all the data inside your CRM (and other programs in your tech stack) and find patterns in all this data.

G2 Crowd shortlists some of the best big data solutions on the market, including Azure Databricks and Splunk.

However, if you want a more accessible data strategy, start with the apps you already have, look into your platform, and enrich what you know about your contacts.

Remember: Big data software needs to be user-friendly and flexible enough for everyone on your team who manages data. It also needs to be tailored to your budget and requirements. As a small business, you likely won’t benefit from a data program designed for the world’s biggest multinationals.

big data for small businesses example, splunk

6. Integrate your data.

Any data solution is only as good as the data it uses. Out-of-date and inconsistent information won’t provide you with any useful insights. You need to make sure your data is synced and integrated.

By deploying an integration solution, you can keep your contact database consistent between apps. You can sync contacts in real time and streamline contact management.

7. Create insightful reporting.

Once you have interesting data at your fingertips, you need a way to visualize it. With clear reporting, you can easily make deductions and share your insights with other team members and stakeholders.

big data for small businesses, leveraging data

Act on Your Data

Once you have useful data in your business, what can you do with it? The short answer: automation, personalization, and customization.

Here are some of the most impactful ways to take advantage of big data as a small business:

  • Personalize your emails.

  • Segment your email lists.

  • Use SEO research to influence your content strategy.

  • Send the most relevant content to a prospect based on their preferences.

  • Trigger internal workflows based on customer actions to provide the best service.

  • Create A/B tests for emails and automatically send the best content.

  • Automatically organize contacts into the most relevant groups and lists in your CRM.

Big data can benefit your business in various ways, from increased sales to better team management. However, you need to leverage all this data properly to grow your small business to its full potential.

Regardless of the big data processes and tools you choose, it’s important to keep your contact database up to date. Otherwise, you’ll be limited in the results you can get from your customer data.

Editor’s note: This post was originally published in October 2021 and has been updated for comprehensiveness.New call-to-action


Categories B2B

15 of the Best Productivity Blogs To Read

Staying productive is a goal many of us have, but finding a strategy that works can be challenging. We can also have certain periods where staying focused isn’t an issue, but others where it can feel impossible to stay on task.

This is why reading about productivity is helpful, especially when the content helps you develop your own tactics for dealing with it. Read on to discover a list of productivity blogs featuring high-quality information and strategies you can adopt to get over the productivity hump.

Download our complete productivity guide here for more tips on improving your  productivity at work.

Top Productivity Blogs

1. HubSpot Blog

The HubSpot Blog features various articles on productivity, from tips from experts on their own best practices to lists of tools that can help you be more productive. You can also download a free productivity guide that will help you learn more about productivity and even prioritize your tasks and projects.

Recommended Read: 5 Surprising Research-Backed Tips That Will Boost Your Team’s Productivity

2. Ali Abdaal

Ali Abdaal uses his experience as a doctor and studying for school to write his blog, The Ultimate Guide to Productivity. In his posts, he talks about what it means to be productive and how people can achieve their versions of productivity with the tools they already have.

Recommended Read: The 2-minute productivity rule

3. Thrive Global

Entrepreneur Arianna Huffington is the founder of Thrive Global, a site that features productivity solutions that reference technology, science, and behavioral psychology.

Recommended Read: 5 tips on how to be a multi-passionate and fulfilled creator

4. Study Hacks Blog

Cal Newport, a computer science professor and bestselling author, is the writer behind Study Hacks Blog, where readers can learn how to achieve their productivity goals and use digital tools to enrich their processes instead of letting them get in the way.

Recommended Read: Professio sano in vitam sanam (on balancing work and life)

5. Work in Progress

Work in Progress’s Work Culture section regularly features helpful interviews with experts and productivity discussions to help you learn more about what it looks like and how to tackle it yourself. You’ll even find unique articles like how to distance yourself from the 24/7, always-on culture while still achieving your personal goals.

Recommended Read: Hobbies are the Antidote to Hustle Cutlure that we need

6. Zen Habits

Leo Babuta, the founder of Zen Habits blog, says the site is a resource for finding simplicity and mindfulness in what can sometimes be chaos. The blog has over a million readers who visit to learn about clearing the clutter, prioritizing their interests and happiness, and staying productive and on task.

Recommended Read: Top 30 Tips for Staying Productive and Sane While Working From Home

7. Boss Babe

Boss Babe is an online community for ambitious women to get the resources they need to grow their entrepreneurial careers and achieve success. It offers online courses and programs to build skills, and its website also houses a high-quality blog with productivity advice relevant to everyone.

Recommended Read: Slow Seasons in Business Can Be Your Most Productive – Here’s What to Do Now

8. Chris Bailey

Chris Bailey says he spent an entire year consuming everything productivity-related that he could, from reading books, interviewing experts, and sifting through journal articles, to even conducting his own experiments on productivity. He now uses his learnings to write articles about productivity to help readers develop their sense of productiveness and become more intentional in their processes.

Recommended Read: There Are 2 Types of Busyness

9. See Girl Work

See Girl Work is a Black-owned creative agency with content and strategy outputs that make an impact. It also has a blog that features all types of business-related content for people to learn from and a section specifically dedicated to productivity.

Recommended Read: How to Make a Great To-Do List (That Works)

10. Freedom.to

Freedom.to is a digital tool that allows you to select specific apps and notifications to block to get work done and maximize your productivity. It also has a high-quality blog filled with helpful learning about productivity that will help you maximize your potential and learn more about your needs.

Recommended Read: Am I A Workaholic? A Guide To Finding Balance

11. 99U

99U is a career resource from Adobe that helps people build their skill sets and bring ideas to life. Its blog features inspirational stories about creators and their businesses and helpful information on finding your preferred work-life balance and being productive.

Recommended Read: Is Impostor Syndrome Blocking Your Creative Potential?

12. Asian Efficiency

Asian Efficiency is a blog that features learning resources about productivity and productivity methodologies that can benefit anyone looking to familiarize themselves with the topic and develop their notions of productivity.

Recommended Read: How The 25X Productivity System Got Invented

13. The Marginalian

The Marginalian features articles about lifestyle and achieving one’s goals, often through connections to science and history. It’s a valuable resource for those looking to learn more about productivity and how it can factor into global affairs.

Recommended Read: The Science of Stress

14. James Clear

James Clear has been writing about productivity and healthy habits since 2021. He’s also the author of Atomic Habits, a #1 New York Times bestseller that has sold more than 9 million copies worldwide. On his blog, he writes informative articles about productivity centered around the question “How can we live better?” where he references insights from various fields, interviews with experts, and science-based strategies to improve productivity.

Recommended Read: How to Create a Chain Reaction of Good Habits,

15. The Middle Finger Project

With her book The Middle Finger Project, Ash Ambirge started a movement centered around “having the nerve to enter any damn room you want,” empowering people to take opportunities and build the path they want. The Middle Finger Project blog features articles about life and entrepreneurship, many of which focus on different aspects of productivity.

Recommended Read: U.S. Concept of Time & Why It’s Preventing You From Finding Your Passions

Over to You

Visit some of the blogs on this list, read the recommended post, and see if the advice fits your needs. The right insight will resonate and inspire you to begin creating your strategy for being productive, which will help you meet your goals.

Take me to Projects

Categories B2B

Startup Marketing Budget: How to Write an Incredible Budget for 2023

When proposing potential ads at your startup, one of the first questions you’ll likely encounter is, “How much will this cost?” If you’ve prepared a killer startup marketing budget, you will be well-equipped to help executives understand and buy into your vision.

Click here to download 8 free marketing budget templates.

A marketing budget should detail how much you’ll spend on paid advertising, fit into your overall strategy, and prove a worthy expenditure based on revenue earned.

In a world where 82% of startups fail from cash flow problems, the stakes are higher for these new businesses. Startups often face limited resources and smaller budgets, making it difficult to stake claim to a marketing budget.

This post covers how to determine what your marketing budget should be and what it needs to include.

Table of Contents

Marketing Costs for a Startup

When your company is new, determining an initial marketing budget can be confusing. In some cases, budget decisions are top-down, inspired by competitors, or made by setting a goal.

If this isn’t the case for your startup’s operations, focus first on what will bring in the most revenue. Revenue determines what your marketing budget should be and where funds should be allocated.

The money gained from your gross revenue should fund your marketing budget. So, how much of your gross revenue will you need? The average marketing budget for startups should be 11.2% of overall revenue. This percentage gives marketers enough resources to build brand awareness and start attracting leads.

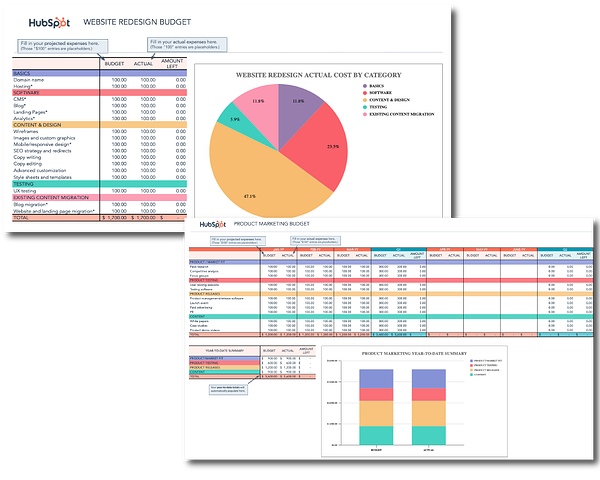
If you’re starting your budget from scratch, consider using a marketing budget template to outline your phase one marketing activities and costs.

Startup marketing budget templates

Download Free Marketing Budget Templates

To identify your gross revenue, calculate your total number of sales/increases.

If you don’t have a gross revenue estimate yet, determine how much you are projecting to make and use those numbers as benchmarks. Explore tools to help you estimate your gross revenue, like this online calculator from the Small Business Association.

Now that you understand the first step to making a budget, explore other potential needs you may have.

startup marketing budget, These budgets outline the money a new company intends to spend on marketing. Startups generally factor in expenses, like advertising, content marketing, and automation software.

Startup Marketing Budget Considerations

So, what do you need to include in your budget?

Once you have money earmarked, you can begin breaking down the costs. Think of what costs naturally occur in your day-to-day and what resources you’ll need to make your marketing happen.

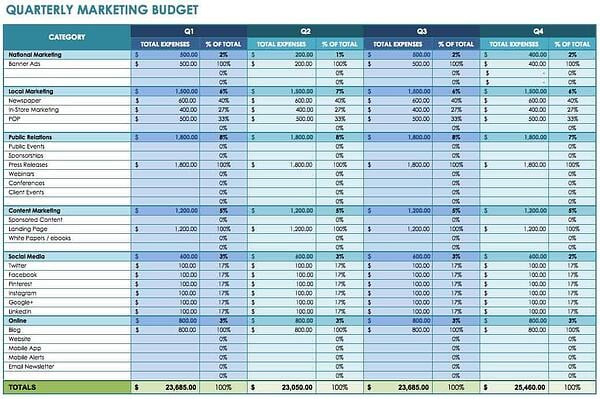
You can put this information in a spreadsheet or template, like these free marketing offerings from HubSpot.There are no real rules with budget design, as long as it’s comprehensible and detailed enough to be useful.

Remember to consider the following expenses, such as:

  • Technology. When you are creating campaigns, factor in the technology you need to use, such as software to build a product page or manage a drip program. There are lots of marketing tools at different price points (and even free software), so be sure to write out what software you’ll need to buy. Check out this blog to determine which products fit your budget.
  • Research. If you haven’t yet discovered your target audience, you may need to invest in market research. Read the section “How to Write a Startup Marketing Budget” below for more info on market research.
  • Automation. Services that automate marketing processes can make your life much easier. They can also be advantageous to startups that don’t have the resources to spend money on extra hands to complete projects.
  • Production. If you need content pieces, product or advertisement videos, or pictures, you will want to budget for these items as well. Instead of paying for multiple different services, you could hire freelancers to fill these roles.
  • Paid advertising. Are you planning to run ads on TV, radio, or online? This is the category where you factor in those costs. It’s easy for paid advertising to add up, with some startups spending as much as 20% of their yearly budget on advertising alone. Remember, you can estimate the cost of paid ads. Take a look at our advertising guide to explore prices on anything from PPC ads to social media ads.
  • Branding. Assets that build a first impression directly impact your branding. This might include business cards, billboards, swag, and signs.
  • Content marketing. Decide how much you’re going to allocate to deliverable content. Consider automation services, likeHubSpotorSprout Social, and content ideas you can produce organically for free.
  • Traditional advertising. If applicable to your business, make traditional advertising a line item. Paid advertising usually occurs online, but traditional advertising refers to advertisements such as print and billboards.
  • New employees. If you plan on growing your team with full-time or part-time staff, you will likely need to include their costs in your marketing budget.
  • Unexpected costs. Expect the unexpected when figuring out your budget. Plan for devices to break or campaigns to take longer than you think they will, generating higher costs.

Working from your business goals helps you make guided budgeting decisions. For example, if your company’s goal is to increase brand awareness, you’ll probably want to devote most of your budget to branding, content marketing, and paid advertising.

Remember that you can play around with free methods for most of these costs. For example, if you are certain that automated software will help your startup, explore free trials or free services that you can use to determine what’s worth the cost.

Tips for Writing a Startup Marketing Budget

Before writing your startup marketing budget, consider the following tips.

1. Check that investments are worthwhile.

Startups have limited resources and need quick wins. Your first goal should always be to get leads for sales. Before committing to an expenditure, ask yourself, “How does this empower sales?” If the answer isn’t obvious, it’s likely not worth the money.

2. Do competitor research.

Check out your main competitors’ websites and blogs. What articles are they writing about? What keywords are they targeting? And, ultimately, how can you improve upon their strategy?

Remember that SEO is a long game, and you likely won’t see immediate wins. However, you should optimize your articles from the beginning to create the right SEO foundation.

3. Understand your customer’s journey.

There’s a reason why your customers chose you. Understanding their buyers’ journeys is valuable information. This knowledge can help you determine which channels are effective and worth budgeting for.

4. Prepare to report on your ROI (return on investment).

You will be accountable for how your marketing budget is spent. Make sure you keep track of the leads you gather and the revenue that can be attributed to marketing.

When you need to report your ROI at the end of the year, you’ll already have data at your fingertips.

5. Review your marketing budget yearly.

Between inflation and economic changes, your budget will almost certainly need an annual review.

In fact, 48% of marketers predict their budget will increase in 2023, according to HubSpot Research. Whether your budget grows or shrinks, you should be ready to make adjustments.

How to Write a Startup Marketing Budget

As a marketing leader, you must set a budget and determine how the money will be spent. This step-by-step guide shares how you can write a clear, concise marketing budget for your startup.

startup marketing budget example, smartsheet

Image Source

1. Calculate your revenue, and determine your budget.

Remember, startups typically need to allocate 11% of their revenue(before taxes) to marketing in order to grow. So deciding your budget is as easy as determining 11 percent of your gross revenue, right?

Maybe, but your marketing budget likely needs executive approval. Plus, you’ll want to back up your budgetary decisions with statistics and a solid plan.

Once you’ve identified your overall plan, you can get a ballpark budget estimate. As a guide, think about your business and campaign goals. From those goals, choose the areas you want to invest the most in.

2. Conduct market research.

Thoughtful research can determine which of your products have the best potential for paid marketing campaigns. You’ll also find out which channels attract the most leads.

Remember: Conducting market research might cost you money and require a spot in your budget. This is especially true if you need to incentivize customers to participate with gift cards or promotions.

3. Work with product and sales to identify campaigns.

Your startup sales and product teams have valuable insight into which products need marketing’s special attention. Work closely with these teams to identify which campaigns you want to roll out during the year.

4. Create a marketing calendar.

Assign marketing campaigns potential dates and costs, spreading them out throughout the year, so you don’t use your budget all at once. Once you’ve created a potential calendar, it’s time to get your startup marketing budget approved.

5. Get executive buy-in.

By this point, you should have a solid marketing budget outline. Your marketing budget will likely need explaining and persuasive reasoning.

Make sure you communicate the strategy behind every cost. Finally, be sure to highlight exciting opportunities and how they play into your budget decisions.

Getting Started

A clear marketing budget can help you grow your startup business. By keeping track of expenses and allocating funds towards essential needs, you can reach your campaign goals.

Having a marketing budget can also ensure you have the freedom you need to make decisions without having to run every idea past executives.

Be sure to leverage the passion your startup company has for its product to make marketing a successful and exciting endeavor.

Editor’s Note: This post was originally published in March 2020 and has been updated for comprehensiveness.

New Call-to-action

Categories B2B

Mobile Form Design: A Beginners Guide to Converting Mobile Users

Think about a time when you were on the train, sitting in the airport, or simply lying on the couch, and you had to complete an online form on your smartphone. Did you ever pay attention to the mobile form design?

Chances are you haven’t noticed. That’s the goal — to give users an intuitive experience that gets them to seamlessly fill up the form and continue with their day.

Easily create mobile-optimized pop-up forms. Get started with HubSpot’s form  builder.

In this guide, we’ll review the most effective ways to do just that. Here, you’ll learn how to design mobile forms that are not clunky or misaligned, but that help boost conversions and create a great user experience.

Table of Contents

Mobile vs. Desktop Form Design

Today, your website visitors aren’t just browsing your site, viewing your content, and completing your forms from their desktop computers. They’re also completing these tasks from their mobile devices.

Mobile was responsible for nearly 60% of global website traffic from April to June 2022. That means it’s critical for your form to be simple to review, complete, and submit via a mobile device.

Why is mobile form design important?

The best mobile form design allows for a positive user experience, which ensures a happy website visitor who’s more likely to convert to a customer and become a returning user.

The design, layout, and functionality of your mobile forms play a large part in your website’s overall user experience.

If your forms aren’t mobile-friendly, you may experience fewer conversions, a loss in mobile site traffic, and an increase in unhappy and frustrated customers. And who wants that?

Why should mobile form design differ from desktop design?

“Everything works differently on mobile, so marketers need to make sure any elements of their websites are always optimized for mobile,” says Lilach Bullock, an award-winning marketing influencer and strategist.

“And that, of course, includes forms — especially since it feels like you constantly have to complete forms while on mobile.”

Specifically, think about the difference in the display or screen size between a mobile device, such as an Apple iPhone, which typically ranges from 4.7″ to 6.7″ in size; and a Mac laptop or desktop, which typically ranges from 13” to 24” in size. It’s safe to assume a form that fits an iPhone screen wouldn’t fit a desktop screen perfectly.

If your mobile visitors cannot easily read, complete, and submit your form, you may lose their business. So creating a mobile-friendly form that fits the screen of any mobile device is crucial to creating a great user experience in order to leave a lasting impression on your visitors and help you boost conversions.

What is responsive web design?

If you want to take mobile form design a step further and ensure your entire website is functional on all types of devices, you can implement a responsive website design.

Responsive web design takes into consideration the user’s screen size, platform, orientation, and environment. This is a simple and effective way to create a great user experience since so many people are constantly visiting and browsing different websites on various devices.

There are several ways you can make sure your site has a responsive design. For example, if you’re a WordPress user, there are several responsive WordPress themes that you can install and use to design your site.

Additionally, if you’re building, or have built, your site with software such as Squarespace, your site may automatically come with responsive web design.

Today, responsive web design is a popular choice for businesses due to the sheer number of people visiting websites via a variety of different mobile devices. But for now, let’s get back to discussing mobile form design.

Mobile Form Design: 11 UX Guidelines

“When designing your mobile forms,” explains Bullock, “it’s important to keep things simple and make them as quick as possible. [Forms] are more difficult to complete on mobile and everything feels like it takes longer than it should.”

In other words, the most important thing is simplicity for the end-user. When creating a mobile-friendly form, there are some steps you’ll want to take to provide the best user experience possible for your visitors. Let’s review 11 of these mobile form design best practices that you can begin implementing today.

1. Minimize the number of form fields.

Ever heard the saying, “less is more”? Well, that’s precisely what you should be thinking while creating your mobile form.

Between the size of a mobile device’s screen and the amount of content you need to place in your form, it’s easy to accidentally make your form feel cluttered. Remember to remove unnecessary fluff. Only keep the form fields for information that you absolutely need.

To streamline the process, you’ll also want to label your form fields clearly and succinctly, and mark optional fields as “optional” or include an asterisk next to the required ones.

form design example with an asterisk used to indicate compulsory fields

Image Source

The aim is to make the form as easy as possible to fill out so that the chances of people completing the form go up.

2. Automate inputs when possible.

If you accidentally mistype your street address and the form corrects the spelling for you, the form autocorrects your response.

If you begin typing your shipping address and a box pops up with the rest of your address asking you if you want to “autofill” the rest of the form fields with your saved address, then your form is autocompleting your response for you.

By implementing autocorrect and autofill features on your mobile forms, you’ll improve user experience by making it quick, simple, and straightforward for users to enter their details.

In the below example, a person can easily autofill their information by clicking on the small pop-up that appears.

mobile form design example showing an autofill option

Image Source

3. Use a single-column layout.

When you’re creating a long or multi-step form, list all of your content in a single-column layout.

the difference between a single-column and multi-column layout in mobile form design

Image Source

Single-column form layouts are:

a. Easier to read.

Placing all your form fields in a single-column format allows your visitors to focus on only one item at a time, making your form easier to read.

b. Less daunting.

If you look at a form, especially in a tight space as you would on a mobile device, and see a large amount of content smushed together, you may feel overwhelmed. That’s why separating your content by rows and placing your form fields in a single-column format make your content look and feel less intimidating.

c. Quicker to complete.

When you place your multi-step form in a single column, leads can complete it more quickly than they would a multi-column form. That’s because the format makes the form easier to read and work through step-by-step.

Take a look at this sign-up form on the HubSpot website when viewed from a desktop or a laptop.

sign up form with a two-column layout as viewed from a desktop

Image Source

The two-column layout makes sense here, as there’s plenty of space on the wider screen to work with. Now check out the same form when viewed from a mobile device.

mobile form design, sign-up form with a single-column layout as viewed from a smartphone

Image Source

This single-column layout allows the eye to flow naturally while preventing clutter on the compact mobile screen.

4. Consistency matters (and so does form appearance).

How do you close a folder or an open tab on your laptop?

By clicking the ‘x’ button in the top-right corner.

But what if the button didn’t appear while on a particular application? How would you feel when you went to close the window?

Confused or irritated, maybe. You might spend a minute or two figuring out how to shut the application.

This is just a broad example but serves well to illustrate the importance of consistency. Watch this video to learn more.

Consistency in form design applies not just to style (colors, typography, logo, etc.) but to generally-accepted conventions that people are used to.

Here are some tips to ensure a consistent experience:

  • Match your form’s look and feel to your brand and website.
  • Ensure your form’s styling and formatting are consistent and complementary (nothing should look jarring or out of place).
  • Align your form field inputs to the left.
  • Affix each label above its corresponding input box and left-align it.
  • Use an asterisk to indicate compulsory questions.

mobile form design examples

Image Source

First impressions leave a lasting impression (in life and in business). That goes for your mobile forms. Nobody wants to complete a dark, difficult-to-read, cluttered, and unattractive form.

Your mobile form should be highly functional as well as aesthetically pleasing. Its appearance should contribute to its readability and positive user experience. To achieve this, use a simple and easy-to-read font style and size, a color palette that doesn’t feel overwhelming, and minimal form fields.

5. Keep in mind the touch experience.

Think about how you hold your phone while texting.

Most likely, gripping the phone with two hands while using your thumbs to interact with the screen. Or you might even do it single-handedly or type by using your index finger.

We interact with smartphones much differently than a laptop or desktop (cue the texting thumb), and mobile form design should reflect that.

Here are some suggestions to keep in mind:

  • Have adequate whitespace to keep the form clutter-free and avoid accidental button presses.
  • Ensure buttons are logically positioned (for example, the submit button near the bottom of the form, so users don’t have to scroll up to find it).
  • Check that the text (font size and style) is legible on the small mobile screen (no one wants to pinch their screen and zoom in to be able to read the text).
  • Make sure the form fields and buttons are large enough to be comfortably tapped with a finger.
  • Make the form pop-up towards the lower part of the screen (where possible) to make it easy to reach.

mobile form displayed in the lower half of the screen

Image Source

6. Leverage input constraints.

Input constraints restrict the type of response a person can enter in a form field. This can include a word limit (say, while filling out a job application form) or only being able to input digits (in the case of a phone number).

This is seen in the form below, where a numeric keyboard pops up when a person goes to enter their phone number.

mobile form design, input constraint displaying a numeric keyboard

Image Source

Input constraints maximize form efficiency by limiting inadvertent mistakes, delays, or confusion. For example, if someone was trying to make a reservation for a table at a restaurant and accidentally selected a date in the past, the constraint would prevent them from actually being able to select and confirm that date.

This is especially crucial when designing for mobile as smaller screens make it harder to enter information accurately. By setting input constraints, you’ll save people time while completing your form fields, and prevent yourself from receiving long-winded or invalid answers.

Here’s another example of an input constraint.

mobile form design, input constraints on two form fieldsImage Source

7. Create clear action buttons.

Buttons are an underrated aspect of mobile form design. Think about it: You get a form submission or conversion only after the right button is pressed. So you really can’t overlook this element.

This UI cheat sheet and UX Planet blog are great resources for designing effective buttons. Here’s a quick run-through of some of the mentioned principles that you can apply to your mobile forms.

  • Too many buttons spoil the broth (just like form fields, keep only the essential buttons).
  • Style and label your buttons consistently (capitalization, formatting, alignment, etc.).
  • Let the focus shine on the primary button (the main action you want the user to take) by making it stand out by size or color.
  • Right is right — a common rule of thumb for mobile is to position the main button on the right side and the second one on the left (though this can vary according to individual needs).
  • Specific labels are almost always the answer (“Edit this page” over “Edit”).

mobile form design, action button

Image Source

8. Provide card scanners for payments.

Tried entering your credit card details in a form via your smartphone? Typing a bunch of numbers on a small screen with a small keyboard can be a tedious process.

Card scanning apps, such as Microblink, have become increasingly popular for that exact reason. When making a purchase, your visitors can click a button that takes them to a screen where they can use their mobile device’s camera to take a secure photo of the front and back of their card, whether that be their license or credit card.

mobile form design, card scanning option

Image Source

With just a couple of pictures, your leads will be finished with one of the most time-consuming parts of the mobile form completion process — keeping your visitors efficient as well as frustration and error-free.

9. Explain the need for specific information.

While completing a simple email signup or a registration form, have you ever been asked to provide personal information that has nothing to do with the signup form itself?

This is a common occurrence in all types of forms (not just mobile). Asking someone for personal or other sensitive information without explaining your need for it can seem sketchy.

When asking a question that doesn’t directly relate to the reason your visitor is filling out the form, it’s essential to create a summary box (with additional information) that the person can click on to understand why you’re asking for this information.

Such indicators can also help provide extra guidance on completing a form field when the instructions are not immediately apparent. In the image below, a summary box pops up when a person hovers over the icon.

mobile form design, additional information about a form field displayed in a hovering pop-up box

Image Source

These small details will make your form feel professional and thoughtful while reducing the odds of the user leaving halfway.

10. Gather validation and feedback.

User experience is at the heart of good mobile form design. And validation and feedback play an important role in providing a great UX.

Validation lets people know if the information they’ve entered is right (or not). Notice the green ticks in the form fields below.

mobile form design, three ticks displayed next to valid form inputs

Image Source

While completing mobile forms, your visitors are bound to make a mistake here or there. The form should flag these errors in real-time so the user can correct them immediately.

For example, if someone adds the incorrect zip code alongside their street address, the mobile form should display an error message. This should indicate — in easy-to-understand language — the error location and how the person can rectify it (as seen in the image below).

mobile form design showing an error flagged due to an incorrect zip code

Image Source

It’s also crucial to give people feedback as they go through the form. For example, a progress bar on lengthy, multi-step forms can make the form-filling process more engaging by showing users how far they’ve reached and how long they have left to complete it.

mobile form design, progress bar

Image Source

Consider a person filling out the above form without a progress bar. They’ll be clicking the ‘next’ button with no idea of when the form ends, and might even abandon it just before the final step in frustration.

Once people submit their forms, you should direct them to another screen or page that says something like, “Success!” or “Thank you” so they know their submission worked.

Here’s an example of a success page on HubSpot that appears after a user signs up to receive a free Google Ads kit.

mobile form design, success page

Image Source

11. Make forms accessible.

Accessibility is fundamental to the usability of your form. Forms designed with accessibility in mind can be used by a wider range of people, including those with visual, physical, sensory, and cognitive disabilities.

Here are some specific recommendations for creating accessible forms from the World Wide Web Consortium Web Accessibility Initiative, WebAIM, and The A11Y Project Checklist).

  • Check that the text doesn’t pixelate or become fuzzy when zooming into your form (for better visualization).
  • Label your form elements in a way that can be clearly understood when read by a screen reader.
  • Ensure your form is accessible in both portrait and landscape modes.
  • Avoid the use of a time limit (where possible) to give people sufficient time to respond.
  • Include captions or transcripts for any video or audio components in your form.
  • Keep color contrast in mind. Here’s a free tool that can help with that.
  • Check that your form is fully-usable with just a keyboard.

A great way to ensure that all of the above mobile form design strategies stick is by exploring what you should not do in form design. The below video looks at some examples of what not to do when designing forms on both mobile and desktop.

Back To You

It’s no secret that your website visitors are completing and submitting your web forms via their mobile devices. That’s because it’s convenient and efficient, as most people carry some type of mobile device with them everywhere, making it crucial for your forms to be mobile-friendly.

Otherwise, your forms will be difficult to read, complete, and submit, which may frustrate your leads or cause you to lose their business altogether.

By considering your mobile form design and implementing these guidelines, you’ll enhance your mobile form user experience, build positive relationships with your leads and customers, and boost your conversions.

Editor’s Note: This post was originally published in Dec. 2018 and has been updated for comprehensiveness.

New Call-to-action

Categories B2B

What is a Persona?: Everything You Need to Know

Social Media Sara starts her day scrolling through TikTok. She is an avid fan of podcasts and handles social media strategy at her company.

This is a snapshot of what a buyer persona looks like. You may have a great product or service, but without understanding your target customers, you might as well just market to the void. Buyer personas are the antidote to that. By creating buyer personas, you will gain clarity on who you’re marketing to and reach your ideal customers.

In this blog post, we’ll cover the following:

Read on to learn more.

Download Our Free Buyer Persona Guide + Templates 

Every business has a target audience, which is further divided into different customer segments. Within those segments, there are different types of buyers — not every customer has uniform wants and needs. A buyer persona details your ideal customer and maps out their story. 

A buyer persona is linked to a buyer’s journey, but the buyer persona focuses on who will go on the journey. Take Social Media Sara, for example. Her company determined that their target social media person often spends time scrolling TikTok and listening to podcasts. Because of this, they might create a marketing campaign that meets her where she is in a targeted TikTok video or in an ad on her favorite marketing podcast

Naturally, every business will have more than one type of customer — it makes sense to create multiple buyer personas for the different types of customers you want to reach.

Why You Need a Persona

A buyer persona extends beyond simply describing your audience; the powerful insights generated by a buyer persona can be leveraged to make better business decisions. 

Ultimately, a well-crafted buyer persona will help you understand your ideal customer and their goals, provide guidance on how to tailor your marketing strategy, guide product development, and help you prioritize your time.

When done well, buyer personas are incredibly valuable for marketing. They can help you find gaps in the content you create. You will also be able to use buyer personas to tailor your content so that it is relevant. Buyer personas can even help you figure out ad spend. 

How to Create a Persona

Creating a buyer persona can seem daunting at first, but it doesn’t need to be once you know the key components of a buyer persona. Backed by data and insights, devising a buyer persona is a very creative process, much like coming up with a semi-fictional character. In this section, we will go over the steps to creating a persona and what to include in a persona.

Steps to creating a persona

1. Conduct research

Research forms the foundation of your persona. Analyze data from your current customers and conduct market research to figure out who your ideal customer is. Combining demographic, behavioral, and psychographic data will yield the best results — the more types of data you analyze, the more comprehensive your buyer persona will be. You can collect data from your current customers through your CRM and conduct market research through surveys, interviews, and paid databases. 

The insights from your research and analysis will help you figure out key information like demographics, business size, job title or position, goals and objectives, and challenges and pain points.

2. Ask the right questions

Reference your list of questions to guide you in the buyer persona creation process. A basic list of questions can include the following:

  • What is their profession?
  • What does a typical day in their life look like?
  • Where do they go for information?
  • How do they prefer to obtain goods and services?
  • What is important to them when choosing a vendor?
  • What do they value most?
  • What are their goals?

3. Dive into your customer’s interests, goals and objectives, and pain points

The key to creating a useful buyer persona is understanding where your customer is coming from and putting together a story. Your buyer persona is not a mere aggregation of data points; by putting together a story based on research, you humanize your customer. Your customer’s interests can include anything from podcasts to TikTok. Once you have the foundation, you can then dive into their goals and objectives. What do they want to achieve for their business? What are the challenges standing in their way?

4. Map the persona to your product

Mapping the buyer persona to your product is a key step. By doing so, you will understand how to solve for the customer.

To learn more about these steps and other ways to develop a persona in more detail, check out this blog post, or you can generate your own now with this free tool from HubSpot.

What to include in a persona

buyer persona

Descriptive name

Come up with a descriptive name for your customer. You can use a realistic first and last name, or a fun moniker like “Marketing Mary” or “Social Media Sara.”

Occupation

Your customer needs an occupation. Identify your customer’s job title and the industry they work in. It would also be helpful to note if they are a decision maker.

Demographics

Basic demographic information like age, gender, education, and income is useful to identify.

Interests

Include their interests. What media do they consume? What are their hobbies?

Goals and objectives

Define their business goals and objectives. What do they want to achieve for their business? How do they plan to get there?

Pain points

Identify their pain points — this will help you gain clarity on how your product can solve for your customer’s needs.

Best Persona Creation Tools

Luckily, there is a wide variety of tools you can use to create your buyer persona. In this section, we spotlight some of our favorites.

HubSpot Persona Generator

hubspot persona generator

Source: HubSpot

HubSpot’s Persona Generator streamlines the buyer persona creation process — and it’s free. Simply plug in the details like age, education level, industry, company size, job title, and more. The persona generator guides you in creating a buyer persona step by step. 

Additionally, HubSpot offers free and convenient buyer persona templates.

Userforge

userforge persona generator

Source: Userforge

With a user persona creator, user story template, and story mapping canvas, Userforge has a variety of options for creating effective buyer personas. The user persona creator lets you choose content sections: quote, goals, story, needs, frustrations, values, blockers, habits, and motivators. This program is free.

Xtensio

xtensio persona template

Source: Xtensio

Xtensio’s template goes beyond the basics. The clean but visually appealing template design is packed with information to help you understand your target customer in a holistic manner. 

Get Started With Personas

Buyer personas are critical for any business. The insights you can derive from a well-crafted buyer persona can shape your content strategy, ad spend, product development, and more. Get started with HubSpot’s free buyer persona creation tools.New Call-to-action

Blog - Buyer Persona Template [Updated]