Categories B2B

Merge Cells in Excel in 5 Minutes or Less

Knowing the ins and outs of Excel is essential for organizing data, understanding analytics, and getting the most from your marketing efforts. The tool is great for quickly processing vast amounts of data, but it can be overwhelming if you don’t spend the majority of your workday whipping up spreadsheets.

Fortunately, a few basic skills are all you need to put together an easy-to-read spreadsheet. One is knowing how to merge cells in Excel. Whether you’re planning blog articles for the upcoming quarter, creating an email list for a targeted campaign, or designing SEO-friendly Google ads, merging cells is a handy way to organize your information.

Download 10 Excel Templates for Marketers [Free Kit]

To sharpen your skills, we’ll cover several ways to combine cells.

Don’t want to start from scratch? Use these free Excel templates as a foundation for your own marketing spreadsheets.

How to Merge Two Cells in Excel

Merging is a way to turn two small cells into one new, large cell. This is useful for organizing information and creating headers, without the need to resize individual cells. Here’s how to do it.

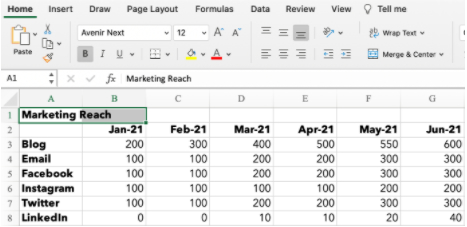
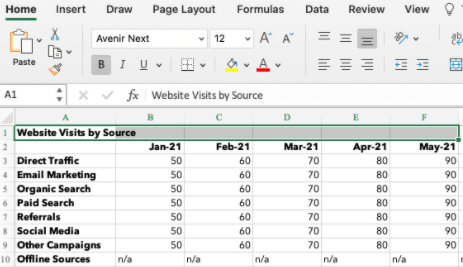
Step 1: Highlight the two adjacent cells you want to merge (I’m merging A1 and B1 in the example).

merging two cells in excel

Image Source

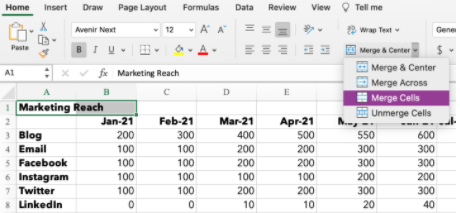
Step 2: Under the Home tab, click the ‘Merge’ icon and choose ‘Merge Cells’.

How to merge two cells in excel

Image Source

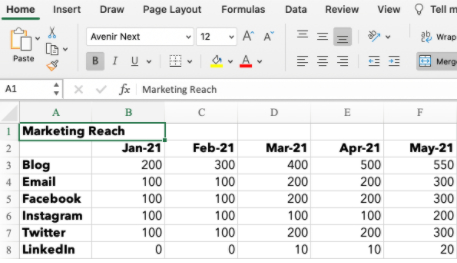
Step 3: That’s it! You’ve merged the cells.

An example of merging cells

Image Source

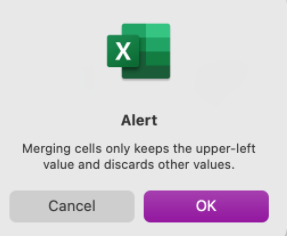
Note: When combining cells, only the data in the upper left cell is saved. Make sure to save the information from the other cell so it’s not lost. If you happen to have data in both A1 and B1, Excel won’t simply wipe it. This alert will pop up:

An alert when merging cells in excel

Image Source

Don’t want to delete the data? Click ‘Cancel,’ and copy/paste the information into a separate document or cell before merging. If you only need the information in the upper-left cell, click ‘OK’ to merge the cells.

How to Merge and Center Cells in Excel

Say you’re building a marketing report and want your titles to be centered above your data. Merge and center cells by following these steps.

Step 1: Highlight the cells you want to merge.

How to merge and center cells in excel

Image Source

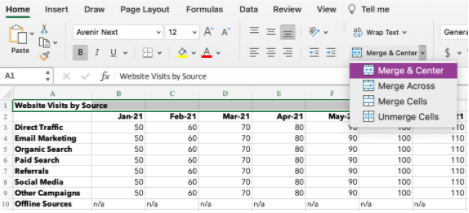
Step 2: Under the Home tab, click the ‘Merge’ icon and choose ‘Merge & Center.’

How to center data in excel

Image Source

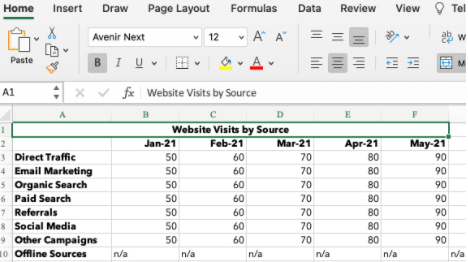
Step 3: Your cells will merge and the data will be centered within the cell.

merging and centering

Image Source

How to Merge Cells in Excel Shortcut

Clicking the correct ‘Merge’ function over and over can be a drag if you need to combine a lot of cells. For fast merging, start by highlighting the cells you want to merge. Then, type the following key combinations.

Excel Shortcuts for Windows

  1. Merge Cells: ALT H+M+M
  2. Merge & Center: ALT H+M+C
  3. Merge Across: ALT H+M+A
  4. Unmerge Cells: ALT H+M+U

Excel Shortcuts for OS

The Apple operating system doesn’t have an ALT key, so you have to set up your own shortcut to merge cells.

  1. In Excel, click ‘Tools’ under the navigation bar.
  2. Select ‘Customize Keyboard.’
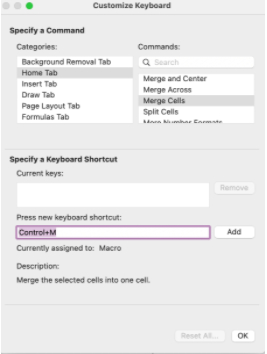
  3. A pop-up will appear. Under the header ‘Specify a Command’ there are two columns: Categories and Commands. For Categories, select ‘Home Tab.’ For Commands, select ‘Merge Cells.’
  4. Select the text box under ‘Press new keyboard shortcut.’ Type the key combination for your shortcut. For example: CONTROL+M.
  5. Click ‘OK’ to set your shortcut.
  6. You can now use CONTROL+M to merge cells in Excel.
  7. Set up additional shortcuts for Merge Across, Merge & Center, or Unmerge.

iOS shortcuts for excel

Image Source

How to Merge Multiple Cells in Excel

You know the basics, but now you want to get creative and merge more than two cells. Depending on your desired spreadsheet layout, you can use the Merge Across, Merge Cells, or Merge & Center function.

1. Merge Across

This option is used to merge cells within a single row. You can’t use ‘Merge Across’ to combine cells within a column or across multiple rows.

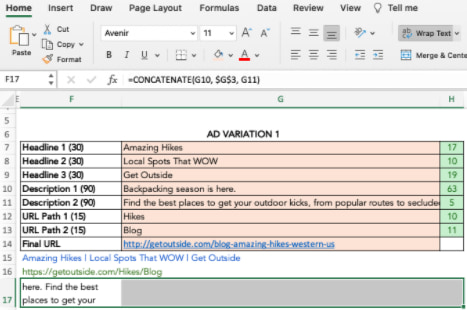
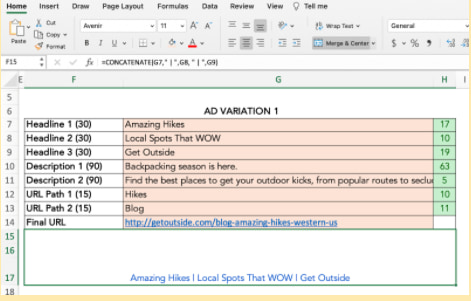
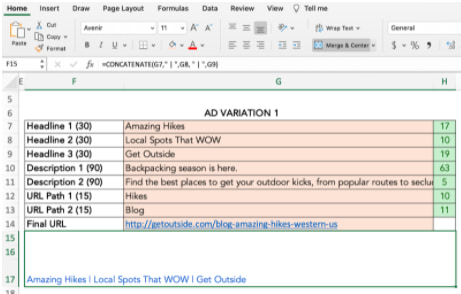
In this example, I’m setting up PPC ads and want to see my description copy in row 17. If I simply resize column F, my table will have too much space between column F and G. Merging multiple cells across row 17 lets me see the copy and keep the table neat.

Step 1: Highlight all the cells you want to merge within the row.

An examples of merge across cells

Image Source

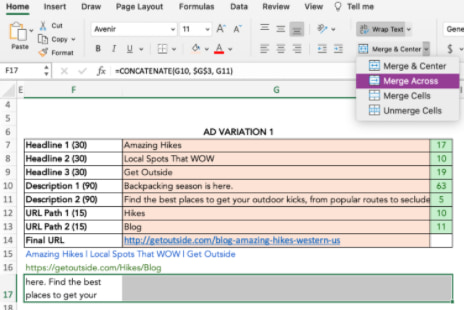
Step 2: Under the Home tab, click the ‘Merge’ icon and choose ‘Merge Across.’

select merge across from a dropdown menu

Image Source

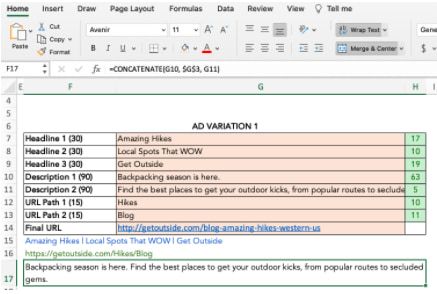
Step 3: The cells merge across the entire highlighted area.

an example of merge across in excel

Image Source

2. Merge & Center

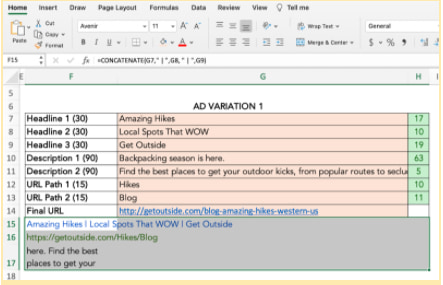
You can merge and center multiple cells across rows and down columns. Just remember the data in the upper-left cell is the only information that will stay once merged. In the example below, I use ‘Merge & Center’ to combine rows 15, 16, and 17 with columns F, G, and H.

Merging and centering in excel example

Image Source

merge cells function example

Image Source

3. Merge Cells

The ‘Merge Cells’ function is ideal to combine multiple adjacent cells across rows and columns. It works just like the ‘Merge & Center’ function, except the data will be left-aligned instead of centered after merging.

merge and center function

Image Source

How to Merge Cells in Excel Without Losing Data

Want to merge cells without losing information from all but the upper left cell? Easy. You can use the ampersand (&) or the CONCATENATE function to combine data from two or more cells.

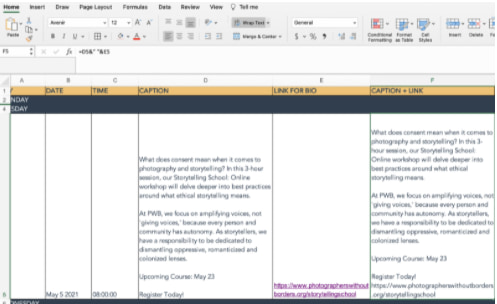
In the example below, I’m creating copy for Instagram and want to combine the caption with its corresponding link.

Ampersand

Step 1: Choose the cell where you want to put the merged data. Make sure this is separate from the cells you’re merging.

Step 2: Type = in the blank cell and select the first cell to combine.

Step 3: Type & and use ” ” to leave a space between cell data.

Step 4: Type & again before choosing the next cell. Repeat for all the cells you want to combine. An example formula is =D5&” “&E5.

Step 5: Hit Enter. In the example, you can see how the text from cells D5 and E5 merged into F5.

an example of the ampersand function in excel

Image Source

CONCATENATE or CONCAT

The CONCATENATE function (or CONCAT) is another way to combine two or more text strings together.

The formula in Excel is =CONCATENATE (text1,text2,…). Text1 is the first cell to merge and can be a text value, number, or cell reference. Text2 is the next item to join. For this function, you can merge up to 255 items or 8,192 characters.

Step 1: Highlight a new blank cell where you want to merge the data.

Step 2: In the formula bar, type =CONCATENATE(

an example of the concatenate function in excel

Image Source

Step 3: A formula builder will pop up, allowing you to choose Text1, Text2, and so on. Select the cells you want to merge, in order from first to last. To include spaces between the cell data, you must include ,” “, within the formula. [i.e. =CONCATENATE(D5,” “,E5)]

concate function in excel example

Image Source

Step 4: Hit Enter. The data from your selected cells will be combined in the CONCATENATE cell.

concatenate function example

Image Source

Why Can’t I Merge Cells in Excel?

A lot can go wrong if your formula or formatting isn’t set up correctly. If you’re struggling to merge cells, try these troubleshooting tips.

  1. Ensure you’re not actively editing a cell you want to merge. The ‘Merge’ icon will be shaded out if you’re in the middle of making changes. To fix this, simply hit ‘Enter’ to stop editing or click onto another cell before clicking back to the cell you’d like to merge.
  1. Check if one of the cells is part of an Excel table. Tables have a unique format that don’t allow merging. You can tell you’re on a Table if the ‘Chart Design’ or ‘Format’ tabs across the top of your workbook are highlighted in green and the ‘Merge’ icon is shaded out.
  1. Look at the sharing permissions of the Excel workbook. If it’s not shared with you or is protected, you won’t be able to make any changes or merge cells.

How to Unmerge Cells

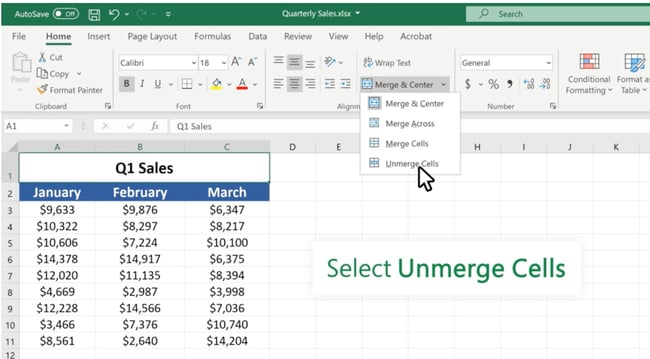
Maybe you got a little excited trying out your new skills and merged one cell too many. Don’t panic. Simply unmerge your cells by following these steps.

unmerge cellsImage Source

  1. Highlight the cells you want to unmerge.
  2. Under the Home tab, click the ‘Merge’ icon and choose ‘Unmerge Cells.’
  3. Your cells will go back to the original formatting, but you will have lost the information from before the merge.
  4. If you need that information, click ‘Command’ + Z (OS) or ‘CTRL’ +Z (Windows) to undo your actions until you see the data pop up.

Excel Shortcuts Make Life Easier

While using spreadsheets can feel intimidating at first, with the tips and shortcuts above, you’ll have it down in no time. 

Editor’s note: This article was originally published in May 2021 and has been updated for comprehensiveness. 

excel marketing templates

Categories B2B

What Is YouTube CPM? [+ Why It Matters]

YouTube is a powerful advertising platform with over two billion monthly active users. As a creator, this means you have numerous opportunities to earn money. Understanding YouTube CPM is key to unlocking its potential.

CPM, Cost per 1,000 Impressions, is a vital metric that determines how much advertisers pay to reach viewers through your videos.

It’s commonly used across various paid media platforms to describe the advertising expenditure per 1,000 individuals reached by the ad.

→ Free Templates: How to Use YouTube for Business [Download Now]

By maximizing your YouTube CPM, you increase your earnings and demonstrate the value of your content. In this article, we‘ll explore what CPM is, how it’s calculated, what makes a “good CPM,” and more.

Table of Contents

What is CPM, and how is it calculated?

CPM, or cost per 1,000 impressions, is the cost an advertiser needs to pay on YouTube for every 1,000 impressions their ads receive on your video.

CPM varies depending on how much an advertiser pays to display the ad. Advertising costs on YouTube depend on a range of factors, including bidding price, ad type, and consistency.

To calculate CPM, divide the amount the advertiser paid for an ad by the number of views a video has. Then, multiply by 1,000.

For instance, let‘s assume an advertiser is paying $9 for an ad seen 5,000 times on your video. To calculate CPM, you’d divide nine by 5,000 = $0.0018, then multiply $0.0018 by 1,000.

This gives you a CPM of $1.80. YouTube takes 45% of your CPM, meaning you‘ll receive 55% of that $1.80. So, if you make $1.80 CPM off an ad, you’ll only keep $0.99.

Additionally, there’s another type of CPM: playback-based CPM.

Rather than calculating the cost the advertiser pays for 1,000 impressions, playback-based CPM calculates the cost an advertiser pays for 1,000 video playbacks where an ad is displayed.

There are free calculators available online if you don’t want to calculate your CPM manually.

And while individual videos’ CPMs might seem small (like the $0.99 made above), it can add up to a hefty monthly earning if plenty of businesses see your videos as consistently worthwhile platforms for their promotions.

Why is CPM important?

As a YouTube creator, CPM is an important metric for analyzing which of your videos are most valuable to advertisers.

Since advertising is the primary method for monetization on YouTube, it’s essential to understand how CPM works to ensure you’re maximizing revenue.

To make a full-time career out of YouTube, it’s critical to know which videos can be monetized so you can create a more efficient, long-term strategy to target those types of topics.

For instance, perhaps you create YouTube videos for beauty, health, and wellness. But you find “Drugstore Makeup Tutorials” receive the highest CPMs. This suggests you should make more content that aligns with that topic.

One of the best ways to increase your CPM is to make your channel an ideal space for advertisers to place their ads.

YouTube research has found that ad exposure (ensuring their ads reach people multiple times per week) significantly improves advertising ROI.

Advertisers consistently placing ads on your videos benefits them, earning you higher CPM and increased revenue.

Additionally, if you find one business in particular consistently advertises on your videos.

If the brand aligns with your values, you might reach out directly to discuss other YouTube monetization opportunities, like affiliate marketing or brand partnerships.

The Average CPM on YouTube

CPM varies greatly depending on how much an advertiser pays to distribute an ad on your video.

Let‘s say an advertiser pays $10 for an ad that plays on your video with 1,000 views. If that’s the case, you‘d make $10 CPM (10/1,000 x 1,000). Of course, you’ll need to take 45% off that total — making your earnings around $5.

However, in most cases, the videos on which businesses choose to advertise will have more than 1,000 views, making your earnings closer to $7-$10.

Jillian Hope, HubSpot’s Senior Manager of Brand Advertising, agrees, telling me her team typically sees an average of $7 to $10 from past campaigns.

It’s important to note that CPM is just one metric that you can use to analyze and improve your YouTube performance.

For example, YouTube analytics provide metrics like revenue per mille (RPM), which shows how much you’re earning per 1,000 video views across multiple revenue sources.

The Highest CPM on YouTube

The highest CPM varies by country, but here’s a list of the five highest YouTube CPM rates by country from 2022-2023:

  • Norway: $43.15
  • Germany: $38.85
  • Moldova: $29.50
  • Algeria: $24.50
  • South Korea: $17.00

Higher CPM rates also relate to the content of your videos. Some categories earn higher CPMs than others. Some popular content niches on YouTube that earn high CPMs include:

  • Makeup
  • Retail
  • Health
  • Finance
  • Technology

But video topics aren’t the only factor that can make your CPM fluctuate. Many creators report peaks and troughs in their CPM throughout the year.

For example, seasonal shopping around the holidays throughout November and December can temporarily drive up YouTube earnings in certain niches.

Getting Started

As a creator, you should use CPM as a metric to help you identify which topics seem most valuable to advertisers, as those topics likely provide the most opportunity for monetization.

Rather than looking for “quick tricks” to increase your CPM, however, you’ll want to play the long game by creating a comprehensive YouTube strategy that helps you increase sales, reach new audiences, and grow brand awareness.

Featured Resource, YouTube for Business Kit: 18 Free YouTube Templates, 18 design, planning, and video description templates for YouTube. Download for Free

Categories B2B

How to Use Wistia: A Step-by-Step Guide

If you’re looking for ways to strengthen your video marketing strategy, you’ve come to the right place!

We’ve partnered with our friends at Wistia, the complete video marketing platform for any business, to show you how to use Wistia and HubSpot to strategically reach your goals with video.

In this step-by-step guide, you’ll learn:

  • Where your business should be using video
  • How to upload your videos to Wistia
  • How to customize your videos
  • How to share your videos
  • How to generate leads from your videos
  • How to track your video performance in HubSpot

Let’s dive in!

→ Access Now: Video Marketing Starter Pack [Free Kit]

Where You Should be Using Video

Video is an awesome way to connect with your potential and existing customers on a personal level, almost like meeting them face-to-face. It’s the perfect tool to showcase your product and let your brand’s personality shine through.

Businesses that ace their video marketing game have figured out how to use video at different touchpoints across their customer journey. If you want to take your video marketing strategy to the next level, here’s where you should consider using video:

  • Your website’s landing pages
  • Blog posts
  • Your help center
  • Email campaigns
  • Your software application
  • Social media channels
  • the list goes on

Now, here’s where Wistia comes into play. Designed for marketers, Wistia provides all the video creation, hosting, sharing, and analytics tools your business needs to integrate video into the customer journey and attract, engage, nurture, and convert leads.

Ready to learn how to use Wistia to make your videos work harder for your business? Let’s get started!

How to Use Wistia in 6 Steps

Step 1: Upload your videos to Wistia.

It’s super easy to get your videos uploaded to Wistia. All you have to do is create a new Project in your account and choose the videos you want to upload to it. As soon as you’ve uploaded a video, it’s automatically transcribed and ready to be distributed anywhere you want your video to be seen.

Wistia’s recommended upload settings for video are:

  • MP4 file
  • H.264 codec
  • 5,000–8,000 kbps target bitrate

Want to make the process even easier? You can seamlessly import videos straight from Descript, Zoom, and YouTube. These are just a few Wistia integrations that can help make your video workflow a breeze.

Create Videos in Wistia

Don’t have any videos to upload? No problem! You can create videos right in Wistia. Here are some of the things you can do:

Step 2: Customize your videos.

Wistia offers a variety of ways to customize your videos to not only deliver a great viewing experience, but also to help you reach your business goals.

You can customize your player color to match your branding, create a custom thumbnail to entice your audience to press the play button, add chapters to make it easy for your viewers to find the information they’re looking for, insert a Call to Action (CTA) to direct your viewers to an action you’d like them to take, and more.

You can make changes anytime, and your video will be updated wherever it’s embedded.

We also recommend making sure your videos are accessible to everyone. By enabling features like captions and audio descriptions, you can open the doors to a broader audience, allowing more people to enjoy your videos. With Wistia’s in-app accessibility checklist, it’s easier than ever to make video accessibility a seamless part of your workflow.

Step 3: Integrate HubSpot with Wistia.

Did you know that you can combine the powers of HubSpot and Wistia to seamlessly capture, track, and manage leads? You can also use this integration to embed your Wistia-hosted video into your emails and website.

If you have a HubSpot account and an Advanced or Premium Wistia software subscription plan, follow these steps to integrate both accounts:

  1. Connect the HubSpot integration in your Wistia account. This allows Wistia to request your lists and forms and send leads and engagement data into HubSpot.
  2. If you’re tracking a video, set up a Wistia email capture form (called Turnstile) or add a HubSpot form directly to the video. Turnstiles and HubSpot forms are how Wistia identifies users for proper tracking.
  3. Embed your video on a page with a HubSpot tracking script. The Wistia player and HubSpot script work together to identify users and track their activity for display on HubSpot contact records.

The first step is usually a one-time thing, and thereafter you’ll only need to repeat the second and third steps for each video you want to track.

Step 4: Share your videos.

Whether you want to embed your videos somewhere, publish them on social, or send them to folks privately, Wistia makes it super simple to share your videos.

How to Display Your Wistia Videos

Embedding a Wistia-hosted video onto your website is a piece of cake.

All you need to do is open the Embed & Share window from your Media Page, choose your embed code type, fine-tune it, and then paste it onto your website.

There are two main types of Wistia embeds: inline embeds and popover embeds. Inline embeds will place the player directly on the page, in line with the rest of your content. Popover embeds display your video’s thumbnail in line, but play the video in a popover window when selected. The best part is that there’s no coding required.

Wistia Channels

Wistia Channels enables you to turn a collection of videos into a video gallery without a developer’s help. With just a simple embed code, you can take your recent webinars, a library of product videos, or a branded series (like a podcast) and display them as a beautiful, binge-able collection.

Embedding a Channel on your website is as simple as embedding a single video. Use an inline code when you want your Channel to show within the flow of your website, or use a popover code when you want to give your viewer a more immersive, full-window viewing experience.

More Ways to Share Your Videos

With Wistia’s Email Campaign Link feature, you can include your videos in your marketing emails and even track their success. Just grab the email merge tag Wistia generated specifically for your favorite email marketing provider and then paste it into the body of your email.

The Wistia + HubSpot integration makes embedding videos into your emails even easier. When you connect both accounts, you can access your Wistia video library in HubSpot using Media Bridge, select a Wistia video, and then embed it in a HubSpot email or web page.

Want to share your videos on social media? Use Wistia’s Publish to Social feature to connect Wistia to your Facebook, YouTube, and LinkedIn accounts and then directly upload your video content to these social networks.

Wistia’s integration with Hootsuite also lets you access your Wistia library from within the Hootsuite platform. It’s easy for you to find, schedule, and publish your Wistia-hosted video content to any social media channel via Hootsuite.

If you just want to share a video without making it available to everyone on the internet, no problem — simply grab a direct link to the video. The link will take folks to a media page you can customize to provide a branded viewing experience.

No matter how you share your Wistia videos, it’s easy to keep your content secure with privacy and security options. You can control access to your videos by password-protecting your video, sharing a private video link, or adding an email gate to your video or Channel.

Step 5: Generate leads.

Videos are a great way to generate leads for your business, and Wistia makes it easy to do so. With Turnstile, you can capture email addresses at any point in your video’s timeline.

If you’ve integrated HubSpot with Wistia, you can access your existing HubSpot forms in Wistia and add them to your videos. You can capture leads with your videos and pass detailed viewing data into your HubSpot customer relationship management system (CRM). Then score, segment, and assign leads in a flash based on video triggers.

Generating Leads with Wistia’s Live Event Registration

If you set up a webinar or a live-streamed event with Wistia, it’s easy to see who registered, who attended, and who was the most engaged.

When you enable registration, Wistia automatically creates a landing page for your event so you can collect sign-up information like names and email addresses. If you’ve integrated HubSpot with Wistia, those contacts get passed right from your registration page to HubSpot. Now, you can also use HubSpot forms right on your registration page.

As soon as your webinar or live stream is over, your audience can watch it on demand. Whether you include a link to your webinar recording in an email blast or create a landing page to host your on-demand webinars, the leads can keep flowing in.

Step 6: Track your videos’ performance.

Lastly, Wistia’s detailed analytics can help you strengthen your video marketing strategy over time. You’ll get insights into who’s watching your videos, how much they’re watching, and which ones provide the most value for your business.

Engagement Graphs

Wistia’s engagement graphs show how your audience consumes your content. You can see which sections of your media your audience replayed multiple times and where they stopped playing, with drop-offs indicating when attention waned and big spikes revealing sections that people found compelling enough to replay.

Analytics by Embed Location

To understand how your video is performing based on where it lives on your site, you can view media analytics by embed location.

All you need to do is head to the Media Analytics Overview page and scroll down. From there, you’ll see metrics like plays, play rate, time played, engagement, unique visitors, and conversion rate for each embed location during the date range you’ve selected at the top of the page.

Heatmaps

Wistia heatmaps show precisely which parts of your video each individual viewer has watched, skipped, and rewatched.

With the Wistia + HubSpot integration, Wistia heatmaps will appear in your contact timeline. You can also see how many videos a HubSpot contact has watched. Once a contact has filled out a HubSpot form anywhere on your website, all their viewing data for any video on your site is added to their contact card in HubSpot.

With these insights, you can build email workflows that automatically contact your most engaged viewers. What’s more, your sales team will get a complete view of their leads’ interactions and the integration will proactively alert them when their leads are watching key videos so they can reach out at optimal times.

Make Your Videos Work Harder for You

If you’ve made it to the end of this article, congrats! You’ve just upped your video marketing game. We hope you’re inspired to start doing more with video for your business. And when you’re cooking with HubSpot and Wistia, you’ve got the perfect recipe for video success!

Discover videos, templates, tips, and other resources dedicated to helping you  launch an effective video marketing strategy. 

Categories B2B

How to Connect INTENTIVE Insights to Salesforce

INTENTIVE shortens B2B sales cycles and simplifies life for both marketing and sales professionals. By delivering unparalleled business insights via buyer-level intent signals and behaviors, INTENTIVE truly accelerates sales outcomes.

But none of this matters unless you’re able to actually get your hands on the buyer-level intent insights the platform offers.

Using INTENTIVE’s Buyer-Level Insights

The information INTENTIVE records, aggregates, and presents to users is some of the most actionable across the B2B world.

So how can these insights be put into action?

Installing the INTENTIVE Insights Salesforce App

We’re excited to share that we’ve built a fully loaded Salesforce app that’s ready to export buyer-level intent insights directly into your Salesforce environment.

Here are the step-by-step instructions for installing the INTENTIVE Insights app and connecting it to your Salesforce instance.

1. Install the Managed Package

According to Salesforce’s Help site, a managed package is a “container that includes the components of a Salesforce application, and it’s a mechanism for installing apps in Salesforce orgs.”

In this case, the managed package will be NetLine’s INTENTIVE Insights app.

To install the NetLine INTENTIVE Insights managed package for Salesforce, use the links below:

Production Salesforce Orgs
Sandbox Salesforce Orgs

Invite your teammates

Choose which users you will give access to INTENTIVE Insights. Depending on your access requirements, these access levels are:

  1. Admins Only
  2. All Users
  3. Specific Profiles

We recommend selecting All Users or Specific Profiles, as access to the INTENTIVE Insights component will be further controlled by a Salesforce permission set.

Agree to the acknowledgment box and click the Install button. Note that this may take a few minutes.

2. Deploy and Authorize the INTENTIVE Insights app

Once the installation is complete, you’ll complete the following steps to deploy the app and enable authorization with the INTENTIVE platform.

  • Go to the App Launcher (which can be found at the top left-hand corner) and search for “INTENTIVE Insights”. Open the INTENTIVE Insights app.
  • Next, click Complete Setup. This will deploy the app to your Salesforce org.
  • Go to Setup > App Manager.On the INTENTIVE Connected App row, select the dropdown arrow at the right side of the screen and click on View.
  • Click on Manage Consumer Details and copy the Consumer Key and Secret from Salesforce to the INTENTIVE platform.Before your Consumer Key and Secret are displayed, you may be prompted for a verification code.

  • Input your Consumer Key, Consumer Secret, and Salesforce Organization ID in the text fields found on the Salesforce Connector page inside the NetLine Portal.

*Note that you can always retrieve these details from your Salesforce Setup Administration. If you need to do so, you can find each setup below:

  • Consumer Key and Secret:
    • Setup > App Manager > INTENTIVE Connected App > View > Manage Consumer Details
  • Organization ID:
    • Setup > Company Information > Salesforce.com Organization ID

3. Add “INTENTIVE App User” Permission Set to Users

  • Within Salesforce Setup > Users > Users, click on the names of each User that needs access to the INTENTIVE Insights app.
  • Enable the “INTENTIVE App User” Permission Set for each User.

Alternatively, you can open Setup > Users > Permission Sets, and click Management Assignments > Add Assignments to assign the Permission Set in bulk.

For more information about assigning Permission Sets, please see the Assign Permission Set to Users Salesforce Documentation.

4. Add the INTENTIVE Insights component to a Lightning Page Account Record Page layout.

  • From an existing Accounts Lightning page, click the gear icon and select Edit Page.
  • At the bottom of the left sidebar, there will be a component in the Custom – Managed section called “INTENTIVECanvasApp”.
  • Add this to the location on the Account Lightning Record Page where you would like the component to be displayed.
    • For example, you could add a tab called “INTENTIVE Insights” and add the component there, as shown in the screenshots below. Save and Activate on specific app(s) as needed.
  • Add a Tab by clicking on the component with Tabs.
  • Then in the right-hand column, click Add Tab. Customize the tab name by clicking it in the properties pane, click Custom, and enter the name “INTENTIVE Insights“.


For more information on adding and customizing tabs on Lightning Pages please see the Salesforce Documentation.

INTENTIVE and Salesforce Lightning

Additionally, we know that many Salesforce users prefer Salesforce Classic to Lightning. It’s important to note, however, that INTENTIVE Insights will only work with Salesforce Lightning.

Note that the INTENTIVE Insights component must be deployed on an Account Lightning Record Page, as it provides the insights for the Account context that it is deployed on.

Connecting INTENTIVE to Salesforce is Simple

But that’s just our opinion, of course. We know that things can go array at times, so if you get stuck, send a note to [email protected]—we’ll help get you unstuck and on your way in no time.

We’re excited to help you get the most of out NetLine INTENTIVE!

Categories B2B

How to Send a Calendar Invite with Google Calendar, Apple Calendar & Outlook

As a marketer, few things are more frustrating than half the registrants for an event you promoted never showing up.

Fortunately, you’re about to learn how to send a calendar invite via Google Calendar, Apple Calendar, or Outlook, so registrants can add the event to their calendars and be less likely to forget about your event.


Get instant access to our free meeting scheduling software. No more wasting time with back-and-forth emails or setting up calendar invites.

Unless you somehow magically know what type of calendar your target audience uses, your best bet is to include all three major calendar invites in your email, giving recipients a choice that works for them.

Outlook and Apple Calendar users will get an .ics file, and Google Calendar users will use a URL-based custom invitation.

Note: All screenshots and steps were taken on a Mac, but if you’re on a PC, the process is similar.

Step 1: Create a New Event 

Apple Calendar

Outlook

Google Calendar 

Step 2: Set Details for Your Event

Apple Calendar 

Outlook

Google Calendar

Step 3: Save and Send Your Event

Apple Calendar 

Outlook

Google Calendar 

Step 4: Insert Invites Into Your Marketing Email

Gmail

Apple 

Outlook

Step 1: Create a New Event

If you have a Mac, you can create your invitation in Apple Calendar. If you have a PC, you can create it in Outlook.

For Google Calendar, you’ll create the URL directly from your calendar application (you’ll need to be logged into your Google account to do this). It doesn’t matter which type of computer you have.

Apple Calendar

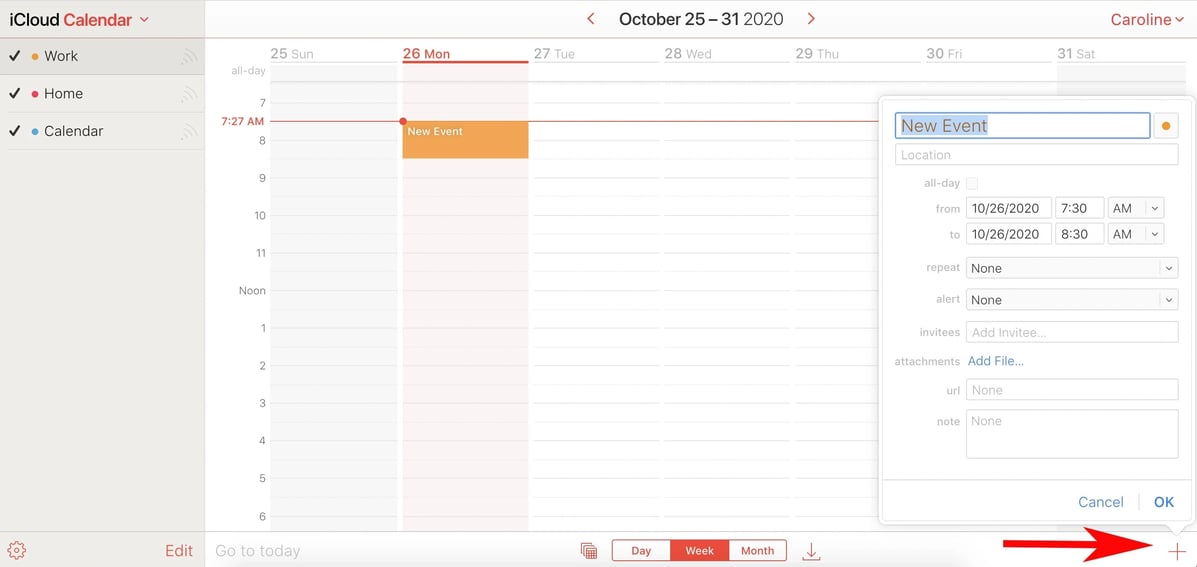
Open Apple Calendar and click on the “+” sign in the bottom right corner of the window. A pop-up will appear. Enter the name of your event in the “New Event” text box and hit return/enter on your keyboard.

This will create an event on your calendar, but it will place the event on the current date and time and leave the rest of the details blank. You’ll need to change this information to reflect the details of your event (more on that in the next section).

the apple calendar homepage with an arrow to the new event button in bottom right corner; how to send a calendar invite

Outlook

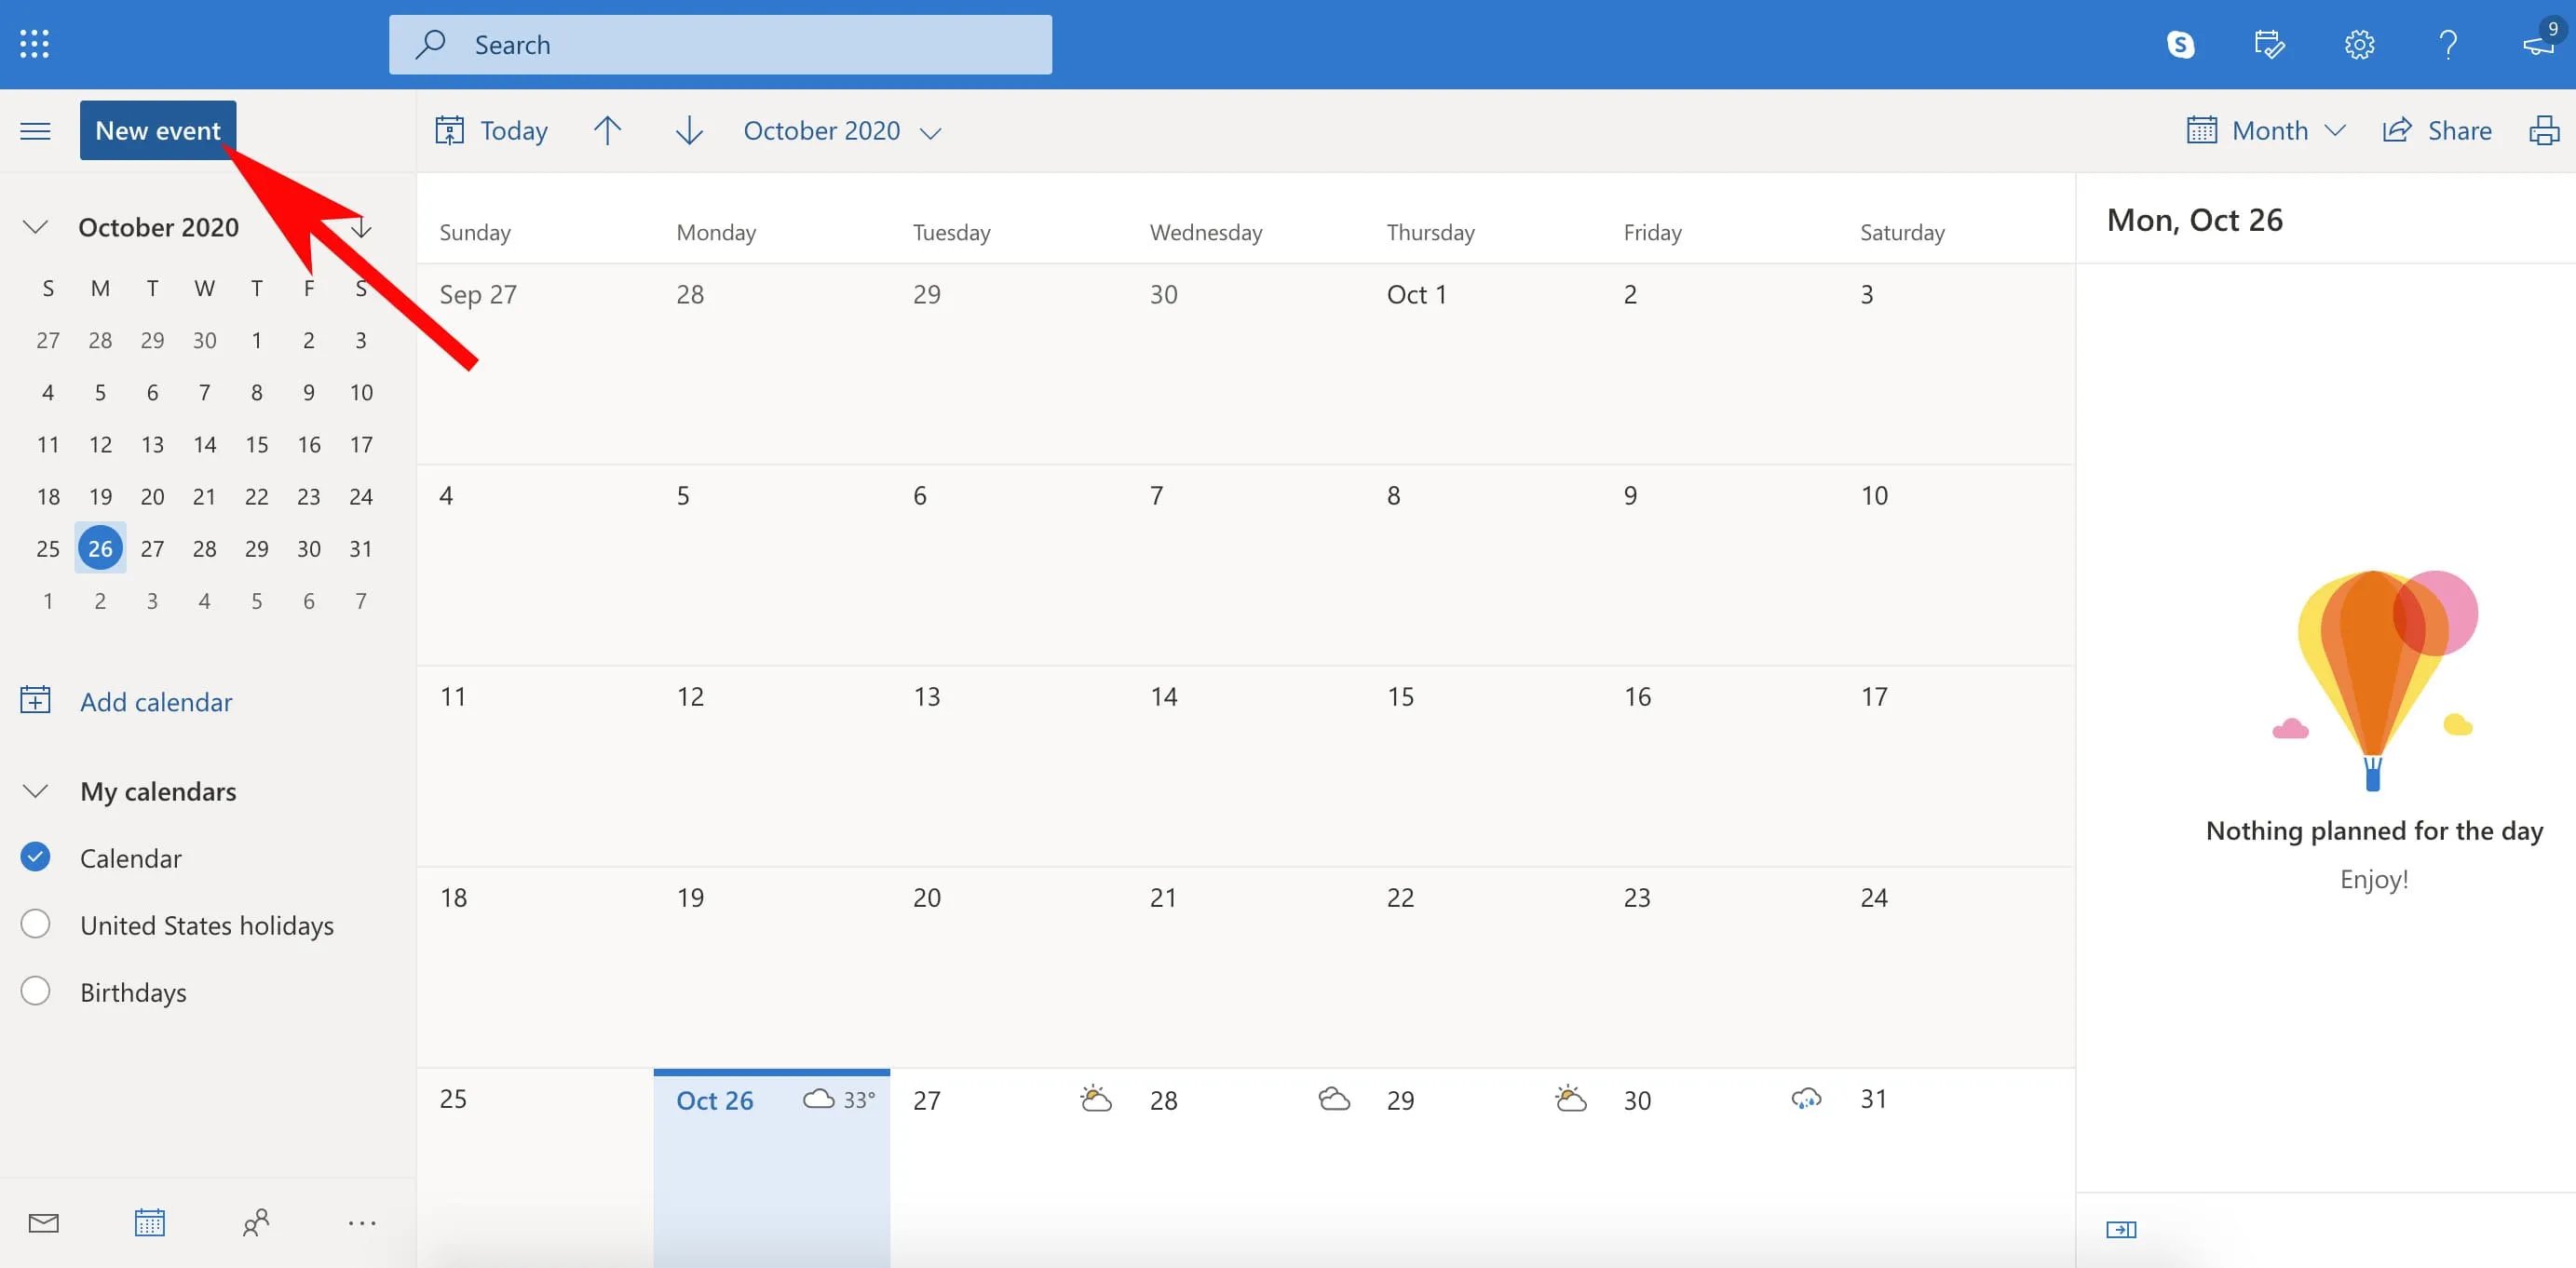
Open up Outlook Calendar, then click on the “New Event” icon in the top left corner.

An event pop-up will open for editing — simply include the event’s title, time and date, location, and whether or not you want to set a reminder. To find the option to “Invite attendees,” click “More options.”

outlook calendar homepage with arrow pointing to new event button

Google Calendar

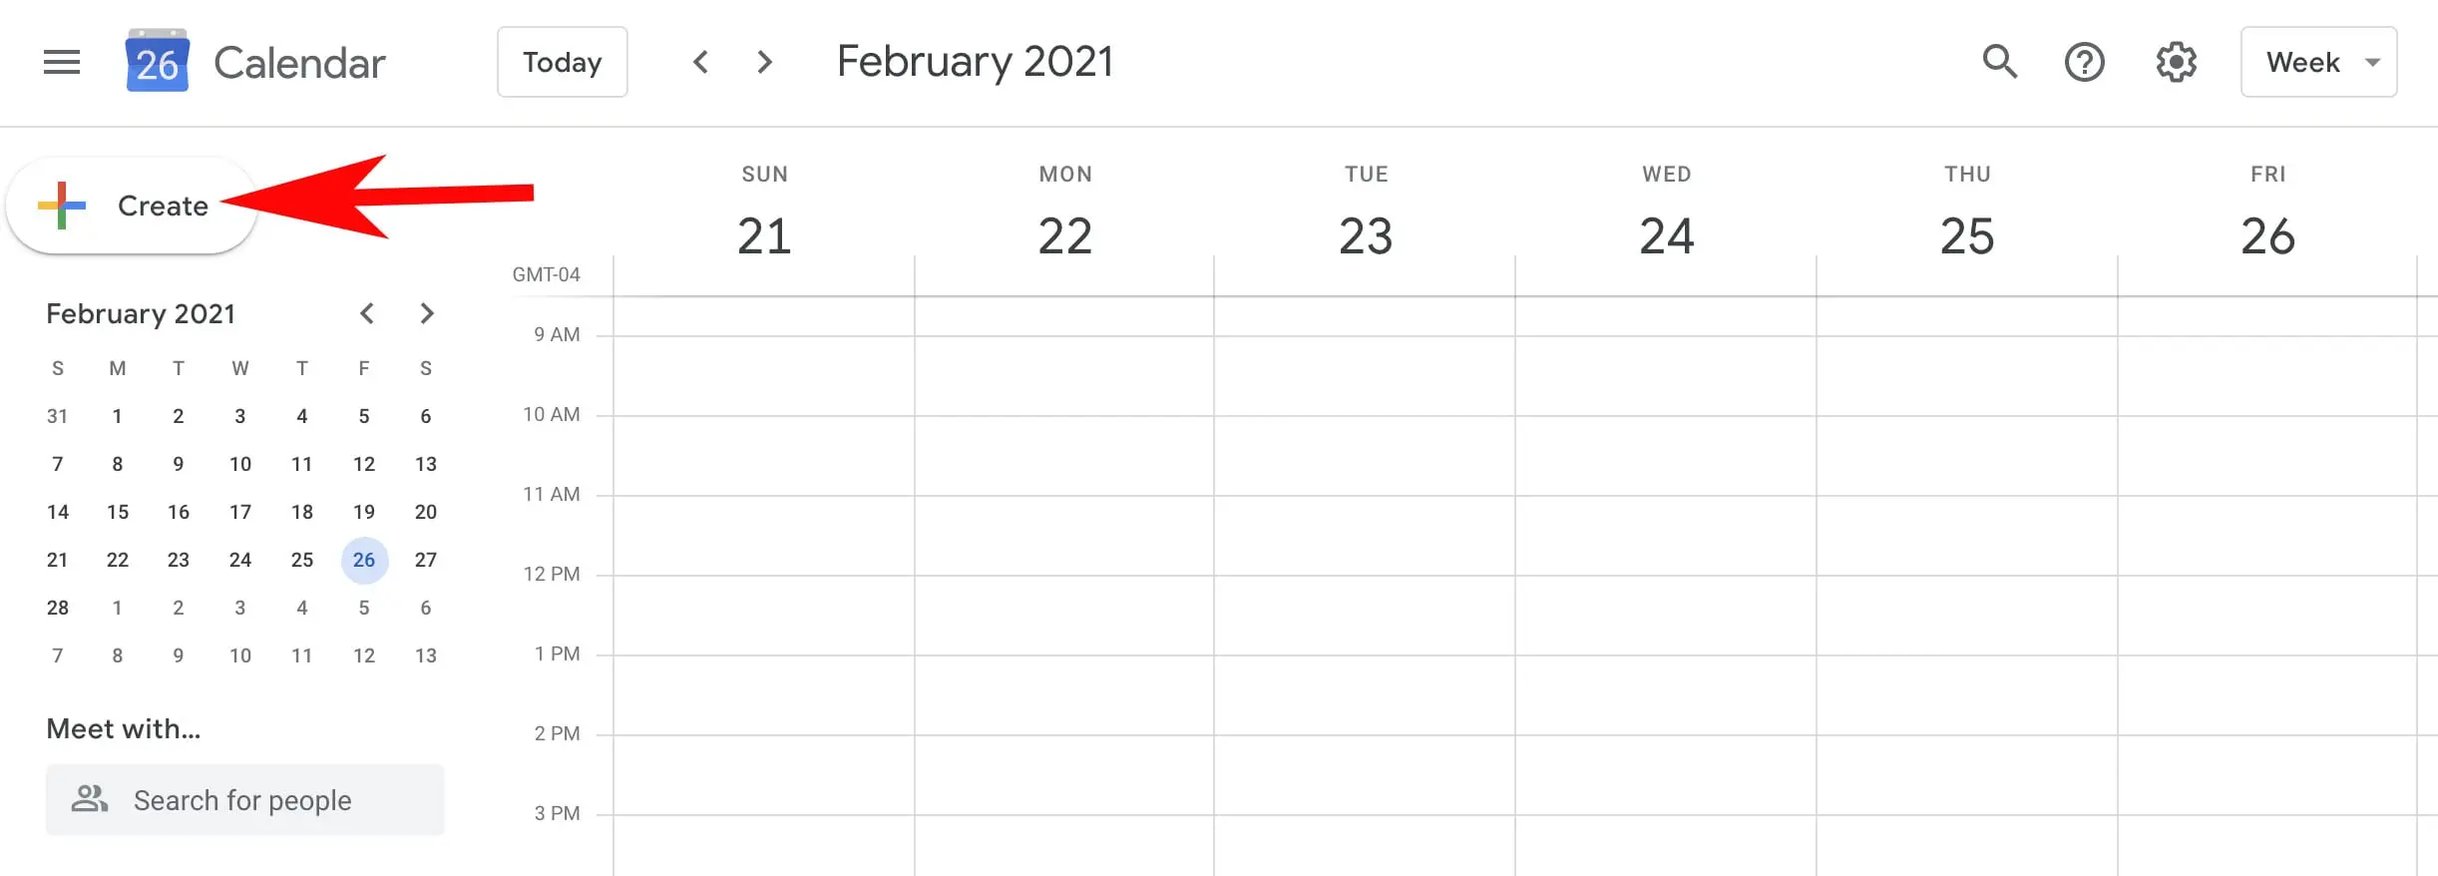
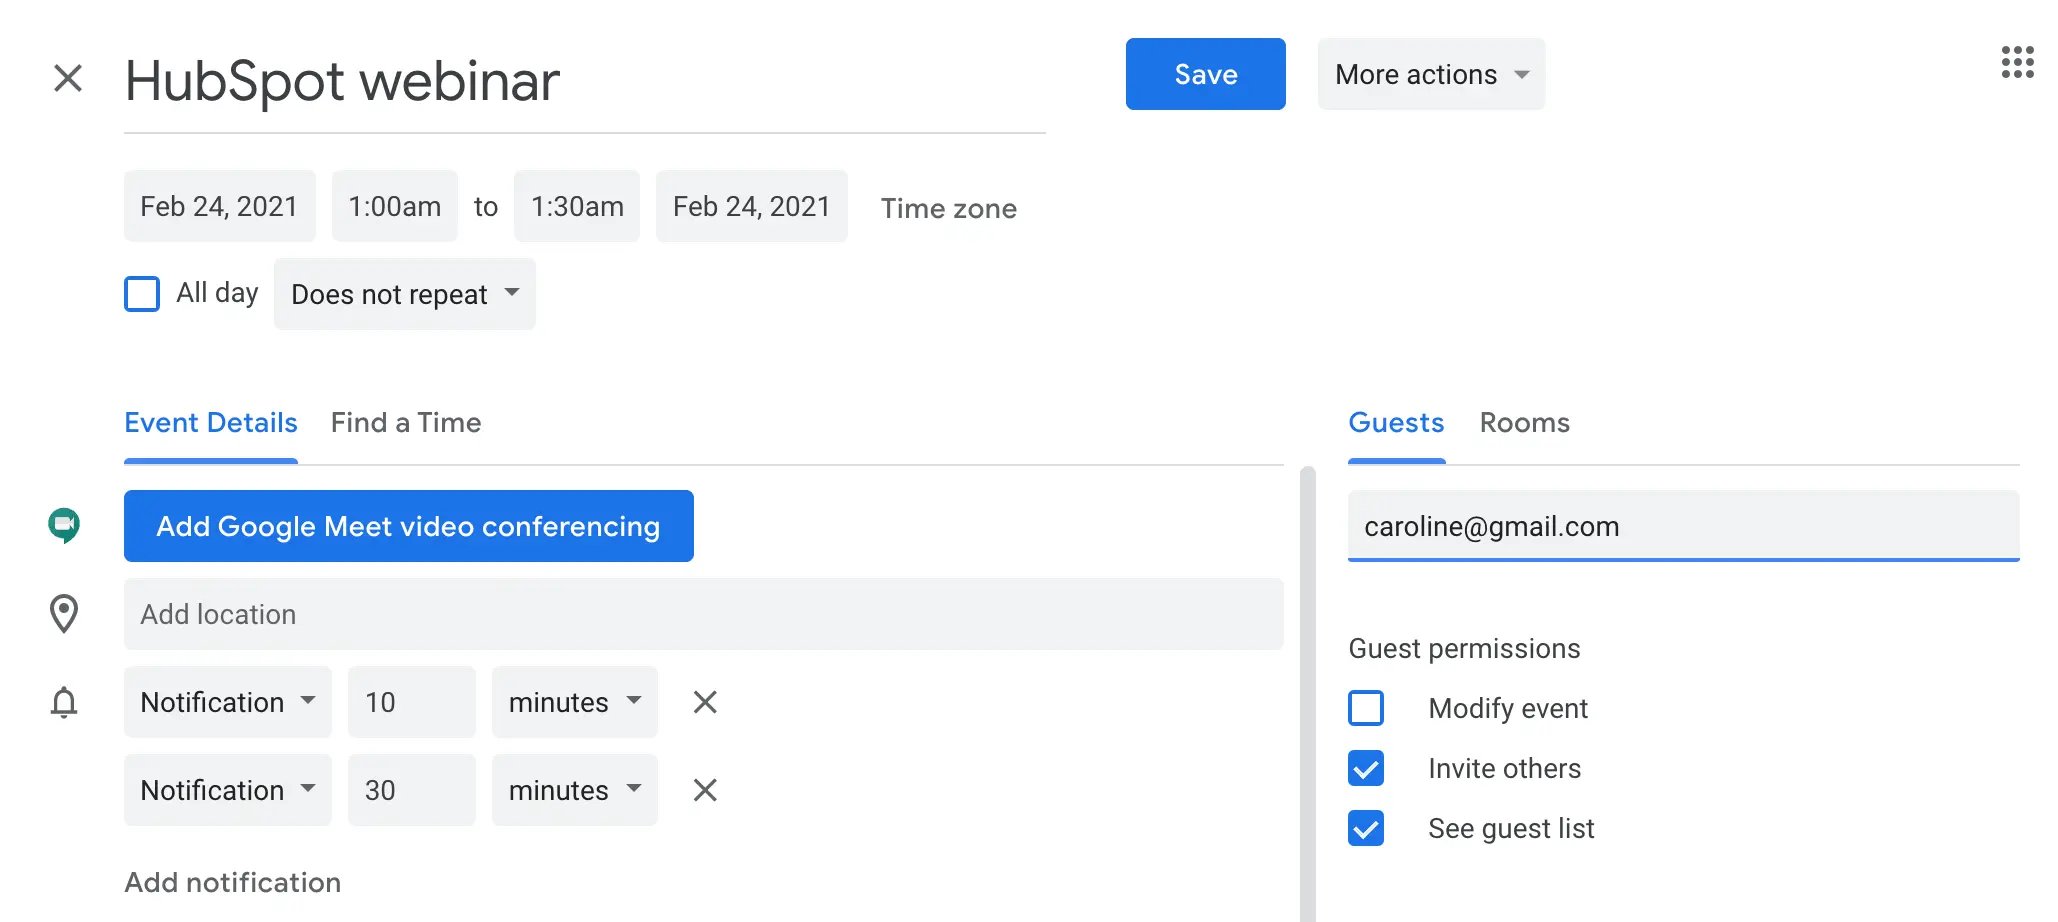
Open Google Calendar in a new browser window. You’ll need to be logged into your Google account. Click the “Create” button on the top left side of the screen. A new event window should open.

google calendar homepage with arrow pointing to create button; how to send a calendar invite

Step 2: Set Details for Your Event

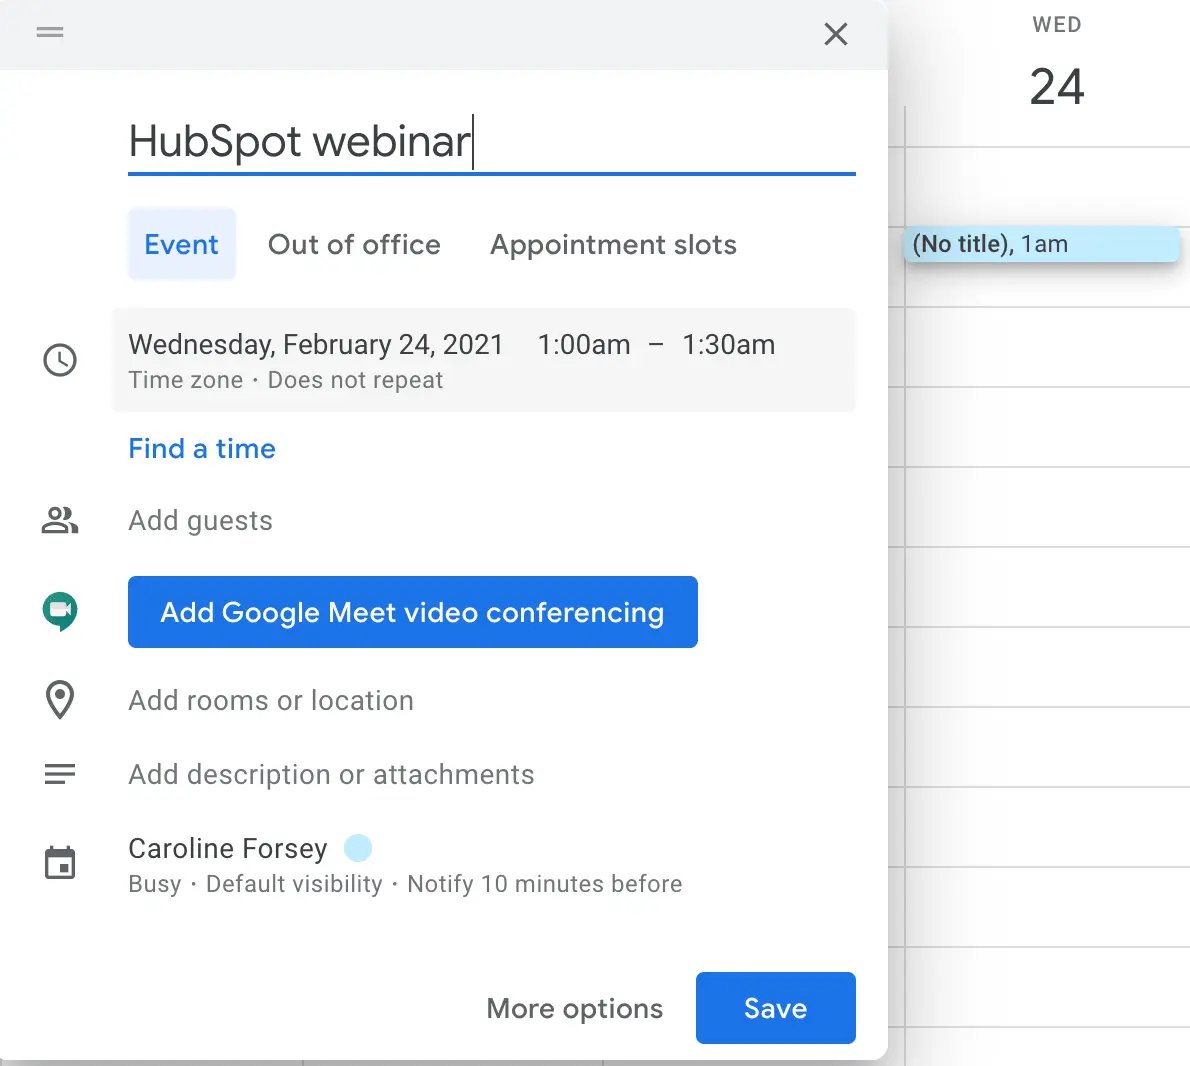
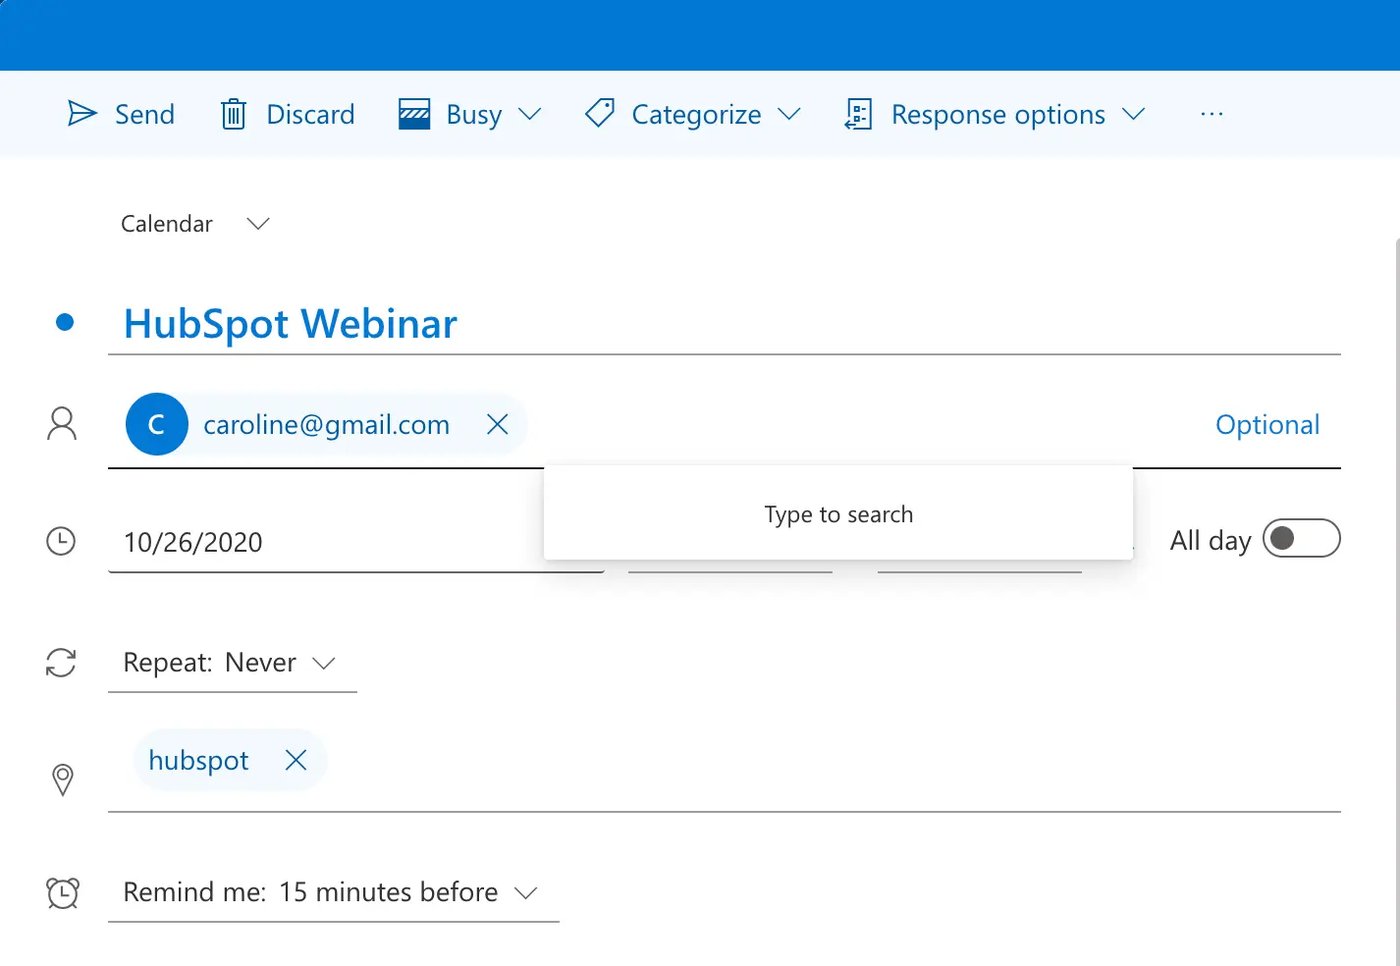
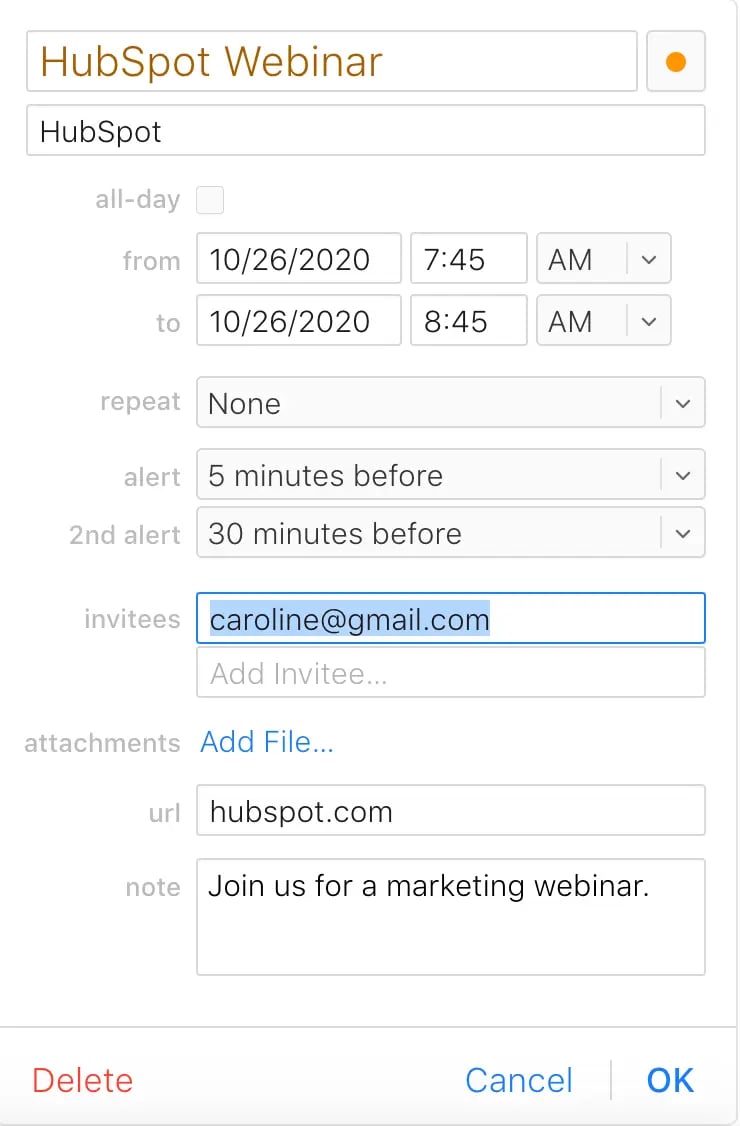
While Outlook, Apple Calendar, and Google Calendar events have slightly different formats, you’ll still need the same components for each one:

  • Event name
  • Location
  • Time
  • Event description
  • URL of your event’s landing page
  • Optional event alert

Below are examples of how these details look in the different applications, as well as a clarification of what information and format to use for each of these components.

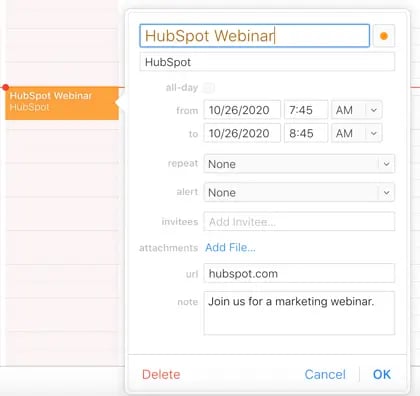
Apple Calendar

apple calendar event; how to send a calendar invite

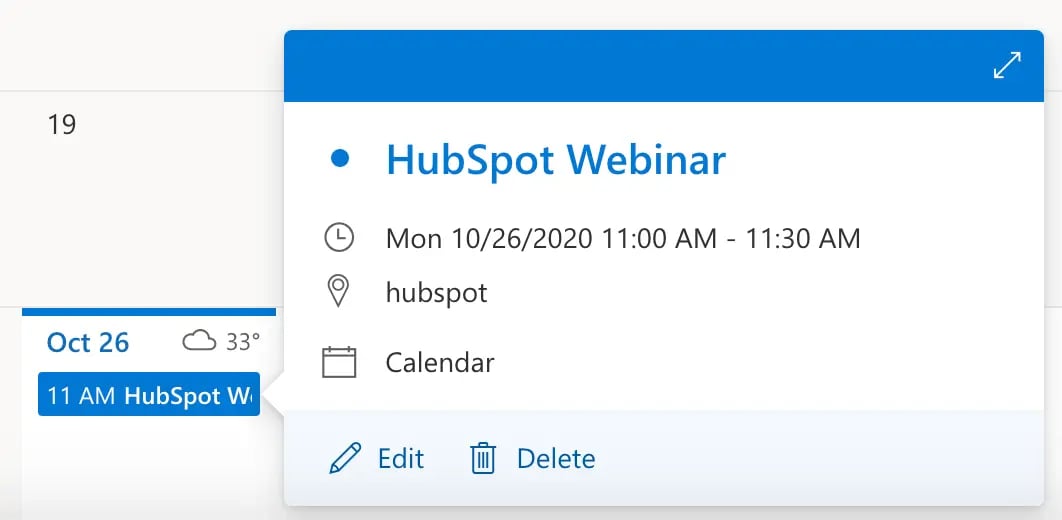
Outlook

outlook calendar event; how to send a calendar invite

Google Calendar

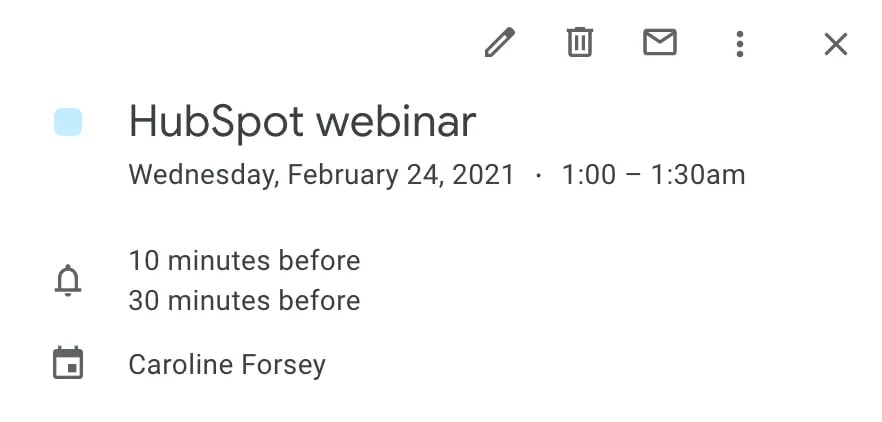
google calendar event; how to send a calendar invite

The Details You Need to Include

Event Name 

Make sure the name reflects what your actual event name is called on your website and in your other promotions (this is a no-brainer, but we’re being thorough here).

You may want to also include your company name at the end so registrants can quickly remember who is hosting the event when they stumble on it in their calendar later.

Location

The physical address of the event (one line, such as “123 Business Ave, Springfield, TX”) or the landing page URL, in the case of an online event.

Time

Enter the start and end dates and times of the actual event. Adjust the event’s timing to your time zone, as you’re the one creating the .ics file. It will automatically change the time to correspond with each person’s time zone. For example, if you’re creating the event file in Boston for a webinar in San Francisco that starts at 10 a.m. PST, you should enter the start time as 1 p.m. EST.

Alert (Optional)

You can set up alerts so attendees don’t forget about the event between when you sent the invite and the time of the event. In Outlook, you can set a time for one reminder to go off (such as one hour before).

In Apple Calendar and Google Calendar you can set multiple alerts.

It’s important to not overwhelm people with too many alerts, as this creates a negative, intrusive experience. Below is an example of an alert sequence in Apple Calendar that reminds folks about your event but isn’t in-your-face:

hubspot alerts on calendar; how to send a calendar invite

URL of Event Landing Page

Do you have a specific landing page for your event or webinar? Include its URL, as it acts as a refresher for those who may be fuzzy on the details of what the event is about.

Include it in the URL section of an Apple Calendar invite as well as in the body text of your Gmail or Outlook invites if you haven’t already included it in the Location section.

Description

Here, you should include a snippet of the event’s details. This goes in the “note” section of your Apple Calendar invite, in the body of your Outlook invite, or in the “description” text box in Google Calendar.

It’s also helpful to provide your contact info in this section. That way, people can reach out if they have any questions.

Step 3: Save and Send Your Event

Once you’re all set editing the invite, you can save it to use as an attachment in your marketing email.

Outlook

Click on your event in Outlook, select “Edit,” and then click “More options.” Once you see the pop-up (shown below), type the emails of people you’d like to invite into the text bar “Invite attendees.”

When you’re ready, click “Send” in the top left of the screen to send the invite to people in your recipient list. 

outlook save and send; how to send a calendar invite

Apple Calendar

Double-click on your Apple event to open it up, and then type emails into the “Invitees” text box. When you’re ready, click “OK,” and the invite will automatically be sent to the emails you’ve included in the event details.  

apple save and send; how to send a calendar invite

Google Calendar

Click on your event in your Google calendar and click “Edit event.” Then type emails into the “Add guests” text box to the right of your event details (next to “Rooms”). When you’re ready, select “Save.”

If you’ve done it correctly, Google Calendar will show you a pop-up confirming you’d like to send the event to guests. Click “Send” to ensure it gets sent to the emails you’ve included. 

gmail save and send; how to send a calendar invite

Step 4: Insert Invites Into Your Marketing Email

The easiest way to send an event via email for Outlook, Apple, and Gmail is to do it directly from the event invite itself.

Each of these email providers gives you the opportunity to type emails directly into the event and include additional text, attachments, etc.

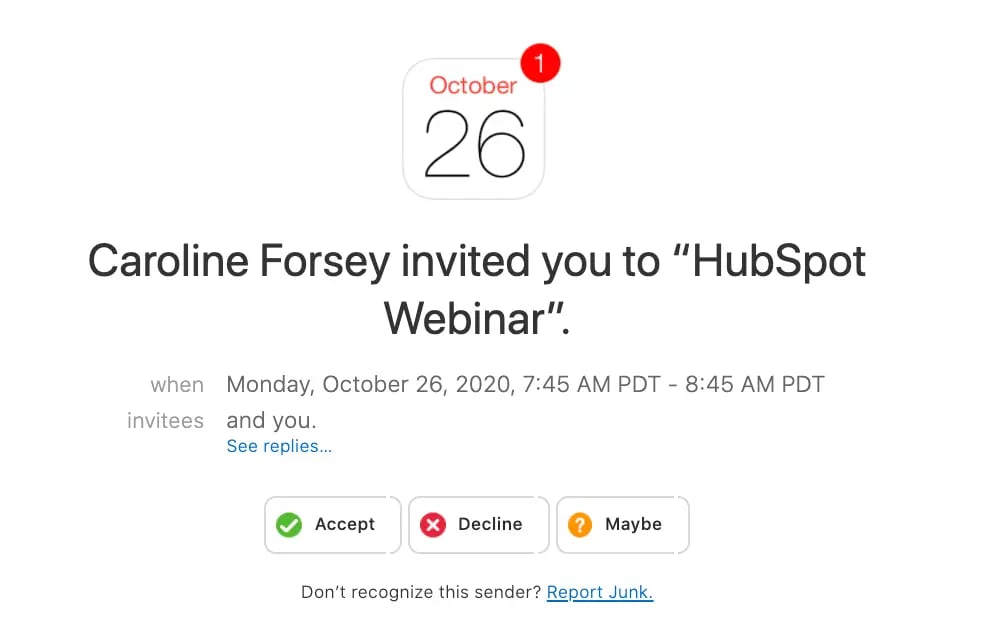
Best of all, the invite you’ll receive is clean and offers you the opportunity to accept or deny the invite directly from your email inbox: 

Screenshot of webinar invite; how to send a calendar inviteHowever, there are a few workarounds you can try if you’d prefer to include the event URL in a marketing email. 

Gmail Calendar

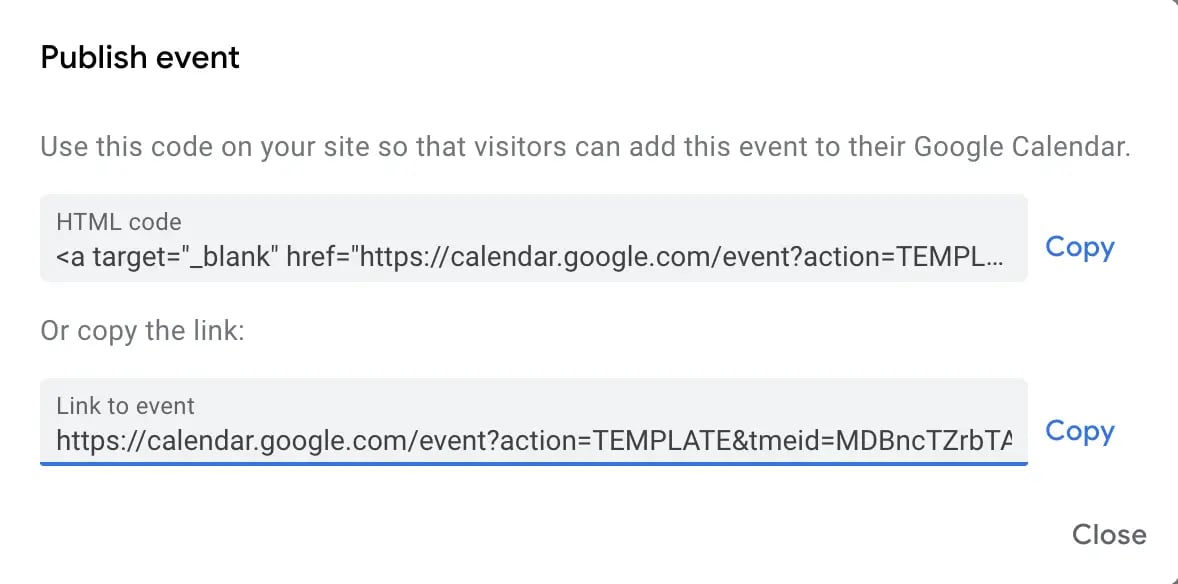
For the Gmail calendar, click “Edit” to open the event in a new window, and then select the “More actions” dropdown. From there, click “Publish event”: 

Screenshot of HubSpot Webinar (Gmail); how to send a calendar invite

In the pop-up screen, you’ll see an HTML code or a link to the event. Simply click “Copy” beside the link to copy the link, and then open the email you intend to send and paste the URL.

Gmail calendar publish event

You’ll want to ensure, however, that each email recipient has been included on the event invite list, as well. 

Apple Calendar

If you’re using Apple Calendar, alternatively, you’ll need to get a little more creative.

To workaround the option of sending the event to a recipient directly from the event details, simply send the event only to your own email. When you open the invite, you’ll see a .ics link attached to the email:

Screenshot of ics. link; how to send a calendar invite

Simply download the .ics attachment, and then drag-and-drop that calendar event into an email to send it to recipients. 

Outlook Calendar

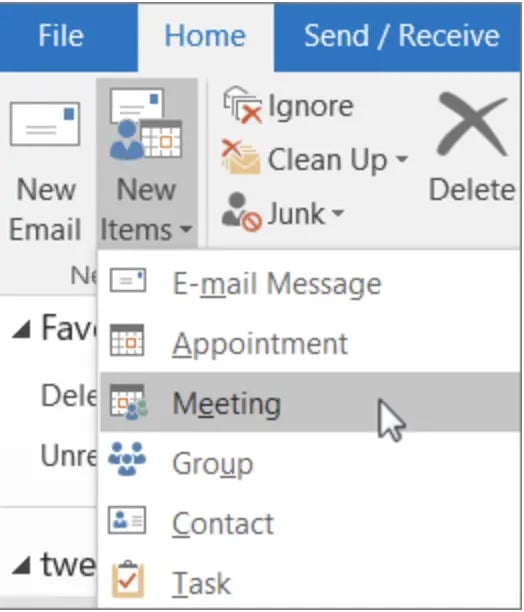
Finally, if you’re using Outlook, you’ll need to open your inbox and select “New Items” > “Meeting”:

Screenshot of meeting tab in Outlook; how to send a calendar inviteImage Source

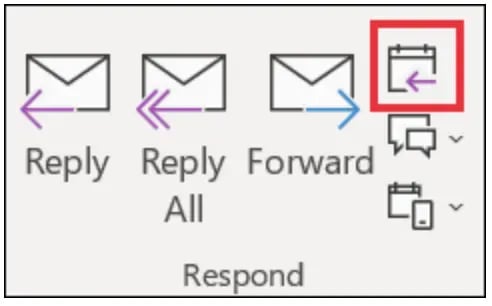
Click “New Meeting”, and finally, select “Reply with Meeting” from within the email itself: 

Screenshot of "reply with meeting' feature; how to send a calendar inviteImage Source

And that’s it! You’re all set. Use these tips to send marketing events to leads, prospects, and customers alike.

Take a look at The Ultimate Guide to Event Marketing to learn more about the types of events you might consider creating to engage and delight potential customers. 

Editor’s Note: This post was originally published in June 2014 and has been updated for freshness, accuracy, and comprehensiveness.

New Call-to-action


Categories B2B

The Ultimate Guide to SEO in 2023

SEO is why you find exactly what you’re looking for when you turn to Google for a step-by-step guide to fixing your unfortunately-timed flat tire.

It’s a harsh truth that without at least some presence on Google, your business faces a digital uphill battle. Most marketers know how important SEO is, and it’s one of the trends they’re investing the most in this year.

In this guide, you’ll learn what SEO is, discover a strategy to build your online presence — Search Engine Optimization (SEO) — and what you must do to position your site in search engine results.

→ Download Now: SEO Starter Pack [Free Kit]

Keep on reading to understand SEO, or jump ahead to the section that interests you most.


When asked to explain what SEO is, I often choose to call it a strategy to ensure that when someone Googles your product or service category, they find your website.

But this simplifies the discipline a bit.

There are a ton of ways to improve the SEO of your site pages. Search engines look for elements including title tags, keywords, image tags, internal link structure, and inbound links (also known as backlinks). Search engines also look at site structure and design, visitor behavior, and other external, off-site factors to determine how highly ranked your site should be in their SERPs.

With all of these factors taken into account, SEO primarily drives two things — rankings and visibility.

But before diving deeper, I want to note that many resources make SEO seem complex; they might even scare you away. I promise this guide isn’t like that. I’ll break SEO down into its most basic parts and show you how to use all of its elements to create a successful SEO strategy of your own.

Rankings

This is what search engines use to determine where to place a particular web page in the SERP. Rankings start at position number zero through the final number of search engine results for the query, and a web page can rank for one position at a time. As time passes, a web page’s ranking might change due to age, competition in the SERP, or algorithm changes by the search engine itself.

Visibility

This term describes how prominent a particular domain is in the search engine results. Lower search visibility occurs when a domain isn’t visible for many relevant search queries whereas with higher search visibility, the opposite is true.

Both are responsible for delivering the main SEO objectives – traffic and domain authority.

What’s the importance of SEO?

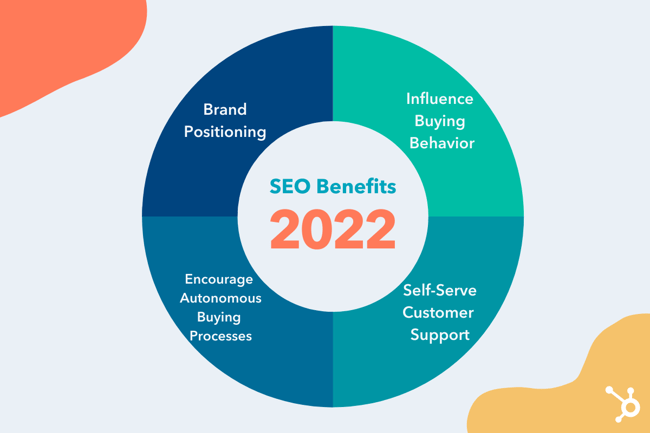
Why do seo? Four benefits of SEO in 2022

There is one more important reason why you should be using SEO: The strategy virtually helps you position your brand throughout the entire buying journey.

In turn, SEO can ensure that your marketing strategies match the new buying behavior.

Because, as Google admitted, customer behavior has changed for good.

As of July 2023, Google holds 92.08% of the worldwide search engine market share.

What’s more, they prefer going through the majority of the buying process on their own.

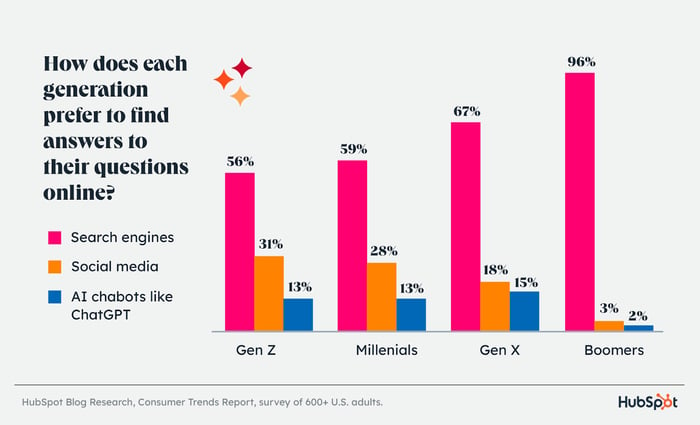
For example, 86% of consumers say search engines are the best way to get information. And, across all generations, people overwhelmingly use search engines to get answers online.

Image Source

Finally, DemandGen’s 2022 B2B Buyer’s Survey found that 67% of B2B buyers start the buying process with a broad web search.

But how do they use search engines during the process?

Early in the process, they use Google to find information about their problem. Some also inquire about potential solutions.

Then, they evaluate available alternatives based on reviews or social media hype before inquiring with a company. But this happens after they’ve exhausted all information sources.

And so, the only chance for customers to notice and consider you is by showing up in their search results.

Featured Resource

How does Google know how to rank a page?

Search engines have a single goal only. They aim to provide users with the most relevant answers or information.

Every time you use them, their algorithms choose pages that are the most relevant to your query. And then, rank them, displaying the most authoritative or popular ones first.

To deliver the right information to users, search engines analyze four main factors:

  • The meaning behind someone’s query, which is their most likely intent for starting a search, and how that intent matches the most helpful content.
  • Relevancy between the search query and the content on a page, and search engines assess it by various factors like topic or keywords.
  • Quality of content, which uses the E-E-A-T (we’ll discuss this further below) model to surface content that seems the most helpful based on signals like expertise, authority, and trustworthiness.
  • The usability of a site, which considers page speed, mobile friendliness, and other factors related to how easy it is to discover content on a site.
  • Context, which relies on a searcher’s past behavior and settings like location.

And to analyze all this information they use complex equations called search algorithms.

Search engines keep their algorithms secret. But over time, SEOs have identified some of the factors they consider when ranking a page. We refer to them as ranking factors, and they are the focus of an SEO strategy.

When determining relevance and authority, following the E-E-A-T framework can help tremendously. E-E-A-T in SEOstands for “expertise”, “experience,” “authoritativeness,” and “trustworthiness.” Here’s what each one means:

  • Expertise: You’re a subject matter expert.
  • Experience: You have personal experience with the content you write about.
  • Authoritativeness: Others see you as a source of authority, like other sites linking to your site and vouching for your credibility.
  • Trustworthiness: Your website and its content are credible and current.

Professionals who responded to our Web Traffic & Analytics ranked trustworthiness and expertise as the most important ranking factor for showing up in SERPs, followed by experience and authoritativeness.

As AI becomes a bigger part of the search mix, expertise and experience will become increasingly important for content writers looking to stand out from AI generated content, as algorithms don’t have the expertise to develop unique opinions or have the level of personality that a human expert has.

And although these are not direct ranking factors, they can improve your SEO content which can impact direct ranking factors. In fact, 65% of SEOs say that Google’s 2023 algorithm update (which included the updated E-E-A-T framework) had a positive impact.

As you’ll shortly see, adding more content, optimizing image filenames, or improving internal links can affect your rankings and search visibility. And that’s because each of those actions improves a ranking factor.

What is SEO strategy?

An SEO marketing strategy is a comprehensive plan to get more visitors to your website through search engines. Successful SEO includes on-page strategies, which use intent-based keywords; and off-page strategies, which earn inbound links from other websites.

Three Core Components of a Strong SEO Strategy

To optimize a site, you need to improve ranking factors in three areas — technical website setup, content, and links. So, let’s go through them in turn.

1. Technical Setup

For your website to rank, three things must happen:

First, a search engine needs to find your pages on the web.

Then, it must scan them to understand their topics and identify their keywords.

And finally, it needs to add them to its index — a database of all the content it has found on the web. This way, its algorithm can consider displaying your website for relevant queries.

Seems simple, doesn’t it? Certainly, nothing to worry about. After all, since you can visit your site without any problem, so should Google, right?

Unfortunately, there is a catch. A web page looks different for you and the search engine. You see it as a collection of graphics, colors, text with its formatting, and links.

To a search engine, it’s nothing but text.

As a result, any elements it cannot render this way remain invisible to the search engine. And so, in spite of your website looking fine to you, Google might find its content inaccessible.

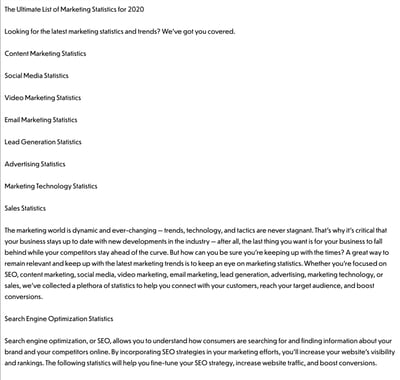
Let me show you an example. Here’s how a typical search engine sees one of our articles. It’s this one, by the way, if you want to compare it with the original.

The ultimate guide to marketing statistics in 2021 as a plain text version of the site that Google sees when crawling the site for SEO

Notice some things about it:

  • The page is just text. Although we carefully designed it, the only elements a search engine sees are text and links.
  • As a result, it cannot see an image on the page (note the element marked with an arrow.) It only recognizes its name. If that image contained an important keyword we’d want the page to rank for, it would be invisible to the search engine.

That’s where technical setup, also called on-site optimization, comes in. It ensures that your website and pages allow Google to scan and index them without any problems. The most important factors affecting it include:

Website navigation and links

Search engines crawl sites just like you would. They follow links. Search engine crawlers land on a page and use links to find other content to analyze. But as you’ve seen above, they cannot see images. So, set the navigation and links as text-only.

Simple URL structure

Search engines don’t like reading lengthy strings of words with complex structure. So, if possible, keep your URLs short. Set them up to include as little beyond the main keyword for which you want to optimize the page, as possible.

Page speed

Search engines use the load time — the time it takes for a user to be able to read the page — as an indicator of quality. Many website elements can affect it. Image size, for example. Use Google’s Page Speed Insights Tool for suggestions on how to improve your pages.

Dead links or broken redirects

A dead link sends a visitor to a nonexistent page. A broken redirect points to a resource that might no longer be there. Both provide poor user experience but also, prevent search engines from indexing your content.

Sitemap and Robots.txt files

A sitemap is a simple file that lists all URLs on your site. Search engines use it to identify what pages to crawl and index. A robots.txt file, on the other hand, tells search engines what content not to index (for example, specific policy pages you don’t want to appear in search.) Create both to speed up crawling and indexing of your content.

Duplicate content

Pages containing identical or quite similar content confuse search engines. They often find it to be nearly impossible to display any of those pages at all. If search engines do find them, your website can be penalized. For that reason, search engines consider duplicate content as a negative factor.

2. Content

Every time you use a search engine, you’re looking for content — information on a particular issue or problem, for example.

True, this content might come in different formats. It could be text, like a blog post or a web page. But it could also be a video, product recommendation, and even a business listing.

It’s all content.

And for SEO, it’s what helps gain greater search visibility.

Here are two reasons why:

  • First, content is what customers want when searching. Regardless of what they’re looking for, it’s content that provides it. And the more of it you publish, the higher your chance for greater search visibility.
  • Also, search engines use content to determine how to rank a page. It’s the idea of relevance between a page and a person’s search query that we talked about earlier.

While crawling a page, they determine its topic. Analyzing elements like page length or its structure helps them assess its quality. Based on this information, search algorithms can match a person’s query with pages they consider the most relevant to it.

The process of optimizing content begins with keyword research.

Keyword Research

SEO is not about getting any visitors to the site. You want to attract people who need what you sell and can become leads, and later, customers.

However, that’s possible only if it ranks for the keywords those people would use when searching. Otherwise, there’s no chance they’d ever find you. And that’s even if your website appeared at the top of the search results.

That’s why SEO work starts with discovering what phrases potential buyers enter into search engines.

The process typically involves identifying terms and topics relevant to your business. Then, converting them into initial keywords. And finally, conducting extensive research to uncover related terms your audience would use.

We’ve published a thorough guide to keyword research for beginners. It lays out the keyword research process in detail. Use it to identify search terms you should be targeting.

With a list of keywords at hand, the next step is to optimize your content. SEOs refer to this process as on-page optimization.

On-Page Optimization

On-page optimization, also called on-page SEO, ensures that search engines a.) understand a page’s topic and keywords, and b.) can match it to relevant searches.

Note, I said “page” not content. That’s because, although the bulk of on-page SEO work focuses on the words you use, it extends to optimizing some elements in the code.

You may have heard about some of them — meta-tags like title or description are two most popular ones. But there are more. So, here’s a list of the most crucial on-page optimization actions to take.

Note: Since blog content prevails on most websites, when speaking of those factors, I’ll focus on blog SEO — optimizing blog posts for relevant keywords. However, all this advice is equally valid for other page types too.

Featured Resource

a) Keyword Optimization

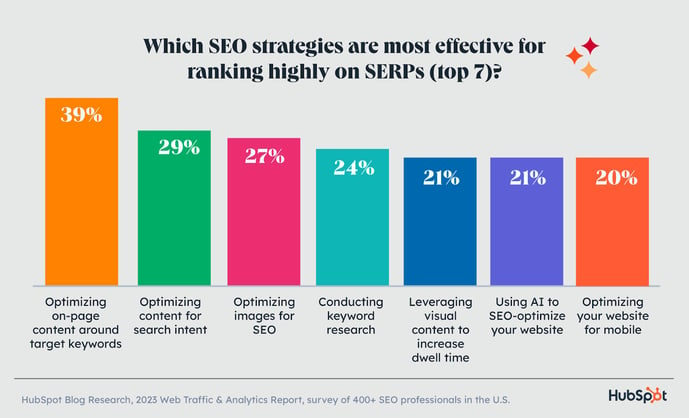
According to web analysts and SEO experts, optimizing your on-page content around target keywords is the most effective SEO strategy for ranking highly on SERPs.

optimizing for keywords

Image Source

For keyword optimization, first ensure that Google understands what keywords you want this page to rank. To achieve that, make sure you include at least the main keyword in the following:

  • Post’s title: Ideally, place it as close to the start of the title. Google is known to put more value on words at the start of the headline.
  • URL: Your page’s web address should also include the keyword. Ideally, including nothing else. Also, remove any stop word.
  • H1 Tag: In most content management systems, this tag displays the title of the page by default. However, make sure that your platform doesn’t use a different setting
  • The first 100 words (or the first paragraph) of content: Finding the keyword at the start of your blog post will reassure Google that this is, in fact, the page’s topic.
  • Meta-title and meta-description tags: Search engines use these two code elements to display their listings. They display the meta-title as the search listing’s title while the meta-description provides content for the little blurb below it. But above that, they use both to understand the page’s topic further.
  • Image file names and ALT tags: Remember how search engines see graphics on a page? They can only see their file names. So, make sure that at least one of the images contains the keyword in the file name.

The alt tag, on the other hand, is text browsers display instead of an image (for visually impaired visitors.) However, since ALT tag resides in the image code, search engines use it as a relevancy signal as well.

Also, add semantic keywords — variations or synonyms of your keyword. Google and other search engines use them to determine a page’s relevancy better.

Let me illustrate this with a quick example. Let’s pretend that your main keyword is “Apple.” But do you mean the fruit or the tech giant behind the iPhone?

Now, imagine what happens when Google finds terms like sugar, orchard, or cider in the copy? The choice of what queries to rank it for would immediately become obvious, right?

That’s what semantic keywords do. Add them to ensure that your page doesn’t start showing up for irrelevant searches.

b) Non-Keyword-Related On-Page Optimization Factors

On-page SEO is not just about sprinkling keywords across the page. The factors below help confirm a page’s credibility and authority too:

  • External links: Linking out to other, relevant pages on the topic helps Google determine its topic further. Plus, it provides a good user experience. How? By positioning your content as a valuable resource.
  • Internal links: Those links help you boost rankings in two ways. One, they allow search engines to find and crawl other pages on the site. And two, they show semantic relations between various pages, helping to determine its relevance to the search query better. As a rule, you should include at least 2-4 internal links per blog post
  • Content’s length: Long content typically ranks better. That’s because, if done well, a longer blog post will always contain more exhaustive information on the topic, thus keeping a reader on your site longer. That’s called dwell time, and it’s an important ranking factor for the search engines
  • Multimedia: Although not a requirement, multimedia elements like videos, diagrams, audio players can signal a page’s quality. It keeps readers on a page for longer just like longer content does. And in turn, it signals that they find the content valuable and worth pursuing.

3. Links

From what you’ve read in this guide so far, you know that no page will rank without two factors — relevance and authority.

In their quest to provide users with the most accurate answers, Google and other search engines prioritize pages they consider the most relevant to their queries but also, popular.

The first two areas — technical setup and content — focused on increasing relevance (though I admit, some of their elements can also help highlight the authority.)

Links, however, are responsible for popularity.

But before we talk more about how they work, here’s what SEOs mean when talking about links.

What is a backlink?

Links, also called backlinks, are references to your content on other websites. Every time another website mentions and points their readers to your content, you gain a backlink to your site.

For example, this article in Entrepreneur.co mentions our Not Another State of Marketing Report page. It also links to it allowing their readers to see other stats than the one quoted.

An example of a backlink from entrepreneur.com to HubSpot's Not Another State of Marketing Report

Google uses the quantity and quality of links like this as a signal of a website’s authority. Its logic behind it is that webmasters would reference a popular and high-quality website more often than a mediocre one.

But note that I mentioned link quality as well. That’s because not all links are the same. Some — low-quality ones — can impact your rankings negatively.

Links Quality Factors

Low quality or suspicious links — for example, ones that Google would consider as built deliberately to make it consider a site as more authoritative — might reduce your rankings.

That’s why, when building links, SEOs focus not on building any links. They aim to generate the highest quality references possible.

Naturally, just like with the search algorithm, we don’t know what factors determine a link’s quality, specifically. However, over time, SEOs discovered some of them:

  • The popularity of a linking site: Any link from a domain that search engines consider an authority will naturally have high quality. In other words, links from websites that have good quality links pointing to them will yield better results.
  • Topic relevance: Links from domains on a topic similar to yours will carry more authority than those from random websites.
  • Trust in a domain: Just like with popularity, search engines also assess a website’s trust. Links from more trustworthy sites will always impact rankings better.

Link Building

In SEO, we refer to the process of acquiring new backlinks as link building. And as many practitioners admit, it can be a challenging activity.

Link building, if you want to do it well, requires creativity, strategic thinking, and patience. To generate quality links, you need to come up with a link building strategy. And that’s no small feat.

Remember, your links must pass various quality criteria. Plus, it can’t be obvious to search engines that you’ve built them deliberately.

Here are some strategies to do it:

  • Editorial, organic links: These backlinks come from websites that reference your content on their own.
  • Outreach: In this strategy, you contact other websites for links. This can happen in many ways. You could create an amazing piece of content, and email them to tell them about it. In turn, if they find it valuable, they’ll reference it. You can also suggest where they could link to it.
  • Guest posting: Guest posts are blog articles that you publish on third-party websites. In turn, those companies often allow including one or two links to your site in the content and author bio.
  • Profile links: Finally, many websites offer an opportunity to create a link. Online profiles are a good example. Often, when setting up such a profile, you can also list your website there as well. Not all such links carry strong authority, but some might. And given the ease of creating them, they’re worth pursuing.
  • Competitive analysis: Finally, many SEOs regularly analyze their competitors’ backlinks to identify those they could recreate for their sites too.

Now, if you’re still here with me, then you’ve just discovered what’s responsible for your site’s success in search.

The next step, then, is figuring out whether your efforts are working.

How to Monitor & Track SEO Results

Technical setup, content, and links are critical to getting a website into the search results. Monitoring your efforts helps improve your strategy further.

Measuring SEO success means tracking data about traffic, engagement, and links. And though, most companies develop their own sets of SEO KPIs (key performance indicators), here are the most common ones:

  • Organic traffic growth
  • Keyword rankings (split into branded and non-branded terms)
  • Conversions from organic traffic
  • Average time on page and the bounce rate
  • Top landing pages attracting organic traffic
  • Number of indexed pages
  • Links growth (including new and lost links)

Local SEO

Up until now, we focused on getting a site rank in search results in general. If you run a local business, however, Google also lets you position it in front of potential customers in your area, specifically. But for that, you use local SEO.

And it’s well worth it.

46% of Google searches are for local businesses. They look for vendor suggestions, and even specific business addresses.

87% of consumers use Google to research local businesses. They look for vendor suggestions, and even specific business addresses.

But hold on, is local SEO different from what we’ve been talking about all along?

Yes and no.

Search engines follow similar principles for both local and global rankings. But given that they position a site for specific, location-based results, they need to analyze some other ranking factors too.

Even local search results look different:

  • They appear only for searches with a local intent (for example, “restaurant near me” or when a person clearly defined the location.)
  • They contain results specific to a relevant location.
  • They concentrate on delivering specific information to users that they don’t need to go anywhere else to find.
  • They target smartphone users primarily as local searches occur more often on mobile devices.

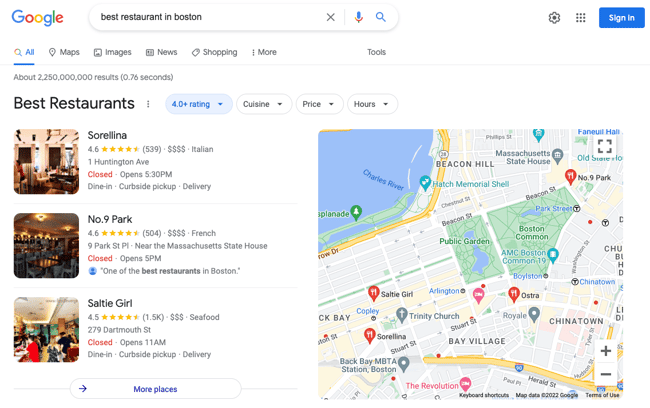
For example, a localpack, the most prominent element of local results, includes almost all information a person would need to choose a business. Here are local results Google displays for the phrase “best restaurant in Boston.”

Local SEO example of a localpack featured snippet in the SERP

Note that these results contain no links to any content. Instead, they include a list of restaurants in the area, a map to show their locations, and additional information about each:

  • Business name
  • Description
  • Image
  • Opening hours
  • Star Reviews
  • Address

Often, they also include a company’s phone number or website address.

All this information combined helps customers choose which business to engage. But it also allows Google to determine how to rank it.

Local Search Ranking Factors

When analyzing local websites, Google looks at the proximity to a searcher’s location. With the rise of local searches containing the phrase, “near me,” it’s only fair that Google will try to present the closest businesses first.

Keywords are essential for local SEO too. However, one additional element of on-page optimization is the presence of a company’s name, address, and phone number of a page. In local SEO, we refer to it as the NAP.

Again, it makes sense, as the search engine needs a way to assess the company’s location.

Google assesses authority in local search not just by links. Reviews and citations (references of a business’s address or a phone number online) highlight its authority too.

Finally, the information a business includes in Google My Business — the search engine’s platform for managing local business listings — plays a huge part in its rankings.

The above is just the tip of the iceberg. But they are the ones to get right first if you want your business to rank well in local search.

What is black hat SEO?

The final aspect of SEO I want to highlight to you is something I also hope you’ll never get tempted to use. I mean it.

Because, although it might have its lure, using black hat SEO typically ends in a penalty from search listings.

Black hat practices aim at manipulating search engine algorithms using strategies against search engine guidelines. The most common black hat techniques include keyword stuffing, cloaking (hiding keywords in code so that users don’t see them, but search engines do), and buying links.

So, why would someone use black hat SEO? For one, because, often, ranking a site following Google’s guidelines takes time. Long time, in fact.

Black hat strategies let you cut down the complexity of link building, for example. Keyword stuffing helps users to rank one page for many keywords, without having to create more content.

But as said, getting caught often results in a site being completely wiped out from search listings.

And the reason I mention it here is that I want you to realize that there are no shortcuts in SEO. And be aware of anyone suggesting strategies that might seem too good to be true.

Doing SEO Yourself

Be honest with yourself — are you interested in learning SEO? Do you have time to learn the basics? Do you have the resources to bring in help if you redesign your website and accidentally deindex several pages? If the answer to any of these questions is “no,” then you might not want to take on the responsibility of SEO yourself. SEO is a long term play, and just like a muscle, you have to work at it consistently to see results. That can take a substantial amount of commitment. If you have any doubts, try the next best thing — delegating the work.

However, learning about the process and becoming an SEO expert makes you well-equipped to create content because you’ll know exactly what matters most. And there is a wide variety of SEO tools out there that will help you throughout the process.

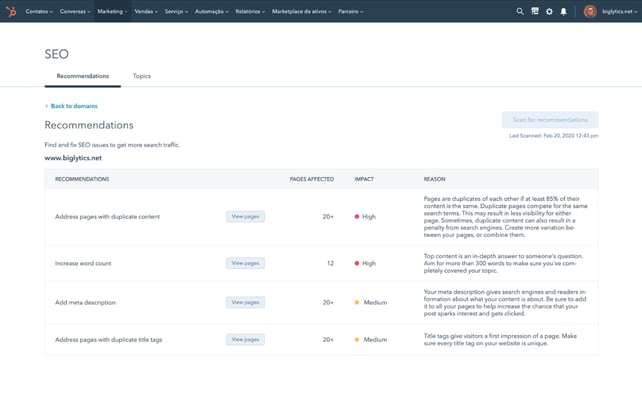
For example, HubSpot’s SEO Marketing Software includes tools that help you optimize your content and execute your SEO strategy. You’ll get a list of issues to fix ranked based on importance and detailed insight into why those issues matter to prepare you for the future.

hubspot seo marketing software

Get started with HubSpot’s SEO Marketing Software

Nowadays, 50% of writers also use AI SEO tools to boost content performance, and 65% of web analysts say it helps their pages rank higher in SERPs. Bloggers also say AI tools are highly effective at helping them align their web content with search intent (which hits on two of the four factors used to rank pages JUMP LINK)

Delegate SEO to a Team Member

If you’re not quite sure about taking on SEO yourself, consider delegating the work to a team member. If you have a person who’s interested in growth marketing, development, or even web design, this would be a valuable skill to help grow their career. You could also hire a full-time search engine optimization specialist if you have the budget.

The person in this role can report to the marketing team, development team, or even design team. Because SEO touches nearly every function of a business while maintaining a unique set of skill requirements, this position won’t be subject to frequent changes if departments need to be restructured later on. The person you delegate to this job will contribute cross functionally more often than not, so you’ll have some liberty with managing them.

Outsource SEO to an Agency

You don’t have the interest in SEO, your team’s at full capacity, and you can’t spare the budget to fill a full time SEO role. Now what? The best bang for your buck is to outsource SEO to a reputable consultant. Why? First, a well-respected SEO consultant is highly skilled in bringing organic traffic, leads, and conversions to businesses. They do this day in and day out, so they won’t need the ramp up time that you or a member of your team would need in order to learn the basics.

Second, a consultant can be less expensive than hiring someone full-time for the role because they don’t require insurance benefits, payroll taxes, etc. But how much exactly would you be looking at for outsourcing your SEO?

SEO can cost between $100 and $500 per month if you do it yourself with a keyword research tool. It can cost between $75 and $150 per hour for a consultant, and up to $10,000 per month if you hire a full-service marketing agency. Small businesses generally spend less on SEO than big brands, so be sure to take that into account.

Incurring SEO costs can mean one of two things: the investment in your organic search strategy, or how much you pay for paid search engine marketing (SEM) services like Google Ads. If you’re paying for a tool, consultant, or marketing agency to help you optimize your web content, your bill can vary wildly with the depth of the services you’re receiving.

SEO Resources & Training

This guide is just a starting point for discovering SEO. But there’s much more to learn.

Here are online training resources to try next if your or someone on your team wants to take on this skill:

You can also pick SEO knowledge from industry experts and their blogs. Here are some worth reading:

Over To You

Without actively positioning its content in search results, no business can survive long.

By increasing your search visibility, you can bring more visitors, and in turn, conversions and sales. And that’s well worth the time spent becoming an expert in SEO.

marketing

Categories B2B

8+ Presentation Skills Every Marketer Needs

Marketers play a crucial role in attracting customers and driving success for their brands. And today, presentation skills are a key tool in your marketing toolbox.

Strong presentations help you better communicate and make an impression on your audience.

Whether you‘re a seasoned professional or a budding marketer eager to make a lasting impact, there’s always room to improve.

We’ll explore eight essential presentation skills that allow you to stand out, tips for leveling up, and examples of some of our favorite presentations. Let’s dive in.

→ Free Download: 10 PowerPoint Presentation Templates [Access Now]

What are presentation skills?

8 Effective Presentation Skills

How to Improve Your Presentation Skills

Top-Notch Presentation Examples

What are presentation skills?

Presentation skills enable marketers to effectively convey information, ideas, and messages to their audience. That may be a group of potential clients, colleagues, stakeholders, or the public.

These skills encompass techniques that help marketers engage, inspire, and influence their listeners, leaving a lasting impact.

A well-developed set of presentation skills empowers you to communicate your thoughts with clarity and conviction. It goes beyond just conveying data or facts.

Presentation skills involve artfully crafting a narrative and using various tools to captivate the audience. This keeps listeners engaged and persuades them to take the desired action.

Keep reading to see some of the most effective presentation skills you can develop.

8 Effective Presentation Skills

1. Clarity

Say what you mean and mean what you say. When presenting, you don’t have to leave anything up to interpretation. Pick action words and be clear with what you’re saying.

2. Conciseness

Being able to cut down on your presentation is a skill within itself. You should be able to cull down what you want to say, leave room for questions, and not pack too much information into your presentation that you begin to bore your audience.

3. Creativity

In the same vein of not boring your audience, you want to find ways to bring your creativity into your presentation.

This could mean thinking of new and exciting ways to present your information, whether through exciting animation, riveting personal anecdotes, or even finding a way to integrate videos into your presentation.

4. Focus

Staying on topic is crucial to giving a good presentation. Honing the skill of focus allows any presenter to stay on track with what they’re saying and for the audience to follow along.

5. Pacing

Understanding your pacing is an important skill to hone so you don’t rush through your presentation. Knowing when you should take breaks and slow down will take time to practice, but it’s helpful to know.

6. Humor

Keeping parts of your presentation light is a skill you can hone in on, and humor can make it more engaging.

Add a few jokes to your presentation where appropriate, and pause for light-hearted moments to keep your audience engaged.

7. Balance

Interesting and engaging presentations strike a balance between humor and seriousness. What does this balance look like for you and your presentation? Finding it is a skill in itself.

8. Confidence

When it all comes down to it, what you’re saying won’t matter if you, above all else, don’t believe it. The audience will follow you with your expertise and manner of speaking as long as you believe in yourself.

These skills take time to develop and can only improve your presentations. In this next section, we take you through the steps and ways to improve your presentation skills.

How to Improve Your Presentation Skills

Listing presentation skills is easy. Mastering them so you can wow a crowd requires more effort. Below, we’ll explore best practices that can help you make the most of your presentations.

Remember: When it comes to presenting, practice makes perfect. The more you get in front of a crowd and speak, the better you will be.

1. Take your time.

Understanding your pacing is a good way to improve your presentation skills. When you’re working through an upcoming presentation, time yourself going through your material.

Are there places where you’re rushing or dragging through your presentation? Here is a good place to work your timing out.

2. Relax your shoulders.

Body language is an unconscious way to communicate whether or not you’re comfortable. Understanding where your tension points are can help you relax during your presentation.

Run through your presentation at home and note how your body feels. Do you notice any tension in your body? Once you know where you’re holding the stress, it’s easier to take action and relax.

Consider quickly stretching or shaking out the tension before you take the stage.

3. Practice.

There is no better way to feel comfortable during your presentation than having run through it many times. This way, you can understand your pacing, places to slow down, and places to take breaks.

The more you know the material you will say, the more confident you will seem.

See if a friend or family member can be your practice audience. They can also give you notes on your delivery.

4. Annunciate.

In the vein of practice, you should work on sounding out your words to add extra clarity. This will allow for a better experience for those listening to you and reduce the opportunity for miscommunication.

Notice that you have a few specific troublesome phrases. See if you can replace them with something simpler. If you have note cards, you can also write out tricky words or names phonetically. You can reference your write-up if you stumble.

5. Figure out where to take breaks.

Holding attention during your presentations isn’t about rushing through your material as fast as possible.

Go through your presentation and find spots where you take a sip of water, where you would anticipate laughter, and where you take a second to breathe.

6. Figure out what you can cut.

This is where the conciseness comes in. There might be sections of your presentation that can be cut, places where the information might drag. Take a critical eye and see where to make it tighter and more engaging.

Time yourself to see how long your presentation is supposed to be.

7. Say what you mean.

Clarity is an important skill to have when you’re presenting. Here, you should think critically about what you’re saying and how you’re saying it. Avoid hyperbole when possible.

Always say what you mean, and mean what you say. Your audience will value the accuracy of your words.

8. Be a storyteller.

To engage your audience, weave storytelling into your presentation — more than 5 in 10 people believe stories hold their focus during a presentation.

Consider including a case study or user persona as a throughline during your talk. You could also develop a clever metaphor to explore throughout your presentation.

For example, you could compare your sales team to a group of loyal knights on a quest to share the value of your brand.

9. Memorize structure, not words.

Memorizing your whole talk may seem like a good idea. However, trying to deliver a presentation word-for-word is a mistake. If you forget or stumble on one memorized word, you may interrupt your whole flow.

Repeating every word from memory may also sound stilted to your listeners.

While you don’t want to wing your whole presentation, you also don’t want to seem like you’ve memorized every single word. Instead, memorize the structure of the presentation.

Get comfortable saying the different parts of your talk in many ways.

10. Present slowly and pause frequently.

When you get nervous, you talk faster. To combat this, remember to slow yourself down when practicing.

Place deep pauses throughout your presentation, especially when transitioning between slides, as it gives you time to breathe and your audience time to absorb.

11. Focus on actionable takeaways.

When you start your presentation, you have your audience’s attention. Now is your chance to hook them on what you have to say. A simple overview can be boring.

If you start with too comprehensive of a summary, your audience may feel like they already heard it all and check out.

Instead, focus on what listeners will get from the presentation. What are the actionable takeaways they will leave with? Then, at the end of the talk, you can leave them with actionable steps of what to do next.

12. Get comfortable with technology.

You might use a slide deck in your presentation or set it up over Zoom. To feel more confident when you’re presenting, practice with your specific tech stack in advance.

Familiarize yourself with both the software and hardware involved in your chat. For example, you’ll want to know your conferencing platform and practice setting up a second monitor.

13. Think about movement.

Are you someone who likes to walk and talk? Are you expressive with your hands? Think about how you want to move during your presentation and the space you’ll be in.

Feeling comfortable with your movement can help the flow of the presentation.

14. Ask for feedback.

You will never deliver the perfect presentation, so ask for feedback. Talk to your managers about where you could improve. Consider surveying your audience for an unbiased look into your presentation skills.

You’ll hear about what you can improve specifically in the future. This will help you improve overall.

15. Learn from other presentations.

As mentioned above, learning from past presentations is a good way to improve your presentation skills.

You may not remember every excellent presentation you’ve sat through, so we’ve pulled together a list of ones that we like. You can reference these talks and see critical skills in play.

Just as reading can make you a better writer, watching good presentations can help make you a better presenter.

Here are some examples of presentations we like because we use what we discuss in the paragraphs above, including good timing, thoughtful presentation of materials, and creativity.

Top-Notch Presentation Examples

1. Elizabeth Gilbert: Your Elusive Creative Genius

You may not know Elizabeth Gilbert by name, but you’ve likely heard of her book Eat, Pray, Love. In this presentation, Gilbert discusses how anyone can be a genius. All you have to do is get out of your way and unlock your own creativity.

What we like: Gilbert weaves humor, lightness, and focus throughout her presentation. Viewers will enjoy her take on creativity, be able to follow her pace, and have actionable takeaways. At the end, listeners leave inspired.

2. Manoush Zomorodi: How Boredom Can Lead to Your Most Brilliant Ideas

As the host of “Ted Radio Hour,” Manoush Zomorodi is a professional presenter. During this presentation, she discusses how boredom can help you discover creativity.

Only during moments of stillness do we become restless and unlock brilliance.

What we like: The hook of the topic brings us in — everyone wants to understand how to make great ideas. However, the presenter and her dynamic energy keep us engaged. Zomorodi uses audio clips to break up the monotony.

She knows where to pause and brings in appropriate visual aids.

3. James Cameron: Before Avatar … A Curious Boy

James Cameron, the esteemed director, knows a thing or two about storytelling. But before he created Avatar and directed Titanic, he was just a kid like everyone else.

During this presentation, Cameron discusses how his curiosity at a young age has propelled him forward.

What we like: This talk is personal, personable, and targeted for his audience to walk away with actionable steps and inspiration. Cameron also has a grasp of his body language. He moves fluidly on stage, even without visual aids.

4. Luvvie Ajayi Jones: Get Comfortable With Being Uncomfortable

Unsure of whether you should speak your mind? In this presentation, activist Luvvie Ajayi Jones shares three questions to ask yourself if you’re considering making waves.

She encourages us to get used to discomfort in order to move the needle and make a change.

What we like: The hook “I’m a Professional Troublemaker” brings us right into the action. The audience is left with questions and an interest in what she’s going to say next.

This talk is memorable, inspirational, and funny at times, striking the important balance we discussed earlier in this article. Audiences will hold onto “In a world that wants us to whisper, I choose to yell” for years to come.

Practice Makes Perfect

Mastering presentation skills is an essential asset for professionals in every field. Effective delivery and engagement are key factors that determine if your words make an impact.

By utilizing techniques such as clear messaging, compelling visuals, and dynamic delivery, you can captivate your audience and leave a lasting impression.

Blog - Beautiful PowerPoint Presentation Template [List-Based]

Categories B2B

The 22 Best Video Editing Apps for 2023

Using a video editing app is critical for creating a winning video marketing strategy. And if you’re reading this blog post, chances are you already know you should incorporate more video content into your marketing, especially after the rise of remote work.

But like most new strategies, you’ll need to prove its ROI before you get a budget. And that can be tricky because to make a great video, you need a few things — like a camera and editing software. You might already have a high-quality camera built into your smartphone, but editing your raw footage and preparing it for publication requires a third-party mobile app. You might even need to hop on the computer for the more extensive post-production projects.

→ Access Now: Video Marketing Starter Pack [Free Kit]

The good news: There are several free and inexpensive video editing apps you can download that run the gamut from super simple to Hollywood-level powerful. In this post we will delve into the best video apps for every device and click one of the links below to jump to a specific type of app, or keep reading to learn about them all.

What are the best video editing apps?

Every editing app will be different, but there are a few features you’ll want to look for. Because most apps will have a free and paid version, it’s important to know what’s essential and what might be worth an upgrade.

Editing Apps for Videos: Standard Features

For every video app whether paid or free, it will include:

  • Scrubbing through video as you edit.
  • Choosing an aspect ratio that fits with your target platform (Instagram, Youtube, Facebook, TikTok, etc.).
  • Adding text and shapes along with professional transitions throughout the shots.
  • Exporting video with at least 480p quality with high definition exports up to 4k.
  • Adding music to the video via stock music or your library.

The following solutions can help you make video magic — whether your video is meant for Instagram, YouTube, or a similar channel where your audience is hungry for content. Some tools may even offer premium or extra features like video asset management, graphic design tools, and more.

Instagram Video Editing Apps

The following apps allow you to edit and quickly upload beautiful videos to Instagram. None of these apps are limited to Instagram but are known for their support of this social network.

1. Magisto

Price: Starts at free | Platforms: iOS, Android, Online

Best Video Editing Apps for Instagram: Magisto

Image Source

Video automation is here — in the form of the Magisto video editor.

Owned by Vimeo, Magisto allows you to make incredible videos without ever leaving your smartphone in three easy steps: First, you‘ll choose your video editing style (the type of story you’re telling), then you‘ll choose the photos and video clips you’d like included, and lastly, you‘ll pick your music from Magisto’s built-in music library.

Using artificial intelligence (AI), this intuitive app helps organize your footage in a video that best delivers the message you have in mind. Why not stop at the free version? Upgrade to Premium or Professional for a small monthly fee and make longer movies with more of your own content.

Pros

  • Easy-to-use templates for hassle-free creation
  • Intuitive, beginner-friendly interface
  • Online version available for creating both on Windows and macOS laptops
  • Professional and Business plans come with a free Vimeo Pro subscription

Cons

  • The “Created with Magisto” watermark will be visible unless you upgrade to premium
  • No multi-track editing or 4K exporting
  • Ideal for very short social media videos (< 3 minutes long)
  • Stock videos are only accessible with a Professional plan

2. Wondershare Filmora

Price: Starts at free on mobile | Platforms: iOS, Android, macOS, Windows

Best Video Editing Apps for Instagram: Wondershare FilmoraImage Source

Wondershare Filmora (formerly Wondershare Video Editor) is the perfect option if you want to start with basic video editing functionality with the opportunity to get more advanced as you go. The app is perfect for Instagram but can create audience-ready videos for numerous platforms.

Filmora is available for Windows and Mac computers, whereas the company’s FilmoraGo mobile app is free to download for both iOS and Android devices.

Filmora’s “Easy Mode” strips away the complexity so you can drag and drop video clips, add some music, and produce a finished video in a matter of minutes. The FilmoraGo app has many of these features, plus an Effect Store where you can incorporate preset intros, themes, and transitions into your video creation.

Sounds too good to be true? Well, you’re right: The free version of Wondershare Filmora adds a watermark to your videos that you can only remove through upgrading to their paid service.

Pros

  • This app is a powerful option for both beginner and advanced video editors.
  • The desktop version offers multi-track editing and more traditional video editing capabilities.
  • The mobile version includes easy-to-use effects, stickers, and filters.
  • You can layer music and different sounds in the mobile app.
  • Relatively affordable (starting at less than $50 per year for Filmora X, and free for the mobile app) compared to competitors such as Adobe.

Cons

  • The desktop apps are not free, but a trial is available.
  • Videos are watermarked with the Wondershare branding unless you upgrade to a premium plan.

3. InVideo

Price: Starts at Free | Platforms: iOS, Android

Best Video Editing Apps: InVideoImage Source

If you’ve already got a script to work with, InVideo just might be the best option for quickly uploading Instagram videos. This platform comes with over 5,000 templates to choose from, 8M stock images, and music — but where InVideo really shines is its AI tools.

Not only can you use it to generate a script, if you already have one, you can take advantage of its AI text-to-video tool. This feature allows you to create videos based on the script you upload. Like Wondershare, the free version adds a watermark to your videos.

Pros

  • The AI tools save users time creating videos.
  • You can upload your own music or use its royalty-free options.
  • Comes with step-by-step tutorials for creating videos for YouTube and Instagram.
  • This app is easy to use for beginners.

Cons

  • Can’t export videos with the free version but you can share a link.
  • Script-to-video media suggestions aren’t always the perfect match, so you’ll need to make adjustments.

4. InShot

Price: Starts at free | Platforms: iOS, Android

There are times when you just want to edit a video — no fancy collages and no splicing. For that, there‘s InShot, a handy app that lets you trim, speed up, or add music and filters to video. It’s pretty fundamental, but with that comes a high ease of use. You can also add a background if you like, though we think it’s pretty cool to have an overlap of images — like we did with the video above.

I took a simple video of a tranquil beach scene, but enhanced it with InShot’s “warm filter” and added a fitting musical track to it — a song called “Pikake Stream,” by Kalani. (I recommend viewing the video in its entirety with headphones, especially if you’re having a stressful day.)

Pros

  • It’s a great app for beginners and marketers who don’t have a lot of time for intensive video editing.
  • Built-in music library with royalty-free options.
  • You can add voice-overs and your music.
  • The app has a 4.8-star rating on the Apple Store and over 1M ratings.

Cons

  • There’s no desktop app available.
  • Filters and stickers are only available with a paid subscription.
  • Your video will be watermarked unless you upgrade to the paid version.

best-video-editing-apps_3


Top Free Video Editing Software

The following tools are the most versatile mobile apps of all the free software listed in this article.

1. WeVideo

Price: Starts at free | Platforms: iOS, Android, Chrome OS

Top Free Video Editing Software: WeVideo

Image Source

Cloud-based video editing software (i.e., software that you access via a browser instead of downloading directly to your hard drive) is growing more and more popular. One of the programs leading the charge is WeVideo.

WeVideo offers some advanced features and functionality, including audio editing capabilities, a library of commercially licensed music, and the ability to share videos in 4K resolution. However, the free version of WeVideo isn’t without its limitations.

One major downside is that you‘re only given 10GB of cloud storage. If you’re making a one-off video, this is fine. But if you‘re planning to edit multiple videos, you’ll need more space. The free version also puts a WeVideo watermark on your videos, which isn’t ideal.

WeVideo is also available as a desktop computer product and comes with free and paid plans. For a complete breakdown of the differences between these plans, check out WeVideo’s pricing page.

Pros

  • You can access your videos from any device
  • Paid versions are relatively cheap (starting at $4.99 for the Power version)
  • 4K exporting available

Cons

  • Only 10GB of storage and 5 minutes of published video are available on the free version
  • The maximum resolution is 480p on the free subscription
  • Your video will be watermarked with WeVideo’s branding unless you upgrade

2. Splice

Price: Free | Platforms: iOS

Splice allows you — as the name suggests — to splice together different video clips on your phone to create a moving collage.

We had a lot of fun playing with this one, especially since Splice even contains a library of musical tracks that can be used as a background for your finished product. You can also use the app to trim and edit the different pieces of video and customize transition lengths from one scene to the next.

My colleague, Amanda Zantal-Wiener, experimented with Splice by compiling the above 15-second video of her dog — using only an iPhone 6.

Pros

  • Easy and intuitive to use
  • Familiar user-friendly interface
  • Multi-track and timeline editing with layers and masks
  • No sign-in required
  • No watermark, even for free subscribers

Cons

  • Subscription starts at $2.99/week, or $12.97/month, which is pricier than other alternatives
  • Effects and music are only available for paid subscribers

3. Adobe Premiere Rush

Price: Free | Platforms: iOS, Android

Top Free Video Editing Software: Adobe Premiere Rush

Image Source

Adobe‘s popular video editor, Premiere, isn’t just available on your mobile device — it’s free.

Melissa Stoneburner of Examiner.com calls this app a “gateway” into the full Adobe Premiere Pro video editor for desktop, and we can see this for ourselves. Similar to Magisto (the first video editor on our list), Adobe Rush automatically sets your video to the music of your choice (using Premiere Rush’s library or your own), and offers a Freeform editor that allows you to customize your edits further after this initial audio sync.

Premiere Rush‘s equally robust video editing features help you trim, drag, and drop multiple video and image clips — right from your mobile device’s photo and video album — in the order you’d like.

Then, just add proper lighting, manipulate the speed of the video, and share your final product directly on Facebook, Twitter, or YouTube.

Pros

  • It’s a natural choice for current Adobe users.
  • Premiere rush offers a familiar video editing interface for those with experience and an easier learning curve for beginners.
  • The paid version supports 4K exports.

Cons

  • Some users report exporting and crashing issues on the Android version.
  • Limited storage capabilities (<100GB) for free users

4. PicPlayPost

Price: Free | Platforms: iOS, Android

We‘ve already covered the coolness of photo collages. But what if you could make a video collage? PicPlayPost is a simple app that lets you do exactly that. Just remember that the sound from both videos will play at the same time, so be sure they won’t clash with one another.

There are many uses for a video collage app, but my colleague, Lindsay Kolowich, particularly likes the way fitness professional Melissa Made uses it on her Instagram account. She posts video collages with her performing a workout on one side, while she explains the workout out loud on the other.

Pros

  • You can create alternative formats such as gifs and live photos
  • 4K exporting available

Cons

  • Most valuable features are available on the paid version only
  • You can’t paste text from another app
  • Video will be watermarked with the PicPlayPost branding unless you upgrade

Best Video Editing Apps for YouTube

Although the video editing services below do not offer mobile versions, they do offer easy-to-learn functionality at minimal cost. These apps are the best for sitting down at your computer and editing amazing video content for your YouTube channel.

1. Blender

Price: Free | Platforms: Windows, macOS, Linux

Best Video Editing Apps for YouTube: Blender

Image Source

The open-source program Blender is more than just a video editor: It’s a full-blown 3D animation suite, which allows for modeling, rendering, motion tracking, and more.

On the video editing side, there are a ton of features, including transitions, speed control, filters, adjustment layers, and more. There are also 32 slots available for adding video clips, audio clips, images, and effects, which means you can produce some incredibly complex video.

For the amateur video editor, all the options can be a bit overwhelming. But if you’re looking to produce truly professional-quality video — without having to deal with watermarks — Blender is a solid option. The best part: “You are free to use Blender for any purpose, including commercially or for education,” according to its website. For the fine print, check out its licensing info.

Pros

  • Blender has a long history of use across multiple platforms.
  • You can render, model, sculpt, and animate using this app.

Cons

  • There’s a steep learning curve for beginners.

2. Lightworks

Price: Free | Platforms: Windows, Mac, Linux

Best Video Editing Apps for YouTube: Lighthouse

Image Source

Like Blender, Lightworks is definitely on the more advanced (and powerful) end of the video editing software spectrum. In fact, it‘s a program that’s been used to edit some well-known and award-winning films, including Pulp Fiction, The Wolf of Wall Street, and The King’s Speech.

There are two different licenses you can choose from with Lightworks: “Free” and “Pro.” (The latter of which, as you might have guessed, requires that you cough up some cash.) The main difference between the two licenses is that the Pro version offers more features, including stereoscopic output and advanced project sharing. But the free version is still quite powerful, providing 100+ effects and supporting multicam editing.

Pros

  • Like Blender, Lightworks has a long history of use across multiple platforms.
  • You can access royalty-free videos and audio from the desktop app.
  • You can export up to 4K.
  • Multi-track editing and timelines, even in the free version.
  • You can buy a lifetime license for $437.99 and never worry about renewing a subscription.

Cons

  • There’s an extremely steep learning curve for beginners.
  • Limited options for creating titles and subtitles.
  • Users have reported formatting issues when importing video clips.

3. Movavi

Price: Free | Platforms: Windows, macOS

Best Video Editing Apps: Movavi

Image Source

If you are a novice in video making, the Movavi Video Editor is a nice option for beginners who are just starting out. This software provides a simple, intuitive interface as well as powerful video editing tools that make it easy to add titles, filters, transitions, and effects packs.

At Movavi Video Editor, you have the choice between two modes of video creation: automatic and manual. The automatic mode allows you to create personalized, themed movies in just five easy steps. Upload your photos and videos, choose a template from the collection provided, add a soundtrack, preview your video, and export it in any format you desire or share it directly online.

Manual mode offers a multi-track editing space where you can add up to 99 tracks for video, audio, and titles. The timeline is customizable for more accurate editing, and the drag-and-drop controls make it easy to maneuver and customize each element.

Pros

  • Chroma-key, synchronization, sound autocorrect, keyframing, and motion tracking.
  • Video rendering speed and 4k processing

Cons

  • Watermark with a free version.
  • The trial version has functional limitations and is available for 7 days only.

4. Shotcut

Price: Free | Platforms: Windows, macOS, Linux

Best Video Editing Apps for YouTube: Shotcut

Image Source

Shotcut is another open-source video software — and it‘s completely free. It’s possible to use Shotcut to create professional-looking videos, but the interface is tricky to use. Perhaps that’s because it was originally developed for the Linux platform, which looks and feels a lot different from the typical Windows or Mac UX.

With dedication — and time spent in the Shotcut frequently asked questions and how-to guide sections — it’s possible to use this software to create and export high-quality videos, completely for free.

Pros

  • It’s completely free—you never have to upgrade, ever.
  • The diverse list of features rivals those of paid apps.

Cons

  • Shotcut could be difficult to get the hang of at first.
  • Some users find the UI difficult to navigate.
  • It’s less intuitive compared to other apps such as Premiere Pro and FinalCut, even for experienced editors.

5. VSDC Free Video Editor

Price: Free | Platforms: Windows Only

Best Video Editing Apps for YouTube: VSDC Free Video Editor

Image Source

In experienced hands, the VSDC Free Video Editor can produce professional-looking videos. In addition to supporting nearly every major video format, the program offers advanced video effects, including object transformation and color correction, as well as advanced audio effects like volume correction and sound normalization. And unlike WeVideo, the VSDC Free Video Editor is truly free. You can use the program’s full feature set without having to deal with pesky watermarks.

Unfortunately, there is one catch. If you want technical support, you need to pay. (And because there is a bit of a learning curve, there‘s a good chance you’ll need assistance.) Support for the VSDC Free Video Editor costs $9.99 for one month and $14.99 for one year.

Pros

  • The free version is packed with typically premium features such as masking, blending modes, and 4K exports.
  • You can share your video directly from the app to YouTube, Vimeo, and other platforms.

Cons

  • You have to pay for support if you’re using the free version.
  • Not as user-friendly as other alternatives.
  • Users have reported a steep learning curve.

6. Machete Video Editor Lite

Price: Free | Platforms: Windows Only

Best Video Editing Apps for YouTube: Machete Video Editor Lite

Image Source

At the simple end of the spectrum is Machete Video Editor Lite, a free program allowing you to cut, copy, and paste different sections of video. As the Machete website puts it, Video Editor Lite was “designed for quick and simple ‘slicing’ of your video files.”

The program‘s intuitive interface means you won’t have to waste time shuffling through technical support documents. And because Video Editor Lite doesn‘t re-encode your video files when you slice them, you don’t have to worry about losing video quality.

The main downsides to the program? It only supports the AVI and WMV video formats, and it doesn‘t allow for audio editing. Still, if you have zero video editing experience and only need to make simple edits, it’s a great option.

Pros

  • This app offers simple but powerful slicing and editing capabilities.
  • It’s an incredibly simple and user-friendly interface; simply download and go.

Cons

  • You can only export AVI and WMV files.
  • You can’t edit or replace the audio.
  • The website is outdated with limited support documents.

7. Avidemux

Price: Free | Platforms: Windows, macOS, Linux

Best Video Editing Apps for YouTube: Avidemux

Image Source

Like Machete Video Editor Lite, Avidemux allows you to do basic video editing (no audio editing) without having to worry about losing video quality. But Avidemux also has a few more tricks up its sleeve.

For starters, the program supports multiple video formats, including AVI, DVD, MPEG, QuickTime, and MP4. What’s more, Avidemux comes with several filters that allow you to perform a host of different functions, from flipping and rotating clips, to adding subtitles, to adjusting colors and brightness levels.

And while the learning curve for Avidemux is slightly steeper compared to Machete Video Editor Lite, the upside is that there’s an extensive Avidemux wiki that covers everything you need to know.

Pros

  • Supports multiple file formats such as AVI, MPEG, MP4, and Microsoft’s proprietary ASF
  • Simple interface that’s best for tasks such as cutting and splicing footage
  • Easy learning curve; simply download and start using

Cons

  • Limited capabilities compared to other apps (especially mobile apps)

8. HitFilm

Price: Starts at free | Platforms: Windows, macOS

Best Video Editing Apps for YouTube: HitFilm

Image Source

HitFilm Express is a free video editing and visual effects software — which means you can use it to add more than 180 special effects to your videos, including 3D editing.

Possibly the coolest HitFilm feature is its wealth of tutorial videos — users can practice applying special visual effects in movie tutorials based on Star Wars, Westworld, and more.

Of course, upgrading to HitFilm Pro grants access to more visual effects, better high resolution and 3D rendering, and better audio syncing between audio and video files. It costs $300, but if you’re not ready to fully invest, HitFilm Express users can purchase lower-cost expansions to use more tools in their software.

To see the complete list of differences between HitFilm Free and Pro, check out their “Compare Versions” page.

Pros

  • Powerful capabilities such as mask rendering, export queues, and unlimited tracks and transitions
  • Built-in voice recorder for easy voice-overs
  • Has been described as a mix between Adobe After Effects and Adobe Premiere Pro

Cons

  • Beginners may experience a learning curve.
  • Some users have reported crashing issues.

9. Wideo

Price: Starts at $19.99 per month on the yearly subscription

Wideo Editor

Because of their high engagement and level of convenience, animated videos have become more popular over the last few years. And Wideo helps anyone interested in this type of content to edit great animated videos regardless of their editing skill level. Its easy-to-use interface makes it a great option for both beginners and advanced editors.

They offer a vast library of video templates to make video creation easier and faster. You can add animations to your live shot videos or create a whole narrative using their animations library.

Pros

  • Easy to use
  • Templates make video creation faster
  • Free tools for video creation like storyboard generator, color palette generator, text-to-speech, and blog to video

Cons

  • Download is only available on paid plans (starting at $19.99 per month on the yearly subscription)
  • There is a 1 min video length limit on the free plan

Video Editing Apps for Android

These video editing apps are particularly appealing for Android mobile users, though some of them are compatible with more than just the Android operating system.

1. VideoShow

Price: Free | Platforms: Android, iOS

Video Editing Apps for Android: VideoShow

Image Source

VideoShow allows you to edit video content in many creative ways beyond cutting and pasting scenes together. The award-winning app, which has more than 400 million users, allows you to include text overlays, stickers, music, filters, and sound effects in your footage. Because of these features, it lends itself to video producers who want to add a bit more creativity to a vlog series, where the video is primarily of one person speaking directly to the camera.

Pros

  • Easy-to-use yet powerful, with HD exports available for free users
  • Expansive music library

Cons

  • Your video will be watermarked with VideoShow branding if you’re not on the paid version
  • You can’t export the video without upgrading to the paid version

2. PowerDirector

Price: Free | Platforms: Android, Windows, macOS

Video Editing Apps for Android PowerDirector

Image Source

This robust video editor has a suite of creative design tools just for Android and desktop users. Developed by CyberLink, the app can help you create 4K-quality videos from footage taken with numerous devices. Special features include motion tracking, which helps you focus on specific subjects in each frame; video collages, which help you piece together numerous photos into a motion video; and video stabilization, allowing you to remove moments of “shaky camera” in your footage. PowerDirector can also help you add voiceovers and creative sound effects using chroma key.

Similarly to InVideo, PowerDirector has several AI features that help speed up the creation process. It comes with speech-to-text, object detection, and a restoration assistant that automatically detects and corrects unwanted background noise.

Many of PowerDirector’s features are completely free in the Android app. For a more advanced suite of editing tools, you can invest in one of CyberLink’s paid products starting at $99.

Pros

  • Powerful features such as green screen editing, motion graphics, and keyframe controls
  • Incredibly low price compared to competitors such as Adobe
  • Multi-track editing and timelines
  • The company constantly adds new graphics and templates for users to choose from

Cons

  • Some users have reported that it can be buggy

3. Quik

Price: Free | Platforms: Android, iOS, macOS, Windows

Video Editing Apps for Android: Quik

Image Source

Quik is a video editing tool developed by GoPro, making it the software of choice for people who are editing footage from their GoPro camera. But yes, it can edit content from any source.

The app can manage up to 75 photos and video clips in one project, and can even comb through this content to help you make smart editing decisions based on what the app detects in the footage. From time-lapses to panoramic pieces, Quik can manipulate your media in lots of creative ways. The app has more than 20 preset themes to choose from and supports eight common file types.

Pros

  • Easy-to-use and intuitive app
  • Automatically imports photos from your camera

Cons

  • This software no longer receives updates from its manufacturer
  • You only have access to the cloud when you upgrade to GoPro PLUS

4. KineMaster

Price: Free | Platforms: iOS, Android, ChromeOS

Video Editing Apps for Android: Kine Master

Image Source

KineMaster is a super-versatile video editing tool that allows you to edit videos on “multiple layers.” What does that mean? Content creators can add an unlimited amount of text overlays, images, audio, and even free handwriting onto their footage for the artistic detail they or their brand needs. You can also blend multiple pieces of footage and use double-exposures to customize the background in a load of creative ways.

For simpler editing tasks, of course, this app offers intuitive trimming and splitting features to make your video progress just the way you want it to.

Pros

  • Powerful features such as multi-track editing, layers, and blending modes
  • Over 3M reviews on Google Play and an average rating of 4.5 stars
  • You can share on YouTube, Instagram, and Facebook straight from the app
  • 4K exports available

Cons

  • Your video will be watermarked with the KineMaster branding if you don’t upgrade to Premium
  • Limited access to assets on the free version

5. VivaVideo

Price: Free | Platforms: iOS, Android

Video Editing Apps for Android: VivaVideo

Image Source

VivaVideo makes professional-level edits easy for content creators. Free for all mobile devices, the app allows you to trim, merge, speed up, slow down, and reverse clips and images in a short amount of time. The app also comes with a simple collage- and slideshow-maker and offers a variety of camera lenses to capture new, edit-ready footage directly in the app.

Pros

  • Fun on-trend filters, templates, and effects
  • Expansive music library with hundreds of clips to choose from
  • Multi-track editing allows you to layer voice clips and music

Cons

  • The five-minute time limit for videos

With most people working from home, the importance of video can’t be overstated. But unless you get the right app for video editing, you’ll run the risk of publishing videos that look unprofessional and unpolished.

With these apps, you’ll be sure to create a video that attracts, converts, and delights your audience. The sooner you download one, the sooner you can sharpen your audio/video creation skills and attract more people to your brand.

Create Better Videos for a Higher ROI

Online video content isn‘t just watched more — it’s expected more. Luckily, you have the video editing tools to help you delight your audience and improve conversion rates across your social media accounts. Grab the guide below to make the video learning curve easier and to jumpstart your video marketing efforts.

Editor’s note: This post was originally published in March 2019 and has been updated for comprehensiveness.

Discover videos, templates, tips, and other resources dedicated to helping you  launch an effective video marketing strategy. 

Categories B2B

Brand Logos: 20 Logo Examples & Sources of Inspiration

Brand logos are undoubtedly one of the most critical components of a strong brand identity. However, designing a memorable logo that resonates with your target audience and effectively communicates your brand message can be challenging.

Access hundreds of Website Themes & Templates on HubSpot

In this post, you’ll discover 20 brand logos that have achieved global recognition and embody the essence of their respective brands.

You’ll also explore how these designs have evolved and examine what makes them incredibly compelling.

Table of Contents

20 Brand Logo Examples

Not sure what it takes to create a killer brand logo? Here are 20 examples to inspire your future design projects.

1. McDonald’s

Brand logo examples: mcdonalds

Image Source

Mcdonald’s started as a small drive-in restaurant in the 1940s and has rapidly evolved into one of the largest fast-food franchises in the world. Similarly, the logo has evolved significantly over the years and is now one of the most recognizable brand logos.

The first version of the McDonald’s logo featured the company’s mascot at the time — Speedee. However, the logo has evolved in favor of a more minimalistic design.

The now famous “Golden Arches” were introduced in 1960 and have endured through multiple logo iterations over the years.

What we like: The brand’s focus on simplicity helped create a timeless and memorable logo. Plus, the design’s uniqueness created an easily recognizable and distinctively representative identity.

Pro tip: McDonald’s is an excellent example of how less can be more. Consider opting for a more minimalistic design that allows you to build a unique brand identity.

2. Amazon

Brand logo examples: Amazon

Image Source

Amazon started in 1994 as an online marketplace for books but quickly grew into one of the largest e-commerce platforms in the world. Today, the business has its hands in several industries, from digital media to cloud computing.

While the brand might have significantly expanded its offerings, the company has remained consistent with its logo design approach. Although initial versions toyed around with graphic elements, every iteration (including the current one) has featured the brand name as a core design element.

What we like: Amazon’s design focus has remained on establishing the brand identity by keeping the company name at the forefront. However, it also does this while conveying its value proposition through the “swoop,” which is strategically positioned underneath “A” to “Z” to highlight the range of its offerings.

Pro tip: While Amazon’s design approach can be a great way to establish your brand identity, you must be especially cautious when choosing a name to ensure it doesn’t hinder future expansion, flexibility, and brand evolution.

3. Levis

Brand logo examples: Levis

Image Source

Levi’s started in 1853 as a dry goods business during the San Francisco “Gold Rush.” However, in 1873, after receiving a patent for riveted clothing, the company began selling “blue jeans,” an innovative take on the traditional denim pants laborers wore.

Over the years, the company’s logo has evolved. Its initial 1886 iteration symbolized its fundamental value proposition of strength by featuring two horses attempting to pull apart a pair of Levi’s jeans. The 1936 iteration introduced its signature red tab. Finally, the current “batwing” design which was first introduced in 2008.

What we like: Levi’s has also evolved toward a more simplistic logo like many other brands. However, the logo has retained elements that have become synonymous with the brand, such as the “red tab,” which continues to be a core part of Levi’s unique brand identity.

Pro tip: When redesigning a brand logo, be careful and considerate about changing or removing key elements that have become part of its identity. Remember, a redesign may only require a partial overhaul.

4. Shell

Brand logo examples: shell

Image Source

While you may recognize Shell today as a multinational energy company, its origins trace back to 1833 when Marcus Samuel started selling seashells to expand his business. It wasn’t until the 1880s, when Marcus had passed the company to his sons, that Shell finally got into oil.

The initial logo design featured a black and white mussel shell which was trademarked in 1900, but this was eventually replaced with the “Shell Pecten” or scallop.

This new design was formalized by 1930 and underwent a couple of iterations between 1930 and 1970, including the addition of the name “Shell” in 1948.

This design also underwent multiple revisions, with the 1992 iteration (which remains the current version) incorporating mathematical geometry and warmer colors.

What we like: Even though Shell‘s logo was designed after the company moved away from selling seashells, the design managed to preserve the brand’s rich heritage. What’s particularly interesting is how the perceived meaning of the logo has now gone beyond its literal representation and evolved to simply represent the brand.

Pro tip: Although it’s best practice to choose graphics that have some connection to your company, audience, or industry, it’s also okay to take inspiration from other sources. For example, you can pull from your own history.

Sometimes, unexpected ideas and elements can bring added depth to your brand’s visual identity.

5. Microsoft

Brand logo examples: Microsoft

Image Source

Microsoft, a portmanteau of the words “microprocessor” and “software,” was started in the 1970s to design software for the “Altair 8800” — a microcomputer created in 1974.

Over the years, the company has expanded well beyond software to several industries, including gaming, artificial intelligence, and hardware.

The company’s logo has also evolved alongside its offerings, with the first iteration in 1975 being a monochrome text-only logo. This logo was redesigned several times, with changes primarily made to the stylization of the “O” in the 1980, 1982, and 1987 iterations.

The first version of the logo you recognize today was introduced in 2012, marking a significant change for Microsoft.

This redesign introduced color and incorporated the iconic Windows sign. This logo was then subtly updated again in 2019, resulting in the current version.

What we like: The Microsoft logo cleverly integrates the Windows logo, which is both the company‘s flagship product and one of the most influential technology products of our time. This makes the brand immediately recognizable and a powerful reminder of Microsoft’s impact and enduring legacy in the tech industry.

Pro tip: When designing a logo, consider incorporating recognizable elements, graphics, symbols, etc., as this establishes visual cues that trigger brand recall and connect your logo with your brand identity, values, or offerings.

6. Apple
Brand logo examples: apple

Image Source

Apple’s rise as a computing giant began in 1977 when the company’s first mass-produced computer was released to the public. This product was a huge success, and subsequent launches over the years only further solidified the company’s position at the forefront of consumer tech.

However, while Apple got it right with its first-ever product, its first logo was a different story. The first iteration of the Apple logo significantly differed from the minimalistic design you see today.

This logo, designed by Ronald Wayne in 1976, featured an image of Isaac Newton sitting under a tree and the text “Apple Computing Co.” wrapped in a ribbon.

A year later, Apple’s logo transformed into a rainbow-colored version of the well-known “bitten apple” image, positioned to the right of the text “Apple.” However, in 1984 the brand did away with the text altogether in favor of a more minimalistic approach.

A 1984 redesign leaned even further into this approach, with the previous rainbow palette replaced by a solid black color scheme.

This monochromatic scheme has remained unchanged, with the current Apple logo alternating between black, white, and grey versions depending on the product.

What we like: The current version of Apple’s logo has become the gold standard for sleek minimalism within the consumer tech industry. This design approach creates a modern yet timeless effect that perfectly conveys Apple’s brand image.

Pro tip: To create a modern design that stands the test of time, consider eliminating unnecessary design elements and complexity. Instead, focus on creating a logo that is clean and uncluttered.

7. Starbucks

Brand logo examples: starbucks

Image Source

The Starbucks brand was created in 1971 and named after a character called “Starbuck” from the novel “Moby-Dick.” It’s interesting to note that, unlike many businesses of a similar size that either, Starbucks started as a coffee brand and continues to operate primarily as such.

Similarly, the Starbucks logo has maintained a sense of consistency since its inception. The first iteration of the logo featured a twin-tailed mermaid (or siren) to represent their product’s allure. It also incorporated a circular design featuring the company’s name and offerings.

Over the years, there have been several iterations, the most significant being the 1987 transition from brown to the iconic green color. The logo was then eventually updated to a simplified design that removed other elements, such as text and the outer circle.

What we like: The Starbucks logo is a great case study on the importance of consistency and longevity in design. Although the logo has been through multiple iterations, the core design element has remained unchanged. This allows the brand to strike a delicate balance between familiarity and modernity.

Pro tip: While the choice of Starbucks’ name and logo character may appear playful at first glance, it’s important to remember that they still have meaning. So, while making your design choices try and strike that balance between creative expression and conveying a meaningful message.

8. Twitter

Brand logo examples: twitter

Image Source

Twitter has come a long way from its humble beginnings in 2006. While the company was initially started as a side project for a podcast platform called Odeo, it quickly became a massive success, with over 1 million total users barely two years later.

Fast forward to today, and Twitter is one of the largest tech companies in the world, worth around $14 billion (as of the time it was acquired).

The journey to develop its logo has also been fascinating. The first iteration of Twitter’s logo featured a green color palette and a text-only design; however, this design never truly saw the light of day.

By the time Twitter was launched to the public in 2006, Linda Gavin had developed a new iteration of the logo (interestingly in a single day). While this iteration retained the text-only format, it departed from the previous green palette and adopted a single shade of blue instead.

In a subsequent redesign, the Twitter logo underwent further changes, incorporating the iconic “Larry the Bird” element alongside the text. And today, Larry takes center stage thanks to a 2012 redesign that opted for a more simplified design approach.

What we like: Twitter has always taken a more simplistic, no-frills design approach right from the start. This has allowed them to maintain consistency in their designs over the years.

Pro tip: Twitter‘s design approach perfectly matches the core principles of its platform — simplicity, brevity, and impactful communication. When creating your designs, consider how you can also convey your brand’s message, principles, or identity.

9. Nike

Brand logo examples: nike

Image Source

Nike started in 1964 as Blue Ribbon Sports — a joint venture between track and field coach Bill Bowerman and one of his former students, Phil Knight. The name Nike was introduced in 1971, a year before the brand’s shoes were launched.

In the years since then, Nike has introduced the iconic “Just Do It” slogan, launched some of the most successful collaborations, and established itself as one of the industry’s most recognizable brands.

Now, while one of the most recognizable elements of the Nike brand is its logo, the first-ever iteration of the brand logo in 1964 was a wordmark featuring the name “Blue Ribbon Sports” — the name of the brand at the time.

However, once the brand name was changed in 1971, the swoosh we all know and love was introduced, albeit with the “Nike” superimposed.

By 1995, the brand had become so recognizable that the company decided to undergo a significant redesign by removing the word “Nike” and leaving only the iconic Swoosh as the primary element.

This version is still in use, with subtle modifications in 1999 to enhance the Swoosh.

What we like: The decision to remove the name from the logo showed Nike’s deep understanding of its brand equity and a strong belief that the Swoosh could stand on its own as a powerful representation of the brand.

Pro tip: Like Twitter and Apple, Nike is another excellent example of how a brand image can become integral to brand identity. When designing your logo, consider using unique visual elements that could potentially become representative of your brand.

10. Coca-Cola

Brand logo examples:  coca cola

Image Source

Coca-Cola has come a long way from serving 9 drinks a day in 1886 to 1.9 billion daily servings as of 2020. What started as a small operation at the Jacobs’ Pharmacy in Atlanta is now a multi-billion dollar multinational.

Similarly, its logo has undergone several changes over the company’s 130-year history. The first version of the Coca-Cola script logo was designed by Frank M Robinson, who interestingly happened to be the bookkeeper to Coca-Cola’s inventor Dr. John S Pemberton.

A couple of years later, in 1893, this logo was updated to include the text “Trademark” within the tail of the “C” in “Coca” after a trademark for the product was granted by the U.S. Patent Office.

However, not even 3 years later, the logo underwent a dramatic redesign, which made the text more dramatic with curved lettering and swirls. This was short-lived and eventually changed a year later.

1947 saw the creation of the Coca-Cola red disc, which marked the introduction of the “red and white” color scheme.

While there have been several redesigns since then, the current logo iteration retains this element in combination with the elegant typography synonymous with the first-ever iterations of the logo.

What we like: The current iteration of Coca-Cola’s logo was developed as part of a unified branding strategy that uses the classic Red Disc logo design to unite its offerings (Classic, Diet, and No-Sugar) under a single “family.”

Pro tip: When designing a logo for a business with multiple offerings, consider incorporating elements from the brand’s history, identity, or other defining aspects that can serve as unifying elements within the logo design.

11. Volkswagen

Brand logo examples: Volkswagen

Image Source

Volkswagen was founded in 1937 by the German Labour Front with the construction of its first major plant just a year later in 1938. However, this factory was used primarily as a production plant for military vehicles and weapons during the war, instead of fulfilling its original intention of producing commercial vehicles.

After the war, the British military took control of the factory, and the Volkswagen Saloon cars (The Beetle and Transporter) were officially launched.

These cars were a huge success, and the company has followed up with many successful models since then. Today, Volkswagen is one of the largest car companies in the world.

Just like the company, Volkswagen’s logo has evolved over the years. The first version of the logo included the letters “V” and “W” surrounded by a round emblem meant to represent a cogwheel and the co-national flag of then-Nazi Germany. However, the Nazi symbolism was removed after a 1939 redesign.

Over the next few years, the Volkswagen logo underwent several iterations, incorporating font, colors, structures, and weight alterations. However, in 2019, the company ultimately arrived at a design that has remained essentially unchanged ever since.

What we like: The Volkswagen logo has managed to maintain consistency over the years while also doing away with imagery that might be non-inclusive. This is an excellent example of how it’s possible to preserve a brand image and identity while letting go of elements that might be exclusionary.

Pro tip: Today, you must be careful about the imagery you use in your designs. Also, in cases where a logo requires a redesign, don’t be afraid to let go of outdated concepts or elements.

12. Pepsi

Brand logo examples: pepsi

Image Source

Like Coca-Cola’s origin story, Pepsi was created by a pharmacist who operated a soda fountain in his store. In 1893, Caleb Bradham began selling a drink aptly named “Brad’s Drink,” which would later become Pepsi-Cola. By 1902, the drink had been trademarked, and Pepsi was selling across several states in America.

Unfortunately, the flourishing brand suffered a multi-year financial setback during World War 1 and the Great Depression. However, a turning point came with the introduction of its national radio jingle, “Nickel, Nickel,” which marked the start of a revival.

From that point onward, Pepsi experienced numerous successes, solidifying its position as one of the most successful global beverage companies.

Pepsi’s logo has evolved right alongside the brand. The first iterations of the logo until the 1940s were wordmark logos featuring the text “Pepsi Cola” in differing red scripts. It wasn’t until a redesign in the 1940s that the “bottle cap” and color scheme were introduced.

By 1960, this design had been refreshed, and the word “Cola” was removed. Over the next several years, there were about eight iterations of the logo, with one of the most significant changes during this period being the introduction of the “Pepsi Globe” — a circular design with the red, white, and blue color scheme.

Today, the current iteration of the logo retains this concept; however, the overall design has been updated for a more modern and sleek effect.

What we like: Pepsi has successfully established a distinct color palette that has become synonymous with the brand. This means that the logo now carries a strong visual association.

Pro tip: One of the great ways to build a memorable brand is to develop distinctive images, color palettes, and other visual elements that your audience can readily associate with your brand.

13. Instagram

Brand logo examples: instagram

Image Source

Instagram’s evolution over the years has been nothing short of amazing. The company was founded in 2010 and grew to 100,000 users within a week of its launch. Then, less than two years later, it was acquired by Facebook for $1 billion.

Today, Instagram is one of the largest social media networks in the world, with over 1 billion active users every month.

The evolution of its logo, however, has been less dramatic. Although the first and current versions of the logo are markedly different, every iteration has revolved around a common element, the image of a camera.

The first three iterations of the logo showcased a retro camera with a distinctive rainbow stripe. However, in 2016, the brand embraced a more simplistic approach by transitioning to a camera icon instead of a detailed camera representation.

This redesign also marked the introduction of the gradient color scheme, signifying a more vibrant visual identity for the platform.

Today the logo remains mostly unchanged, with only slight updates to the shades in the color palette.

What we like: Instagram’s logo evolution shows simplicity doesn’t necessarily mean sacrificing vibrancy or color. Instead, their design evolution shows that dialing back the complexity of a design or design element can create more space to infuse vibrancy into other aspects.

Pro tip: Balancing modernity and creative expression can be difficult. When creating your designs, identify areas where you can simplify certain elements, allowing you the flexibility to be bold and expressive in other aspects.

14. Walmart

Brand logo examples: walmart

Image Source

Walmart’s evolution is another meteoric success story. The brand was started in 1962 as a single location in Arkansas. By the 1970s, had become a publicly traded company.

A decade later, the company had over $1 billion in annual sales and nearly 300 locations. Now, Walmart is a multinational retail corporation generating over $600 billion in revenue yearly.

Over the years, the company’s logo has also evolved. However, the design approach has been pretty similar through every iteration. The initial version of the logo was a straightforward wordmark featuring the company’s name.

Subsequent logo redesigns (except in 1968) primarily focused on modifying the font and exploring the presence or absence of a hyphen.

Eventually, the “starburst” was also introduced into the logo, and a more vibrant color palette was adopted, which is still in use today. Interestingly, this current version of the logo bears a striking resemblance to the original design.

What we like: Walmart’s logo is another great example of staying true to your roots while evolving alongside the business. Although the current version of the logo doesn’t stray too far from the original, it also incorporates more vibrant and modern elements and design choices.

Pro tip: While change can be beneficial and sometimes essential, it is equally important not to make changes solely for the sake of change. There is often valuable insight to be gained from your initial design ideas and iterations.

15. Canon

Brand logo examples: Canon

Image Source

The prototype for the first-ever Canon camera was developed in 1934 by Precision Optical Instruments Laboratory. This laboratory birthed Precision Optical Industry Co. in 1937, which was then renamed Canon Camera Co. in 1947. This new name was derived directly from its flagship product, the Canon camera — a name trademarked in 1935.

Over the next 50 years, Canon went on to expand across the globe, winning several innovation awards and introducing multiple revolutionary digital imaging solutions into the market. Today, Canon remains at the forefront of innovation as one of the prominent leaders in the imaging and optical industry.

Canon’s logo has also evolved over the years. The first version of the logo, designed in 1934, was a simple stylization of the text “Kwanon” — the original name of the first camera prototype. However, once the product name was changed in 1935, the logo was redesigned to reflect this change.

Subtle changes were made to the letterforms in subsequent iterations, refining their shapes and styles. The logo also transitioned from the previous solid black color to a more vibrant shade — red.

What we like: Canon has demonstrated remarkable consistency in its logo design approach. From the first version to subsequent redesigns, the brand name has always remained front and center, showing a dogged commitment to building a solid brand identity through its design choices.

Pro tip: Your logo is a powerful tool for building and establishing your brand identity long-term. When planning your next design project, consider simplifying your designs and instead placing the spotlight on the brand.

16. Doritos

Brand logo examples: Doritos

Image Source

In 1964, a food company named Frito-Lay introduced Doritos, a tortilla snack. The product was an immediate success. However, it wasn’t until the introduction of the taco and nacho cheese flavors in 1966 and 1977 that Dorito’s popularity truly exploded.

By 1993 Doritos was raking in over $1 billion in annual retail sales, making it one of the best-selling snacks at the time. And today, Doritos remains one of Frito Lay‘s most successful brands and one of the world’s most popular tortilla chips snacks.

Similarly, the Doritos logo has also become iconic in its own right and is now widely recognized both within the United States and internationally.

The earliest iterations of the Doritos logo from 1964 to the early 1990s featured stylized text of the brand name against a background composed of differently shaped and sized rectangles. The famous “triangle/arrow” wasn’t until a redesign in the 1990s that the triangle became a more prominent design element.

Iterations from this point onwards varied significantly, and it wasn’t until an early 2000s redesign that the “fire” element was added to the logo. Finally, in 2013, Doritos introduced the version of the logo still in use, which incorporated several design elements from its many iterations over the years.

What we like: The Doritos logo is a design that truly captures the essence of the product. It communicates the brand’s bold, energetic, and playful nature, establishing a distinct brand identity that sets them apart from the competition.

Pro tip: While modern design trends often lean towards minimalism, don’t be afraid to try bold and dynamic designs.

17. BMW

Brand logo examples: BMW

Image Source

BMW was founded in 1916, after a series of mergers and company conversions during the World War. The company initially started as an engine construction company but moved into motorcycle production in 1923.

This was an extremely successful move, and the BMW was a massive success at the Berlin Motor Show that year. Barely five years later, the company once again wandered into a new market — automotive construction — after acquiring a car manufacturer called Automobilwerk Eisenach.

During the following two decades, BMW experienced a series of challenges and achievements. However, it wasn’t until the introduction of the BMW 1500 in 1951 that the company began to witness a consistent streak of success.

Fortunately, unlike the company‘s journey, BMW’s logo has evolved relatively stable. In fact, the design has been incredibly consistent since the beginning. The very first versions of the logo up until today have retained the same circular shape and incorporated the BMW emblem.

What we like: BMW has maintained a consistent visual identity throughout history. This is especially impressive, considering how long the company has existed and its challenges over the years.

Pro tip: BMW demonstrates the importance of preserving a brand identity even in the face of challenges. Consider where and when you might want to do this in your redesign projects.

18. FedEx
Brand logo examples: FedEx

Image Source

Federal Express Corporation was founded in 1971 by Frederick W. Smith. Two years later, the company commenced operations in Memphis. There, it achieved an impressive feat (at the time) of delivering nearly 200 packages across the country in a single night.

By 1977, the company had purchased a fleet of Boeing 727s and was listed on the New York Stock Exchange the following year. Today, FedEx is a multinational conglomerate delivering millions of packages worldwide and bringing in over $90 billion in annual revenue.

Interestingly, FedEx has experienced very few logo redesigns in its wildly successful history. The initial logo prominently displayed the company’s full name, “Federal Express,” and used a white, red, and purple color palette.

Then in 1994, a redesign introduced the iconic red and purple color scheme and the concept of a “hidden arrow” within the logo.

In 2022, a slight update refreshed the design, maintaining its core elements.

What we like: FedEx’s hidden arrow is one of the most brilliant aspects of its logo design. This element perfectly communicates some of the brand’s fundamental attributes — speed, precision, and movement.

Pro tip: Allow your ideas space to expand, embrace experimentation, and work through as many iterations as you need. Sometimes moments of brilliance (and the occasional happy accident) will only happen if you give the creative process enough time.

19. Ford

Brand logo examples: Ford

Image Source

Ford has come a long way since the quadricycle, the first vehicle designed by Henry Ford in 1896. The company introduced the Ford Model A in 1903, which became its first successful automobile.

This success was then followed up with the introduction of the Model T in 1927, a car that sold over 5 million units in the middle of the Great Depression.

Over the years, Ford expanded its portfolio by introducing several successful car brands, and in 1956, the company transitioned to a publicly traded business. Today, Ford manufactures commercial vehicles (under the Ford brand) and luxury vehicles (under the umbrella of the Lincoln Motor Company).

One of Ford’s earliest logos was designed in 1907 by Childe Harold Wills, an engineer that helped develop the cars alongside Henry Ford. This logo showcased the company name in a scripted typeface that became one of the defining elements of Ford’s logo design.

It wasn‘t until a 1927 redesign that the iconic Blue oval was incorporated into the logo and sported on a Ford vehicle. This new logo debuted on the newly redesigned Model T, renamed the Model A, in honor of the company’s first car.

Subsequent redesigns between 1927 to the early 2000s made slight changes to the font and depth of the design. However, a redesign in 2003 introduced a modernized version of the logo known as the “Centennial Blue Oval” to commemorate the company’s 100th anniversary.

What we like: Ford’s blue oval has become an iconic symbol synonymous with the brand itself. While the design may not be groundbreaking or especially exciting, it’s a great example of how unique design elements can become enduring symbols of a brand.

Pro tip: As a logo designer, focus on creating designs that can become enduring symbols in the minds of consumers.

20. Adobe

Brand logo examples: Adobe

Image Source

Adobe released its first product, Adobe PostScript, in 1983. This product was a huge success and helped establish the company as one to watch. However, the release of Adobe Photoshop in 1989 truly solidified the brand’s position as the go-to software for digital imaging.

Over the years, the company introduced several revolutionary products such as Illustrator, Acrobat, Flash, and Premiere Pro. Today, Adobe is undoubtedly the most widely-used digital imaging software amongst individual and corporate users.

Marva Warnock, the wife of Adobe co-founder John Warnock, designed the company’s first logos, which featured the text “Adobe Systems” in a stylized wordmark placed inside a solid blue rectangle.

The next iteration was a 1990 version, which saw the rectangle stripped away and the text color changed from white to black.

Adobe’s color palette and the stylized “A” were introduced in future iterations that saw the logo move away from a simple wordmark to incorporate bolder elements. Each iteration also saw changes in the position of the wordmark and the use of colors in the design.

Today, Adobe’s logo combines elements from its earliest design, such as the wordmark, with recent additions like the stylized red letter “A.”

What we like: Despite being primarily a wordmark, Adobe’s use of the stylized red letter “A” in the designs has effectively transformed it from a generic wordmark into a memorable visual symbol.

Pro tip: Don’t be afraid to mix and match. Consider incorporating creative elements that can elevate your design when designing a logo.

Logo Inspiration Resources

Starting your design project is one of the most challenging aspects of creating a logo. So, if you still need guidance about where to begin, here’s a list of resources to find inspiration and creative ideas.
1. Creative Market

creative market logo inspiration resource

Image Source

Creative Market is a designer’s playground with over 3 million unique fonts, graphics, themes, photos, and templates.

Use the search bar to browse logos matching your style or profession. If something catches your eye, you can purchase and download designs right on the platform.
2. Dribble

Resources for brand logo inspiration: Dribble

Image Source

Dribble is one of the largest platforms for designers to share and promote their work — making it an ideal hub for finding inspiration.

Plus, if you decide to outsource your design project, this is a great place to find design professionals. You can contact artists directly or use the Project Board to post a job.

3. Logoimport

Resources for brand logo inspiration: Logoimport

Image Source

Logoimport is an Instagram account that shares designs, illustrations, and graphic inspiration.

This account also does a great job of tagging the artist on each post. If something piques your interest, you can view more of an artist’s work with just a few taps.
4. Behance

Resources for brand logo inspiration: Behance

Image Source

Owned by Adobe, Behance is a social media platform for artists to showcase and share their creative work.

What’s unique about Behance is its advanced search functionality. Want to browse logos that are all blue? No problem.

Want to browse logos that are solely made with Photoshop? Sure. With Behance, you can quickly narrow your searches to see the most relevant designs.

Tools for Designing a Brand Logo

Even with limited design experience, several tools make it extremely easy to create an eye-catching logo. Here are some you should consider.
1. Canva

Tools for Designing a brand logo: Canva

Image Source

Canva is an online graphic design tool offering a library of customizable logos.

Using the platform is also straightforward. You can either start from a blank page or browse through the template library to find a logo design you can customize.

Note: While some Canva templates are free, others may require a Pro account.
2. Logomakr

Tools for Designing a brand logo: LogoMakr

Image Source

Logomakr is a tool that allows you to design a logo from scratch with thousands of stock icons and hundreds of fonts. If that’s too much of a feat, you can use one of its templates and customize the text, color, and graphics to match your branding.

Although Logomakr is a free tool, you can pay for professional assistance should you need help designing your logo.
3. Logo Garden

logo garden logo inspiration resource

Image Source

Logo Garden is a design tool that contains a vast library of graphics, fonts, and colors. If you get stuck along the way, the platform also offers design tips and videos to guide you.
4. GraphicSprings

Tools for Designing a brand logo: GraphicSprings

Image Source

GraphicSprings promises beautiful logos in three easy steps. First, pick a template from its library. Then edit the graphic and text of your logo with its easy drag-and-drop menu. Lastly, download your design for a small fee.

Voila, it’s that simple.

Creating an Effective Brand Logo

It’s always a good idea to study how other brands have modernized, evolved, or improved their designs, regardless of your experience as a designer.

Use the examples in this post as a guide, and find ways to uniquely incorporate the elements discussed in your next design.

New Call-to-action

Categories B2B

68% of Web Analysts Don’t Think SGE Will Negatively Impact Traffic: Are They Wrong?

SGE is Google’s move to transform the search experience by integrating generative AI. With this massive change to SERPs, many marketers wonder if— or how — it will impact traffic.

According to our Web Traffic and Analytics report, 75% of web analysts believe generative AI-integrated searches will positively impact their blogs, and 68% predict their blogs will get more traffic than before.

But are they correct, or is this just wishful thinking? Here, let‘s dive into how SGE could impact your site’s ranking for the long haul.

Download Now: Free State of Marketing Report [Updated for 2023]

The Pros of AI-integration into Search Engines

As mentioned above, most web analysts expect AI integration to affect the SERPs positively.

For instance, SGE will positively impact user experience. It will provide more accurate and relevant information and allow users to find what they’re looking for more quickly and efficiently.

Furthermore, an AI-integrated search engine will create more personalized results based on user preferences and past behaviors. Users will enjoy a more customized experience with content tailored to their needs.

Accessibility is another excellent perk of AI-integrated search thanks to automatic language translation capabilities, which can facilitate communication across different languages.

AI-generated translations would break down language barriers and make information (and content) accessible to a broader audience.

Moreover, generative AI can help create unique content, such as summaries, suggestions, and recommendations that intrigue users and provide fresh ideas.

The Challenges of AI-integration in Search Engines

Of course, there are some concerns and possible drawbacks to AI-integrated search. One concern is the impersonal user experience. Our report found that many users prefer human responses over generic AI.

An impersonal user experience could also result in a lack of user trust.

Our report shows users are skeptical toward AI-generated responses, as they expect biased or untrustworthy information.

Furthermore, users expressed the need to double-check AI-generated responses due to the perceived bias of programmers.

There is also a possibility marketers may experience a dip in visibility and organic traffic due to Google’s AI Snapshot feature, which would push some content beneath the fold and out of sight of users.

How to Adapt to AI-Integrated SERPS

There are many ways to prepare your website for AI integration in search engines.

Train, Research, and Learn

Train your employees to understand and work with AI tools and technologies. Consider attending conferences, workshops, or webinars to stay updated on the advancements of AI in your industry and to keep ahead of the competition.

You should also research other businesses using AI and how they integrated the technology. Moreover, take steps to understand algorithms, models, and functions.

Integrate and Implement

Look for ways to integrate AI into websites and digital marketing strategies, such as downloading and using AI-powered software and apps.

Our study shows that 50% of blog writers use AI in some capacity, be it to brainstorm, outline, or copyedit.

74% of web analysts whose websites leverage AI say it makes their content perform better, and 65% say it helps their pages rank higher in SERPs.

Implementing AI into your digital marketing strategy for the first time could be challenging, so you should consider hiring professionals in AI and organizing teams dedicated to the technology.

These professionals can test algorithms and conduct program testing.

Optimize and Improve

Leveraging AI in your strategy isn’t a cure-all. Beyond AI, you must also optimize your keyword usage, SEO management, keyword search, and search results to keep up with AI-integrated SERPs.

Additionally, SGE will change the types of content that perform best on the SERPs.

For instance, in a post-SGE world, HubSpot’s Director of SEO Global Growth Aja Frost, believes first-person, expert, personality-driven content will perform best.

As she puts it, “As a result of the AI evolution, there is an exponential increase in the amount of AI-written, low-value content. And, in response to that, Google is prioritizing first-person, credible, personality-driven content.”

Additionally, update search definitions and website lists. You must also utilize SERP tools and improve website inquiries and instructions.

So, will SGE have a negative or positive impact on SERPS?

Whether or not you’ll benefit from changes by SGE will depend on how proactive your organization is in adapting to AI-integrated SERPs.

According to our report, 57% of web analysts are already taking steps to prepare for generative AI being integrated with search engines.

These steps include the tips mentioned above, such as training your team staff on AI usage and implementing it into their workflow.

There‘s no way around it — SGE will impact your web traffic; its impact depends on your organization’s preparedness.

state-of-marketing-2023